Using popped-up pike baits
Predator ace Mick Brown increases his chances of catching by making his bait more visible. We look at pop-up piking tactics...
Even in the depths of winter, a heavy weedbed won’t die back completely. This is when a popped-up deadbait comes into its own.
Using a standard leger rig will see the bait dragged into the weed and out of sight.
It is true that as well as their other senses, pike have an exceptional sense of smell and will eventually find any bait in the water, regardless of how buried in weed it may be.
However, to tilt things further in your favour and speed up times between runs, using a popped-up deadbait will allow any patrolling pike to spot your bait a lot quicker.
Furthermore, similar to carp anglers who use pop-up boilies to alter their rig presentation, there are times when pike prefer a popped-up bait as opposed to a standard deadbait offering where the bait lays lifeless on the bottom.
The beauty of a popped-up deadbait, particularly on large waters where there is a strong undercurrent, is that the bait will flutter enticingly.
To exaggerate this swaying movement, you can drag the bait back a few turns every few minutes to try and induce any pike in the area to make an attack.
This movement can be very appealing to pike, who primarily use sight for hunting purposes for much of the time. They are also one of the only freshwater fish to have binocular vision. This means their eyes see things very much like our own.
The advantages of binocular vision means the pike will still have a spare eye if one is damaged, allowing it to continue feeding.
Also, binocular vision gives the pike precise depth perception – ideal for exact judgment of distances which is an invaluable asset for a predator that primarily hunts by ambushing its prey.
To further enhance the visual stimuli, Mick quite often colours his deadbaits using one of Dynamite Baits’ new pike flavourings.
One of his favourites is red. “All predators love red. By painting my deadbaits this colour it gives me confidence and I’m positive that it also brings a few more pike than a standard popped-up bait might otherwise do,” he said.
HOW TO MAKE A POP-UP TRACE LINK
There are many ways to popup a deadbait. Some anglers use large hi-density foam popup balls, inject the bait fish itself with air, or insert a length of buoyant material – foam sticks or balsa sticks.
Mick prefers the later – buoyant balsa sticks – for popping up his deadbaits.
He feels that using a Fox Predator Floater Stick is the safest way to pop-up a bait for both the angler and the pike.
The beauty of pop-up sticks is that they have a tiny moulded eye in the top of them. This allows Mick to attach the stick to a short length of trace wire, before the stick is pushed into the cavity of the deadbait.
Once the bait is taken, there is no way that the pike can bite off the link and swallow the stick because the pop-up stick is attached to the trace via a length of trace wire.
“When it comes to making pop-up links, I like to standardise the length of the trace that I attach the pop-up stick to,” Mick explained. “By making every pop-up link the same length – four inches in my case – you can then buy baits of suitable size that can be either hooked on whole or cut down to the perfect length required.”
Another tip from Mick is that he likes to keep a handful of pre-made links in his tackle box, to be used whenever he needs them.
“The trouble with a lot of anglers is that we’re lazy, and even though we know that tying a certain rig will probably bring more bites, we can rarely be bothered to do it on the bank.
“By having a few pre-made pop-up traces already in my tackle box, there are no excuses,” Mick added.
To make one of Mick’s pop-up traces (see sequence, right) you will need:
● A rig trace to mount the deadbait on
● 20lb Carbo Flex trace wire
● Crimps
● Crimping pliers
● Trace blades
● Fox Sea Lead Clips
● Forceps
● Fox Predator Deadbait Floater Sticks
● An appropriately-sized deadbait
STEP ONE
This is all the kit you need to fashion one of Mick Brown’s deadbait pop-up links – (from left) crimps, trace blades, crimping pliers, Fox Deadbait Floater Stick, Fox Sea Lead Clip and a spool of 20lb Carbo Flex trace wire
STEP TWO
First, snip off an eight-inch length of Carbo Flex wire using the trace blades
STEP THREE
Next, thread on a crimp and the Fox Sea Lead Clip then take the tag end and pass it back through the crimp to form a half-inch hoop. Then squeeze the crimp into position using the pliers. This locks the lead clip in the loop
STEP FOUR
Mick then threads on another crimp at the other end of the trace wire, making another loop so that the distance between this loop and the end of the lead clip is four inches. The new crimp is then locked into place with pliers
STEP FIVE
The loop (without the lead clip) is then threaded over all three points of the top size 6 treble hook on the pike trace
STEP SIX
Make sure that the size of Fox Deadbait Floater Stick you plan to use matches the size of bait
STEP SEVEN
Use a pair of forceps to enlarge the cavity of the deadbait into which the floater stick will be inserted
STEP EIGHT
Having pierced the tail end of the fish (see step seven), the lead clip is inserted into the fish’s rear vent and the wire link is then pulled through using the forceps. Alternatively, use a carp angler’s stringer needle to pull the link through
STEP NINE
Fix the lead clip on to the floater stick via the metal loop in the end of the stick
STEP 10
The stick is then inserted into the bait – just be careful not to split the deadbait
STEP 11
The top treble goes into the root of the deadbait’s tail...
STEP 12
...and the bottom treble of the pike trace goes into the deadbait’s flanks
STEP 13
Before adding flavour pierce the sides of the deadbait to ensure that the flavour penetrates the flesh
STEP 14
One of Mick’s favourite flavours is the new Dynamite Baits’ Predator Blood Red which both colours and flavours
STEP 15
The red flavour is painted on and left to dry for a few minutes before it’s cast into the swim. Once settled in the water, it will stand proud of the bottom.
Types of fishing pellet explained
Unlike men, not all pellets are created equal. Some have high oil content, some have low oil content, others break down and some are flavoured. Which one you pick depends on the job you want it to perform. To remove confusion, here’s a selection of the types of pellet and how they work.
1. Halibut
These high-oil pellets are crammed with nutrients and proteins. Available from tiny 2mm pellets used to create beds of free bait, through to gob-stopping 21mm giant pellets. They are often glued to a hair rig, or drilled and threaded on a hair. Big carp, barbel, catfish and specimen bream and chub love them.
2. Carp
Many commercial fisheries have banned halibut and trout pellets due to their high oil content. Based on vegetable proteins, these pellets are less oily, but are still excellent carp attractors. They tend to break down rapidly and are best used as a loosefeed, rather than a hookbait.
3. Trout
Primarily created from salmon fry crumb, trout pellets have very high oil and protein content. Because of this, they’re better in summer when the warmer water will wash the oil out of the bait and create a scent trial for the fish to home in on.
4. Expanders
These hard, buoyant pellets are designed to be soaked in water to soften them and produce a slightly spongy texture. This enables you to directly hook the pellets. Jamie Masson uses BCUK pre-soaked expanders for his hookbait.
5. Hemp
There are few freshwater fish that don’t love hemp. These pellets are designed to breakdown completely into a hempy mush. Being fairly low in oil, they’re ideal to use all year round. They work well in PVA bags, groundbait mixes, as a loose feed or can even be boosted with a little hemp oil. Tremendous for tench and carp.
6. Soft feed pellets
Usually made from tiny carp pellets that have been carefully moistened and preserved. Excellent for getting carp and silver fish feeding and keeping them in the swim.
7. CSL
CSL stands for Corn Steep Liquor. These savoury smelling pellets collapse quickly underwater, creating a fine carpet of attractive food particles. They can be used in PVA bags or Method mixes, they’re also good when used as a loosefeed. Many species love CSL, particularly carp and barbel. These are sweet pellets.
8. Flavoured pellets
Bait companies make customised fishmeal or carp pellets laced with flavouring. These are Nutrabaits Trigga Ice pellets, big carp love them.
Chum Mixers, floaters and floating baits for carp fishing
Floaters are a general term used to describe those baits that can be used to take carp off the surface. There are many different types of bait that could be classed as floaters, but the one No1 choice is Pedigree Chum Mixer. Here a guide to what else is available to help you take a few carp off the top this summer…
Chum Mixers
Chum Mixers are dog biscuits, basically. They are brown, hard, salty and flavoursome baits that will remain afloat for many hours. They are more likely to get eaten before they actually sink, the carp love them that much.
They can be used straight from the bag, but they will need either gluing to the hook shank or drilled and hair-rigged if they are used in this way.
Cat biscuits
Again, these baits float well and are rock hard when they are used straight from the bag. They do not make great hookbaits though because of the size – there are larger floating baits available that will catch the eye of a passing carp more readily.
Marshmallows
Available from almost all supermarkets, marshmallows make great floating hookbaits but they aren’t ideal as loosefeed though – unless you’ve won the lottery recently. Which we haven’t. Yet. Unfortunately.
Expander pellets
Used straight from the bag, these little beauties float and are therefore excellent as a feed attractor. They aren’t very good on the hook though, due to their size. But catapult a few of them around your larger floating hookbait and you’ll soon have the carp queuing up.
Sonu Baits Oily Floaters
These are a recent addition to the wide array of floaters on the market and are already prepared and flavoured to ensure that you can simply open up the pack and use them straight from the tub. They can be used as hookbait or loosefeed, and many anglers have used them to great effect over the past year.
Cereals
We wouldn’t suggest trying to hair-rig a whole Weetabix, but some cereals like corn flakes and rice crispies can be used to great effect to attract carp into your swim. They are a little on the light side for catapulting, but if you tip a few into a PVA stocking, add a dry stone and tie it into a small package you will be able to fire these baits a long way, the PVA will dissolve and the freebies will rise to the surface.
Pop-up boilies
These highly scented boilies float very well indeed and are therefore perfect as a hookbait when surface fishing. They aren’t too cheap though, so loosefeeding them by the handful isn’t an option for many, but a carefully presented pop-up boilies cast among other loosefeed may well give you the edge.
They can be cut down too, using a sharp craft knife, so that they look like Chum Mixers, and doing this will ensure that the bait remains afloat for much longer than a Chum Mixer too.
Making paste to catch chub, carp and barbel
Paste is a fantastic bait that is often neglected by anglers, often due to the fact that it can be quite difficult to hook, and keep on the hook. But, get it right and you can enjoy some absolutely enormous hauls of match-sized carp, and smash your personal best chub, barbel or carp.
Paste is basically a soft and pliable mixture of powdered and solid ingredients that can be moulded around the hook. Because the bait is moulded around the hook, the hook is invisible to the fish, making it quite easy to trick the fish into taking the bait.
The most difficult part of paste fishing is introducing the baited hook into your swim without the soft paste falling off the hook, but with a little ingenuity this can be overcome quite easily.
There are two main types of paste – those used by match anglers to catch many fish really quickly, and those used by specimen anglers to trick big fish into taking the bait.
Making a paste for commercial carp
Match anglers tend to use paste in conjunction with a pole, as poles allow the paste to be lowered gently into the swim, rather than cast it out. This means that the paste will remain on the hook better.
Paste for match fishing is really very simple indeed. Any finely ground fishmeal groundbait can be made into a paste in seconds, providing a simple, soft and highly effective carp bait.
Simply take a clean bait box, scoop up about half a cupful of water and add a little fishmeal groundbait. Mix it up thoroughly, and keep adding groundbait and mixing until you have a soft and sticky ball of paste. And that’s all there is to creating a great paste ideal for use on a pole rig on commercial carp waters.
Making a paste for river chub
This paste is a little trickier to make, a little more expensive, but it stinks to high heaven, sticks to the hook perfectly and helps catch some great chub.
Take a chunk of Danish Blue cheese and crumble it into a round mixing bowl. Sprinkle a little flour over the pieces and continue to break it up using our fingertips. Keep adding flour until the cheese resembles fine breadcrumbs.
Now is the time to add any colouring and additional flavour to the mix. A couple of drops of Supercook cake and icing colouring is perfect here, and it’s fairly cheap too.
Tip a couple of teaspoons of water over the mix and begin turning it over with a fork. The cheese, flavour, colour and flour will begin to bind. Keep mixing with the fork and adding very small quantities of water until the mix begins to ball-up. Now you will be able to get hold of the mix and knead it into a ball. This will distribute the colour evenly and soften the paste.
Once it’s thoroughly mixed through, divide the paste into suitable sized lumps to see you through a session, bag it securely and pop in the freezer until you need it.
This paste will last for years, and it can even be re-frozen a few times, and still catch chub!
Making a paste for big carp
By far the best paste to use when fishing with homemade boilies is simply a little of the leftover boilie mix which has been wrapped around the boilies itself. This will stick to the boilies perfectly, release a scent trail for a long time, and take ages to break down. But, not all carp anglers make their own boilies, so here’s what you can do…
Crack a couple of eggs into a round mixing bowl, add any colouring or flavourings you wish and then mix thoroughly using a fork. Now sprinkle a little finely ground carp groundbait into the eggs and continue mixing.
Keep adding the groundbait and mixing until the mix stiffens enough for it to be kneaded by hand. Knead it thoroughly to ensure all the crumbs absorb the moisture from the eggs and there you have it – a great specimen carp paste that can be moulded around a boilie, a pellet, meat, even a cork ball.
The eggs used in the mix will help bind this paste, ensuring that is takes a long time to break down once it hits the bottom.
Hooking paste
This is really very simple to do, regardless of whether you intend presenting the paste around the hook directly, or around a secondary bait such as a boilies or pellet.
Simply tear off a chunk of paste that will be large enough to wrap around your hook or bait. Flatten it slightly, but not too much. Now place your hook or bait onto the middle of the paste and gently fold the paste around.
Use your fingertips to carefully squash the paste until it forms either a teardrop shape, if you are moulding it around your hook, or a ball, if you are moulding it around another bait. And that’s all there is to it!
Buying, mixing and using groundbait
Groundbait is the perfect attractor for most fish. A carefully placed ball or two of the right groundbait can increase the chance of fish being attracted and drawn straight to your hookbait tenfold.
Years ago groundbait consisted of simply breadcrumbs. Now the fish have never had it so good, with all manner of fantastic ingredients used in the formulation of groundbait to add different scents to the water, and to create different reactions on the bottom too.
It’s a real minefield out there when it comes to picking the right groundbait as there are so many available, but here we will help you choose the right one for you to enable you to head to the tackle shop in confidence, sure that you will be picking the correct mix to attract the species you wish to catch.
In the main groundbait is sold in 2.5kg bags for around £2.75. The vast majority need to be mixed carefully with water. Doing this ensures all the crumbs are dampened, the groundbait sticks together, it doesn’t float, it can be formed into balls, it becomes sticky, it becomes capable of holding other food items like casters, and that is can be thrown into the swim.
Groundbait colour
There are now four main colours of groundbait: brown, black, red and green. The vast majority of groundbaits out there are brown, and this colour is by far the most popular if you want to attract all species of fish because it blends in with the bottom of the venue, therefore it won’t scare the fish too much.
There are a few groundbaits that are black. These tend to be really finely ground mixes that are best used in the height of winter, when the waters tend to be crystal clear. A black groundbait provides a very dark carpet on the bottom, and if they are mixed quite dry, they will also form a dark cloud near to the bottom too. This dark colouration gives smaller fish, that would otherwise be spotted by pike and zander, the confidence to come into the cloud and feed over the black carpet of feed on the bottom.
Red groundbaits are few and far between. The most commonly known red mix is Van den Eynde Expo. This is a renown tench groundbait, but it also attracts bream and carp too. Tench respond well to red groundbaits, but most other fish don’t care much for this colour.
Green groundbait is a relative newcomer to the fishing market and has come about through various ingredients used to catch and tempt carp. They tend to be fishmeal based groundbaits and therefore a green mix will attract bigger fish, such as carp, tench and bream.
What’s in groundbait?
The list here is vast, but it really isn’t worth naming all the ingredients as you are very unlikely to know what is in each mix because that information is never printed on the bag – it’s a widely kept secret in most cases.
But, there are a few ingredients that may well be listed and, if you look closely, you can actually see them among the crumbs.
Fishmeal is a prime ingredient in many carp and bream groundbaits. It is simply dried and ground fish offal. When used in a groundbait it is extremely fine and powdery, it mixes very easily and releases a great deal of scent. What a fishmeal groundbait lacks is activity. What we mean by this is a ‘fizzing’ action on the bottom. Fishmeal groundbaits simply sit there in a pile, slowly breaking down to release scent.
For this reason, a fishmeal groundbait is by far the best type of groundbait to use for bottom feeding fish such as bream. The inactivity of the groundbait on the bottom will ensure that the fish remain on the bottom, right where your hookbait will be.
Other ingredients, such as crushed hemp, have completely the opposite effect of fishmeal. Crushed hemp makes a groundbait very active indeed. Once the balls of crushed hemp-laced begin breaking down they will release those particles of crushed hemp which rise from the groundbait a little, then drop down again. One ball of ‘hemp’ groundbait can take half-an-hour until all the particles cease their activity.
Roach, rudd, barbel and chub love this type of groundbait, where there’s masses of activity on the bottom. Bream, skimmer bream, tench and carp aren’t particularly fond of it.
Other ingredients, such as crushed nuts and molasses help bind the groundbait together. When mixed with water these ingredients make the groundbait quite sticky, therefore excellent for fishing really deep water or powerful rivers, where the angler requires the groundbait to sink straight to the bottom before it begins to release any particles and loosefeed contained within the groundbait balls.
Breadcrumb is another widely used groundbait ingredient. Although carp, bream, tench and roach all love breadcrumbs, by the time it’s used in a groundbait mix the crumbs will be overpowered by the additional scents and particles added, so in the main bread crumbs are simply used as a bulking agent in most groundbaits. The exception is pure white bread crumbs itself. Although perhaps the simplest of all groundbaits, this is one of the most specialist mixes that really plays a key role in winter, for roach and skimmer bream fishing.
Biscuits, crushed seeds, salt, spices and vegetable matter can also be contained within groundbait. These are simply used to provide additional scent, attractors or simply as a bulk.
Mixing groundbait correctly
The key to a perfectly mixed groundbait is a little time and effort. 15 minutes spent doing this correctly at the start of your session will make all the difference to your catch. So, get it right and you’ll definitely put more fish in your net.
All you need is the groundbait (obviously!), a round groundbait mixing bowl and a spare bait box. There’s no need for any additives or colourings – the mixed groundbait will be more than enough to attract fish into your swim. A groundbait riddle will help ensure that you have the right consistency, but this is not crucial.
Pour the groundbait into your mixing bowl. A full 2.5lg bag will be enough for a full day’s feeder fishing session, but you may need twice that if you know that the fish respond to regular feeding with small nuggets of groundbait, or you are fishing the Method for a full day.
Now form a small dip in the centre of the groundbait, scoop up some water into a spare bait box and add a little to the groundbait. Mix it in thoroughly using your fingers. You need to keep mixing and adding a little water until the groundbait becomes fully damp throughout.
The perfect groundbait should be fluffy and just sticky enough to hold together with a single squeeze. If it doesn’t hold together with a single squeeze, add a touch more water and mix again. If it’s one solid ball you have added too much water and that groundbait will have become useless – it will need throwing away and another batch mixing.
Using groundbait
There are two key ways we can use groundbait to draw fish into our swims. The first is to squeeze it into balls and throw it in, the second is to put it inside or around a feeder and cast it in. Both are excellent ways and both have their day on certain venues.
The downside with forming balls of groundbait and throwing it in is that you cannot take out what you have put in to the water, so if the fish aren’t prepared to respond to a heavy bombardment of groundbait you will have problems!
So, of the two methods, introducing groundbait via a feeder is often the better option as you are only introducing a little at a time. Around 15-20 casts with a groundbait feeder will be equivalent to one large ball of groundbait going into the water.
Balling in
This is the term used to describe making a multitude of groundbait and throwing it into the swim at the start of the session and throughout it when required.
The balls are formed by hand, using both hands, to make them perfectly rounded and therefore aerodynamic. And the best way to do this is to make the required amount of balls first, then cast your float out or ship your pole out and use it as a target to aim your groundbait at.
Don’t throw the groundbait out like you would a ball as it will simply break up mid-flight. You need to throw them out using an underarm swing, and let the balls roll off the palm of your hand.
When balling in it’s important, if you are adding loosefeed, not to add anything live, like maggots. Their wriggling within the groundbait balls will weaken them and they are very likely to break up in mid-flight, scattering the feed all over the place.
These balls of groundbait can also be cupped in via a pole cup, which is by far the most accurate way of feeding groundbait. The groundbait balls will weigh a substantial amount though, so be very careful that you do not damage or snap your pole while you are shipping them out.
Feeder and Method fishing
This method of introducing groundbait can be much more accurate than balling in, plus it can be used to introduce groundbait at a much further distance than throwing it or catapulting it. Another plus point with feeder fishing is that every time you cast your feeder you are introducing another small patch of groundbait very close to your hook, and if you keep casting to exactly the same spot time after time you will slowly but surely build up the attractors and therefore shoal the fish together.
The groundbait for feeder fishing should be mixed in exactly the same way as before, so that it just holds together with a single squeeze.
Use your feeder to scoop up the groundbait and lightly squeeze both ends of the mix so that it compresses slightly within the feeder. Don’t squeeze too hard or it won’t explode from the feeder.
Once you’ve cast the feeder out, water will penetrate the crumbs, making them expand even further until they almost explode from the feeder.
It is possible to add extra loosefeed to the groundbait when feeder fishing. Simply add just enough for the next cast to the groundbait, scoop it into the feeder and cast it out.
This type of feeder fishing works with absolutely any type of groundbait mix – so long as it’s mixed correctly.
Method feeder fishing is a little different. The groundbait needs to be the right type of it won’t work. The best mixes are either specific Method groundbaits (it will say on the bag) or any fishmeal carp groundbait – they are both as effective.
Method feeders aren’t tubular like groundbait feeders – they are more like a spiral or rib-cage design. This is because the groundbait should be stuck to the outside of the feeder, so that the fish can peck and attack it.
The Groundbait needs to be moulded around the Method feeder’s frame by placing a pile of groundbait into the palm of your hand and pressing the feeder into it. A few gently squeezes in the right place will ensure that the groundbait remains aerodynamic and easy to cast.
Once on the bottom the fishmeal-based Method groundbait will remain around the frame feeder, in a prime position for the fish to find it, and find your hookbait (which should be set upon a very short hooklength), and take it, and then hook themselves against the weight of the feeder.
The best deadbaits to use when fishing for pike
Fish are the main diet of pike, catfish, zander and big eels. The feed naturally on both live and dead fish of many species, so it makes great sense to use deadbaits, in their many forms, to catch these fish.
Sea or coarse fish deadbaits?
The choice as to which you should use will probably not be yours as the controlling club of the water you are fishing may well state that coarse deadbaits aren’t allowed, and probably neither are livebaits.
This ruling will have been placed to protect the natural coarse fishing population of the lake or waterway. It will prevent their smaller fish from being caught and killed to be used as bait, but more importantly it will prevent anglers introducing strains of virus from fish of one water to another.
But, if the fishery rules allow you to use either sea or coarse fish deadbaits here’s what we suggest you do… When targeting pike, sea deadbaits are often the best choice. For zander, eels and catfish, coarse deadbaits seem to work better.
Types of sea deadbaits
There are more choices of sea deadbaits than there are coarse fish deadbaits, plus they are often more readily available. You will be able to buy them pre-packed and frozen at all good fishing tackle shops, but equally they are for sale in all good supermarkets too. Here’s details of the most commonly used sea deadbaits, and why.
Which ever type of sea deadbait you intend using, you must hook the baits correctly. The very last thing you want to happen on a cold winter’s day, when the pike aren’t going to eat much, is for your deadbait to fly off the hook to provide the pike with a free meal!
Mackerel
This is a fantastic sea deadbait for many reasons. It’s skin is very tough, it can be cut into small sections and literally carved with a sharp knife to make it aerodynamic, and it is quite weighty for its size, therefore mackerel can be cast a heck of a long way with a 2.75lb or 3lb test curve specialist rod.
They are incredibly oily fish too, so their scent trail carries a long way in the water.
If you can only get hold of 10-12in long mackerel in your local supermarket, don’t worry. You do not have to use them whole and face the possibility of smashing your rod to pieces upon the cast. Get a very sharp knife and cut them in half using a diagonal cut. A lot of predator anglers prefer to use the tail section and we understand why – because it’s the most aerodynamic – but the head section leaks more blood and scent, so it’s swings and roundabouts, really.
Smelt
This is another firm favourite among predator anglers because of the strange smell of the smelt, plus it’s size makes it perfect for fishing with. The smelt smells of cucumber.
They are long and lean sea fish that aren’t often seen in supermarkets or fishmongers – you will have to buy them from your local tackle shop.
They are quite soft fish, but with careful hooking you will be able to cast a whole smelt a good long way.
Herring
Herrings are available from good supermarkets as well as tackle shops. They are regarded as one of the better sea deadbaits for pike fishing because of the huge amount of oil that the fish releases.
They are fairly substantial sized baits when used whole, so the best way to use a herring is to hook it in the tail root and the back, then take a very sharp knife and slice the bait diagonally, half-an-inch beyond the second treble hook. Doing this not only makes the bait easier to cast due to its weight being reduced and it becoming more aerodynamic, but it also helps to release all those lovely juices into the water.
Sprats
These are very small deadbaits that can easily be used whole. They are very light, so when they are used with a fairly heavyweight rig they can be cast great distances quite easily. They tend to measure only 4-6in.
Sprats are very slender sea fish that can be bought from fishmongers as well as tackle shops, but you are more likely to find them in supermarkets.
They are quite soft when they are fresh, so bait floss may be necessary to tie the bait to the hooks when you need to cast them good distances.
One of the best uses for sprats is as an attractor. As they are so cheap it’s not too much of a burden on the back pocket to chop them up and feed them into your swim to attract those pike.
Lamprey
This eel-like species is actually a sea fish. It spends most of its time in the sea and will only move into estuaries and then into freshwater to spawn. And as the fish spends the vast majority of its life at sea, we think it can be classed as sea bait.
It is a terrific bait though. Because the lamprey feed upon the blood of other sea species, it is absolutely full of the stuff. A fresh or recently thawed lamprey will ooze masses of blood, producing a very long scent trail that predators will soon sense.
They are available from all good tackle shops (you won’t find them for sale at supermarkets) and they have very tough flesh that allows them to be cast enormous distances if needed.
Other sea baits
There are other sea baits that anglers use when those pike have become wise of the usual baits. Fish such as sardines and sandeels can have their day, and even squid can catch pike.
Sardines and sandeels are best fished static as they are quite soft-fleshed fish so constant casting and retrieving associated with wobbling will soon see the baits fly off the hook.
A whole squid, on the other hand, has tough enough flesh to allow it to be hooked and re-cast numerous times for wobbling. The white flesh and many tentacles make this bait unbelievably attractive to any nearby pike.
Popping up your deadbaits for extra visibility
Whether they are frozen or defrosted, deadbaits sink like a stone. This is hardly ideal as there may be times when you are fishing over a thick bed of weed or a thick layer of fine silt – the deadbait may become entangled in the weed or it may sink right out of view.
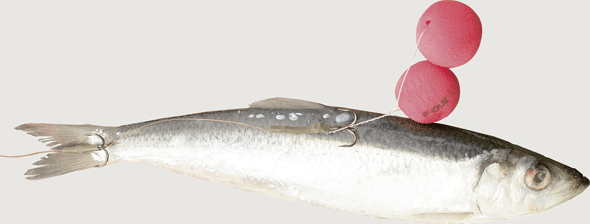
The way around this is to pop the deadbait up so it remains visible and snag-free at all times.
What you will need
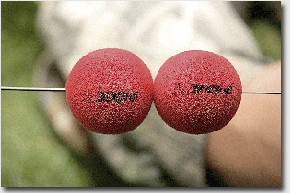
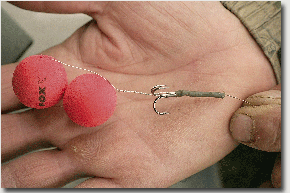
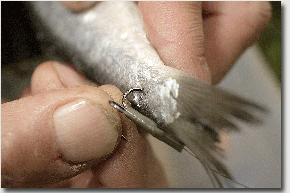
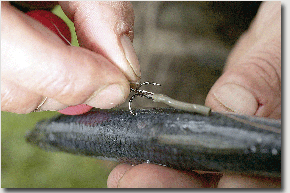
To do this effectively you will need a pair of forceps, some wire, a baiting needle, wire cutters and either one or two red, buoyant Fox Bait Poppers. The amount of Bait Poppers you use will depend upon the size of the deadbait you are fishing with. The larger the bait, the more poppers you will need.
 |
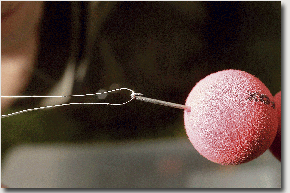 |
|
|
STEP 1 |
STEP 2 |
|
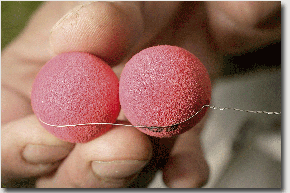 |
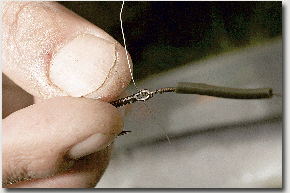 |
|
|
STEP 3 |
STEP 4 |
|
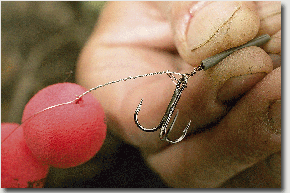 |
 |
|
|
STEP 5 |
STEP 6 |
|
 |
 |
|
|
STEP 7 |
STEP 8 |
|
|
|
Here's the finished pop-up rig. The bait will sit up, on top of the weed, begging for a pike to snap it up. |
Flavouring deadbaits for pike fishing
Many deadbaits ooze oils and blood, but it is possible to flavour deadbaits to make them even more attractive.
Although there aren’t that many flavourings out there that cater for the predator angler, there are enough. Most specialist fishing tackle outlets stock them, and one of the most popular in recent years has been Predator Plus – a red liquid that pike seem to love.
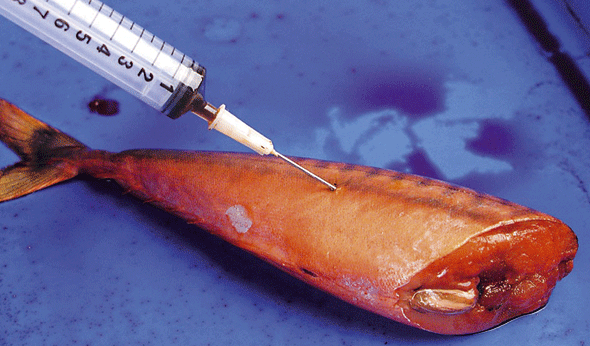
The best way to flavour deadbaits is to inject them. This forces the flavouring right inside the bait, making it leak into the water steadily for a long time.
As the vast majority of deadbait flavourings available are oil-based, using a very fine needle with your syringe isn’t ideal. The needle will become blocked very quickly and unusable.
The best thing to do is to invest in a deadbait injecting kit, comprising a large syringe and a very wide bore needle. This will allow you to inject those oily additives easily and quickly.
Injecting your deadbaits
Adding extra scent and attraction to your deadbaits is easy, but you must take care. Firstly you need to defrost the deadbait fully or it will not take on any of the injected additive.
Once defrosted place the deadbait on the ground, not in your hand. If you slip and inject yourself accidentally you will suffer all manner of possibly fatal complications.
Fill the syringe with the required amount of additive, push the needle onto the end of the syringe, pierce the deadbait deeply with the needle and squeeze a little additive into the fish.
Do this as many times as you like, piercing the bait and squeezing a little additive into the hole formed.
Once in the water the additive will seep from the fish and be carried along with any flow or undertow where it will arouse the interest of a nearby predator and they will follow it right to your bait.
How to hook deadbaits when pike or zander fishing
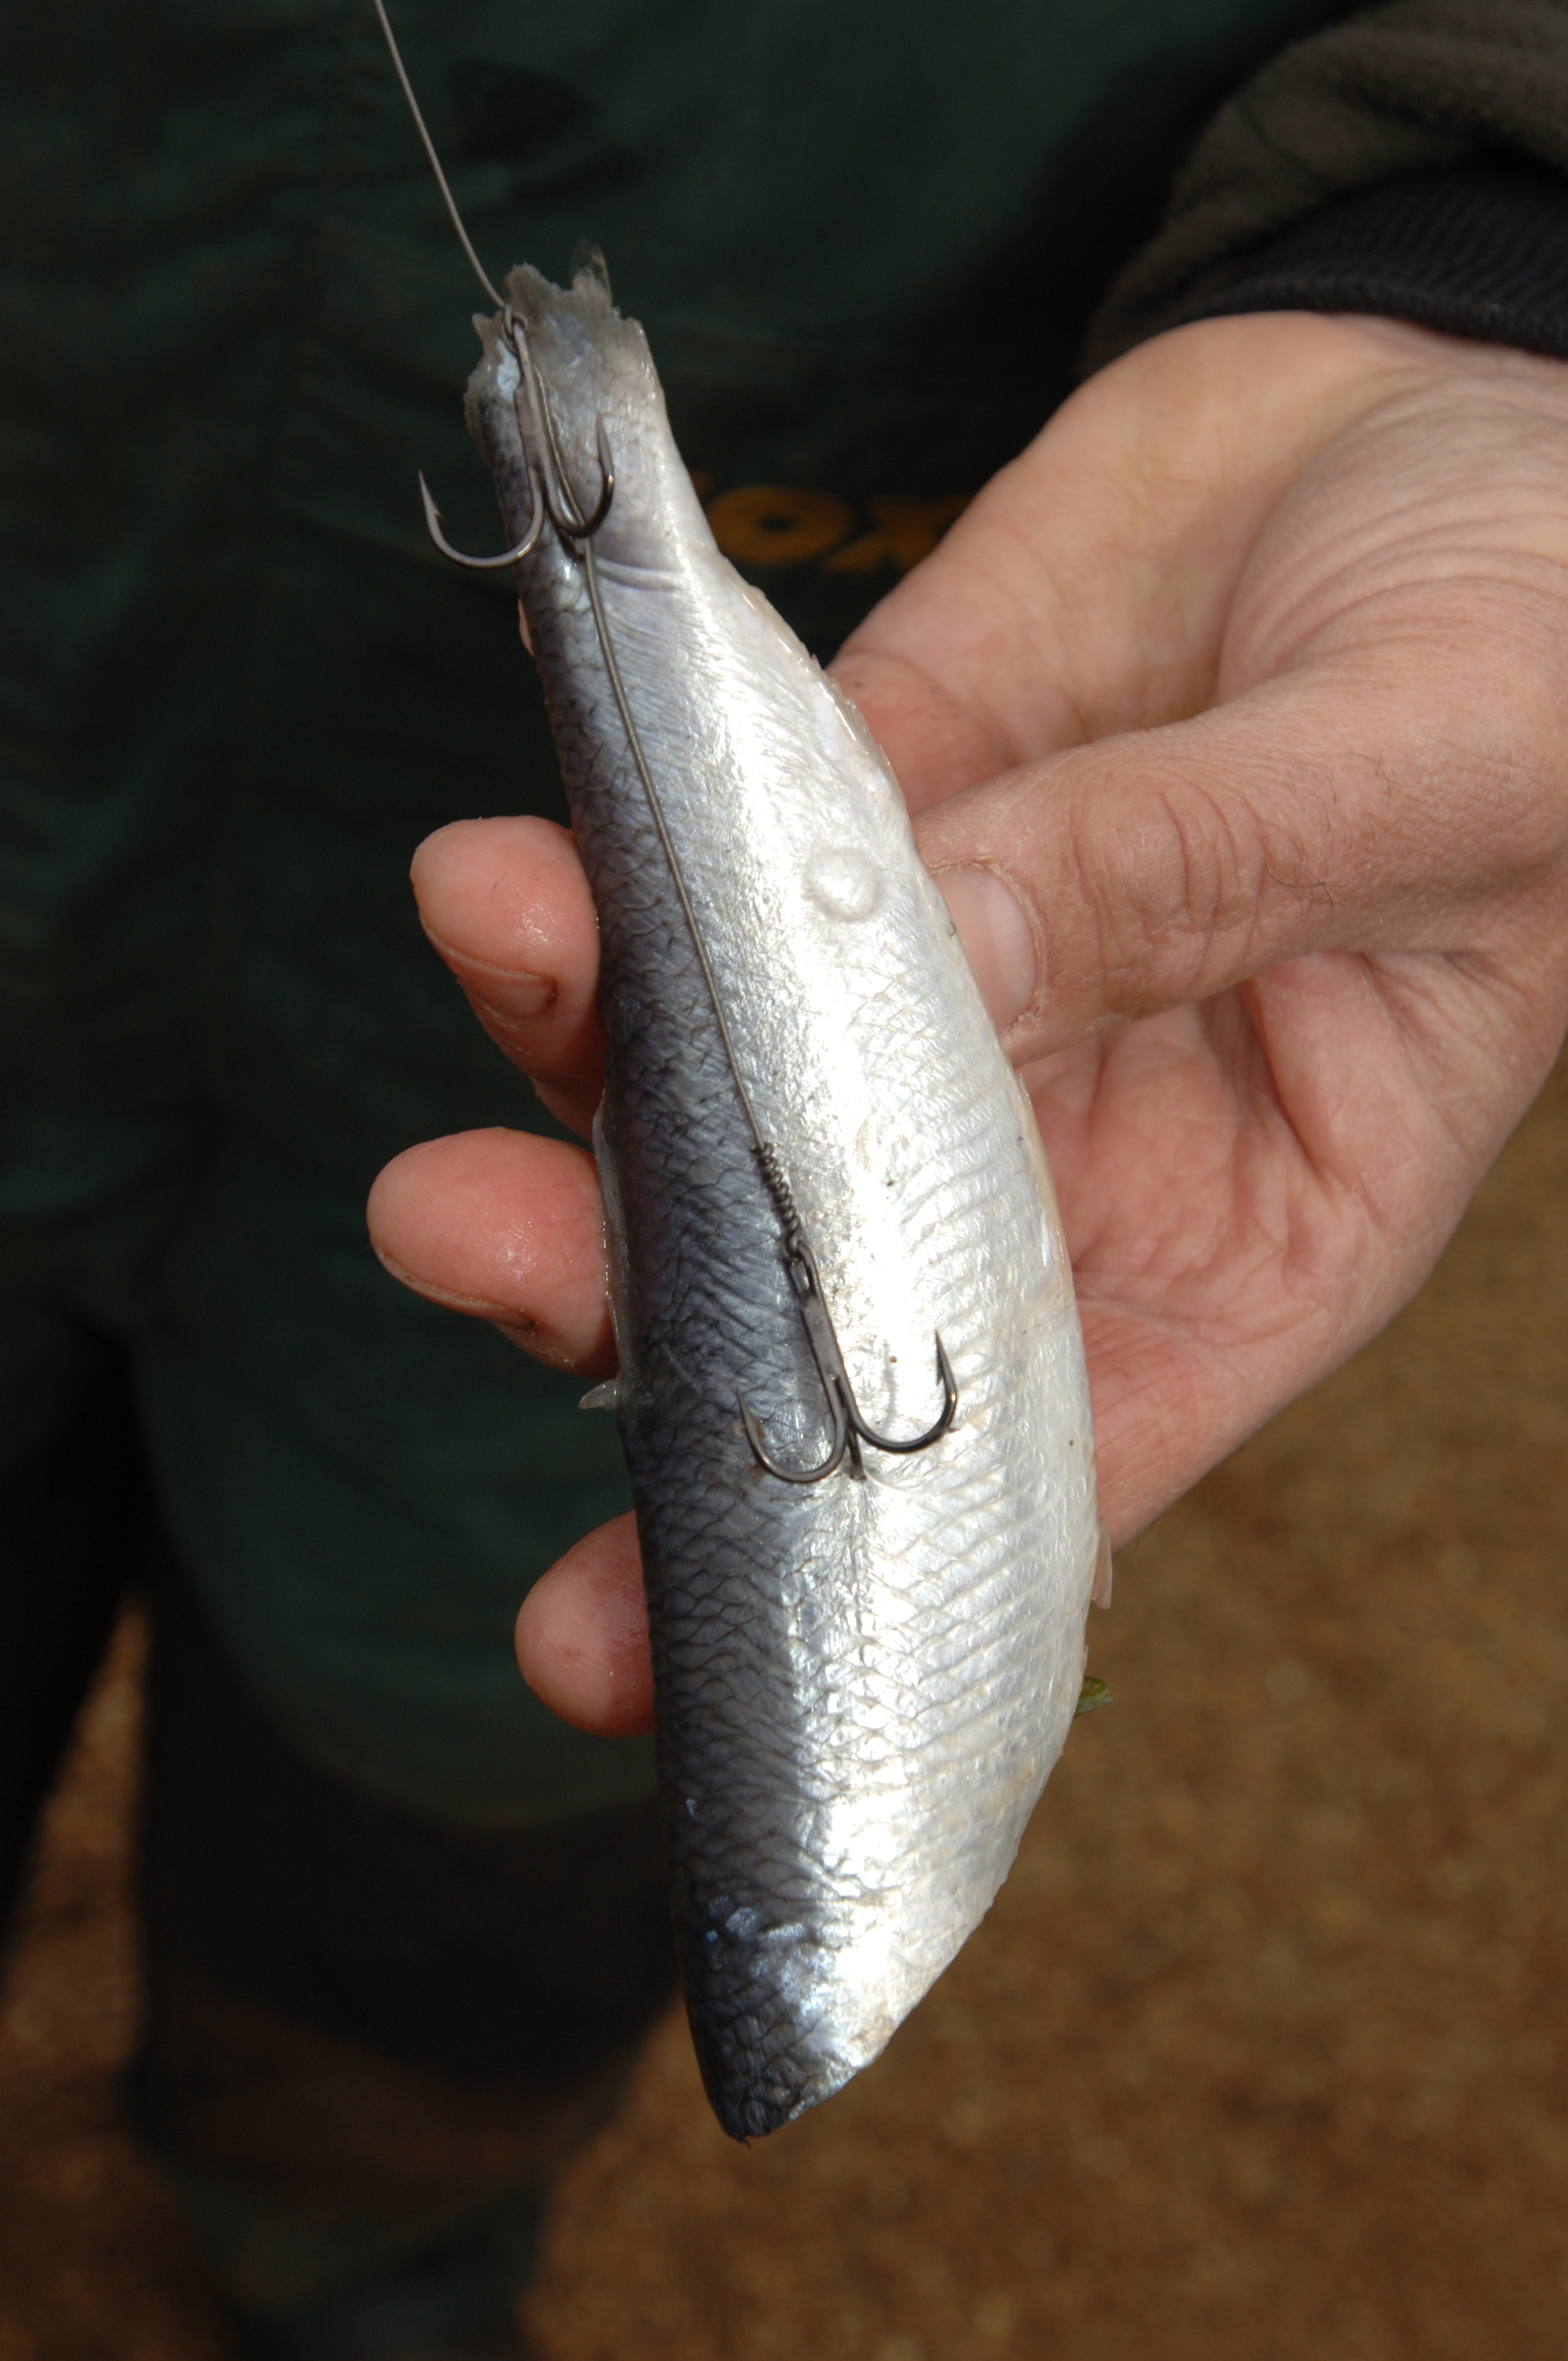
There is a very simple method to hook deadbaits to ensure they not only stay on the hook throughout a powerful cast but it also ensures that the hooks are in a prime position to ensure that they hit home and the predator is landed.
Correctly created wire pike rigs will have two sets of treble hooks, one positioned at the end of the wire, and another set around 2-3 inches along the wire.
The treble hook that is locked along the wire should be set securely within the tail root of the deadbait. It must be locked as tightly as possible within the bait as this hook takes the most pressure upon the cast.
The treble hook that is positioned at the end of the wire trace should be lightly nicked into the flesh of the back or side of the deadbait.
If you are using semi-barbed treble hooks where two of the three points are barbless, make sure you insert the barbed point into the deadbait as this hook will grip the bait much firmer than the barbless hooks.
Colouring deadbaits
If you want to make your deadbaits even more attractive to any passing pike you could colour them. This will also trick wise pike into taking baits that would otherwise reject.
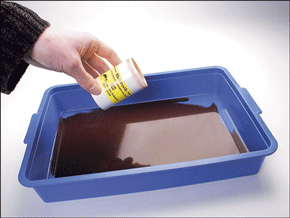
To colour deadbaits you will need a lot of newspaper, some forceps, some kitchen paper, an old bait box and your chosen dye.
The best dyes to use are those that carp anglers use for colouring boilies. They are extremely potent and, when added to a little water, provide a great deadbait dye.
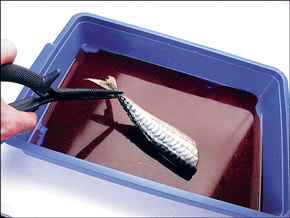
Mix a spoonful of colouring with a cupful of water in your bait box. Now use the kitchen paper to dry your deadbaits as much as possible.
Grip your deadbaits by the tail with your forceps and swish them around the dye until the whole body becomes coloured. Once dyed, leave the baits to dry on the newspaper (try not to drip the dye any anywhere that may stain). The dried baits can be wrapped in cling film and frozen for later use.
 |
 |

Everything you need to know about luncheon meat
What is it?
The bane of schoolboy’s sandwiches, luncheon meat is actually one of the most versatile baits the angler has, working for everything from carp on commercial fisheries to hard-fighting river barbell and chub and even 60lb plus catfish!
Soft in texture and packed with oils, meat is especially deadly in spring, summer and autumn although it can still work in winter when fished as a single bait with no feed.
On the river front it has lost ground in recent years to paste, pellets and boilies for specimen fish but on days when all else fails, a tin of meat can often winkle out a fish or two – big fish man Ray Walton has an enviable list of barbel bests all taken on his rolled luncheon meat method on rivers like the Stour, Avon and Ouse.
Where do I buy it from?
Plain luncheon meat is available on almost every supermarket shelves with popular brands including Princes and Plumrose, which has attained almost cult status amongst match anglers.
Some bait companies also sell meat specially designed for fishing, in a range of colours and flavours – check out the likes of Sensas, Dynamite Baits and Van Den Eynde.
How do you fish it?
Meat can be fished on almost any method you wish but being quite soft it doesn’t stand up that well to long range casting. Fishing it on a hair-rig can help here but generally, it’s a bait best suited to short casts, margin work or polefishing.
Can it be flavoured?
Yes it can! Changing the flavour of meat can make a drastic change to your catch rate, lowering the guard of the fish and working well with other feeds such as pellets, hemp and sweetcorn. Popular flavours include Scopex, Strawberry, Mussel and spices such as cinnamon, paprika and curry powder.
To flavour meat, follow this simple guide:
1 The evening before fishing, cut the meat into the size you need. Small cubes are ideal for carp and tench while larger chunks work best for bigger fish such as barbel.
2 Pop the meat into a plastic bag and add your flavouring. Be careful not to overdo the amounts as most additives are pretty powerful!
3 Blow air into the bag to inflate it and tie it off. Now give the bag a good shake to disperse the flavourings, evenly coating the meat.
4 Pop the bag into the fridge overnight and by morning the meat will have absorbed the flavouring and is ready to use.
What about colouring?
On some waters, dyed meat works to the exclusivity of every other bait with red especially deadly. Meat will absorb colours fully over time and plain old food colouring will work but far better are the myriad of specially-designed fishing colours from manufacturers like Nash, Richworth and Mainline. You can colour luncheon meat while flavouring it, simply adding a good glug to cubed meat and leaving overnight.
What sized piece should I fish?
Experimentation is key here, but generally speaking small quarter inch cubes or meat punched with specially-designed punches will do well for commercial carp, tench and bream. On rivers where chub and barbel are the targets, try ripping larger irregular-shaped pieces off the block of meat by hand. The non-uniformity of these pieces will often fool a fish that has seen it all before.
Punched meat can work especially well on venues where hook pellets are banned, especially when fishing shallow. By punching meat and leaving it to toughen in the sun, you create hard, pellet-shaped baits that will stay on the hook nicely.
Preparing and flavouring expander pellets using a pellet pump
Most expander pellets float if they are used dry, straight from the bag. To make them sink, so you can use them to catch carp, bream, tench and crucian carp, you will have to prepare them correctly. That means using a pellet pump.
Pellet pumps come in all shapes, sizes and colours, but they all perform exactly the same function – to remove air from the pellets and replace the air with water. That’s what makes the pellets sink.
But did you know that you can flavour your pellets too, to make them even more appealing to the fish? You can flavour them while using the pellet pump. Here’s how to do it…
1
2
3
4
5
1. Tip the amount of pellets that you need for your session into your pellet pump. Now fill the pellet pump container with enough water to ensure that all the pellets float.
2. It is at this stage that you add a squirt of your chosen flavour, if you so wish.
3.Now securely attach the pump to the container and pump it 10 times. Now release the lid to allow the air to escape and re-attach the top and pump it 10 times again. The pellets will now have sunk to the bottom of the container.
4. Once they have been pumped, the pellets can be tipped out over a sieve or riddle and transferred into a clean bait box. Now, to keep the pellets fresh and to stop them from drying out, tip just enough water over the pellets to cover them.
5.Some match anglers prefer to prepare their pellets on the bank immediately before they begin their match or session, but you don’t have to do this. You can prepare the pellets the night before, tip them out to drain them and immediately bag them up. Squeeze the bag to remove any excess air, twist the neck, seal it and store in a fridge overnight.
Pellets – the perfect fishing feed and bait
Pellets were originally created as an animal foodstuff or as a feed for stocked fish. The pellets were used to ensure that the animals and fish gained substantial weight prior to being sold to market. But anglers have latched on to these protein-packed food morsels and have discovered just how good they can be for attracting quality fish like carp, tench, bream, catfish, barbell and chubinto their swim.
They are produced by extruding. Basically the raw ingredients such as fishmeal and vegetable matter are mixed and forced through small tubes (called extrusion). This creates a sausage-like tube of the mix. This is then heated with steam to harden the mix. The final stage it to cut the cooked mix into the desired length. And that’s how they make pellets.
Luckily for all you carp, barbel, chub and catfish anglers out there, the large 21mm and larger halibut pellets needed another heat source to ensure that the centre of the pellets were cooked and harden. The only way this could be done was to force steam into the middle of the pellet, and that’s why some larger pellets were already supplied with a perfect hole in the centre that was ideal for a hair rig to be inserted. Perfect!
What do pellets do?
Basically, pellets are nothing more than compressed parcels of groundbait. Once submerged they will begin to break down and if they are left long enough they will form a carpet of fine mush on the bottom of the lake.
Some pellets take a lot longer to breakdown than others. Tiny 1mm pellets will take a few minutes before they turn to mush, while rock-hard 21mm halibut pellets will take weeks to fully break down.
As they are breaking down, the skin of the pellet will slowly begin to dissolve and if there is the slightest undertow in the lake the scent of the dissolving particles will travel through the water, triggering the fish to follow the scent and ultimately persuade them to pick up the bait, or mooch through the dissolved pellet particles looking for food.
Which pellet to use
We do have a large choice of different pellets available for us to try, from tiny 1mm micro pellets (smaller than a match head) to massive 21mm-plus pellets, so choosing the right one can be a little bit difficult sometimes.
Micro pellets are impossible to hook – they are designed to break down in the water really quickly and create a soft, highly-scented carpet of attractant that will pull fish right to your hookbait. Pellets from 4mm upwards are hookable, but they are also ideal as loosefeed too.
Halibut pellets – those rock hard, very oily, almost black pellets – are best used for either long-term sessions where it’s best to prime a swim and wait for those bigger fish to come along, or used as hookbait. These pellets are way too hard to be side hooked so the smaller pellets will have to be locked alongside the hook using a pellet band, while the largest halibut pellets should be drilled and then hair-rigged.
Expander pellets are another type of pellet favoured by match and pleasure anglers. Most expander pellets float when they are taken straight out of the bag, so they are perfect as a loosefeed when floater fishing. But to use them on the hook for the likes of bream, tench and carp, you will need to prepare them correctly.
To do this you will need a pellet pump.
All other pellets of a size large enough to be used as a hookbait will need to be attached to the side of your hook using a bait band. Alternatively they can be Superglued to the back of a hair.
Supergluing pellets
Gluing two pellets together around a hair is a great way to present a bait to the likes of barbel, chub and carp. All you need is a hair rig, some Superglue and two pellets that have perfectly flat sides.
Take a pellet and add a drop of Superglue to one of its flat sides. Lay the hair across the glue. Now squeeze the second pellet onto the glue and hold securely until the pellets stick firmly and the hair becomes trapped.
Drilling pellets
This is a technique favoured among catfish, carp and barbel anglers seeking to catch really big fish. They use giant halibut pellets for this technique.
You will need a drill bit or a bait drill, a hair rig, some bait stops and your large halibut pellet.
Take the halibut pellet and hold it securely by the flat sides. Push the drill into the centre of the pellets and begin twisting the drill to form a hole. Gently but firmly continue twisting the drill to deepen the hole. Do not be tempted to force the drill through the bait as you will only crack the bait.
Once the drill passes right through the bait you will be able to pull your hair rig through the hole, using a baiting needle, and lock the pellet in place using a row of three bait stops. One bait stop may not be large enough to hold the pellet in place.
Coarse fishing with casters as bait
Casters are the next stage in the life cycle of a maggot. They are the chrysalis of a maggot – a shell-like pupae that contains the soon-to-emerge fly.
Casters are slightly smaller than maggots and their shape is a lot more rounded. They are available at all good tackle shops and, like maggots, are sold by the pint.
Casters are a little bit more expensive than maggots due to the fact that they have taken longer to evolve than maggots, due to the fact that the maggot is stage two of the fly’s life cycle, whereby casters are stage three.
A pint of casters will cost around the £3 mark.
Casters are a superb bait that always tends to pick off the larger fish. Maybe it’s because the casters have a crunchy shell that the larger fish adore, or maybe it’s because the casters aren’t as often fished as maggots – but whatever the case, they certainly do make a great bait.
Turning your own casters
Although casters can be bought from tackle shops, there are times when they aren’t available as they have either sold out, or the bait producer hasn’t managed to run-off enough casters to go around all the shops.
To make a pint of casters you will need just over a pint of maggots – to take into account those that will die. The best maggots to use to create casters are white maggots. Coloured maggots just do not make good casters, probably due to the fact that they contain impurities, in the form of dies, that don’t help the fly’s metamorphosis.
When you get your white maggots home riddle them thoroughly and pick off any dead maggots and maggot skins by hand. You will now be left with a few maggots that have slowed their wriggling down and have started to transform into casters.
These should be tipped into a spare clean bait box and covered with folded sheets of damp newspaper, with the lid placed upon the box. Do not use dripping wet newspaper as the water may gather at the base of the bait box and suffocate some of the casters at the bottom. The best place to store these soon-to-be-casters is in a fridge.
Continue riddling your maggots twice a day, removing the casters and adding any new ones to the supply in your fridge. Within a few days you’ll have more than enough fresh casters to last a session.
Caster colouration and what it means
Buy a bag of casters and you’ll undoubtedly find casters of different shades. The freshest ones will be white or a cream colour, while the oldest will be almost black. Try to buy your casters as fresh as possible as they will not only last longer, they will give the fish a different bait to target – it’s amazing sometimes that a lighter coloured caster will bring about bites much faster than a dark one, and vice versa.
One thing to bear in mind, when you are buying or storing your casters, is the fact that the darker a caster becomes the more buoyant it will be. Light-coloured casters sink very quickly, while those much older, very darkly coloured casters will float.
Dark, floating casters can be used to great effect on occasions, particularly during the summer. Simply leave a helping of casters out in the sun (but beware of birds scoffing them all) and allow the sun to dry them out and turn the shell dark brown. A full day in the sunshine will crisp-up the shells, darken them dramatically and transform them into floaters. They can now be used on the hook to present a really slow-falling bait to catch fish on-the-drop, or they can be catapulted out as feed for surface feeding rudd or carp.
Hooking casters
Most baits are best used with a hook that matches the size of the bait, but casters are best used with a hook that fits inside the bait. A size 20 or 18 hook fits perfectly inside a single large caster, but that’s not to say that casters cannot be side hooked, they can.
The most important point to note when hooking casters is to do it gently and carefully because if the caster bursts it will become almost useless. And remember to use a very sharp hook!
Casters and groundbait
Casters are one of the best baits to add to groundbait. Why? Because they provide a mass of protein-rich food that the fish will happily feed upon once they find the flavoured groundbait crumbs. But another great reason why casters are so good in groundbait is because they don’t wriggle, therefore they won’t break up the groundbait as it flies or when it lands on the lake or river bottom.
Caster myths
A lot of anglers think that adding crushed casters to a groundbait mix will make it a lot more appealing to fish. Although the extra scent of the crushed casters will draw in fish, crushing the casters will do more harm than good.
The shells of crushed casters float and therefore as soon as the ball of groundbait breaks down, or a fish disturbs it, the caster shells will begin to rise. This will attract the fish and they will follow the rising shells, and they will move away from your groundbait.
Bread – one of the most underused fishing baits
Cheap, easy to get hold of and a multitude of uses, bread is one of coarse angling’s most underused baits, but one that has caught some of the biggest fish in history! Here’s the four main uses…
Bread punch
The preserve of the matchman, breadpunch is also effective for specimen roach and chub. Put simply, punch is bread that has been punched into discs of varying sizes using special brass-headed tools.
Once in the water, punch will swell up to twice its size but stay on the hook well thanks to the punching process. Canals, drains and rivers, where roach are the main quarry, respond particularly well to punch, especially in winter and even some commercial carp fisheries have seen decent nets of carp taken on bread.
Take a look at the sequence below to find out how to use punched bread effectively - a great technique to try on canals, slow-flowing rivers and even stillwaters in the winter.
STEP 1
STEP 2
STEP 3
STEP 4
STEP 5
STEP 1
You will need a bread punch. They are available in a multitude of sizes to suit a variety of different sized fish. Whichever punch you choose, remember that the punched bread bait will swell to twice its size once it is submerged.
STEP 2
Quality white bread is best for punched bread fishing. Mother's Pride is one of the most favoured as it is quite a 'duoghy' and sticky bait that hold onto the hook well. Place a slice onto a hard base and press your chosen punch into the bread.
STEP 3
The bread punch will cut out a small pellet of bread. Here it can be seen resting within the sharp brass cuttign section of the bread punch.
STEP 4
Use your hook to remove the pellet of bread. Pass the hook point through the groove in the side of the brass cuttign blade of the bread punch and you will extract the bread pellet. You may need to use your fingers to gently work the pellet right onto the shank of the hook.
STEP 5
The finished punched bread should sit on the hook perfectly central and hang from the hook shank. Once it hits the water it will begin to swell so don't worry that a lot of your hook is showing when you first hook the bread - it will quickly become masked by the swollen bread in the water.
Bread flake
The specimen hunter’s friend, flake is a killer hookbait for almost everything that swims. Sliced bread is okay for flake but better still is a whole loaf, which allows you to tear off any sized chunk you wish. Mould the bread around the shank of a big hook such as a size 8, leaving the rest of the bread to fluff up once in the water.
Bread crust
A great surface bait, crust fished popped up off the bottom at half or three-quarters depth is also a great bait to ambush cruising carp. Rip off a piece of crust and hook normally or via a hair-rig, especially when carp have become wary of more conventional floating baits such as pellets and Chum Mixer biscuits.
Bread paste
Not used that often, paste is a good winter chub and roach bait for legering, especially when used in conjunction with mashed bread feed. To make paste, use old slightly stale bread mixed with a little water and kneaded into a stiff paste.
Can bread be improved?
You can flavour and colour bread using liquid additives but be careful on the amounts, otherwise your slices will be useless! A better bet is a bait spray to lightly coat each slice and popular flavours are Strawberry, Scopex and Cheese for paste. Likewise, bread can be coloured red but one of the main reasons bread is so good is its natural colour – the whiteness stands out well in the water, allowing fish to home in quickly.
What about feeding bread?
There are a couple of ways of feeding bread depending on what you’re fishing for.
Big fish like chub and roach love a bit of mashed bread, which is easily made my mixing stale white bread with water until you have a wet slop with bigger particles of bread within. This can then be fed in small balls in likely looking swims before fishing – great for roving on small rivers.
For smaller species on rivers and canals, try liquidised bread. Pop slices, crust and all, in a blender and whizz until fine crumbs. Feed as small balls, which will break up quickly making it great for shallow water while for feeder fishing, simply cram a cage feeder with the crumbs and fish a piece of flake or large piece of punch on the hook.
Particles, seeds and pulses – great fishing baits for big fish
Particles, pulses and seeds are excellent baits to attract bigger fish. They are a little specialised and often don’t bring instant success, but if you are considering a fairly long-term baiting campaign, or are planning a weekend session they could provide you with great results.
Preparing particles, seeds and pulses
It cannot be stressed strongly enough that almost all particles, seeds and pulses need preparing before they can be used for fishing. The reason why is because once they come into contact with moisture they will start to swell. So, any dried particles that are introduced into a fishery will begin to take on water and increase in size. If a fish eats those particles before they have swollen fully the fish could be in big trouble as the particle will continue swelling within the fish’s digestive system. And we certainly do not ever want that to happen.
Each particle, pulse and seed must be either soaked or boiled and simmered for a certain length of time before it is safe for the fish to eat. Please follow the instructions detailed on our website to ensure that you are preparing your particles properly. You will find the details on our particle preparation page.
Using particles
Particles such as sweetcorn, hemp and tares can be used straight on the hook or as loosefeed to catch some ‘everyday’ species such as roach, bream, tench and carp. They are sold in the tin, prepared and ready to use. But most other particles are used to attract fish into the swim, to bring the fish towards your non-particle hookbait (a boilie, a cube of meat etc).
The most famous particle has to be hemp. It has been used for many years to attract roach, barbel and carp.
Other particles, seeds and pulses worth trying as a loosefeed attractant for barbel, carp, bream and tench are groats, wheat, rice, pearl barley, chick peas and red dari seeds. Once prepared properly they can be literally shoved into a river swim or the margins of a lake where they will emit a rather potent scent that will waft downstream or with the undertow to pull in fish from far afield.
A few samples of your hookbait scattered among the particles will soon give the fish enough confidence to find and eat your true hookbait.
Hooking particle baits
Of all the particles anglers use around 50 percent of them can be used as hookbait. Smaller particles such as hemp, corn and tares can simply be side hooked, while larger particles such as peanuts, tiger nuts and black-eyed beans are better presented upon a hair-rig.
Because you should have prepared the particles correctly hair-rigging them poses no real problems – simply pass a baiting needle through the bait, clip on your hair and draw it back through. Easy really.
Feeding particles
Most particles, when they are prepared correctly, cannot be fed using PVA bags or stocking very easily because the moisture within and surrounding the particles will melt the bag.
So, one of the most favoured ways of feeding an extensive amount of particles is with a spod, pictured above.
This large rocket-like device can be attached to the line set upon a strong specimen rod (a 3lb test curve rod with 15lb line is perfect) and used to cast the particles out.
The spod will fly through the air fairly accurately and once it hits the water's surface it will up-end and release the bait.
Fishing for big carp and big fish with boilies as bait
Boilies are the number one bait for big carp fishing, big barbel fishing, catfish and even specimen bream or tench fishing. They are the perfect bait to use if you want to break your personal best weight for all these species.
What is a boilie?
A boilie is a protein-rich, round bait that has been boiled to create a hard outer skin. They are available in different sizes, different colours and different flavours – way too many to mention here on this page.
They are produced by adding eggs, colouring, flavouring and extra additives to a powdered base mix, then mixing thoroughly to create a paste, then shaping into balls, then boiling for between a few seconds and a couple of minutes to cook and harden the outer skin.
Boilies can be bought in two types – shelf-life and frozen. Shelf-life boilies tend to be harder than frozen boilies (when they defrost) and contain preservatives to ensure they do not rot in the bag. Freezer baits don’t contain any preservatives – as the name suggests they are frozen to ensure the baits remain fresh before they are defrosted and used.
What is a base mix?
Base mixes can be a number of things, but in the main they form the largest ingredient in a boilie’s make-up.
There are three main types of base mix:- milk protein, fishmeal and bird food. The milk protein base mixes are very much like baby milk compounds – full of added goodness and protein that go a long way to ensuring babies get the right level of nutrients.
Fishmeal base mixes are just that – powdered fishmeal. Again, this is full of fatty acids and proteins designed to attract and feed fish.
Finally, bird food base mixes contain tiny seeds and crushed seeds that again provide the fish with a healthy diet.
So how are they made?
The base mix is the start of the process. It will be a powder and, in the case of bird food base mixes, it will also have tiny seeds within the powder too. To this powder all the other powdered additives are added and mixed together thoroughly. If a powdered colouring is to be used in the boilies, this is the time to add it and mix it into the powder.
Next, the eggs are cracked and added to the powder. Most home-made boilie recipes require six eggs.
Once the eggs are sitting in the powder, any liquid additives should be poured over the eggs. You can add any liquid colouring or flavours at this stage. Some specialist anglers like to add liquid additives too, such as Multimino, to give their boilies a little extra attraction.
Now, the powder and liquid and eggs are whisked together thoroughly until all the ingredients resemble a paste. If the paste is too sticky, a little more base mix can be added and kneaded in until the paste is flexible but does not stick to the hands.
Next the paste is rolled into sausage-shaped tubes, placed upon a rolling table and rolled into the correct sized balls. As soon as the balls are formed they are placed into a sieve and lowered into boiling water for between 30 seconds and 2 minutes, depending upon how hard the boilies needs to be.
Save your paste
If you make your own boilies, always save a little of the paste. This can be used to great effect by moulding it around the hair-rigged boilies and fished as per normal. The softer paste will dissolve fairly quickly, and in doing so it will emit a long-lasting scent trail that will help attract more fish to your bait.
But this spare boilies paste mix doesn’t have to be used wrapped around a boilies – try it around a large halibut pellet and you’ll also get great results.
Pop-up boilies
The vast majority of boilies sold are sinking baits, but there are buoyant, floating boilies available, called pop-up boilies. These can be used as an alternative to bread or dog biscuits and fished on the surface in the warmer months. But their best use is to create pop-up rigs on the bottom.
The pop-up boilies is threaded onto the hair and counter-balanced by adding a large shot or some tungsten putty onto the hooklength. This little weight will anchor the pop-up boilies so that it sits just off the bottom. Doing this will add extra attraction to the bait because lifting it off the bottom by an inch or two will ensure that the fish sees it more readily.
Pop-up boilies can be produced at home, using specialist pop-up boilies base mixes, but there’s no need to go to those lengths because most good fishing tackle shops sell pop-up boilies ready made and in a wide variety of colours and flavours.
Feeding boilies
Because boilies are so high in proteins and goodies, they aren’t the ideal bait to loosefeed – they are expensive too! You are best loosefeeding particles, pellets or groundbait to form a attractive bed of scent, then place your boilies hookbait directly over the top.
But, a single boilies sitting on top of a big expanse of pellets and particles or the likes can prove a little off-putting to the fish, so it makes good sense to introduce at least a few boilies. This will give the fish the confidence to take them.
The best way to ensure that you feed a swim with a few boilies accurately is to use PVA tape. This product can be used to create stringers – strings of bait similar to a necklace. But the magical properties of PVA are such that it dissolves in the water, leaving a series of baits next to each other in a fairly tight pile.
Simply thread two or three boilies onto a stringer needle or long baiting needle. Now pass a length of PVA tape around the hook of the needle and push the boilies off the needle and onto the PVA tape. Make sure the boilies are at least an inch apart upon the tape, take the tape and pass both ends over your hook point.
Now, when the baited rig and stringer lands, the PVA will quickly start to dissolve to leave a small pile of boilies right next to your boilies hookbait. Perfect!
Sweetcorn – one of the best coarse and carp fishing baits
If there’s one bait that will catch good quality coarse fish month in month out it is sweetcorn. It’s one of fishing’s most useful baits due to its bright colour and sweet scent. It is a versatile bait in that it can be flavoured, coloured, fished on the hook, fished on a hair rig, and even mushed up to make a great groundbait.
Another plus point in sweetcorn’s favour is its availability – you can buy a tin from supermarkets, corner shops and even some petrol stations, so you’re never far away from a supply of great tench, bream, roach, carp and barbel bait.
Hooking sweetcorn
Always follow the old adage – use the right size of hook to suit the bait you are using. For a great little guide to hook sizes click here.
Placing sweetcorn directly onto the hook is quite easy – simply take a grain by the flattened side and pierce the rounded section of the grain with the hook point. Gently pass the hook point inside the grain and twist as you go to work the hook point out of the flat part and out of the grain.
If you wish to hair rig your sweetcorn you can do it one of two ways, upright or flat. To hair rig sweetcorn upright pass your baiting needle straight through the flat side of the kernel and thread the bait onto your hair. This isn’t the best way to hair rig it as the bait may well sit upright on the bottom, and that’s quite unnatural.
To hair rig sweetcorn so that it lays flat on the bottom pass the baiting needle through the widest part of the kernel and pull the hair through the bait that way. Now, when the bait lands on the bottom, it will lie flat and therefore look completely natural to a passing fish.
Flavouring and colouring sweetcorn
Many anglers prefer to simply use sweetcorn straight from the tin as it has enough colour and flavour to attract the fish they seek, but on some venues where sweetcorn has been used to excess the angler may need to alter the bait slightly to make it more attractive, and to trick the fish into taking it.
To flavour and colour the bait open the can and tip out the juice. Now tip the grains into a plastic bag and add a squirt of your chosen flavour and a few drops if colouring. Supercook food dye – available from all good supermarkets is as good as any here – and blow into the bag to fill it with air. Now twist the neck of the bag and give the bait a good shake to disperse all the ingredients.
Now squeeze all the air out the bag, seal it and freeze it overnight. When you take it out and allow it to thaw the flavour and colour will be drawn right into the bait making it even more effective than if you used it immediately.
Pre-baiting with corn
Anyone thinking of pre-baiting a swim for tench, carp or bream should think about adding sweetcorn to their groundbait or particle mix. A bag of frozen corn is far cheaper than buying tins of the stuff and will help bulk the pre-baiting mix out, adding colour and scent that is sure to attract the fish into your area, for them to feed on all the other goodies you have in the mix.
Sweetcorn as groundbait
Have you got a liquidiser? If so you will be able to make a great groundbait or groundbait additive that works brilliantly for roach, carp, bream, tench and rudd.
Pour the whole contents of a tin of corn into your liquidiser and give it a blast until the grains turn to a mush. This mush can be added to dampen a Method mix groundbait to give it extra scent and a scattering of colour, or it can be scooped into a pole cup and fed into your Stillwater swim to create a scented cloud that fish can’t refuse a quick sniff at.
You might need to scoop the pole cup under the water as you tip the contents out to help remove the sticky sludge from your cup though.
A few pellets added to the liquidised corn will give the fish something to get stuck into when they come to the yellow cloud.
Imitation sweetcorn
If you want to use sweetcorn for big fish, but there are masses of roach and rudd in your venue, you might like to consider using plastic, fake corn instead as the small fish can’t smash this bait to pieces.
There are two types of imitation sweetcorn – those that sink and those that float. Be sure to buy the type you want to use.
Simply follow the hooking tips above to hair rig your imitation sweetcorn and present it over a few grains of natural corn. Don’t be put off with the bait being plastic – once the fish arrive in your swim and start munching away they won’t know the difference – you’ll soon get a run off a specimen fish.
Hemp seed and tares – great for barbel and roach fishing
What is hemp seed?
You may have read about hemp, often referred to in old books as ‘the demon seed’. It was for a long time extremely controversial and banned on a lot of waters but in recent times, anglers have come to see hemp for what it is – a deadly coarse fish catcher.
Hempseed is the seed of the cannabis plant but that doesn’t mean the seeds anglers use can be whacked in a Rizzla and puffed away on! Fishing hemp is treated so that it cannot grow and often cooked so that the seed splits.
Black in colour and the size of a tiny piece of gravel, one line of thinking is that fish mistake the seeds for small black snails in amongst the lake or riverbed. Old thinking reckoned the fish became pre-occupied with the seeds, using its link with cannabis to suggest the fish were drugged.
This is of course nonsense but fish, especially roach, prize hemp above all other baits and no sensible roach man on a river would be without a couple of pints of seed at any time of year. It’s also a great bait for laying down a big carpet of feed for species like tench, carp, chub and barbel.
How do I use it?
Hemp is quite a weighty bait and will sink easily so can often be fed by hand. In swift river currents, a bait dropper is a better bet but strangely, it never quite works when fed in groundbait. For laying down a big bed of bait, simply ladle the stuff in. Roach require a more delicate approach with constant little and often loosefeeding via a catapult. Another great way is to dump a load of hemp into your swim usign a pole cup, pictured above.
How much does it cost and from where?
Cooked hemp is normally sold across the tackle shop counter in pints and the price can vary but around £1 is right. Some bait companies sell hemp in bulk plastic jars with one jar enough to last several sessions.
Can I boil my own?
You can but it is a smelly process! Uncooked hemp is available in bulk sacks of up to 25 kilos from bird feed merchants and to cook, simply put the amount of seed you need in an old saucepan (not your wife’s best!) and cover with water.
Bring to the boil and then simmer uncovered gently.
Adding a spoon of Bicarbonate of Soda can help darken the seeds even more. By this point the seeds will pong of old socks so keep a window or two open!
Keep checking the seeds and once they start to split, revealing the white kernel inside, they are cooked. Drain and leave to cool before measuring out with a pint pot into plastic bags for freezing.
There is a non-smelly way to cook hemp though. Just three-quarters fill a flask with dried, uncooked hemp, pour boiling water in to fill the flask and seal the lid. Give the flask a shake and leave it for an hour. The seeds should have split by then and be ready to use.
All particles - hemp and tares included - need to be prepared correctly before use. This means that they either need boiling, soaking or simmering for a set time.
Can you use hemp for hookbait?
It is a fiddly process but for picking off better roach, hemp is hard to beat. Try and source larger grains of seed (often known as Chilean Hemp) and prepare much the same as your feed grains. However, it can be worth cooking your hookbaits for a little less time, making them tougher and so easier to hook.
Hooking them is hard to master and one of the best ways is to pre-prepare a couple of dozen grains before you set off to the bank. Select the biggest grains with a decent split and punch a hole in the flat base of the seed (where the seed was attached to the plant) using a baiting needle or the wire stem of a pole float.
Once on the bank, use a wide gape fine wire hook (the Kamasan B511 or Mustad Wide Gape Canal Seed are excellent) and push the point through the punched hole. Ease the bend around the inside of the seed and bring the point out through the split, making sure there is plenty of hookpoint showing.
Hooked this way, the grain should stay on for several fish.
What about tares?
Hemp and tares are a brilliant combination for river roach and it’s always handy to have a handful of tares with you. A tare is a cooked pulse that is commonly used for horse and pigeon feed and are quite soft, making them easy to hook.
Generally speaking, once the fish are lined up on hemp hookbaits, switch to a single tare on a large wide gape hook such as a size 16. Bites will be positive and the fish of a far better average stamp than on hemp – however, they won’t always work so don’t spend too long fishing tares if you aren’t getting bites.
Coarse fishing with maggot baits
Maggots are a really versatile fishing bait that can catch almost any British coarse fish – all you need to do is present them correctly and you’re onto a winner.
You can fish maggots on the bottom of the river, lake or canal. You can even fish maggots on the surface – and at any depth in between.
All you need is a little know-how and the right shotting pattern and you’ll soon see your float go under, your tip go round, or your indicator rise..
Hooking maggots
There is an old saying that you must follow when hooking maggots, or any bait, and that is to match the size of the hook to the size of the bait. I mean, would you stick a single maggot onto a size four hook? No, you wouldn’t, because that’s stupid!
Always hook the maggot blunt end first, and use the sharpest hook you can find. The maggot mustn’t burst when you pass the hook through the flattened part of the skin – the hook should just lightly nick the skin. If it does burst, do it again with a fresh bait.
If you intend using more than one maggot on your hook, keep hooking the baits in the blunt end so they sit next to each other perfectly.
Stopping line spin
Double, triple or quadruple maggots placed upon a hook can cause anglers problems because that bait isn’t very aerodynamic. It will spin through the water when it is retrieved quickly, and that spinning of the bait will cause the hooklength to spin too.
If you are using a fine hooklength there is a chance that it will become kinked and damaged, therefore weakened. One way to prevent this is to use a micro swivel between your hooklength and your mainline. These take the pressure out of the spinning hooklength ensuring that it remains kink-free and strong at all times.
The best knot to use to tie a micro swivel onto your rig is the Grinner knot.
Making maggots float
It is possible to make maggots float very easily. Doing this will allow you to use your maggots a whole lot more effectively given the required circumstances.
You could fish a bunch of wriggling floating maggots on the surface, you could slow the maggot down as it falls through the depths, or you could pop a bunch of maggots up above weed or a Method feeder if you know how to make maggots float.
All you need is a spare bait box and a spare lid. Firstly, cut a large square in the bait box lid large enough for you to get your hand in, but there needs to be enough of the bait box lid remaining to create a large lip. This will prevent the wet maggots from escaping, as they become excellent climbers when they are wet.
Tip enough water into the bait box to cover the base – you only need to cover it with a couple of millimetres of water that’s all. Now add a handful of maggots and let them wriggle around in the water for 20 to 30 minutes.
Their survival instinct forces them to take onboard enough air to ensure they don’t drown, therefore the maggots become buoyant and they will now float. Simple!
Using dead maggots on commercials
Did you know that in some circumstances dead maggots can actually be better than live maggots? Live maggots will sink to the bottom and wriggle away into the silt, making it difficult for the fish to find them. The solution is to kill the maggots and then they won’t be able to hide!
This is a particularly useful technique to try when fishing commercial coarse fisheries as these tend to be weed free on the bottom but often very silty.
To get a load of dead maggots for feeding simply pour half a pint into a polythene bag, squeeze the air out and tie the neck up. Now place them in the freezer for a day. The cold will kill them off, but don’t put more than half-a-pint in each bag as the ones in the middle will remain warm enough to stay alive.
A quick way to get a handful of dead maggots for hookbaits while your at your swim is to pour a little hot tea or coffee over a few. That will scald them and they will stiffen and die.
Flavouring maggots
Maggots can be flavoured if you wish to add a little extra pulling power to your bait. This can be done by adding either a liquid flavouring or a powdered flavouring.
When you are adding a liquid additive riddle your baits first to remove any maize, dead maggots or sawdust and sprinkle on the desired amount of flavouring as per the instructions. Don’t overload the flavour as you will only do more harm than good. And you could potentially kill the maggots that you need to keep alive.
If you choose to flavour your maggots with a powder you will also need to riddle the baits and then add the flavouring. You can add quite a lot of powder flavour and a couple of great ones to try are Brasem (great for bream) and turmeric (great for roach and chub).


