
How to fish and create a slider float rig
You may well have read or heard about match anglers fishing a slider float rig. If you’ve ever wondered what they are talking about, read on as here’s a compact guide to tying a slider float rig and how to fish the slider…
A slider rig is one of the best ways to float fish a bait on the bottom in deep venues – those 10ft deep or more – because the float isn’t locked in position on the line like normal waggler rigs.
This means that any depth of water can be tackled, and casting is easy. Even when your rod is only 12ft, but the water’s way deeper than that.
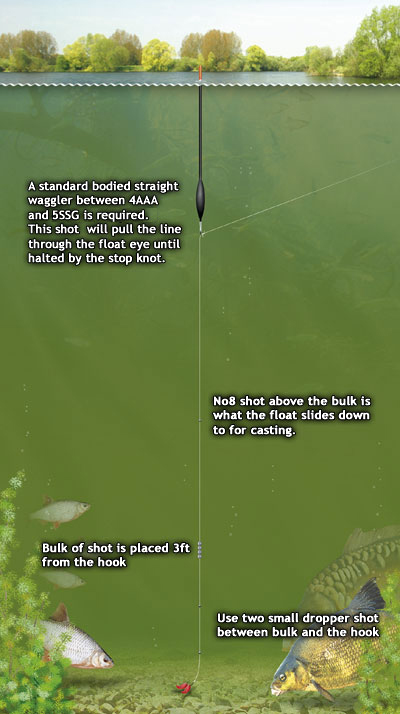
Slider float rigs work on this principle: The large waggler float is attached to the line using a swivel float adaptor that allows the float to slide along the mainline. Below the float is all the shot required to cock the float. And above the float is a stop knot that prevents the float from going too far up the line.
There’s a certain way to set up the shotting below the float – just take a look at the diagram below to see how’s it’s done.
The position of the stop knot above the float will depend upon the depth. Basically, it’s a case of attaching a plummet to the hook, sliding the stop knot along the line to guess the depth and casting the rig to see if you’ve found the correct depth. Obviously the float will sink if the rig is set too shallow. Basically, that single stop knot positioned above the float takes the place of the split shot that you’d normally use around the float’s base.
The float must be of a certain style. Normal straight, crystal and insert wagglers aren’t ideal for this technique. The perfect float needs to have a large shot carrying capacity – something in the region of 4AAA and above is needed. And here’s why…
When this rig hits the water you must leave the bale arm open. The large waggler will rest on the surface for a second or two while the huge amount of shot drops, dragging line through the eye of the float adaptor. That’s why the bale arm needs to be open – so line can zip through easily.
Before you’ve time to blink the stop knot will hit the float adaptor’s swivel and suddenly the float will stand up and sink to the correct level, ready to detect a bite. That’s the time to snap over the reel’s bale arm and maybe take up any slack in the line, ready to hit a bite.
It’s a very ingenious method of float fishing and, as with most good things, it’s really very simple when it’s clearly described.
And what’s more, despite needing a gigantic float, this technique is very sensitive, so you’ll be able to detect the most gentle of bites – often spotting more bites than you would if you were feeder fishing the same swim.
SLIDER FISHING TRICKS
You must use a swivel float adaptor when fishing the slider to ensure your line passes through the float easily and quickly.
It’s best to use either a small piece of your mainline or slightly thicker fishing line for the stop knot.
If your stop knot slips, simply tie a second one onto the line and push them together. Obviously they both must be tied onto the line above the float.
Leave around 1in of line protruding from each side of the stop knot as this will help prevent the float slipping over the knot.
Don’t use a waggler rod with really tiny line guides, especially of you have to cast long distances, as this will cause too much resistance and you may not cast the distance required.
If all your swivel float adaptors have large swivels, simply crush the swivel loop into an oval using pliers. That works for Alan Scotthorne, so it’ll work for you too!