
How to catch big perch

Commercial waters are packed with huge perch - feeding on the endless supply of silverfish. The result is they’re getting bigger and bigger. Mick Cutler shows you how to catch one of these magnificent creatures…
The next time you cast into your local commercial lake just remember that the hookbait may land within a few feet of a British Record Fish.
Yes, you did read that correctly. The fact is that the majority of modern lakes have the potential to throw up a historic perch.
The past three record perch have come from small commercial waters and the good news is these fish are getting bigger and more numerous.
With most managed fisheries being devoid of pike, perch are the ‘top dog’ in the predatory food chain. They grow fat as they binge on the masses of fry and small silverfish produced in these prolific fisheries. We are currently enjoying Britain’s golden age of perch fishing.
To ensure you cash-in on this accessible source of specimen fish we’ve sought the help of perch expert Mick Cutler.
Mick (49), has pursued big perch since 1985 and has a personal best of 5lb 1oz along with lots of 3lb and 4lb fish. Many of these specimens have been caught at public access lakes that anyone could fish.
Giant perch are NOT the preserve of exclusive, expensive syndicates. Taking us to a typical two acre club water, the Maidstone angler agreed to reveal his perch secrets.
These gems have evolved over years of trial and error and he’s kept them hush-hush, until now...
THE RECORD PERCH STORY
The British perch record has changed three times in the past 20 years, on each occasion it has been caught at a small, day ticket or club fishery.
In 1985, John Shayler became the first angler to break the 5lb barrier when he landed a 5lb 9oz fish from Furnace Pond, in Kent.
In April 2002, 11-year-old Dean Rawlings set a new record when he landed a giant of 5lb 9oz 8dr while fishing for carp at a tiny Oxfordshire commercial pool.
As IYCF recounted in this October’s issue (see ‘Moments and Heroes’ page 136), this capture was made even more special as Dean was actually winding in his maggot-baited waggler rig when the giant took it!
Finally, in February this year, Les Brown from Washington, Sussex, landed a 5lb 15oz fish while legering maggots at a local two acre day ticket fishery.

LEFT: Britain's first 5lb perch in John Shayler's hands. RIGHT: In February Les Brown showed how big day ticket perch can grow.
WHY TARGET SPECIMEN PERCH IN SMALL WATERS?
As the past three record breakers have all come from small waters, this question seems moot. But, why are these environments so prolific when it comes to monster perch?
“Simply stated, small muddy commercial carp waters provide the perch with the perfect growth environment,” explained Mick.
“The great thing about small carp pools is they are stuffed full of stunted silverfish and small match carp that spawn prolifically. This provides the perch with an abundance of food – either small roach or carp fry.
“The majority of commercial carp waters don’t contain any pike, so the perch are at the top of the food chain.
“In essence, these fish are the only predators, so they are basically living their lives like Roman Emperors! All they do all day is swim, eat and make little perch,” he enthused.
Similar to pike, perch thrive on neglect. Anglers rarely target them and this helps them achieve colossal weights in unmolested surroundings.
In short, these public fisheries provide the perfect habitat for producing monster perch.
AREAS TO TARGET
A voracious predator, perch are actually inherently lazy feeders.
“The bigger they get, the less likely they are to chase baits gung-ho style around the swim,” Mick explained.
“The smaller perch – those below 1lb – are fairly active, chasing fry and bait fish all over, but once they get above this weight, they tend to get really sneaky.”
Specimen perch are like ninjas, stealthily ambushing their chosen quarry from well-camouflaged lairs. When looking to catch big perch, target any features in, or around the edge of, a small pool.
Overhanging or fallen trees, reed beds or dead lilies all provide the perfect places for perch to launch an attack, as their green and black bodies blend into the background. From February through to
April – depending upon the water temperature – perch will also be located in any shallow areas. These are the places where they spawn.
At other times of the year, they will drop into deeper water, where there is less light penetration. Water that’s six to eight feet deep is perfect.
In these dimly lit spots the perch has its greatest advantage over prey as it can use its brilliant eye sight, which is better than almost every other coarse fish, to attack unsuspecting targets.
WEATHER CONDITIONS
Overcast, low barometric pressure and a light drizzle are very good conditions for perch fishing.
However, the main consideration when perch fishing is light intensity. Like all predators, perch have large eyes and extremely good eyesight that they use as their primary weapon.
Perch hate bright light. Not only does it help prey fish spot an attack more easily, but it also makes it harder for the perch to hide, negating the element of surprise.
“Perch are devious. If prey fish can see them, they have to waste more energy chasing their meal,” said Mick “Younger, smaller fish are more prepared to chase, but the larger, more experienced specimens – 2lb plus - won’t waste their time. It is a case of effort versus reward.”
Light levels are one of the reasons commercial pools are so good for perch as the quantity of bottomfeeding species, like carp, tench and bream, stir up the bottom making these waters permanently murky.
“On these venues, a bite can come almost anytime, however, I’m always most confident during the half-hour either side of sunset,” Mick said.
“For some reason, you never get many bites at dawn, it’s always dusk that produces the most runs, making them quite a fisherman-friendly fish.
“If the day is set to be bright, sunny and clear, I still go perch fishing but I won’t set off too early. I get to the lake at noon then fish until dark.
“I’m not saying you won’t catch perch during the night, but in my experience the sport is so slow that it hardly seems worth it,” he continued.
KICKING OFF THE SWIM

Mick catapults out a pouchful of red maggots
Once at his chosen swim Mick uses a two rig attack - one based on the use of worms the other using a livebait.
The first thing Mick does is break out a waggler rod: “As it is illegal to transport live fish from one water to another I spend the first hour float fishing for small livebaits,” he said.
“This serves two purposes. Firstly, it allows me to get bait in the water, attracting prey fish into the area that I’m planning to target for the day.
“Secondly, it gives me a handful of livebaits to use.”
When it comes to kicking off the swim ready for his perch rods going in, Mick has two approaches.
“My normal tactic is to fire out three pouchfuls of red maggots and two pouchfuls of Hinders 3mm betaine pellets over each rod.
“It attracts the small prey fish and this creates interest from the perch. I’ll then set up my two rods – one with a worm hookbait and one with a livebait. By the time I’ve done this, the swim is primed and ready to go.”
To continue drawing fish into his peg, Mick fires three half lobworms and a pouchful of red maggots over both rods, then a pouchful of betaine pellets every 30 minutes.
“I like betaine pellets as they kick out loads of fish oil, but they’re not as natural as maggots and worms,” he continued.

RIG CHOICE
Mick uses two rigs when perch fishing – a float and a leger rig.
The float rig (below) comprises of a 4AAA Drennan Loafer, attached with float rubbers at the top and bottom.
“It’s better to set up the float stick float style – rubbers top and bottom – rather than bottom only like a waggler, as it cuts down on the resistance felt by a taking fish.
“Float rigs are always my first choice as they give little resistance to the taking fish – perch hate resistance and will instantly drop the bait if they feel something.”
Below the float, Mick has a float stop, a swivel bead and another float stop. This creates a paternoster that allows the livebait to swim naturally.
“The bottom float stop enables me to position the bait at a certain level,” explained Mick.
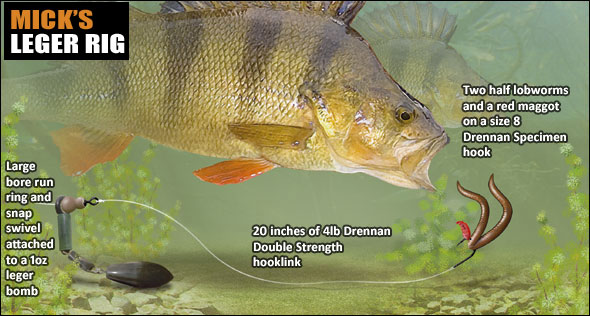
If livebaiting is not your thing, Mick also catches lots of big perch using a leger rig (see previous page) baited with worms.
His rig consists of a 1oz leger that is stopped from falling onto the hooklink with a bead.
The hooklink is made with 4lb Drennan Double Strength line and a size 8 Drennan Specimen hook.
“A 20 inch hooklink is a good length. It gives the perch enough ‘rope’ to hang itself, but not enough to result in a deeply hooked fish,” Mick said.
When legering, Mick prefers to use lobworms on the hook: “I fish two halves, hooking them at the broken end, where the juices are escaping.
“The hookbait is then tipped off with red maggot to provide a splash of colour and movement,” he added.
“To reduce resistance I use a bottle top bite indicator. I’ve tried carp indicators, but even the lightest ones are too heavy, perch drop the bait.”
WHICH BAIT?

As we move from autumn to winter in the next few weeks, worms and livebaits both work well.
“I always use a halved worm, hooked at the broken end, as fish will home in on the scent.
“Don’t put more than two worms on the hook. Perch don’t mind a big bait, but worms can wriggle round and mask the hook,” Mick revealed.
Livebait wise, any small bait will do. A roach of around two or three inches is ideal.
“One bait that can be brilliant is a small perch,” said Mick. “Like pike, perch are highly cannibalistic. A small perch livebait often out fishes a roach 10 to 1.”
GET OUT THERE - NOW!
We are currently enjoying the golden age of perch fishing and with more commercial stillwaters reaching maturity, along with the perch that live in them, there’s never been a better time catch specimen perch.
With the last three British records all coming from small, intimate pools, they are a species that are enjoying a real renaissance, with more waters than ever capable of throwing up a monster.
Who knows, if you follow Mick’s advice it might be you adorning the front cover of Angling Times with a new record perch!

How to fish the feeder for bream in rivers

In 1956 a 15-year-old Dave Bosher, fishing on the Child Beale stretch of the River Thames, hooked his fi rst decent bream.
This fish started a love affair with river bream fishing that has continued for over 50 years.
Now, he’s back in the swim where it all began, an area that he has grown up near and fished in for the past half century.
Similar to all those years ago, the River Thames’ bream shoals are still here and they are here in abundance.
“I remember seeing shoals over 100-yards long and from bank to bank; literally hundreds of thousands of them,” said Dave.
“It’s a sight that I have never forgotten and it keeps drawing me back - year in, year out.” With a commendation this good, we just had to send the IYCF cameras along to the Child Beale stretch, located in Theale Park, near Pangbourne, Berkshire, for a masterclass in river bream fishing.
With five decades of know how and experience under his belt Dave had to be the perfect choice to take us through the finer points of catching big, slabsided River Thames bream…
THE FIGHT OF A RIVER BREAM

Punching his groundbait swimfeeder 60 yards across the river, it landed with pinpoint accuracy over the area he’d been baiting.
Moments later, a large splash on the surface revealed Dave had got the bream going - the fish were rolling over his bait.
“They’ve been having it all morning,” Dave revealed. “It took an hour to get the first bite, but since then it has been fish-after-fish.”
Placing the rod on his raised rod rest, Dave carefully tightened up to the feeder, placing a slight bend in the quivertip of his feeder rod.
A few minutes later he had a sharp line bite, no doubt caused by a big slad-sided bream turning in the water,. Within seconds the tip sprang back as a fish picked up his hookbait and dislodged the feeder.
A broad sweeping strike over his right shoulder saw Dave pick up the line and connect with a hefty fish. Standing up, to get a better angle to hold the bream out of the weedbeds littering the bottom, he deliberately played the fish towards the bank.
Unlike their flabby, lake-bound cousins that can fight a wet paper bag, river bream fight like tigers.
Once they turn their broad bodies into the flow, they use the current to test your tackle to the very edge of breaking point.
It took Dave over five minutes to bring the fish from where he was fishing, 60 yards out, to a position where he could successfully land the creature.
Once it was in the net we were able to appreciate why it had taken so long to land. Weighing just over 8lb, it was a magnificent specimen and testified how good river breaming can be.
PRE-BAITING
Being nomadic, pre-baiting an area the day before you fish can tip the scales in your favour. If you put a bed of bait down you should stop a shoal of bream in its tracks.
These fish are eating machines, spending their days searching for food. If you can give them a load of freebies, you should be able to hold them, as it gives the shoal the confidence to stay in the area.
“I pre-baited an area last night” explained Dave, “not only does this concentrate the shoal, but it helps to get their heads down feeding.”
Dave pre-baits with what he is planning to fish with. In this instance, it comprised four kilos of two-parts brown crumb, onepart Dynamite Baits Black Swim Stim groundbait and a kilo of 3mm pellets.
Although four-kilos isn’t a lot of pre-bait for a big shoal, Child Beale is a match fishing stretch, so it sees a lot of bait.
“I only want to put out enough bait to give the bream a taster of my groundbait mix. They will then be more receptive when it comes to the actual session.”
LOCATING THE SHOALS
One of the hardest things, with regard to river bream fishing, is trying to locate the shoal.
A nomadic species, they can roam for miles along a river, looking for food and stopping off in areas that offer consistent feeding opportunities.
This means the best place to start your bream quest isn’t even by the water. To short-cut the shoal search chat to local experts, such as a tackle dealer or bailiff, to see if you can pinpoint the rivers’ noted bream swims.
“The thing about this stretch is that bream are always here,” Dave said.
“Maybe there is a bloodworm bed out there that attracts them, but for whatever reason they’re always in the same area, year-after-year.
“My advice would be to ask around and once you have found a good area, remember it. Once you have found an area that they like, you have won half the battle.”
CASTING AND KEEPING THE SHOAL
As with stillwater feeder fishing, it is always best to line up the cast with a permanent far bank marker and cast to the line clip. This ensures you are accurately casting every feeder where you want it. Once you have the bream feeding in the area, cast slightly short of your prebaited area. Therefore, if you hook a fish you are not dragging it through the rest of the shoal, which will avoid spooking them. Dave’s final casting tip on rivers is DO NOT twitch the feeder back to empty it, as you would on a stillwater.
“By twitching the feeder back on this stretch you will only pull the hook into weed, ruining the presentation,” said Dave.

TACKLE
For his session on the Thames, Dave was using a Daiwa Connoisseur feeder rod combined with 6lb Berkley Trilene monofilament line.
Unlike many bream anglers, Dave never uses braid, preferring the stretch that mono gives.
“I find mono is more forgiving than braid,” he said.
“Once in the flow these fit river bream put up a tremendous scrap and as braid has no stretch, the fish can easily come off. On a river these fish aren’t shy and when you have to play a big fish through the flow, braid is a recipe for disaster,” he continued.
Six pound line may sound heavy for bream fishing, but when you are making around 100 casts in the day and playing 7lb-plus fish across the flow, it would be suicidal to go lower.
Correct quivertip choice is also vital when river breaming. On a stillwater, it is best to use a very light tip, such as a 1oz model, to register any shy bites. While you still need to fish as light a possible on a river, you must ‘beef’ things up a bit and match the strength of the tip to the strength of flow.
This involves a little trial and error, with Dave suggesting you carry a selection of different weighted tips.
“The best way to select a tip is to start light, around 2oz,” he explained.
“Then cast the empty feeder to where you will be fishing and put the rod on the rest to see how the tip reacts. If the strength of the river bends the tip right round, you are using too light a tip and it will offer too much resistance to a taking fish.
“If the tip remains arrow straight, then the tip is too heavy and will not show delicate bites. If the tip just bends slightly, it is spot on.
“This may sound time consuming, having to tackle down and re-tackle to change tips, but it is better to spend a few minutes getting things right now than spending the next few hours blanking.”
Dave’s choice of swimfeeder for the day was a Drennan Gripmesh. These cage style feeders are ideal for shallow water, but for fishing in deeper water Dave wraps PVC tape around them. This stops the groundbait exiting the feeder too quickly when it hits the water.
“The weight of these feeders is ideal for casting. The groundbait will add another ounce and this balances my set-up perfectly for casting to the area I want to fish,” Dave added.
Dave’s hooklink is 18 inches of 0.16mm (5lb 5oz) WB Clarke Match Team high-tech line.
Again, this might sound heavy, but the weed in the Thames can be very thick and a lighter hooklink will not give you the strength to land the fish. The hook is a strong size 14 Drennan Carbon Chub.

DAVE’S FAVOURITE HOOKBAITS
Four red maggots: This is Dave’s first hookbait choice and the bait he generally kicks off with. Four maggots are a little more selective, but if you start to get plagued with roach and perch swap to another bait.
Worms: Two small dendrobaena worms threaded up the line to leave the hook exposed is Dave’s unique way of presenting worms (below).
“It’s like a reverse hair-rig, where the bait is presented above the hook rather than below it as with a normal hair-rig set-up.”
Double caster: One of the all time classical bream hookbaits, casters are a bait that are loved by bream all over the country (above right).

HOW TO PUT THE GROUNDBAIT TO WORK
Plugging one end of his swimfeeder with groundbait, Dave filled it with casters and then plugging the other end,
He then cast five feeder loads of casters followed by five feederfuls of worms to lay a small bed of feed.
Retrieving the rig, Dave used some groundbait to sandwich casters inside his swimfeeder, threaded two worms onto the hook and cast towards the spot he’d prebaited the day before.
After an hour of recasting every 10 minutes, the bream moved into his swim and Dave started to get among the fish.
It was exciting fishing too, as every bream used the flow to test Dave’s tackle to the limit.
After spending a few hours watching Dave do battle with over 70lb of hardfighting bronzed bream, it became apparent that river ‘slabs’ are a very different beast to their lake-bound counterparts.
If you are the type of person that has always written off bream fishing as boring, lacklustre and dull, then you are definately missing a trick.
Maybe you should head down to your local river and have a few hours fun with these bronze-flanked beasts.
Let’s face it, these fabulous fish have kept Dave Bosher going back to the same swim for 50 years and you don’t get a much better commendation than that!
John Wilson on lure fishing

It's all about pulling off one great big confidence trick.
It is a sham, a fraud, a total con but it is also one of the most exhilarating ways to catch a fish.
If you have never tried it before, or only had a half-hearted dabble in the art of this trickery, then it’s time you became a fully fledged predatory con-man.
The fact is there’s never been a better time to go lure fishing. In simple terms lure fishing is the art of conning a predatory fish, like a pike or a perch, into thinking that a shaped and coloured lump of wood, plastic, metal or rubber is actually a piece of potential prey.
By winding this dummy bait through the water the angler’s job is to breathe ‘life’ into these fake baits and trigger the killer instinct imprinted into the predator’s DNA.
There’s no mystery or secret science. Lure fishing is a VERY simple method.
All you need are a few relatively cheap pieces of kit, a venue holding predatory fish and a willingness to explore the water!
That’s it. The rest you’ll pick up as you go along.
To convince you how easy it is to learn the basics we’ve employed a man who has spent decades catching fish on lures – John Wilson.
For the last 20 years John has filled our TV screens with his angling adventures and on many occasions he has used a lure to tempt unfeasibly large fish from the depths.
To pick his brains, and give you the information needed to acquire the skills you’ll need to catch predators, we spent a day with John on his local River Wensum in Norfolk.
On a cold winter’s day we learned that Wilson is an advocate of the ‘simple school’ of lure fishing…
TACKLING UP – TRAVELLING LIGHT

One of the main reasons why anglers are dubious about lure fishing is the bewildering range of baits available.
There are hundreds of different shapes, sizes, colours and designs of lure, the choice is daunting at first.
To make life easier the table below describes the seven main families of lures – plugs, spoons, spinners, jigs, spinner baits, rubbers and jerk baits.
Although they perform different tasks you don’t need dozens of each model when you start lure angling.
Think about it, when you first went fishing you probably stuck a worm or maggot on your hook to begin with. It’s the same with lure fishing.
A couple of basic plugs, a spoon and maybe a spinner or two will be enough to get you going.
Indeed as we trooped towards a low, clear river the most obvious thing about John’s approach was how little he was carrying.
In one hand he held a nine foot Masterline Wanderer lure rod teamed with one of his own Masterline Signature reels, in the other hand he clasped two tackle boxes carrying the lures and the wire traces needed to attach them to his mainline.
Mobility was vital: “One of the reasons I like lure fishing is that I’m always doing something,” John explained.
“Not only do I repeatedly cast and retrieve my lure, searching the swim for a fish, but I also keep moving along the river or round the lake looking for new spots. It’s an active and interesting way to fish.”
Once at the river it took John under a minute to set up his gear, such is the simplicity of lure fishing tackle.
The 30lb breaking strain Cortland Spectron braided line was threaded through the rings of the short nine foot rod before a 12 inch long Rapala ready-made wire trace was tied to the end.
Sporting a large clip on the end of the heavy duty wire it was easy for John to thread the plug onto the end of his line.
That was all there was to it - one rod, a reel loaded with braid, a ready-made wire trace and a lure. Job done.
1 PLUGS
A family of plastic or wooden lures, also known as ‘crankbaits’ because they work by being cranked in. Equipped with a diving vane under the chin, they wobble on a straight retrieve. The angle of the vane denotes how deep they dive. The shallower the vane angle, the deeper they’ll go. This is the Rapala X-Rap SXR-10 John used in this feature.

2 SPOONS
Polished metal shaped like the bowl of a desert spoon. Spoons spin slightly on the retrieve, glinting in the sun, so they mimick an injured fish. Best fished on a stop-start retrieve, their weight allows them to be fished at any depth. This is a Lucky Strike Lizard.

3 SPINNERS
Water pressure forces a polished metal ‘blade’ to revolve around a fixed barrel body on a slow, even retrieve. The blade flashes in sunlight and gives off vibrations attractive to predators. Spinners often have red ‘skirts’ around the treble hook to increase visual attraction. Best in shallow-to-medium water. Pictured is a Blue Fox Super Vibrax spinner.

4 JIGS
These realistic-looking, soft rubber imitation fi sh normally have a fl oppy tail but the main predatorattracting action is imparted by the angler ‘jigging’ the rod tip up and down to ‘bounce’ the lure across the bottom. The soft rubber tail is threaded onto a weighted jig head hook. The picture shows an Esox Cobra jig set.

5 SPINNERBAITS & BUCKTAILS
Have metal blades hanging from one side of a stainless steel wire frame, and long, fl owing rubber or plastic ‘tentacles’ surrounding a large single hook on the other. The blades spin and fl ash and the tentacles pulse and fl utter enticingly. Bucktails are spinners equipped with fl uorescent coloured, imitation deer hair tails. This lure is a Cordell spinnerbait.

6 RUBBERS
This is the generic term for a large family of soft rubber-bodied lures of all shapes and sizes weighing from a few grams up to 8 oz. The lures usually feature a long, pliable curly tail that fl utters on the retrieve. This lure is a Musky Innovations Bulldawg.

7 JERK BAITS
Are like plugs, but don’t have a diving vane. Weighing up to 10 oz and made from solid wood or plastic they have to be fi shed with specialist, short, heavy-duty rods. The action is imparted by jerking the rod tip while reeling in. This makes the lures slide and glide. Jerks can be fi shed at great depth or across the surface. This jerkbait is called a Strike Pro Belly Buster.

CHOOSING THE RIGHT LURE
John is a big believer in searching the water column with his lures. The location of prey fish and the temperature/colour of the water can effect where the pike will be lying up.
For example, in clear, cold winter conditions he believes the prey and predators tend to slink into deeper water or areas offering cover.
During our day most of his casts were made into deep water, or close to snaggy marginal areas that he hoped would provide the pike with ideal ambush points.
However, at other times of the year or if there is a mild spell in winter, the shallower areas or the upper layers of the water can be a better bet.
According to John (as the diagram, below, displays), you’ve got to search the water column to find the fish: “Lure anglers should think of the water as a layer cake of depths. I think about a swim in two feet bands and use lures that will work through the different depths.”
Clearly the choice of lure is vital in performing this task.
As our guide to different lure types reveals (see previous page), the design of a lure effects how it performs in the water – some float, some sink. Other lures have the depth they work at affected by the angle of the diving vane or the speed they are retrieved.
Thankfully some manufacturers realise how confusing the range of lures can be and that many newcomers can’t choose lures that work at the depths they require.
The new Rapala lures John carried were supplied in packs marked with details on the depth range they are designed to work at – a good move.

BRINGING THE LURE TO LIFE
Once you’ve picked a lure the skill comes from your ability to make a lump of metal or wood behave like a live fish.
Predators are instinctual hunters that are programmed to sense the movements of potential prey.
Watching John work his lure in the clear waters of the weir pool it was obvious he could make his Rapala X-Rap plug behave like a fish.
Casting into the pool John allowed the lure to fly unhindered through the air before he ‘feathered’ the line pouring off the spool with his index finger just before it hit the drink.

This made the lure land perfectly: “Feathering the line before the lure hits the water ensures its head points back at you and stops the treble hooks tangling round the wire trace.
“It also helps to pull the line tight so that you can feel if a pike hits the lure as it sinks to the bottom.”
Once the lure hit the river John allowed it to sink on a tight line (at approx. one foot per second), until it dropped to the bottom of the pool.
Now he brought the plug to life.
Pointing his rod almost directly at the lure John started to wind in the braided line.
Adopting a slow winding speed he began to crank the small, cigarshaped blue X-Rap towards him.
However, as he made his second and third casts of the day it became more obvious that he was varying the speed and pattern of his retrieve.
On some casts he turned the handle slowly on others he was a little faster. He also frequently stopped winding for a second, to halt the lure, then quickly made a few turns of the reel to make it jump forward.
Prey fish, like roach, don’t move at a constant pace – they dart, twitch and swim at different speeds.
By altering his retrieve John mimicked this behaviour and was teasing the pike to respond naturally: “I always retrieve my lures erratically,” he explained, “sometimes pike are aggressive and will chase a lure, other times they want it to slowly tease past them.”
This is one reason why braid is so essential, because it has virtually zero stretch you can feel the action of the lure and accurately alter its retrieve. The second reason for using braid didn’t take long to appear.
As he wound his lure through the water for the fourth time John felt a sharp ‘bang’ rocket through the braid. John’s face screwed up: “Ahhhhh… that was a pike snatching at the lure. With braid you aren’t watching for a bite you are feeling for it.”
Five minutes later he had more luck.
As he wound his plug along a deep water margin, teasing it past a raft of vegetation trailing into the water, a pike suddenly slammed into his lure.
With his rod pointing almost directly at the fish, the pike tugged hard against the rod and John struck. The nine foot rod whipped into a full curve as a pike simultaneously erupted on the surface.
“Lots of anglers angle the rod away from the lure and watch the tip for a bite, this is wrong,” said John bluntly. “The top will often bang when a fish hits the lure but the bend in the rod doesn’t help the hooks hit home. A straight rod, coupled to a tight braided line, is far better at slamming the hooks.”
With the braid transmitting every thrash of the hooked pike, John had great fun trying to stop the fish throwing the hooks or snagging the line in the marginal snags.
Weighing 5lb it wasn’t a monster but it was a spectacularly marked fish in prime condition. Size doesn’t matter: “I measure the success of a lure fishing in the number of hits I instigate. All I’m trying to do is fool the fish into taking an artificial – that’s the thrill of the ‘bang’ as they hit the lure.
“Sometimes it’s a big pike, sometimes it’s a ‘jack’. Sometimes the hooks stick, sometimes they don’t. Either way the success is that YOU have conned a pike into attacking your lure.”

KEEP MOBILE – KEEP SEARCHING

Over the next few hours of the morning John moved around the pool and along the river, casting into every likely area and regularly altering the pattern, colour or shape of his lure.
As he explained, changes to your lure and remaining mobile to target new areas can influence your results:
“If you are in the right place the first cast is often the one that’ll be taken. Concentrate hard when you cast a lure into a swim for the first time and make sure you are as accurate as possible – the first time a pike sees a lure is usually when it will take it.
“With each repeated cast with the same lure into the same swim the chances diminish that a pike will take it – they twig the lure isn’t a fish.
“Changing lures every few casts gives you a fresh chance of sparking a take from a wary pike, resting the swim also helps. But the most important thing is that you’ve got to stay mobile – keep trying new swims to locate pike you’ve not fished for.
“The more pike you can put a lure in front of for the first time the more chances you’ll get.”
THE ALLURE OF LURE FISHING!
During our session on the Wensum John’s ideas consistently tempted responses from the pike.
On eight occasions he teased them into following his lure or got them to snap at it, unfortunately he ‘bumped off’ four fish as he suffered ‘one of those days’ when all his luck was bad. “That’s the way it goes…” he laughed as we strolled across a Norfolk meadow bathed in weak winter sunshine.
“Some days you turn every take into a fish on the bank, on others you get lots of fish snatch at it without getting the hooks. The river is low, clear and cold today, perhaps the pike are just not feeding?
“But for me whether you catch many or not is relatively unimportant. A day spent wandering the banks, searching for fish and exploring the water with a lure, is far better than one sitting in the same place looking at motionless rods.
“You’re always active and there’s a real thrill of the ‘bang’ as a fish hits the lure. Managing to trick a pike into thinking a lure is a real fish is a very satisfying way to catch it.”
If you think about John’s sentiments on lure fishing it really is difficult to argue with him - it’s certainly no surprise that lure fishing is rapidly growing in popularity.
If you have a spirit of adventure and fancy wandering the banks with a rod in hand give lure fishing a try.
There’s a very good chance you’ll discover the appeal of performing a predatory confidence trick.

John Wilson on long trotting on rivers

One of the most productive and most rewarding ways to fish rivers is by long trotting with a float. It allows the angler to search the swim, to try out every nook and cranny in the hunt for roach, chub, barbel and dace.
Long trotting isn’t a method for the lazy angler though – it’s a testing technique that requires great float control, good watercraft skills, plenty of patience and the willingness to explore.
If you’re one of those anglers who wonders what fish lies at the end of each run and glide, then long trotting is for you, and here’s what you need and what to learn to master it…
TACKLE FOR LONG TROTTING
I believe the best reel for long trotting is definitely a good quality centrepin reel. You simply cannot beat the float control gained by using a well-produced centrepin and if you are intent on mastering this river technique, and you have enough spare cash, I would strongly suggest paying £100 or more on a quality ‘pin. You won’t be disappointed.
It’s false economy to pay for a cheaper centrepin as it just will not pay out line at the rate required, and this will mean your bait won’t be presented at the correct speed, therefore it will look unnatural, and therefore you won’t get as many bites.
So, if you cannot afford to buy a quality centrepin, opt to use your favourite fixed spool reel, with the bale arm open, and pay out line with your fingertips.
The perfect rod for long-trotting needs to have a flexible tip and a robust, powerful middle and butt section. This sort of action will ensure you pick up the line swiftly on the strike, and that you connect and manage to control the fish at distances up to 40 yards, against the current.
Nowadays mid-priced 13ft match/waggler rods are built to such a high standard that they are all ideal for long trotting, but if you want the best control opt to use a 14 or 15ft rod. The extra couple of feet will provide that little bit of extra leverage upon the strike, when controlling hooked fish, and when ‘mending’ the mainline.

TERMINAL TACKLE FOR LONG TROTTING
My mainline will depend upon the size of fish that I’m likely to encounter. If the river’s full of roach, dace and small chub then 2.5-3lb mainline will suffice. If there are barbel and big chub present, then I’ll step up to 4lb.
On thing to remember though, is if you are going to use a centrepin reel for bigger river species, don’t overfill the drum. A large fish will cause the line to bed in on the drum, making trotting afterwards really quite difficult, so you’ll only need 150-200 yards of line.
Regarding my hooklength – I much prefer to tie my hook direct to my mainline whenever possible, but there are times when a finer hooklength is needed to trick roach and dace into taking the bait. This is when I’ll use 1.25 – 1.5lb breaking strain hooklength line, joined to the mainline using a four-turn water knot.

FLOATS FOR LONG TROTTING
The main aim of long trotting is to present a bait so that it trundles along the river bed, at the same speed as the current. This means the angler needs to pick a float that will allow this.
The float has to have enough weighting so that the bait is permanently pulled down to the river bed, regardless of the water speed and direction. Lightweight stick floats are far from ideal for a couple of reasons. Firstly the small sight tips will be near impossible to see at distance, and secondly the lightweight shotting required will make the bait jump off the bottom and dance around unnaturally whenever the float is stopped, held back or mended to alter its direction.
I prefer to use heavier floats for this kind of fishing: Chubbers, Loafers, balsa trotters or even Crowquill Avon floats are perfect, because they are best shot with a bulk of BBs or even SSGs positioned 1ft from the hook.
This heavy bulk of shot ensures that the bait is forced down to the bottom at all times, regardless of the strength of the flow.
These floats are attached to the mainline using a couple of float bands – one positioned underneath the sight tip, and one around the base of the float.

TIPS FOR LONG TROTTING
If your float requires 3SSG shot, for example, use six AA shot instead, all grouped together. It’s the same weight, but I have found that a longer group of smaller shots rides over shallower weedy or gravel banks far easier than a few larger shot.
If you notice a particular area of the river where the float continues to be sucked under as it becomes snagged upon weed or debris, don’t suddenly alter the depth of the rig to compensate. This will give your rig the correct depth for that little area, but it will be too shallow for the rest of the swim.
The best solution is to hold the rig back hard as soon as it approaches the snag. This will force the bait to rise up in the water and skip over the snag. Once it’s over the area that has been causing problems, continue running the float through the swim, as before.
During biteless periods, try holding your float back occasionally to make the bait speed up and lift off the bottom. During a free trot through the swim, the float will be in front of the bait, but as soon as you apply finger pressure to the line and stop the float, the bait will speed up, pass the float and lift off the bottom. Although unnatural, this can often trigger chub, dace and grayling into snapping at the bait.
John Wilson’s guide to surface floater fishing for carp

Of all the many different fishing techniques, surface controller float fishing and freelining for the likes of carp, chub and even orfe offers the most challenging and rewarding sport.
The amount of different tricks you can try to tempt a bite are endless, and you have to be on your toes when you’re trying to tempt a specimen carp into sucking in the bait with your hook attached.
Here’s a brief guide to what you need to surface fish, the baits you ought to try and how to get the most from this devastating summer technique…
TACKLE FOR SURFACE FISHING
The rod that you need for fishing baits on the surface with depend upon the distance you are fishing. If you are freelining right under the rod tip or at very short range then a through action rod will be best that will absorb the initial lunge of the fish when using such a short line between the rod tip and the hook.
An Avon rod would be perfect for short range freelining as they tend to bend right through to the butt. These rods, in the 1.25lb test curve bracket are absolutely perfect for smaller carp, up to the 10lb bracket, but if you are intent on hitting into larger fish then you’ll need to step up a little. There are Avon rods that have 1.75 and even 2lb test curves – those are better suited to bigger fish taken at short range.
If you are targeting carp on the surface well out in the middle of the lake, opt for a general purpose 2.5lb test curve carp rod. That will give you the flexibility in the tip section to launch the controller float the distance required, but there will be enough backbone power in the middle and butt section of the rod to drive the hook home and play the fish accordingly.
The reels for surface fishing needn’t be anything special… a reliable and powerful; fixed spool reel will suffice so long as it is loaded up to the brim with an appropriate strength of mono mainline. I would suggest 6lb mainline for smaller carp, and 10-12lb for specimens.

FLOATS FOR SURFACE FISHING
Beyond distances of around 10 yards you’ll need to use a float of some kind to give you the additional weight required to be able to cast your lightweight floating bait. There are many different surface fishing floats available – often called controller floats.
Although there are many different versions on the market, there are two main types of surface float – self-cocking controller floats and bubble floats. They are both as effective as each other. There are also homemade surface floats too, consisting of simple lengths of varnished dowel or peacock quill, that lie flat on the water. I call these flat float controllers.
FLAT FLOAT CONTROLLERS
These homemade floats are easy to create and when used they resemble twigs drifting on the surface. They make very little disturbance when they are cast and they are fairly well camouflaged – ideal for surface fishing. They do have their limitations though – because they are so light they cannot be cast very far and are therefore only useful for close range work.
They can be made from peacock quill, reed stems, bamboo strips or, better still, varnished 1/3 inch hardwood dowel – nice and cheap. I simply cut off various lengths, sand down the edges so they won’t damage the mainline and varnish them. They are locked onto the line using a couple of strips of thick silicone tubing and positioned 2-6ft away from the hook.
CONTROLLER FLOATS
These large and self-cocking floats are ideal for distances beyond 10 yards – some can quite easily be cast 50 yards if needs be.

My own Tenpin controller was developed after I tried to tempt a few carp basking some 35 yards out on my own lake, under some overhanging willows. I couldn’t quite get the distance needed to place a bait close to the carp, so after a little experimentation the very first self-cocking, extremely buoyant Tenpin controller was created.
There are many other similar style of controller floats available, but they all do one thing – they give you enough weight and control over your rig so you can present it right where you need it.
These floats need locking onto the mainline, 2-6ft from the hook, in one of three ways. Firstly I thread the line through the top-most eye of the controller, following that with a bead, then either use a swivel as a link between mainline and hooklength, or use a powergum stopknot, or simply tie the hooklength to the mainline using a four-turn water knot, but leave the tag ends long so the float cannot travel down the line to the hook.
BUBBLE FLOATS
These clear, plastic floats are about the size of a golf ball or chicken’s egg. They have two plugs that allow water to enter the float to give it some casting weight. You simply pull out the two plugs, immerse the float and allow water to pour in until you reach the desired level. Obviously you’ll need to leave some air inside the float so that ir remains afloat. Now insert the plugs again and you’re ready to fish.
These floats are attached to the line in one of two ways. The versions having two eyes are simply threaded onto the mainline and locked in place with a split shot or a swivel. The more advanced semi-fixed styles are locked in place by slipping the silicone sleeve over the mainline/hooklength swivel.
BAITS FOR SURFACE FISHING
There’s quite a few to choose from here – some are great as feed, others are better as hookbaits, while some can be used for both.

Good old Chum Mixer dog biscuits, bread and pop-up boilies are by far the most commonly used surface fishing baits. They can all be used as either feed or hookbait, and countless carp have been banked because of these three baits.
Other less common baits that make for great feed are cat biscuits, Rice Crispies, dry expander pellets, Corn Flakes and even popcorn. Marshmallows have been known to tempt a few carp off the top too, as have cork balls. They all have their place in the surface angler’s armoury because on their day they can all be useful.
HOOKING SURFACE BAITS
Because most surface baits are hard pellet-like baits, they can prove quite awkward to hook. Bread crust and marshmallows, on the other hand, are really easy – you simply push the hook through the crust or the outer skin and work it back through. Other harder baits have to be mounted differently…
Hair-rigging pop-up boilies is the best way, but you’ll need a good quality baiting needle to pass through the often rock hard boilies. When complete the bait should be as close to the hook as possible.
Dog biscuits can be hair-rigged also, but you will need to drill the baits first so you can pass your baiting needle through them. You can do that at home using a standard 2 or 3mm drill bit, or on the bank with a nut drill, available from most good tackle shops.
The easiest and just as effective way to hook Chum Mixers and any other large floating pellet is to use a bait band. These simply thread onto the shank or bend of your hook (it’s your choice as to where you want to position the bait) and then the bait is slipped inside the bait band. The band will offer enough grip to hold onto the bait through many casts, and there’s even a high chance that the bait band will still be attached to the hook after you’ve landed a fish.