
How to find the quality fish with Bob Nudd
Even though I’m a small-fish man at heart, there’s still nothing to match the excitement of running a float down a river swim and striking into something substantially bigger on the other end!
Be it a perch, chub, bream or tench, targeting quality fish on rivers is a totally different challenge to setting your stall out for a bag of small roach.
Yet the tactics, baits and feeding are surprisingly simple, and the rewards can be relatively quick in coming.

This is especially true when fishing smaller, more intimate, rivers where there’s less water to play with. My local Old River Nene in March town centre is one such example, being only around 13m or 14m wide with an average depth of 5ft down the middle.
Now, the Old Nene may be best known for its winter roach sport and it may not look that much cop at first glance – but in October, it’s home to some big fish as well, especially quality rudd, skimmers, eels, perch and even the chance of a tench or three – fish that seem to vanish when the cold weather arrives.
But that’s not for a good few weeks yet, so it really is time now to go there with better quality fish in mind. I’d say that’s true of many smaller rivers.
A bit of colour in the water will also help, but even in clear water there’s still every chance of a few fish that will pull your elastic out of the pole.
My approach for these fish revolves around fishing the pole at a comfortable distance and using groundbait, chopped worm and casters, three items that all fish love and which should avoid the smaller species that the Old Nene is also full of.
To put it into practice, I’ve come to the scout hut section of the river where there’s a good chance of some skimmers and one or two lovely golden rudd.
Move the rig
A lot of better fish are caught by holding the rig dead still over the feed, but I don’t do this all of the time.
Instead, the float will be inched through the peg slowly to cover a good few yards of the swim, just to see if the fish prefer a moving bait or are sat just downstream of the feed.
Having around 2ft of line between pole and float helps here, but in stronger flows this would be lengthened to as much as 5ft to let me cover more of the peg. In terms of plumbing up, I set the float to be fished three inches overdepth.

The session
Kicking off on double maggot, it doesn’t hit the bottom as a string of rudd hold the float up and swim off! Changing to caster and redworm is no better, and even half a dendra results in the same, but this is normal just after feeding. The fish are pulled in and go a little mad, swimming about everywhere.
After an hour and plenty of rudd, things settle and the worm gets to the bottom. Chunky perch are first to arrive, and a couple of rudd getting on for 1lb also get in on the act. With few small fish about, I can now revert to baits more suited to skimmers. Double caster catches a few rudd-bream hybrids, quality roach and hand-sized skimmers.
After two hours it’s time for a top-up, and thankfully the small fish don’t reappear. After a few perch something bigger is on, but I get the sneaking suspicion it’s an eel. At 2lb it puts up a right old scrap. Ten minutes later I hook another big fish, again on caster, but it snags me and the hook pulls. I have no idea what it was!
From this point on, it’s a case of running the float through – this seems best on the day – topping up with another ball when the small fish turn up and taking what I can. None of those bream or skimmers show, but with rudd, hybrids, roach, perch and small skimmers coming one a chuck, it’s a lovely day’s fishing. The beauty of it is that you never know if that next run through is going to produce a monster!
Hookbaits
This is a case of trial and error, starting bait always being two fluoro pink maggots. If small fish are a problem, it’s on to double caster and then two halves of redworm.
Failing all that, it’s a 2ins-long piece of dendrobaena worm. As a rule, dendras seem to catch more perch, with the rudd and skimmers preferring maggots or casters, so I try to spend as much time as I can fishing the latter.
Big rigs
Because I could hook a tench or even a carp on this river, tackle must be sensible. I’ll fish 0.16mm Browning Hybrid Power mono mainline to a 12ins hooklink of the same line but in 0.14mm diameter. Hook is a size 14 Kamasan B512 to an orange grade Browning Microbore hollow elastic that works out at around a No8 in old money.
With this gear, I’m confident of landing anything I hook.
Floats also need to be big, not only to deal with the flow but also to get around small fish that with a light pattern can easily hold the bait up as it falls. For me, it’s a 1.5g pear-shaped pattern that’s been designed for me by DT Floats. By using an olivette and a couple of No9 droppers relatively close to the hook I can be sure that the bait will go straight to the bottom. If it doesn’t, I simply push the olivette and shot together to create one bulk.
Pick the right line
The first job is to decide where to fish. At March, the river is typical in that there are two shallow shelves close in and right across that slope down to a deep central channel used by boats. This is where I’d expect the better fish to be and the good news is that it only takes around 7m or 8m of pole to be fishing here.
It’s true that this central channel can attract rubbish, branches and weed, so it is well worth running a rig through the swim before you do anything else to check exactly what’s waiting under the surface.
With some careful plumbing up, though, you will find a clear spot to run over.

Feeding
This involves groundbait, worms and casters which will appeal to a range of species with less chance of pulling in small perch or eels, which worm and caster fed on its own can. I’ll cup three big balls in at the start, making sure to pack them with as much worm and caster as I can.
Groundbait mix is 50/50 Van Den Eynde Black Turbo and Gold Pro Bream, to which I add some yellow Sinking Crumbs to make them stand out on the bottom.
This is my go-to mix for skimmers and better fish in Ireland and it works just as well back home. I mix this the night before to make it relatively inactive and on the dry side to take into account the moisture from the worms and casters.
To form three balls I simply cup an amount in both hands three times and transfer it into another tub. I then put in a good handful of casters and a full pole cup of chopped dendra worms that are cut to a fine texture as opposed to large chunks.
I chop the worms in the cup, as I find it much easier than using a bait tub. The lot is mixed together and each ball potted in using a far-bank marker on a point that is just downstream of my fishing position.

Topping Up
Another ball of groundbait and worm goes in when the bites fade or small fish begin to dominate, but one ball is ample.
Feed any more and you run the risk of putting the quality fish off or pulling in too many bits.
This is also why I don’t loosefeed over the top, as it would only encourage small rudd, roach and bleak to move in.

Match fishing tips | Adapt your feed to catch more carp
Those colder mornings and darker evenings we’re now starting to see will have been felt by the fish we’re after each weekend.

But while you can scale down hooks and lines and fish different parts of your swim, if you don’t get your feeding right there’s little chance of a steady day’s fishing in the first place.
I’m not saying that you need to go into full winter mode yet, but it pays to start trimming back on how much bait you are feeding at the start of a session and during it.
Big potting, for example, using a large pole cup on your cupping kit, begins to lose the effectiveness it enjoyed through the summer, so replace it with a small pot on the pole-tip to regulate how much bait is going in. What you feed is also worth thinking about. Meat and corn can still work but the fish may be far more responsive to micro pellets or dead maggots.
There’s a lot to take in and, of course, no two days are quite the same... but as a rule in October, I do begin to make changes regarding how I feed for commercial fishery carp and F1s in the margins…
How much feed and when to feed it?
For carp I would use the larger Matrix Flexi Pot, which takes around 75ml of bait. This is filled to the top each time. I feed all this in one go to form a precise pile of feed on the bottom over which I can present my rig.
However, I don’t feed like a robot, in other words every time I drop in. I prefer to introduce bait only when I think that the pile of pellets already fed has been disturbed by a feeding fish, when I need to put more in to recreate that homing-in point for the carp.
Feed – small or large?
It’s micro pellets every time, perhaps with a little bit of groundbait on the odd occasion on venues that have a track record of responding to groundbait.
My favourite micro pellets are Spotted Fin Go2. I soak these so they take on as much water as they can, as this ensures that every single one will sink quickly.

The difference between carp and F1s
There’s one change that I make for these two species, and that’s the size of Flexi Pot used. For F1s, I drop down to the 25ml pot to introduce much less feed than for ‘proper’ carp.
Open-water fishing
Faced with deeper water well away from the bank, pots aren’t so important and I’ll often pick up a catapult. The thinking is that there are more fish to catch at this range and they’ll be on the bottom, so I fire in 4mm or 6mm pellets depending on the size of fish I’m after.
There’s no hard-and-fast rule to this, but I’ll only feed if I am trying to attract carp into the swim or once I have hooked a fish, never directly over the top of a rig that’s in the water and fishing.
Barbel Fishing Tips | How to catch more barbel on PVA bags
There are some occasions while river fishing for chub and barbel when you need to switch tactics from a feeder to a bomb, especially at this time of year, when the fish have had a lot of feeders thrown at them.
Right now it can really pay to go down the bomb and PVA bag route.
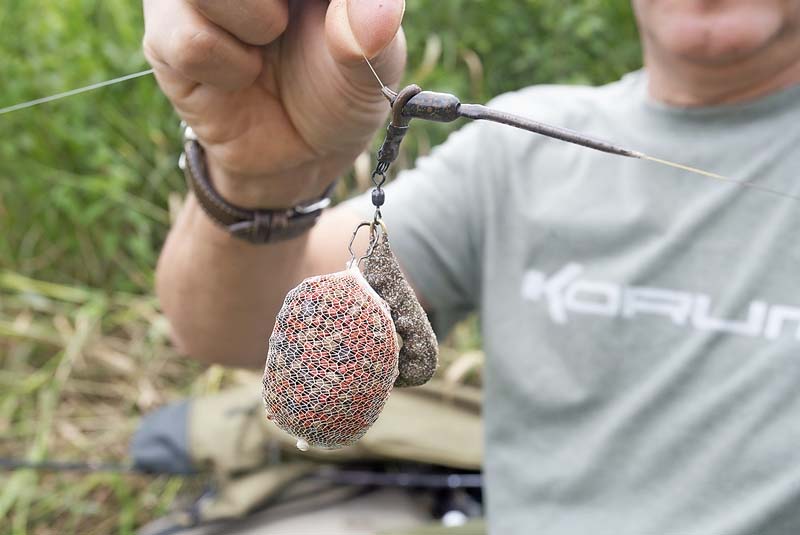
Mesh PVA bags are a great way of introducing free offerings close to your hookbait, and right now I’m using dry baits such as maggots, pellets or chopped boilies.
Here are a few tricks which will help you with your presentations…
Make knots small
Before making your first bag, tie a knot in the end of the mesh and trim it neatly with sharp scissors. This minimises the residue left when the PVA melts in contact with water.
Use a loader
A tight bag should break down quickly in water. So use a PVA mesh on a loading tube. Compress the bait, twist the PVA tightly, tie an overhand knot and tighten it down.
Don’t go too big
Big bags can be unwieldy. I like the finished bag to be not much bigger than a golf ball.
Save mesh
Before cutting your bag off the length of PVA, tie a second overhand knot close to the knot you tied to seal the bag – a 5mm gap is ideal (see picture). This minimises waste, and the knot will be a starting point for your next bag.

Hooking bags
Attaching the bag directly to the hook is the best option when fishing at longer range and using longer hooklengths, as the bag helps to prevent tangles.
If you are hair-rigging a bait, the easiest way is to nick the hook under a few strands of mesh.
Make sure the hook and associated bait are dry first or the bag will melt and fall off.
Clip a bag on
Alternatively, use a carp clip link – I use Avid PVA Links – to attach your PVA bag to the lead end of your rig. The knot on the PVA bag slides into a narrow groove on the clip, holding it in place on the cast.
I prefer this way if I’m fishing in faster or deeper water, where the lead helps to get the bag down to the bottom quicker.
Match Fishing Tips | Put the pole away and catch more on your rod!
It’s all too easy to tie yourself down to the pole on commercials.
It can be a supremely effective tactic on these fish-packed waters, but how about a day on waggler and feeder instead? You might be surprised at the results!
Kieron Rich loves catching carp on these two methods, and over the years he has perfected a way that allows him to get the most from his swim while leaving the pole in the bag.

Feeder first
At the start of any session it’s best to target an area of the swim where the fish naturally live.
An obvious spot is tight to an island, and Kieron believes this is your best bet for a steady start.
“Islands usually have plenty of vegetation that the fish feel confident feeding close to. Even if they spook after you’ve hooked one, they’ll never be far away. They might not be the biggest stamp carp at the start but they’ll keep you busy while you wait for the waggler line to spring into life.
“A small cage feeder packed with micro pellets and baited with a 4mm pellet is ideal. All the time I’ll be priming the waggler line by catapulting in half-a-dozen 8mm pellets every minute for at least an hour.”
Explore the layers
“Even after two hours of feeding pellets into the swim, you might not see any signs of fish in the peg. But more often than not they are simply sat too deep to break the surface with alluring swirls.
“That’s why I always plumb the depth at the start of the session and, when it comes to fishing the spot, I always start on the bottom.
“If I don’t get any bites within a few minutes then it is back to the feeder, and I will continue feeding.If I miss bites, however, that means the fish are sat above my hookbait and I need to shallow up.
“I also steer away from using a big waggler. My Middy Crystal Insert creates minimal disturbance, and any fish feeding in the zone will continue to do so. On many fisheries, the days of using big ‘splasher’ wagglers are long gone.
“Oh, and these days bites on the waggler can be extremely subtle, so make sure you strike at even the tiniest of dips.”

Carp Fishing Tips | Top ten tips for stalking big carp!
After a spring and summer of having rigs, marker floats and spods thrown at them from every conceivable angle, carp in day-ticket waters can become wary of visiting the lake’s main features and open water areas favoured by anglers.
One area where they feel far safer is in the margins, especially if these also provide some form of cover, yet very few anglers ever even consider fishing in ‘the edge’. Successful stalking isn’t rocket science, so follow our top tips and you could transform your autumn catches…
1) Bait and rotate
Identify several marginal spots you like the look of and bait them all lightly before visiting them in rotation. It may take the fish several hours to find the traps you’ve set, but before too long you’ll be able to rule out some and concentrate on others. The carp will already have their favoured margin spots – your job is to find them.

2) Cut out the glare
In order to be able to gauge the depth, the presence of snags and the presence of carp, you’ll need a decent pair of polarising sunglasses - arguably the most important piece of kit for a margin angler. They take the glare off the surface and will help you see what the carp are up to in the swim, which direction they enter and leave it from, and how they are reacting to rigs and any bait introduced.

3) Watch the wind
It helps to know from which direction the wind will hit the banks of your lake, pushing the carp towards them. Most modern smartphones come with built-in compasses, so if you have one, use it! Carp will often follow a fresh wind, and so should you. Fish living in clear pits find areas of freshly-coloured water irresistible.
4) Keep quiet!
There’s little point prepping spots and then blundering along the bank, scaring the fish into the next county. You have to keep noise to an absolute minimum. Carp can feel vibrations caused by a heavy footfall, so creep about as much as possible. Whenever you can, wear dull clothing… and definitely no white T-shirts!

5) Pin it down
When targeting carp in clear, shallow water it’s vital to pin your end tackle down so it doesn’t spook wary carp feeding in the margins. Try placing your rig in a ‘dummy margin’ and see what aspects of it catch your eye the most. If it stands out to you, it’ll be obvious to pressured carp too.
Use Tungsten droppers or putty at intervals to keep both the hooklink and the few feet of line above the rig nailed firmly to the deck.

6) Lower your rigs gently
You’d be surprised at the noise a lead makes when thudding down on the deck, especially if it’s a hard substrate. If you can, lower your rigs into position rather than flicking them out. By doing this it’s also possible to pick out individual carp as they feed right at your feet.
7) Mixed offerings
Mix up the types and sizes of bait you use to prime spots in the edge. This keeps the carp guessing and gives you loads of hookbait options. Hemp, corn, pellets, tiger nuts and boilies (chopped and whole) are all good, but why not try also meat, paste or chunks of Peperami, introduced by hand or lowered in using a baiting spoon?

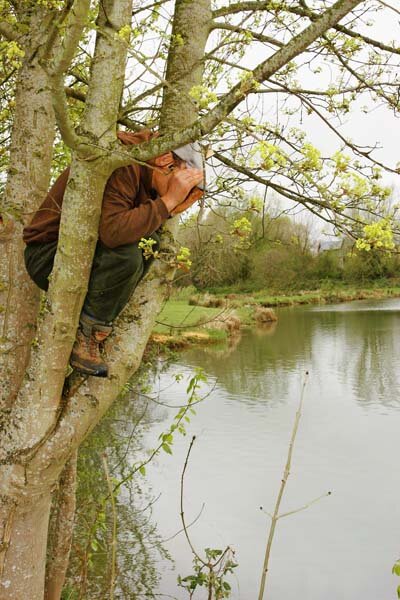
8) Gain elevation
If fishery rules allow and you’re confident doing so, climbing trees around the periphery of a lake will massively improve your view of proceedings and allow you to gauge just how many fish are visiting your spots… and how big they are. This can also help you make choices about the best spots on which to position your hookbaits.
9) Use a safe, solid rig
This is not the time to be messing about with fancy rigs and presentations. Inline leads are tailor-made for stalking, and offer the best hooking mechanics. If you set it up ‘drop-off style’ the lead will also be ejected on the take, leaving you in direct contact with the fish, meaning less chance of it snagging up during the fight.
10) Seek sanctuary
Carp are fond of cover, but fishing for them alongside snags or directly under overhangs is a recipe for disaster, and bad angling practice. Instead, pick a spot to bait up that is at least a few yards away from the obstruction so that you have more than a fighting chance of extracting any fish that you hook.
Match Fishing Bait | How to colour your micro pellets to catch more carp
For ages anglers have been using plain old pellets straight out of the bag, but as a match angler I’m always interested in ways to make what I’m feeding stand out from the crowd.

Changing hookbaits is one way to do this and, on the feeder, so is casting further than everyone else – but most important of all is altering the feed that is going into the swim. Carp will see plain brown pellets a lot, but give them something yellow or smelling completely different and it all adds up to a distinct advantage.
Micro pellets are such a versatile feed that you can change their colour or smell, add groundbait to them or coat them in a strong-smelling sweet gel.
By having something different to try with them on each cast, I can soon find what’s most appealing to the fish, and that adds up to more carp in the net!
Adding groundbait
Some anglers never use groundbait, but I’ll break out a bag of Ringer Baits Green if my swim is deep and I want to make sure the feed is getting to the bottom without breaking up prematurely.
Adding groundbait will also make the feeder payload break down more slowly. This can be useful when you are not getting bites straight away.
A 50/50 split of pellets and groundbait is about right, and I’ll mix the crumb to a normal consistency – too dry and it will take the moisture out of the pellets and not allow you to make a Method ball properly.
Boilie Crush
This is a new addition to my fishing – finely ground boilies that work really well as an additive on waters that see lots of boilies. I’ve also found it brilliant on lakes that don’t see boilies!
It’s a good way of adding colour to your feed, with the yellow being good for bream and the orange for carp and F1s when using Orange Wafters. Two caps of crush is about right for a kilo of pellets, adding them once the micros are fully soaked.
Impact pellets
Sometimes even colouring micros and adding some Crush won’t be enough, especially in really coloured water. This is where a smear of Chocolate Orange Gel Spray comes into play.
Once the feeder is loaded I’ll give it one squirt to add flavour and smell for the fish to home in one. Don’t go mad – it’s possible to put too much scent into the water.
How to add colour to micro pellets
colouring micros can make a big difference if you think fish are struggling to find them on the lakebed. In heavily coloured and clear water alike, coloured pellets stand out so much more than plain ones. Colouring micros is very easy to do on the bank – I like to match the hookbait colour to what’s around the feeder – so for yellow pellets, that would be a yellow Wafter. Here’s how to colour micros…
1) Dampen the micros, pop them in a plastic bag and add a capful of Ringer Baits Yellow, enough for half-a-kilo of pellets.

2) Grip the bag at the top and give the contents a good shake to spread the liquid evenly and fully through the micros.

3) Leave the bag for 10 minutes until the colour is absorbed. Note the difference between plain (far left) and coloured pellets.

River fishing tips | Bag up on roach with these great tactics
We’re just over 10 weeks into the 2019/20 season and on many of our rivers, you would be forgiven for thinking that there weren’t any roach in many of the stretches.
All that has changed, though, in the past week or two.
Thankfully they’re now feeding on our baits again! Rivers like the Trent are on fire at present so this week we’re looking at how to go about getting the best possible weight of roach from the various swims that you are likely to encounter from now until the autumn is well into its stride.

Favourite Baits
Roach love hemp, so there’s always a can or two of Bait Tech’s Super Seed in my bait bag along with half-a-pint to a pint of tares that I cook myself. If you struggle to do this, try my way.
I measure out a pint of dry tares into each of two large glass casserole dishes. I then fill the dishes to within an inch of the top with warm tap water. Don’t put more in, as they will swell a lot over the next 24 hours. Once they are soaked, add a teaspoon of bicarb and the same of sugar to each bowl and give the tares a stir.
Next, put them in the oven on 180°C for about 40 minutes. From this point, I spoon out a few tares every five minutes or so and do a ‘squash test’. You want a seed that is firm but which compresses rather than splits. Over the next 15 minutes, you will find that the tares are perfect. Now’s the time to carefully take them out of the oven.
Drain the water off, sprinkle two teaspoons of sugar over them and cover with kitchen roll. I put them in my bait fridge to cool down, then bag them up in half-pints and freeze. I just take a bag or two to each session and let them thaw out in the car on the way. Casters, maggots, pinkies and, on some rivers, breadpunch complete the bait line-up...

Loosefeeding
The best way to tempt roach has always been on a ‘little and often’ basis. Keep small amounts of feed going in all the while and you will soon get them interested if they in front of you. Hempseed is a key feed at this time of the year so always use it, regardless of what you are putting on the hook.
Waggler Rigs
My favourite float patterns for this time of the year are Thin Insert and Thick Insert wagglers. These are shotted with most of the weight either side of the float and a No8 shot down the line for every 2ft of depth. An 8ft-deep swim would only require four No8 shot with the bottom one on top of the 30cm hooklength.
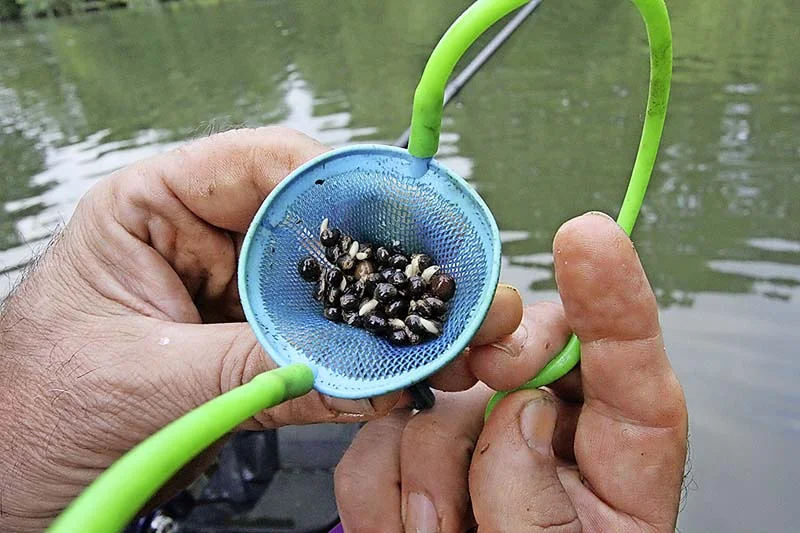
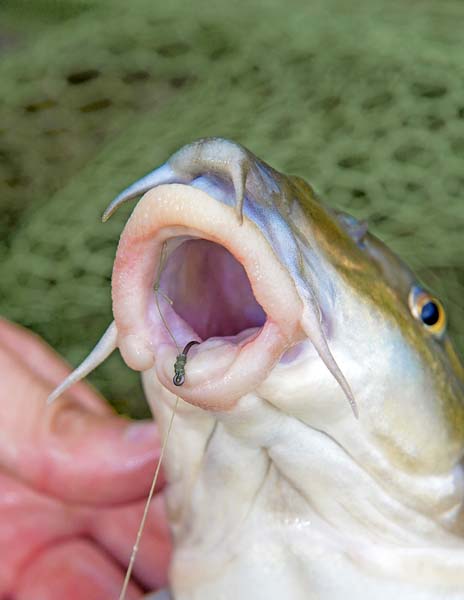
Pellet surprise
Most people wouldn’t expect to see this picture in a feature about roach fishing, but over the past few season anglers on many rivers have been catching some very big roach on banded or lassoed 4mm and 6mm halibut pellets.
Use 3mm and 4mm feed in a small feeder and a long tail and your next bite could be from a barbel… or a 2lb-plus roach!

Pole Rigs
DH23 (up to 2g) and DH17 (up to 3g) patterns cover virtually all my roach fishing on the pole at this time of year. The smaller sizes of both up to 1g are shotted with strung-out No8 shot. For the 1.5g size and upwards I use an olivette and three No9 droppers.
Hooks & Hooklengths
Pro Rig hooklengths of 0.08mm, 0.10mm and 0.12mm, depending on how well the fish are feeding. These are tied to fine wire hooks from size 20 to size 16.

Groundbait
On some venues it can pay to ball in several big balls of groundbait at the start and then loosefeed over the top.
My favourite mix for this is a bag of Bait Tech Pro Natural Original and a small amount of molehill soil. Into the mix I add casters, hemp and a few pinkies.

Top & Bottom rigs
There are so many variable float choices for roach fishing. For smooth-flowing water, a stick float with strung-out shots takes some beating, and I use the No3 Heavy Base model in sizes from 3No4 to 8No4. These are shotted with strung-out No8 and No9 shot in the smaller sizes and No6 shot for the three biggest floats in the range.
It’s always worth considering a bulk rig if you’ve got some depth, and for 8ft of water I’d use 2g or 3g No4 or No5 Bolo floats.
These are shotted with an olivette and one or two No8 droppers.
Location
Roach are likely to turn up just about anywhere, but for big weights at this time of year I’ve found the best depths to fish at are between 4ft and 8ft, running over fine gravel with a decent pace to the river.
Deep swims that hardly move are best avoided until the winter months, when there is more water in our rivers.
Reel lines & rig lines
The best way to tempt a shoal of roach into taking your hookbait is to fish fine. I use 3lb (0.14mm) and 4lb (0.16mm) Pro Match reel lines, and for pole rigs I use 0.12mm or 0.14mm Pro Rig.
Specimen fishing tips | Beat the weed with this rig
This ‘weed beater’ tench rig with its popped up hookbait is tangle-free, as streamlined, inline feeders are less prone than most to getting caught up in weed.
The Korum ICS feeders I use are 45g, weight-forward designs. The position of the weight helps with the bolt effect of the rig so fish will hook themselves. Should the mainline break, the fish can easily pull free of the feeder.
Unlike some anglers, I don’t use tubing on the rig as I’ve found that my bare, 12lb mainline cuts through the weed much more effectively.
I use live maggots in the feeder – generally red with a few whites mixed in – as they will crawl out and into the weed, helping to keep tench grubbing around in the swim.

Use a short hooklink
The business end of my rig features a popped-up hookbait, and I’ve found buoyant baits are best presented using a fine braided hooklink. I tie this to a light but strong size 10 or 12 Korum Specimen hook.
Tench can eject small baits more easily than larger ones, and a short hooklink of 3ins-4ins definitely converts most pick-ups into unmissable runs.
Make my pop-up hookbait
Rig foam and fake maggots lift the hooklink vertically. I will try two or three red ones on one rod and a combination of red and fluoro grubs on the other.
Red and either yellow or orange often get more bites early on in a session but tench soon wise up to them, so don’t be afraid to change.

Carp fishing tips | How to get the best from a "quick overnighter"
A lot of my fishing is session-based, but in the warmer months, with so few hours of darkness and often stiflingly warm daytimes, I often fish shorter sessions.
In summer the bite windows are narrow, and you can often waste many hours waiting for action while the carp rest lazily in the weedbeds. So, there are a number of things I always do to try to maximise my time on the bank...
Be ready for bite time
Quite often bite time in summer and early autumn can be at first light, so I always aim to be fishing in this optimum period. It’s all down to preparation, and that includes making sure your kit is well organised. The lead bag is stocked up, my rigs are ready to go (hookpoints having been checked) and attached to my leaders, and all I need to do is put the rod together, attach a bait and cast out.

Pare down and prepareI
carry just the bare necessities with me on overnighters, so that moving around the lake isn’t a chore. A small pouch houses my terminal tackle, a bucket holds my bait, and even the food I take is ‘stripped back’.
If I know I am going to do a couple of overnighters during the week, I will often make up my food on the Sunday and freeze it in tubs, before taking it out of the freezer on the morning that I go. All I have to grab is a pint of fresh milk and I am away.
I also carry porridge pots in the van, which are super-easy and quick to make and don’t go off.

Make a prior visit
Ideally, I like to have done my homework on the lake I am fishing – walking round with a leading rod, finding spots in a few swims and noting down their location so that I can get the rods out really quickly.
You need to make the most of the time you have on the bank. If I turn up late in the evening, with an hour of daylight left, I can easily cast out to a spot. If you can, prebaiting some spots before you visit will really stack the odds in your favour.
Ramp up your baits
Now that the fish have got over spawning, they are seeking out that extra nutrition, and there really isn’t anything better than a good fishmeal boilie.
To ramp up their attraction so that the fish find them quickly and easily, I take my bait out of the freezer the day before I am fishing and add some Pure Tuna Liquid, which will absorb into the baits as they thaw out.
Once they have that thick glaze, I add some GLM powder and shake them around. This gives them a crusty coating around the outside and ensures all those powders and liquids go to the bottom and seep out of the bait.
Lap the lake
When I arrive at the lake to fish, I will have an idea of where I want to be, but I will always do a quick lap, just in case they are ripping up the bottom in an obscure corner that I had overlooked. Unless I can see signs of fish in a certain area, I can drop back on to the spots that I’ve baited.
This is where having everything written down comes into its own, as I can get in the swim, wrap the rods up, tie the baits on and I’m fishing.

Bait when you leave
Once I have finished my session and pack up, I break all my leftover baits down into crumb and put it out on the spot.
If I can, I put in a few pellets and even some hemp too, to make sure that those smaller items are there to keep the fish grubbing about in the target area. Adding those liquids and other additives is key here too, as they will sit on the bottom and ensure the fish are digging out the bottom in search of the nutrients.

Use a simple rig
My set-up is nearly always an Amnesia D-rig, which sits perfectly over clean bottoms.
Amnesia is a fairly stiff material, which prevents the rig from tangling in flight. It also allows the rig to reset should it be brushed around, spat out and so on.
Having a balanced hookbait on helps with this too, and I like a wafter hookbait, as it sits well with the rig. Having that slow-sinking bait allows the hook to lie flat on the bottom with the bait hovering just above it.

Be flexible
Doing short nights doesn’t take up much time, and I can pick and choose when to fish, depending on the conditions. If a new wind is due to blow up on to my spots on the Wednesday, I can get some bait in on the Monday and drop in when it is right.
This kind of fishing can be demanding, but can be more successful than sitting there for three nights in a row. Even if the lake you’re fishing is popular with the guys that can fish it regularly, and you don’t feel that you can compete with them, get out there and do it! You’ll be surprised just how productive it can be.
Fish ‘off the barrow’
Once the rods are out, I have everything packed away other than my stove. Even though I have most likely baited a spot, if I hear carp elsewhere during the night I need to be moving. Having everything packed and staying as mobile as possible makes this a lot easier. If I was lumbered with a load of kit, I wouldn’t want to move, and I would have wasted a night, potentially. Being where the carp are at 3am is key – moving on to fish at this time has paid dividends for me in the past.

Match fishing tips | THREE ways to fish the pellet waggler in a match!
On the face of it, the pellet waggler seems like a relatively easy way to fish – you just feed pellets, cast the float into the middle of the action and wait for the rod to get dragged in, right? Well, not necessarily…
Stick to this tried-and-tested routine and you will, of course, catch a few carp – but nowhere near as many as if you mix things up with the way you feed, the amounts going in, where you land the waggler in the swim and how long you actually leave it there before repeating the process.
Yes, in an ideal world, the float will bury within seconds of landing.
This tends only to happen, though, when the carp are there in numbers and are competing aggressively for the feed – something you find that tends to happen later in the session.
At the beginning, sport is not so prolific and this is where mixing things up will always outscore ploughing the same furrow each and every time.
I have three routines that I follow when fishing the pellet waggler and these revolve around the key components of feeding, casting, twitching the float and varying the time spent before I wind in again.
There’s no hard and fast rule that says which one works best, so it’s a game of trial and error. But by using all three, you will find the approach that’s right for the carp on the day!
Routine one
This is the old favourite of casting past the feed and then winding the float back into the pellets.
Done this way, there’s not a big waggler landing on top of the fish, which can spook carp easily.
This also means you’re fully focusing on the float and striking at a bite, as opposed to having
to take your hands off the rod to feed.

Step one: Cast beyond the feed zone by a metre or so.
Step two: Now fire out 8mm hard pellets (I use Sonubaits Pro Feed Pellets), ensuring that they land just short of where the waggler has landed.
Step three: Quickly wind the float back into the pellets by turning the reel handle sharply a couple of times. Give it 10 seconds or so before winding in and repeating the previous steps.
Routine two
With this approach you are doing the opposite to routine one – namely casting out and then feeding close to the waggler before winding it into the feed and waiting.
This can work on days when the fish are not feeding aggressively and biding your time will produce.
Step one: Cast out to a spot where you have seen fish topping or cruising, but ensure it is at a range where you can loosefeed pellets accurately and comfortably.
Step two: Now fire in the pellets – again I use 8mm Pro Feeds – but I land them just short of the float. Around half-a-metre or so is perfect.
Step three: Almost immediately turn the reel handle a couple of times to pull the float into the feed so that the hookbait is falling in among the loosefed pellets.
Speed is essential here, and the float has to be moved within a few seconds of the feed landing.
Step four: I’ll then leave the rig in place for a minute before recasting. This gives any fish drawn in by the sound of the feed and float landing enough time to find the hookbait.

Routine three
Sometimes just the hookbait alone, combined with the noise of a big pellet waggler splashing down, will get you a bite. At times like this there’s no need for you to feed a thing.
This is the easiest way of fishing the pellet waggler, but you do still have to try and make something happen by regularly twitching the float.
Step one: Cast out as normal to where you can see fish, or where conditions allow.
Step two: Allow the float to settle and sit for around 10 seconds before then twitching the float with a sharp sideways tug on the rod. I’ll do this five times per cast.
Step three: If nothing happens, wind in and cast again. Keep your hands out of the bait box and off the catapult at all times!
Step four: If I do catch a carp, I will fire in half-a-dozen 8mm pellets after I have unhooked the fish and before I pop it in the net. This ensures some feed will be out there to help pull in a fish or two ready for when I cast out again.

River fishing tips | Give your commercial gear a change of scenery on a local river!
Top matchman Andy May is best known for his commercial fishing exploits, but he likes nothing more than spending a few hours roving his local river for chub.
What’s more, says the former Fish O’Mania champion, you need hardly any extra kit for rivers… and much less of it!
He uses the same rods, reels, baits and bits of terminal tackle as he does on commercials. A few stick floats and you’re away! So why not take a leaf out of Andy’s book and try something a bit different on your local small river this week?
Pick the right swims
When you stroll along the bank you’ll come across countless spots that look ideal, but it pays to quickly analyse a number of factors before settling into a swim.
“If you can see the bottom all the way across then it isn’t worthy of your attention. Look for spots where the water appears to deepen off as fish will sit there when it is low and clear,” he says.
“Cover is also important and my favourite swims have lots of overhanging trees that dim the light and give fish more confidence to feed.
“Last but not least, you need a swim that allows you to run a float through it. If it’s choked with weed you won’t be able to manoeuvre a float and that will instantly lower your chances of providing good presentation.”

A few hours roving
To demonstrate how successful his simple roving approach can be, Andy took us to his local River Dane in Cheshire, where he soon found a number of spots that just screamed big fish. A few runs through on the stick float in each was enough to determine whether anything was present.
“The venue isn’t heavily pressured like a commercial so the fish are less cagey and will snap up a bait the instant they see it.”
In less than two hours Andy landed three 4lb-plus chub and a couple of smaller samples, with no more than one fish coming from each swim. “Today has shown how important it is to stay mobile,” he said. “Grab your commercial fishery kit and put it to a completely different use on the rivers this week.”
The kit you need
“If I am out for two hours of river action I will probably end up visiting at least 10 swims,” says Andy. “But I’ll spend less than 15 minutes in each one before moving on. It follows that you need the bare minimum of tackle with you – a rod, landing net and a small bag of terminal tackle and bait.”
A small carryall with a shoulder strap is ideal and will easily hold everything you will require. Andy has five items that he will never leave the house without when heading down the river...
Bait: “Chub and barbel love pellets. I always take a bag of 6mm pellets and feed these little and often. I like my hookbait to stand out from the crowd and use a banded 8mm pellet.”
Polarising sunglasses: “On low and clear rivers, if you look carefully, you will notice fish moving around. I use Wiley X Europe eyewear – they remove surface glare and make spotting chub and barbel a lot easier.”

Hooks and line: “Most small rivers are full of weed and overhanging trees. Give a big fish half a chance and it will snag you up. I use fairly thick wire hooks in sizes 10 and 12 and all my hooklengths are 0.20mm or 0.22mm. Reel line is 6lb or 8lb.”

Rod: “A specialist rod isn’t required – I use my pellet waggler rod for this type of fishing.”
Floats: “This is the only bit of equipment you might not already own. I carry a few different types of alloy stick float with me to cater for different conditions.

“Presentation is key to getting bites, and using the correct style of float is important. Floats with a big tip are more buoyant and best in fast water, while those with a bigger body are most effective in slower and deeper swims.”
Barbel fishing tips | Perfect rig for spooky barbel
Here’s a top rig to help you catch more barbel while fishing on the river. Dai Gribble explains why he favours this rig when conditions are difficult and the barbel are easily spooked.
A while back I ran a guided trip with an angler who’d been on the river for four days without a bite.
When I looked at his set-up it was clear he’d been using short hooklengths. We switched to a long, 4ft hooklength with a small pellet hookbait and we caught fish almost immediately.
Long hooklengths don’t spook fish, and keep the hookbait clear of any weed build-up on the mainline.
My running rig incorporates a buffer bead, an anti-tangle sleeve, and a quick-change swivel so I can switch hooklengths very easily.
The hooklink is Avid Carp Captive braid with the last 6ins of coating stripped back.
This gives the hooklink superb anti-tangle properties, and the flexibility of the section around the hook assists with hooking.
1) Strip back around 6ins of your coated braid hooklink material – I favour Avid Captive. Tie a small overhand loop knot in the end of the stripped braid – this is for your hair rig bait stop.

2) Add your hookbait to the end of the braid and secure with a bait stop, then tie your hook on with a knotless knot. The hair should be just long enough for the bait to hang 3mm below the bend of the hook.

3) Remove around 1m of the coated hooklink from the spool and thread the anti-tangle rig sleeve on to the opposite end from your hook. You can use a baiting needle for this.

4) Tie an overhand loop in the end of the coated braid, attach it to the quick-change link on the running rig, then slide the anti-tangle sleeve over the link. This kicks your hooklength away from lead or feeder.

River Fishing Tips | How to catch more fish from tricky rivers
Low, clear and full of weed – summer rivers can be tricky places at the best of times.
The fish are spooky, and will often sit out of sight. However, do it right and the results can be breathtaking, as Garbolino UK boss Darren Cox proved recently on the Warwickshire Avon, where he landed two barbel for 22lb in a match.
We caught up with Darren for his tips on how best to approach these challenging waterways, right now.

Swim selection
“When the temperatures are high the fish will be looking for oxygenated water, so weirs, rapids and shallow areas are the places to target.
“I always like to fish over gravel if I can, as fish seem to prefer lying over it, and anything that gives the fish cover is great to target.
“Features such as trees, weed or reeds are always good to look out for. On the day of the match I drew a peg that was very weedy and snaggy, which was why the fish were there.
“The first barbel I had, a fish of 11lb 14oz, snagged me up four times during the fight, but by using the correct tackle I managed to land it.”
Tackle Choice
“Most barbel anglers opt for quite a pokey rod up to a test curve of around 2.25lb and 15lb line. However, I much prefer something softer. During the match I used 6lb Maxima mainline and an 0.23mm hooklength.
“While 6lb Maxima will break at much more than 6lb, the soft rod I use in conjunction with this tackle is one of the most important parts of my set-up.
“I actually think this is better for playing barbel on, as it absorbs the lunges of the fish much better than something stiffer does.
“It may seem under-gunned, but the fact that I landed two double-figure barbel and didn’t lose a fish in such a snaggy swim shows that the gear is up to the job.”
Tactics
“On the day of the match I set up both a float and a tip rod, but the river was pushing through too quickly and was a bit too weedy to run a float through nicely.
“I caught the larger barbel on a feeder, and after getting a few line bites I knew there was something substantial in the swim. It’s always worth setting the float up, though, as it’s a great way to present your bait when the pace is right.
“Even if you don’t catch on the float it’s still a great way to search the swim, as you can find out where the fish are lying.
“A dome-topped balsa float is my preferred option when fishing for big fish with large baits, and I’ll often lay two feet of line on the deck so that I can really drag my hookbait through the swim.
“If you have a large snag in your swim it’s always best to try and draw the fish away from it with feed – however, sometimes this just isn’t possible.
“On such occasions, you have to be prepared to go right into the lion’s den!”
Choice of Bait
One of the biggest problems on summer rivers can be the large shoals of tiny fish such as bleak.
These can destroy your hookbaits, so you want to be using something that excludes these species.
Hemp and casters are a great all-round option, but if you’re going specifically for roach and chub then tares are a favourite of mine. During the match I fed four pints of hemp and casters, as well as a cubed tin of Mainline Match Spicy Brown meat.
The benefit of feeding the meat is that I know that this bait will reach the bottom through all the small fish, which will leave something for the bigger fish to eat when they move into the swim.

Match Fishing Tips | How to catch more on the pellet waggler
The pellet waggler is one of the most exciting ways of catching carp – launching big pencil-shaped floats into open water, blasting big pellets around it and then watching that bulbous orange tip bury before the strike is met with a roaring run of something very big and angry!

It’s also a lot easier on the back and shoulders than, for example, the long pole when presenting a bait shallow to catch carp feeding in the upper layers of the water.
It’s relatively inexpensive to get geared up for a bash on the ‘pellet wag’ with the match rod that’s probably been gathering dust in your shed.
Decisions have to be made elsewhere, of course, and the most important of these is the type of waggler you use. Not all pellet wagglers are made the same and if you look on the tackle shop shelves there’s a great disparity in size, shape, weight and even the materials they are made of. Each one does have a specific job to do.
I carry a range of wagglers for summer fishing but tend to find myself falling back on two very definite types, depending on how shallow the fish are feeding.
Very rarely can you dictate to the fish what depth they will be at by feeding alone, so you have to be prepared to find them!
Regular casting
If I am fishing meat then the whole point is to get a bite in that first foot of the swim, so it goes without saying that a take should come within 10 seconds of the float landing.
If I don’t get one, I’ll wind in and cast again, and I’ll also cast to the same spot to try and build up an area for the carp to home in.
On very warm days when the fish may be cruising, it can pay to cast to thm – a little like dobbing on the pole, seeing a carp and casting the float just in front of it.
Feeding
I may use meat on the hook but that doesn’t mean that I feed the same thing because carp are so used to pellets.
I think they are better, and they can be fired out with a catapult further and more accurately and they make a good ‘plop’ as they land.
I do cube up some meat too and will feed this if I am fishing at shorter ranges or I sense that the fish are very close to the surface , when a feed that sinks slowly will get more of a response. For feed meat I use plain Plumrose meat in 6mm cubes but the feeding will not be excessive – just three or four 8mm pellets or pieces of meat on every cast.

Finding the depth
Although pellets are the main bait for the waggler, meat can be equally good if allowed, and is great for catching fish in the topmost foot or so of the water – so you shouldn’t really be fishing any deeper than this.
The ‘mugging’ waggler stands out here, fished 2ft deep, but I will go shallower to the minimum-allowed 12ins on most fisheries.
On the flipside, if this draws a blank, the carp could be sat deeper even on the hottest of days, so changing to the big balsa float and going 4ft deep might just trigger a change.
Float choices
If those carp are feeding a couple of feet deep minimum, pick a classic large waggler. I use Guru balsa wagglers taking 6g-8g of loading as they are a little steadier in the swim and make a good bit of noise on landing.
However fish are visible close to the surface, a big waggler will be no good and this is where a very different pellet waggler comes into play. These take shot rather than relying on a loading for their casting weight. I call these ‘mugging’ wagglers, designed to pick off carp just under the surface.
They sit up immediately as soon as they land, ready to show a bite, and are also relatively unobtrusive, allowing the bait to fall naturally as soon as it hits the water. I use either the 2SSG Guru foam pattern or some homemade specials from my mate Warren Martin that take 3SSG of locking shot. They look old and battered but they’re brilliant for this type of fishing!

Rudd Fishing Tips | FIVE top tips to help you catch more specimen rudd
When temperatures are high and conditions are bright you can usually rely on rudd for a few bites.

Currently they are being caught to specimen sizes on a variety of tactics, and one man who has proved himself as something of a rudd expert is Dynamite Baits-backed James Champkin (see his 3lb 2oz personal best-equalling rudd on pages 2 and 3).
Who better to ask, then, for some advice on how to target big rudd right now? Here are James’ five essential tips for improving your rudd best, right now...
Evening rise
“There is no doubt that rudd, with their protruding bottom lip, are built for feeding up in the water.
“Big rudd love to slurp insects off the surface and roll on warm summer evenings, and this is the perfect time to locate them.
“Watch for swirls and splashes.”
Pop-ups and slow-sinkers
“Given their distinct feeding habits, my baits for big rudd are based around buoyant and slow-sinking items such as small pop-up boilies and corn.
“Bread has also become synonymous with big rudd fishing: crust can be fished on the surface or a piece of flake can be squeezed tightly to make a slowly descending hookbait. Deadly!”
Fish the Fens!
“Unfortunately, big rudd are nowhere near as widespread as they once were, and locating these golden bars can be difficult.
“If there is one place to target these elusive creatures, it’s the rivers and drains of Fenland.
“The waterways of Cambridgeshire, South Norfolk and Lincolnshire are the last stronghold of rudd, and they contain some absolute whackers!”
Bolt rigs
“A number of carp fisheries also contain some very big rudd.
“On these venues, the fish often hold out at range and they become accustomed to feeding over beds of boilies and particles.
“Mimic this approach in a scaled-down manner and you are more likely to single out the larger rudd.
“I use a cage feeder filled with a cloudy zig groundbait and a small pop-up boilie – yellow and white are great colours.”

Into the night
“The biggest rudd can feed at very specific times.
“I’ve fished a swim hard all
day with no bites, only to catch half-a-dozen big rudd with only a few minutes of daylight remaining.
“They can also feed randomly throughout the night, so make sure you fish well into darkness to give yourself the best chance of landing your own slab of gold.”
Match Fishing tips | Pellet waggler tactics to help you catch more!
There are plenty of anglers that just can’t get along with pole fishing and they’ll never cash in their rod and reel.

Many in this category regularly rely on the feeder to get their fix but we’ve reached a time of year where it just isn’t as effective as it was a few months ago.
While it is still deadly up against islands and in shallow water, it can be a long wait in between bites when chucking into deeper water because many of the fish are sitting off the bottom.
The answer to the problem is simple – switch to the waggler! This style enables you to explore the entire water column and Dan Hull wouldn’t be without it.
“When the water is cold the fish are likely to be close to the bottom but now that is has warmed up they could be sat at any depth,” explained the Dynamite Baits and Middy-backed angler.
“The beauty of the waggler is that it enables you to make subtle tweaks that can put you in touch with fish in an instant.”
But there’s much more to it than just chucking out a waggler and merely hoping for the best as Dan revealed…

Discreet or blatant?
There are lots of elements that will determine how many carp you catch. Arguably the most important of the lot is the type of float you use.
Modern waggler fishing on commercials is widely associated with using a float that causes a commotion when it hits the surface. This noise draws in fish that link it with the sound of food breaking the surface.
That isn’t always the case though, and analysing the form of the venue and the conditions is a must before make your choice.
“If you are on a venue that is in top form and you are fishing in really warm conditions then a chunky pellet waggler that makes a lot of commotion will work well.

“Alternatively, if anglers have struggled of late then it pays to use a more traditional, lighter waggler that will enter the water more discreetly. This is because fish that are cagier and not actively looking for bait are more likely to spook away from any disturbance rather than being attracted to it.”
Setting a routine
Whatever type of waggler you use, you can’t afford to be lazy. When presenting a hookbait up in the water, the carp will smell a rat and ignore it if it’s sat motionless for long periods.
Casting every 30-60 seconds keeps the hookbait falling through the water column and a similar routine is also required when it comes to feeding.
“I only feed five pellets each time I pick up the catapult but I’m doing this every 30 seconds,” said Dan.
“I feed just before I cast out and then if I don’t get a bite within 20 seconds I twitch the float and ping a few more over the top. If that still doesn’t work I repeat the whole process.”
The only exception to this rule is when he suspects the fish are still in the peg but have wised up to the routine. In this scenario, he makes a couple of casts without catapulting any bait. This forces any carp that wants to feed to take the hookbait.
Dan starts the session fishing at 2ft deep. Failure to catch at that depth indicates the fish are sat below his hookbait and he adjusts the rig to fish a foot deeper. On the flip side, he shallows up in six-inch increments if he is missing bites or foul-hooking fish.

Picking your bait
Pellets are the only bait that Dan feeds when fishing the waggler for carp at this time of year.
The size he uses is dependent on the distance he is casting.
“I use the smallest pellet I can get away with to reach the spot where I think the fish are. More often than not 6mm pellets do the trick but if I need to go further and can’t reach the area with them, I step up to heavier 8mm pellets that can be catapulted the required distance.”
In most situations Dan matches his hookbait to what he is feeding. From time to time, however, it can pay to hook something completely different to fool any bigger, wily carp. A Dynamite Baits Washter is his change bait because they sink at a slower rate than pellets, giving fish that aren’t actively feeding and sat just under the surface the chance to engulf it.

Working the peg
Feeding the same spot is an area to work off but every cast doesn’t need to go in the same hole!
“It’s inevitable that the odd pellet will fly away from the target and I am convinced that the bigger carp that are caught less often sit back and feed on these.
“With this in mind, casting a few feet away from where you feed can produce the goods from time to time. I’ve lost count of the number of times the bites have dried up and then a chuck to a random spot produces a proper lump!”
Put in the effort then there’s very few tactics that can offer the excitement of summer waggler sport.

River Fishing Tackle | 10 essential items for the new season.
To celebrate the new river season, Angling Times staff have picked out 11 of their favourite tackle items they wouldn’t be without on the bank.
From specimen barbel and chub fishing to silver fish on the float, these items of kit come highly recommended after months and, in some cases, years of use.
DINSMORES TEAR DROP BAIT DROPPERS
A bait dropper gets a bed of bait down fast, and Dinsmores Tear Drop versions are some of the best – reassuringly heavy and super-easy to use.
The 60g, small version is ideal for slow-moving water, or where a smaller amount of bait needs to be dropped. The medium size (120g) is great for faster rivers.
Price: £9.99, £13.99

VASS WADERS
VASS includes thigh, waist and full chest waders in its portfolio but my favourite is the Vass-Tex 305-5L – tough, breathable and up to three times more waterproof than other waders.
You get padded knee joints, reinforced boots and a zip-tight chest pocket to store bits and pieces. Elasticated shoulder and waist straps ensure a snug fit.
Price: £249.99

Visit: ww.vassrainwear.co.uk
DRENNAN AND DH ANGLING STICK FLOATS
I love float fishing on my local River Nene and have two favourite patterns – Dave Harrell’s No1 Insert Sticks and Drennan Big Sticks – for fishing in depths from 4ft to 14ft.
Decent shoulders on both allow me to slow the rigs down when bream and skimmers are the target.
For up-in-the-water roach and dace fishing the hollow, high-vis tips on the DH Inserts offer sensitivity, while the heavy wire stems settles them quickly.
Drennan Big Stick: 2BB (1g), 3BB (1.4g), 4BB (1.75g), 5.5BB (2.25g), 7.5BB (3.5g). DH No1 Insert: 2x4, 4x4, 6x4, 8x4, 10x4, 12x4, 14x4. Price: £1.85 to £2.25

VAN DEN EYNDE SUPER ROACH GROUNDBAIT
Slow, deep Fenland rivers and drains call for a mix that will get down fast and hold plenty of loose freebies without breaking apart.
In natural brown or dark black, Van Den Eynde Super Roach is just that, and works equally well for skimmers and roach. Use it in the feeder, ball it in or introduce it with a cupping kit.
On the tidal rivers of the Broads, Super Roach will make short work of getting down in 12ft of fast-paced water. In shallower water, you can ‘lighten’ it by adding Van Den Eynde Special or Supercup.
In 1kg bags, Super Roach will always find a place in my bait bucket for summer river fishing.
Price: £3.99

DYNAMITE BAITS BIG FISH RIVER RANGE
I started using these last season, and was so pleased I’ve already stocked up for the season ahead.
My favourite for chub and barbel is the Cheese & Garlic flavour – I use the groundbait, Buster hookbaits and paste. The groundbait is particularly effective in a large feeder plugged both ends to deliver pellets and boilies.
The paste is great in coloured water, wrapped around a boilie.
Price: From £4.99

DRENNAN SPECIALIST BARBEL HOOKS
A MUST for any river angler targeting chub, barbel and carp, these hooks are Incredibly strong and super-sharp, and extremely hard for fish to deal with.
In sizes 4-16, they can be used with a wide variety of baits and presentations. A Teflon coating significantly reduces glare on bright days.
When roving and rolling meat for summer barbel you can guarantee I’ll have a size 6 Drennan Specialist Barbel hook on – they hold the bait perfectly.
Price: £4.25

DAIWA HYPER SENSOR LINE
Daiwa’s iconic Sensor line is tough as old boots, holds a good knot, doesn’t twist easily, and is very sensibly priced.
New Hyper Sensor does all the above but its lower diameter makes casting easier and its low-stretch properties put you in immediate control when trotting a stick or waggler. Shot can be moved around without causing annoying pig-tails. Basically, the best just got even better. On 300m spools.
Price: From £6.99
NISA FEEDERS
The wide, canalised North Bank of the River Nene responds well to feeder tactics with soft groundbait, a long tail and red maggots, and my favourite pattern is the Nisa Open-End.
They come in several sizes and weights and are strong and reliable, attached running-style via a link swivel and tough rubber band.
Sizes: Mini, Small, Medium and Large in weights from 12g to 44g.
Price: From £1.49
DAIWA 13FT POWERMESH SPECIALIST FLOAT ROD
For floatfishing for barbel the 13ft Daiwa Powermesh Specialist Float Rod is the perfect choice – incredibly strong yet very light in the hand. As you will be holding the rod all day long this is very important, and the 13ft length allows for excellent float control.
Price: £107.99

DRENNAN SPECIALIST LANDING NETS
A good net is crucial for big barbel and chub and you’ll struggle to beat Drennan’s Specialist Landing Nets.
In sizes from 18ins to 26ins, they are comfortably big enough to land any barbel you may hook, and the deep mesh is perfect for resting a fish.
The frame is fixed to a solid spreader block, rather than having put-in sections, and this allows fish to be lifted with ease up a steep bank.
Price: £19.95 - £24.95

River fishing tips| How to catch barbel while fishing a river.
The river season is now in full swing so to help you have your best-ever river fishing season we’ve brought you some of the best tips from top river and specimen angler Dai Gribble.
Here some of the best river fishing tips to try right now.
Try using small hooks
Barbel are outstanding fighters, but don’t let this fool you into thinking you must use big hooks for them.
Smaller, strong hooks can be much more beneficial, especially when fishing in daylight when they can be finicky feeders.
Scaling down your hook size can make a big difference in not spooking the fish. They also allow you to use smaller particles.
There are many small hooks such as the Korum Specimen that are strong enough in size 14 and 12 to cope with big barbel. I use them for small baits such as 8mm pellets, mini boilies and single grains of corn.
Keep your rods up
We’ve had a bit of unseasonal weather at the start of this season, with many rivers carrying extra water from the high rainfall.
This makes it even more important to fish with your rods up in the air, because fishing in this way helps you to minimise the drag on the line from the current.
This lets you to hold bottom with lighter leads and feeders, giving you a more sensitive set-up with better bite indication.
Smaller leads and feeders also cause less disturbance, reducing the chances of spooking fish when you cast out.

Carry a range of feeders
Carry a wide range of feeders of varying sizes and weights so that you can select the right one for the job.
Different weight feeders will be required depending on the depth and flow of the swim you are fishing, and different sizes allow you to vary the amount of bait that you introduce.
Generally the deeper, faster flowing and further across I am casting, the heavier the feeder needs to be to hold bottom. The aim is to get the feeder to quickly hold in one place after it has settled after casting.

Feeding rates
As well as carrying feeders of different sizes and weights, it pays to carry different types.
This will allow you to vary the rate at which your feed comes out of the feeder. A mesh feeder will empty much quicker than a traditional-style feeder with just a few holes.
If bites are coming soon after casting, opt for a mesh feeder so that the bait empties quickly, otherwise it will still be full and empty across the river whilst you are playing a fish.
If bites are slow it pays to use a slower release feeder to ensure bait is trickling past your hookbait for much longer.

Running rigs rule
A free-running kit is ideal for barbel. I was lucky enough to test the new Korum Bolt and Run kits and will be using them this season for all my barbel fishing, they’re that good.
With this rig the ring holding the feeder or lead is semi-fixed which provides a great bolt effect when a barbel takes the hookbait. As it is only lightly fixed it comes free instantly a fish is hooked.
Combined with an anti-tangle sleeve this rig is easy to cast without tangling as the feeder or lead stays in place and there is no possibility of it sliding up the mainline when the feeder hits the water.

Look after the fish
Anglers need to prioritise fish care over everything else, particularly in the summer when higher water temperatures mean the water holds less oxygen.
There are a number of measures you can take to minimise the impact on barbel.
Firstly, always rest the fish in the landing net for at least a couple of minutes to allow it to recover before lifting it out of the water. If possible, unhook the fish in shallow water and release it immediately.
Consider whether you really need a photograph and whether it is necessary to weigh a fish.
If it looks close to a target weight then weigh it, but if you are fishing for big specimens do you really need to know exactly what a smaller fish weighs?

River fishing tips | How to use a waggler on summer rivers
Small rivers in summer can be prolific and frustrating in equal measure. The problem is that often you can see hundreds of fish in the clear water, but catching them can be difficult!
Never fear, top match angler Mark Pollard is an expert on these waters, and for this week’s lesson he offers some timely pointers for the early season…

Swim selection
“Spot an overhanging tree that a huge shoal of dace is basking under, or a clump of reeds that a big chub keeps investigating, and it would be so tempting to plonk your seatbox down right in front of the fish-holding feature.
“But minutes after unloading your tackle into the peg you’ll once again scour the water excitedly and the fish will have mysteriously vanished.
“I will always place my box well upstream of where I eventually want to catch the fish. If you sit right on top of them they will definitely move off elsewhere, so it is better to try and catch them from further away.
“It is important to make sure that the area between where you are sitting and where you intend to get the bites is free of large snags and obstructions, as you will need a clear area to run your rig through and bring fish in.”
Careful feeding
Maggots and casters are the best bet when silver fish and bonus chub are on the cards. You have to keep feeding if you want the fish to feed confidently, and it is important that you do it right.
I let my rig start running through the swim and aim to have my loosefeed land a couple of metres behind the float. It will catch up with your hookbait at the point where you are trying to get a bite, making your rig look a lot less suspicious to the fish.
I want to feed the fish just enough so that they will start to compete, but at the same time I need them to find my hookbait quickly so that I get a bite each time the rig runs through.
Hookbait depends on the size and species you are targeting, but triple maggot or caster is a winner when you are trying to fend off small fish, while a single maggot works best when you are happy catching fish of all sizes.

Leave the pole alone
Waving a long length of carbon over the top of the shoal of fish will instantly spook many of them. A waggler is a much better option.
I like to run the float through the swim, allowing the current to push it through to make the hookbait move at a natural pace.
A swim that is fairly slow-moving will enable you to have full control of how the float trots. I always leave the bail-arm open and this allows me to let the float run as far as I want, while also giving me the option of placing my finger on the spool every now and then to stop the rig moving.
A 3g or 4g loaded waggler locked in place by two float stops provides the best control on small rivers, with 4lb mainline through to a 0.10mm hooklength to a size 18 hook.

Pole Fishing Tips | Hit the margins for a late feed frenzy
With just two hours remaining of a session on a commercial fishery it’s tempting to stay on a line further out.

After all, you’re catching well – but the truth is, you can’t afford to ignore the margins, where you can bag up big-time.
Bigger carp, F1s, barbel and tench will all lose their inhibitions in these closing stages and move really close in, often just inches away from the bank, to feed.
This close-range fishing is not only easy to do but is great fun too, watching a big fish churning up a foot or so of water before taking the bait and roaring off.
In matches, this switch to the margins can often see you go from nowhere to victory.
When pleasure fishing, it offers the chance to potentially catch a personal best, or certainly something well worth getting the scales and camera out for.
So, after catching well on my long pole line on Horseshoe at Decoy Lakes, it’s time to take a look in the edge and see who is at home. I get the feeling it could be a bit solid!
Timing
In a match, I wouldn’t expect much to happen in the edge until the final two hours, but for a pleasure session, with less pressure on the lake, you can catch much earlier.
I’d certainly try here right at the start to see if any fish are milling around – if not, there’s no real damage done but if there are, it makes for a lovely start to the day. Don’t spend more than 20 minutes fishing the margins early on.
Did it work?
Of course it did! After catching plenty of F1s and carp on my 11m line, I felt confident that the fish would venture into the edge, and within two minutes of beginning to feed against the platform to my right-hand side the water had coloured up, showing that some fish were about.
Seconds later the float yanked under and carp number one was on. With it safely netted, I was back out, a pot of 4mm pellets was tapped in and down went the bristle again, this time a bite from a lovely barbel. Every drop-in resulted in a bite or a fish landed and with no roach about, I switched to four dead red maggots on the hook.
I panned four barbel in a row before the carp and F1s returned, along with a surprise big skimmer.
In less than an hour I’d caught 50lb of fish but, more importantly, enjoyed the adrenaline-pumping action that margin fishing never fails to deliver!

The perfect margin peg
If you’ve got the pick of the swim on your lake, do yourself a favour and choose a peg that gives you options in terms of cover. Carp love a feature to feel safe feeding close to – this may be reeds or lily pads but be aware of fishing too much of a snaggy area, as you may struggle to land what you hook.
There’s nothing wrong with a bare bank but whatever peg you pick, it will have one feature that’s guaranteed, and that’s the fishing platform of the swim next door.
This gives the fish cover and, more importantly, they associate it with food. Anglers will regularly throw unwanted bait into the spot in front of the platform when they pack up. The carp know this, and will pay a visit to this area every day to see if a free meal is on offer.
Distances and depth
As was the case on the long pole into open water, don’t make things hard for yourself by fishing 13m of pole down the edge.
In fact, my favourite distance is around 5m or 6m. I can feed accurately here, sometimes by hand, but still keep my rig well away from myself. I’d say 10m or 11m is about as far as you need to go if you can’t catch closer to you.
You may often hear anglers talking about ‘finding the right depth’ and for the margins, this means around 2ft or 18ins of water. Any deeper and there’s the chance of the fish coming off bottom to
get at the feed, which can result in foul-hookers.
I set my rig to around 2ft and spend some time until I find that depth. This may be 1m away from the bank or tight up against it. Either way, I’m not concerned.
The right rig
Margin fish are big, but we’re not yet at the time of year where really heavy tackle is needed.
I’ll fish a mainline of 0.18mm Browning Cenex Hybrid Power Mono, while for hooks, I use the same ready-tied rig that featured on my Method feeder, Browning’s Feeder Leader made up of a size 16 or 14 to a hooklink of 0.14mm.
Elastic is stepped up to deal with the bigger fish and is Browning Xitan Microbore 2.5mm, roughly a grade 11-13. Small floats are ideal for very shallow margin pegs, but in 2ft, I need something a little more substantial and fall back on the 0.3g DT Pencil pattern that I was fishing on the long pole. Shotting is a simple bulk of No9s.
This will be fished a couple of inches overdepth when fishing hard pellet, just in case my rig ends up slightly down any marginal slope.

Time to feed
When it’s time to fish the edge you’ll need to feed it.
You can use a big pole cup to dump in lots of bait in one go, but I believe this is a tactic to save for high summer, when the fish are really hungry and feeding aggressively.
For now, you’re better off going down the second route of a small pot on the pole, introducing a small helping of bait each time to try and get one or two fish into the area willing to take the bait.
Pellets rule
Groundbait and dead maggots are a great margin feed but if there are a lot of roach in the lake, as there are in Horseshoe, it can actually be the worst thing to introduce. Besides which, groundbait can only be used in a feeder at Decoy!
Pellets always catch bigger fish, which is what you’re after in the margins, so I’d feed 4mm hard Van Den Eynde pellets and use a banded hard 4mm or 6mm pellet on the hook. I wouldn’t discount maggots, though, and if I was catching steadily and few roach were about, three or four deads on the hook would get a much quicker bite. Barbel absolutely love them, too.
