Guide to shotting patterns
What’s a ‘shotting pattern’ and why can the correct pattern mean the difference between bagging a netful of fish and blanking? Here’s our quick guide to stick float, waggler and pole float fishing shotting patterns...
Shotting pattern is merely the order in which you attach the weights (split shot or styls) on to your line to cock your float and help the bait fall through the water.
There are three main types of shotting pattern – and each is designed to do a different job.
BULK: This is where the main bulk of split shot are grouped tightly together. Its main uses are to make a waggler float sit upright in the water, or to ‘bomb’ the bait quickly down through the water in deep swims where the target fish are close to the bottom, or where smaller ‘nuisance’ fish like fingerling bleak, roach or rudd will take a slow-sinking bait before it gets down to larger, target fish.
On a waggler float you’d normally nip on size AAA or BB shot immediately below the float. Bulks of No 8 shot are most often used with pole or waggler rigs. Bulk shot on river float rigs can vary from tiny No 8s to large No 1 shot, depending on the depth and strength of the flow.
STRUNG-OUT (also known as ‘shirt button’): This pattern can be used on wagglers, stick floats or pole rigs. The shot are spaced equally apart – like the buttons on a shirt – to help sink the bait at a slower, controlled rate.
Number 8, 9 and 10 shot are favourite on stillwater waggler and pole floats, and No 8 and No 6 are used on stick floats.
DROPPER: Droppers are smaller, lighter shot positioned at intervals below the bulk shot. They sink the hookbait slowly once the heavier bulk shot has settled. Dropper shot on stillwater waggler and pole rigs are normally legal lead size 8, 9 or 10 ‘micro’ shot.
How to avoid line damage
1. Take a 10cm (4in) length of line that’s heavier than your mainline and push it through the waggler eye
2. Squeeze on the heavy locking shot either side of the float. The shot mainly grips the thicker line
3. Add your final shot to the rig and trim heavy line. The shot runs on the heavy line protecting the mainline
CLASSIC SHOTTING PATTERNS...
1. THE WAGGLER
Waggler floats are attached bottom-end only with the reel line running through a plastic or metal eye. Wagglers are locked in place by split shot nipped either side of the eye. The vast bulk of the shot must be placed around the eye in order for them to be cast accurately over long distances.
(Sometimes, waggler floats don’t have an eye, but are designed to be pushed into a rubber/silicone float adaptor which is fitted with an eye.)
A typical 3AAA float should have two size AAA shot immediately below the eye, and one AAA shot above. A couple of No 8 dropper shot spaced equidistant between the bottom of the float and the hook will be enough to make the hookbait fall slowly and enticingly through the water. Any other weight to ‘dot’ the float tip down should be pushed directly under the lowest AAA shot.
In deep water, when the fish are on the bottom, a string of No 8 shot placed 40cm (16 inches) from the hook with one or two No 10 ‘dropper’ shot below them will be a better bet.
● NOTE: Never place the bulk of shot needed to cock a waggler properly anywhere lower down the line than the base of the float. If you do, you won’t be able to cast far or accurately as the whole rig will be unbalanced and ‘cartwheel’ in flight.
2 THE POLE
The amount of shot required to correctly shot a pole float is normally printed on the side of the float. This can either be shown in terms of UK split shot, or incontinental styl weights. (A styls to split shot conversion table was printed in these pages last month.)
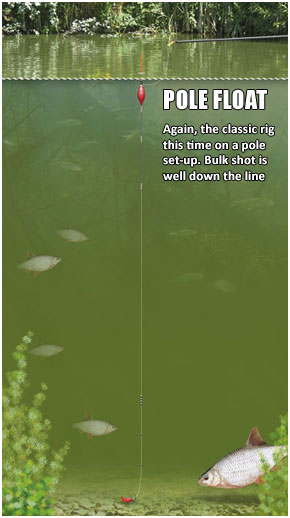
In deeper water, or where the fish are on, or close to, the bottom, a bulk of No 8 or No 9 shot 40cm from the hook with one or two No 10 or 11 dropper shot works best.
When you want to explore the whole water column a slow-sinking bait with strung-out No 8 or No 10 shot is the best pattern to go for.


