
4 great lures for surface action
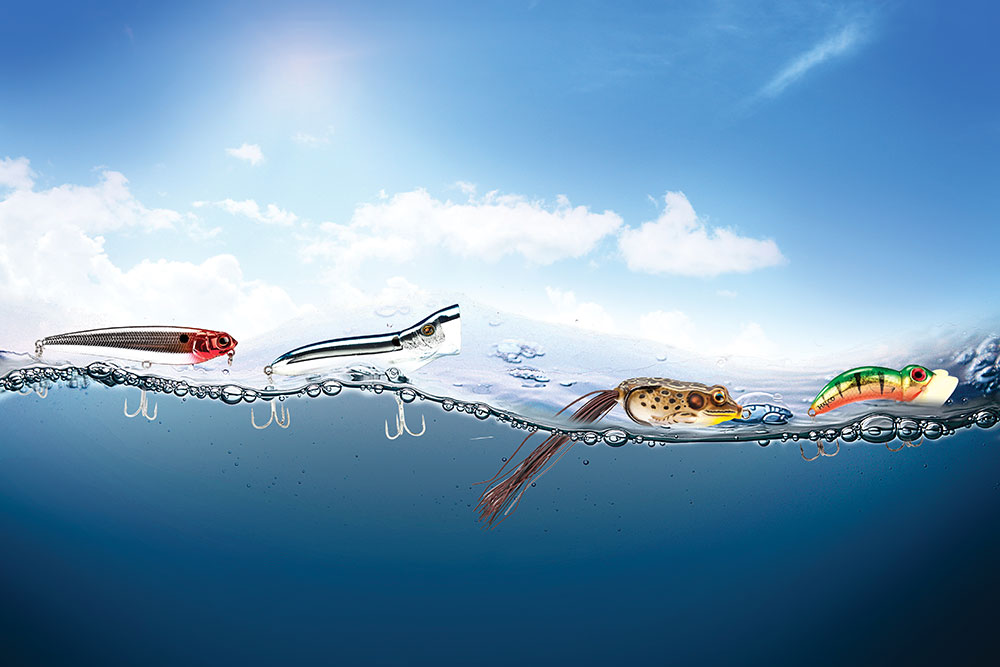
Taking predators off the top is a spectacular way to catch perch, pike and even zander, so here are your best options for action...
When it comes to lure fishing there is nothing more electrifying than surface fishing.
Watching your piece of brightly coloured plastic wobble, pop and gyrate its way across the top of the lake before, in the blink of an eye and a flurry of water, it is violently snatched and you find yourself into a hungry predator.
With the water at its warmest, the prey fish are also close to the top and the predators have learned over the years that these unsuspecting fish make for a very easy meal at this time of the year.
Like all branches of lure fishing, lures that are designed to fish ‘on the top’ all have similarities, but each type of lure has slight differences, which means it is either fished/retrieved differently or it ‘fishes’ very differently.
Some are designed to ‘pop’, others jerk from side to side, while some move in an almost snake-like action.
And you never really know which one will be the ‘trigger’ on any particular day.
With this I mind, here is a brief guide to the main types of surface fishing lures.
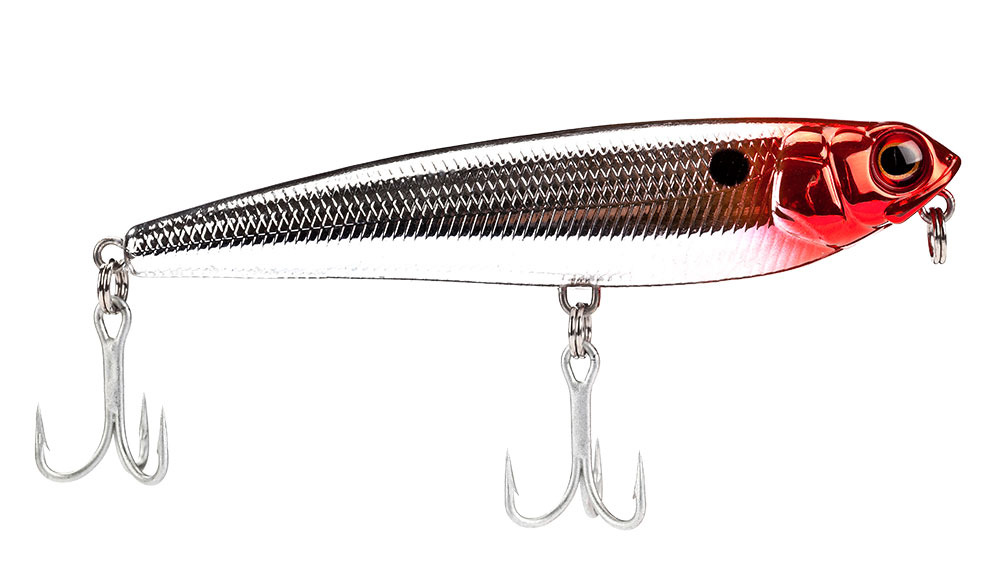
Spro Ikiru
At first glance these types of lure seem to offer the angler very little. There is no propeller, spinner blade or nose cone to create an ‘action’ in the water.
To get the most out of what is known as a ‘walk the dog’ lure, you need to work the rod tip back and forth while jerking the reel handle in time. It’s a difficult art to master at first but, once mastered, the lure will ‘walk’ across the surface in a pleasing zig-zag motion.
The other downside is that it is tiring on the wrists, but it is a hypnotic way to fish. A true walk the dog lure is best fished in relatively calm conditions, because they are easily knocked off their stride in choppy water.
They can be cast a long way though, so you cover a lot of water quickly and tend to be more effective when fished at a slow to medium pace.

Sebile Splasher
This type of lure is characterised by the concave frontage. This sees it doing ‘what it says on the box’!
As you retrieve this lure, you also flick the rod tip down to exaggerate the movement and create the ‘pop’ as the lure’s concave part pushes the water.
Poppers make varying amounts of noise and disturbance and, as far as surface lures go, they are the most stable in choppier conditions.
Some anglers mistakenly believe that surface lures are to be used only when the conditions are flat calm, but a popper works best if there is a wind on the water and even the occasional white horse.
Its stability and relentless action can help bring the fish up to the surface and the accuracy with which you can fish them really helps to fish tight areas where the predators often lurk.
If the popper does not feel right on the retrieve and is behaving strangely, it has most likely turned over in flight and the trebles have caught your line. Wind in and check – this does happen from time to time.

Koppers Live Target frog
Frog lures are far from being a new concept. And when it comes to enticing a bite from a hungry predator, they are simply unbeatable at certain times in and around particular features such as lily beds that are natural nursery areas for young frogs.
Loved by pike and perch alike, frog lures can also be particularly effective when looking to target chub.
This one has a hollow body, with the two hooks wrapping around the sides. This makes it weedless, so it is ideal to fish into any areas of heavy vegetation.
To fish a frog lure, you can either jerk it back in a series of hops, making quarter turns of the reel handle before briefly pausing, or twist the rod side to side, so you can fish in a similar way to a ‘walk the dog’ lure.
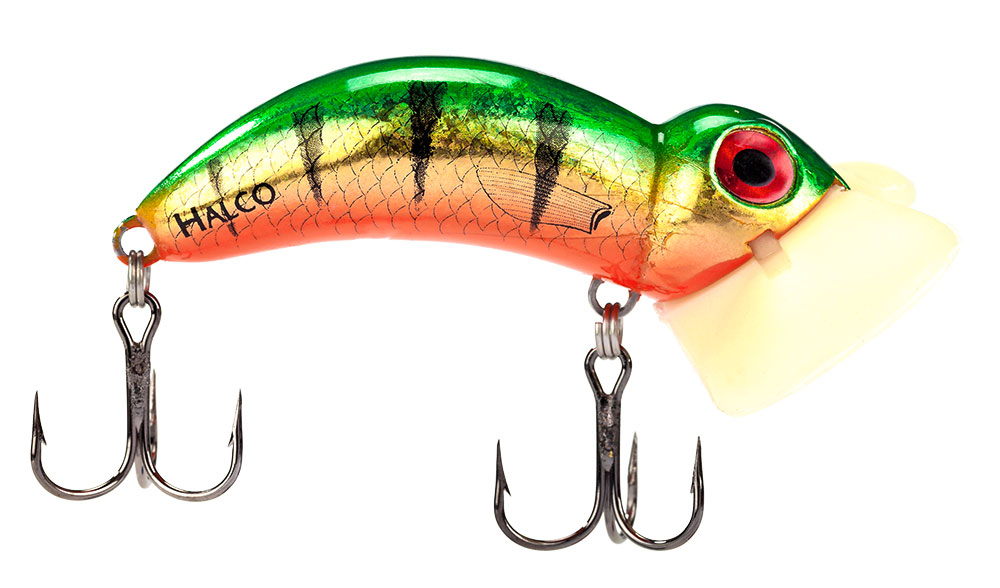
Halco Nightwalker
These unusual looking lures have a quite distinct wing-shaped nose. It is this feature that enables the lure to ‘walk’ and ‘crawl’ across the surface, resembling a distressed fish, frog or rodent.
Fished with a simple retrieve or a slightly jerky movement will see you catching pike, perch and even zander. The walking action makes a very distinct popping noise as it scurries across the top.
A lure like this can even be fished at night, as the combination of the noise, action and the fact its propeller frontage glows in the dark, makes it a very interesting and very often deadly lure.
Guide to carp leads
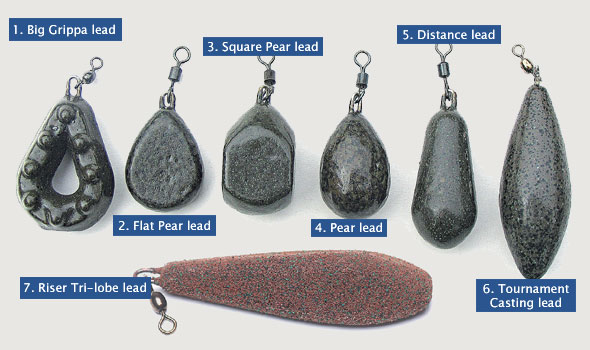
Here is a simple guide to carp leads...
1) The Big Grippa
The Big Grippa is a unique lead, available in sizes up to 10oz, and is best suited to anywhere you need more grip, like rivers, on the sides of bars, along marginal slopes, boating out or at extreme range. The small raised nodules grip the lake or river bed. Like the other flat shapes, these leads are also ideal for sloping island margins or bars.
Grippas have become massively popular on the continent, where carping in wide, fastflowing rivers is the norm and where you have to boat out baits massive distances.
Available in 1.5oz to 6oz
2) The Flat Pear
Hard bottoms are the place for the flat pears. The short, condensed shape of this lead, married with the two flat sides, makes it the perfect lead for bolt rigs at short to medium range. By its very nature the flat pear lead lends itself to being fished on marginal slopes, the sides or backs of gravel bars and in rivers. It’s effective at short to medium range because it holds so well on the lake bed and offers so much resistance to a moving carp, endowing it with superior bolt rig effectiveness.
This type of lead is best used inside solid PVA bags with a short hooklength. It is unobtrusive if you are stalking the margins in clear water.
Available in 1oz to 5oz.
3) The Square Pear
Korda’s new Square Pear shape has been designed as the ultimate bolt rig lead. The shape is greatly condensed, so when a carp tightens the hooklink against the lead it will feel the weight straight away.
It’s an excellent choice for short to medium-range work on gravel or firm-bottomed venues, especially when fishing to island margins or on to features where the bottom may be sloping.
Korda are now on to the second generation of Square Pear – the original lead was too square, and sometimes would not roll over and lie on its side. Instead it sat on its end, with the swivel at the top of the lead sticking bolt upright off the lake bed – not ideal at all!
Available from 1oz to 5oz.
4) The Pear Lead
The classic Pear lead casts a very long way, almost as far as the Distance Casting type, and is less affected by cross winds because the shape is very condensed. This means the Pear lead is suited to most carp fishing situations when fishing up to the very limit of your casting ability.
The condensed shape concentrates the leger’s weight so that a carp pricking itself against it feels the full weight of the lead quicker than with a Distance shape. Tangles are reduced by its tapered profile.
The rounded shape means that the pear lead will still cast a long way. Pears can plug deeply into soft bottoms, so I avoid using them in silt and save them for medium to long-range fishing on gravel-bottomed lakes.
Available in 1oz to 4oz.
5) Distance Lead
This lead is designed purely for casting long distances. The nose-heavy design makes it very stable and keeps the lead condensed, making for good hooking efficiency.
The round nose ensures it flies straight, even in big crosswinds, which is key when you are striving for accuracy. The heavy nose means the weight is concentrated and improves the hooking properties by making sure the carp encounters the full weight of the lead quickly when it picks up the bait.
Available in 1.5oz to 5oz sizes.
6) The Tournament Casting Lead
This is the lead to have on when you have to go for maximum distance, because of its aerodynamic torpedo shape and because the bulk of the weight is slightly forward to help stabilise the leger in flight.
On a lot of silty meres lead penetrates deeply, but Tournament Casting leads are quite easy to pull out of the silt. I don’t think they bury in as deeply as the more dumpy designs.
Available from 1.5oz to 5oz.
7) Riser Tri-lobe Lead
A very under-used, versatile lead that rises on retrieval, avoiding snags and weeds on the way in. You can overcast, retrieve, then steadily let the rig drop on the fish without making a noise. This lead rests gently on deep silt, soft weed and poor ground. It casts relatively poorly, but is good for awkward situations.
How to make wire traces

Whenever you are fishing for pike or zander you simply must use a wire trace, and here we show you how to make your own wire traces for lure fishing and bait fishing in easy to follow steps...
Using a wire trace when either lure or bait fishing shows that you care about the fish you are trying to catch. If you simply tied your treble hooks or lure directly on to your monofilament mainline, you are taking a big risk as both pike and zander have such sharp teeth they will cut straight through it. And what will happen next?
The fish won’t be able to shed the hooks, the fish will suffer as a result and possibly even die as it may not be able to continue feeding due to the obstruction in its mouth or throat. So please, always use a wire trace when tackling those toothed predators.
You can buy ready-tied traces for lure fishing and snap tackle for bait fishing – and reliable they are too – but there’s nothing like catching a fish on a trace you have made yourself, plus DIY trace making is the cheaper option in the long term. Here’s how to make both, using a variety of methods, plus detailed info on common mistakes…
Tying a wire trace for lure fishing
This method involves twisting the wire around itself to lock the swivels directly onto the trace wire.

1. You will need 18 inches of wire, a swivel, a snap link swivel, wire cutters and a pair of forceps.

2. Bend an inch of wire and pass the formed loop through the eye of your swivel.

3. Now pass the wire loop back over the swivel and pull it tight. Forceps will help you tighten the loop.

4. Clamp your forceps onto the tag end of wire and spin it around the main length of wire at least six times.
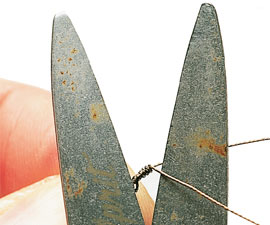
5. Trim off the tag end as close as you can to the whippings using sharp, reliable wire cutters.

6. Now lock a snap link swivel to the other end of wire using steps 2 to 5 to complete the trace.
Tying a wire trace for live and dead bait fishing
You don't have to use crimps to create a wire trace for your dead or live baits - you could use the twisted wire technique shown above to lock your swivel and bottom-most treble onto your wire.

1. You will need some wire, two treble hooks, a swivel, some crimps, crimping pliers and sharp wire cutters.

2. Cut off 18 inches of wire, thread on a crimp, pass the wire through a treble hook and thread it back, well inside the crimp.

3. Position the crimp around 5mm from the hook and squeeze it tightly using the crimping pliers.

4. The crimp should be squeezed three times, making sure each of the depressions line up like this.

5. Thread on your second hook and position it 2 to 3 inches from the first. This gap depends upon the size of bait to be used.

6. Hold the second treble in place and carefully wrap the wire around the base of the hook like this.

7. Now tightly wrap the wire around the hook’s shank three times and then thread it back through the eye.

8. Complete the snap tackle by crimping a strong swivel on to the other end of the wire.
Top tips for trace making
Cut the wire cleanly
It’s worth investing in sharp wire cutters as the end of the wire you are working with must be cut cleanly. A frayed section of wire can damage your main line and also prove extremely difficult to tie or crimp.
When to replace your trace

If the wire of your trace becomes twisted or kinked cut it off and discard it at home - not on the bank. Tie on another fresh one. If you do make your own traces and snap tackle remember to cut off the swivels and hooks. If they are still in good condition you will be able to use them again.
Incorrect crimping

The crimped trace pictured is a disaster waiting to happen! Firstly the crimp is too close to the hook therefore the hook has no freedom of movement. The wire tag end protrudes from the crimp and this could cause tangles or it may cut your main line. The crimp has been squeezed only twice – it should be crimped three times. And finally the crimp has been squeezed too close to the
edge and too hard (the wire can be seen through it). If any of these faults occur when you crimp your traces throw it away and do it again or you’re asking for trouble!
How far apart should the hooks be?

The distance between the treble hooks depends upon the bait you are fishing. The larger the bait the further apart the hooks need to be. Take a half mackerel for example. This bait may be 6in or 7in long and ideally the second treble should be positioned midway along the bait, therefore the trebles should be positioned about three inches apart. When fishing small baits like sprats or eel sections, the trebles can be 2in apart.
How to choose the right float

There's something special about floats and all anglers love to collect them but, far from being mere eye candy, each float has been carefully designed for a specific use.
Can you identify the different designs we’ve pictured here? If not, read on and learn the secrets of the running line.
![numbered].jpg](https://images.squarespace-cdn.com/content/v1/56cc4645c2ea518471e01802/1463660135831-XZSTW07MYWRG4OJDZR02/numbered%5D.jpg)
1 Drennan Crystal Wagglers
WAGGLERS are attached bottom end only. Named because the earliest versions ‘waggled’ as they flew through the air. Used on lakes or rivers on a ‘running line’ ie, a rod and reel, as opposed to a pole.
Crystals are made of see-through hollow plastic designed for both silverfish and carp and in loaded and unloaded versions. ‘Loaded’ means the floats have a metal weight incorporated in the base that provides the casting weight in place of split shot, and which cocks the float.
Normally, loaded floats are manufactured so that the addition of a couple of ‘locking shot’ and a couple of micro shot down the line will cock them perfectly. The shotting capacity is printed on the float stem. “3.0g loaded plus 1BB” means the float has a 3g (the equivalent of 5AAA split shot) loading, plus 1BB shot extra locking capacity.
Loaded floats are far more streamlined than unloaded which require strings of split shot to cock them properly, so they cast further and are far less prone to tangling.
2 Straight and Insert Wagglers
MOST wagglers fall into two categories, ‘Straight’ or ‘Insert’. Straight mean that the float body is the same diameter all the way up. Insert have a separate, finer, sight tip inserted.
Straight wagglers should be used when there’s a surface tow on the water and you want to fish over-depth. The larger diameter sight tip prevents the float top being pulled under.
Insert wagglers should be used when conditions are calm and you want an ultra-fine presentation. The slim diameter inserts allow you to spot the shyest of bites. They’re made of many different materials, including Middy C-Throu design.
3 Peacock Wagglers
THESE were arguably the first and finest wagglers. Made from long, straight lengths of buoyant peacock quill with the feathers stripped off. Various lengths of quill, from six to 18 inches long had a simple metal eye whipped to the bottom end and were painted and varnished to waterproof them. A brightly painted top allowed it to be seen at long range.
Peacocks come in loaded, unloaded, straight, bodied and insert designs or with dart-type flights for accurate long-range casting. They’re also made from Sarcandas reed.
4 Bodied Wagglers, Giant Wagglers and Missiles
THESE are straight wagglers with a streamlined buoyant balsa body loaded with up to 30g of lead and built to cast up to 70 yards.
Many missiles have a series of flat, circular lead weights that fit together on the base so you can adjust the amount of sight tip sticking above the water.
5 Puddle Chuckers
MADE by Drennan, eight different types of float in 24 different sizes make up the dumpylooking Puddle Chucker family. The clever, seethrough floats are made out of clear plastic and intended for chucking up to shallow island features on the commercial carp pools - hence the name ‘Puddle Chuckers’. Like the Drennan Crystals the see-through design is intended to reduce the risk of spooking educated match carp. The shape means they don’t dive too far under water on the cast, yet they still retain a large enough shotting capacity to be cast to long range. The floats come in loaded or unloaded versions with normal or insert tips.
6 Stick Floats
THESE tapered floats are attached ‘top and bottom’ and are designed for trotting a bait on running water. They come in ‘dome’ top or ‘shouldered’ versions so they can be held back in the current.
7 Avons
ANOTHER running water ‘top and bottom’ float with a bulbous body to increase the shotting capacity and keep them stable in fast, shallow water.
8 Chubbers
MADE for shallow, pacy rivers where you need to get a big bulk of shot down quickly in the fast flow. These large, balsa or polystyrene bodied floats are capable of carrying up to 8 SSG shot.
9 Splashers/Baggin’
Waggler floats DESIGNED for the commercial carp pools ‘Splasher’ floats are made to make a big splash when they enter the water, to attract the attention of cruising carp who associate the noise with food.
Baggin’ wagglers are huge balsa bodied floats with a built-in frame feeder attached. Mould a ball of groundbait round the feeder and fish a hookbait shallow below it. Fish rise up to eat the falling groundbait and grab the suspended hookbait.
10 Windbeaters
DESIGNED to combat surface tow caused by wind, these floats have a bulbous base, ultra-fine glass fibre of carbon stem and big, highly visible sight top.
11 Darts
THESE fast-taper floats are perfect for delicate biting silverfish on canals, drains and stillwaters as they can be dotted right down to spot the tiniest of bit
Guide to stick floats

Catching fish on a stick float is one of the most thrilling forms of river fishing, with roach, dace, chub and barbel the main target species.
There are numerous types of stick float on the market made from different materials and with different-shaped sight tips.
However, all are designed to be attached ‘top and bottom’ with silicone rubber and are ‘trotted’ through the swim in the current. Unlike wagglers, stick floats don’t have a bottom eye.
The art of stick float fishing is to run the float down the swim at a natural pace to make the hookbait mimic a free offering and fool the fish into grabbing it.
Shotting patterns vary, depending on the depth of the swim and pace of the current but, generally, a ‘shirt button’ style will suffice. This means the shot are simply strung out at regular intervals between the bottom of the float and the hook - like the buttons on a shirt.
ANATOMY OF A STICK FLOAT...

BODY: This is the thickest part of the float which always tapers away from top to bottom, giving the float a streamlined profile. Buoyant balsa has always been the main choice of body material, though cork and modern, man-made polystyrene is also used.
STEM: The bottom of the float is made from a variety of sturdy materials to add strength (see pic below left), with the most popular being aluminium (1), lignum - a heavy tropical wood (2), cane (3) or nylon/plastic.
Cane stems are perfect for delicate presentation when ‘on the drop’ fishing. Aluminium stems are for fast, turbulent water, heavy lignum wood adds casting weight to the float and nylon/plastic is a cheap all round stem choice.

SHOULDER: Shouldered Top stick floats have a bullet-shaped sight tip and a pronounced ‘shoulder’ below it - in profile it’s like a human’s head and shoulder. This shoulder enables the float to be held back in the current without it riding up in the water. ‘Holding back’ simply means making the float travel through the swim at a slower pace than the current would take it.
SIGHT TOP: This is the part of the float that protrudes above the water. Dome-shaped tops are extra buoyant and highly visible when trotted long distances. Shouldered tops are for holding back (see above) and rounded or tapered sight tips are for spotting delicate bites from shy-biting species like roach and dace.
AVONS/CHUBBERS: Although not technically stick floats, these short, stubby, highly buoyant designs are fished the same way. Made of balsa or hollow plastic they are perfect for shallow, pacey rivers because they can carry a lot of big split shot to keep the hookbait down, yet don’t get dragged under the water so much when the bait trips bottom.
Guide to quivertips

If choosing a quivertip leaves you trembling in confusion, do not fear, our guide will remove the mystery and solve all your problems…
Watching the quivertip on your leger rod twang round is certain to get your heart racing.
However, selecting the correct quivertip for a particular fishing situation can mean the difference between a red letter day and a blank.
Here’s a list of the factors that affect quivertip choice:
>> CASTING WEIGHT
The heavier the feeder/leger weight, the stronger the tip should be. If you use too light a tip it will either not cast the weight properly or, worse still, actually break on the cast!
>> FLOW OR UNDERTOW
If the tip is dragged right round, by the flow on a river or undertow on a stillwater, you will not be able to see the bites. You should step up the strength of the tip to compensate.
>> SIZE OF FISH
If you’re targeting shy biting silverfish use a very light tip. For larger species like carp, tench and barbel, you should use a heavier tip. The bites from these species aren’t shy and they will often try to pull the rod in.
QUIVERTIPS EXPLAINED
>> STRENGTH
All quivertips have a test curve or strength rating. A test curve is the amount of weight it takes to bend the tip to 90 degrees. Glass tips tend to be 2oz or less, whereas carbon tips can be a strong as 6oz.
>> TIP MATERIAL
Quivertips are made from two types of material, carbon or glass fibre.
CARBON tips are stiffer and generally have a higher strength rating (2oz to 6oz).
GLASS tips have a soft, progressive action and are produced in lower test curves (0.5oz to 2.5oz).
The two materials are identified by the colour of the tips base. Carbon tips have a dark base; glass tips have a clear or white base.
>> TIP EYE
The size of the tip’s end eye can be a giveaway sign to the strength of the tip. Generally, the larger the eye the heavier the tip, as it is designed to be used for distance casting and thicker lines.

WHAT TIP SIZE TO USE AND WHEN...
|
TIP RATING |
WHEN TO USE |
SPECIES |
|
0.5oz - 1oz |
Stillwaters |
Silverfish |
|
1.5oz - 2oz |
Stillwaters and slow-moving rivers |
Small carp, tench bream and silverfish |
|
2.5oz - 3oz |
Stillwaters and moderately flowing rivers |
Carp, tench and chub |
|
4oz - plus |
Distance fishing, the Method feeder and fast-flowing rivers |
Double-figure carp and barbel |
How to cast
The ability to cast close to a fish-holding feature, or consistently drop a feeder on a sixpence, often means the difference between bagging or blanking.
Here’s what to do, and what not to do, if you want to become a better caster...
1
DO... face the target with shoulders square and line the rod up above your head with the blank running above the centre of your head with the butt-end pointing directly at the intended target. Keep your elbows tight to your body.
DO NOT... try to cast across one shoulder with the butt end pointing away from the target. Do not open your elbows out

2
DO... make sure that the float or feeder you’re casting hangs about 76cm (30-inches) below the rod tip and is as still as possible, not swinging like a pendulum.
DO NOT... have the float or feeder wound close to the rod tip, or hanging too far down towards the ground.

3
DO... pick a fixed far-bank marker like a tree, bush or telegraph pole and always cast directly at it and allow for any strong crosswind.
DO NOT... aim for a spot in open water that you cannot positively identify at any time of the day as the sun and clouds travel across the sky.
4
DO... make sure the spool on your reel is correctly filled to almost level with the lip, and you can also comfortably hold the line with your index finger during casting without stretching.
DO NOT... underfill the reel as line will not flow freely, so reducing the length of the cast. Do not overfill the reel as coils of line will fall off the spool, causing tangles.
5
DO... use the reel’s line clip to help you cast an identical distance every time. If casting to a feature like an aerator, make an initial cast but deliberately drop the float or feeder a few metres short of the target. Then, pull another metre of line off the spool and ‘clip up’ before recasting. Repeat the process until the float or feeder lands on target but cannot be overcast because the clip will not allow any more line off the spool.
DO NOT... try to land the float or feeder tight up against a feature with the first cast. If you overshoot, you’ll tangle and probably have to pull for a break.

6
DO... make sure that the guides on your rod are properly aligned.
DO NOT... try to cast when the rod rings are twisted.
Guide to pike floats

There are loads of pike floats on the market, each one designed to do a specific task. Follow our guide to find out more...
1. STUBBY INLINE FLOATS

Stubby inlines are used for suspending larger lives or deadbaits, like half mackerel and big sardines. They can also be used for close-in deadbait work.
2. DEADBAIT PENCILS AND WAGGLERS


These sensitive floats are available in loaded (requiring no shot) and unloaded versions. These floats work best up to a distance of 40yards. Designed for use with deadbaits, they are fished bottom only, with the bait ideally set overdepth.
3. HI-VISIBILITY DART

A dumpy design with a dart flight that provides excellent visibility, especially in rough/choppy water. It’s well suited to fishing at long range. Attached at its base, this float provides sensitive bite indication when fishing static deadbaits.
4. SUNKEN FLOATS

These unusual floats are made to present a fish bait under the surface of the water. They work well on either slow-flowing rivers or stillwaters and are primarily used for popping up deadbaits in the current or for suspending livebaits off the bottom.
5. BALL BOB FLOATS
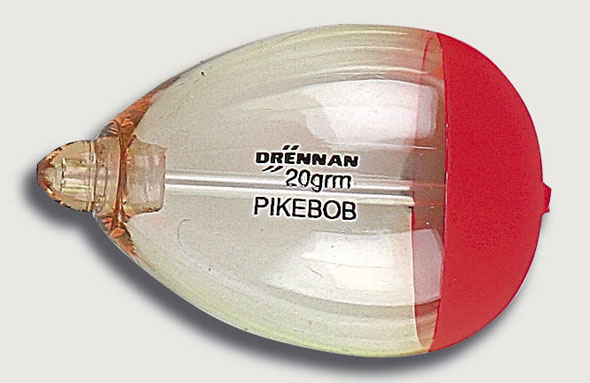
This classic is a truly universal pike float. Ideal for using on still or running water, ball floats are excellent for suspending live or deadbaits, free-roving livebait rigs or laying deadbaits on the bottom. The disadvantage is their shape, meaning they are not as sensitive as some slimmer types of float and they don’t cast well.
6. SLIMLINE INLINE FLOATS

Slimline inline floats are primarily designed for trotting either live or deadbaits in running water. The mainline passes through the centre of the float and is locked at depth using either rubber float stops or a sliding stop knot.
How to choose the correct pole float

Mesmerising - that’s the only word that can describe the vast array of different shaped, coloured and sized pole floats lining fishing tackle shop shelves.
With so many different designs to choose from it is no surprise that lots of pole anglers – inexperienced and experienced alike – choose the wrong float for the venue and weather conditions they are faced by.
In this simple guide to what’s what in the world of pole floats we’ll banish the mistakes and ensure you always choose the right float…
BODY SHAPE
The main part of the float is called the body and there are dozens of different shaped designs on the market – each one is purposely made to perform a different task in different types of fi shery. To make it easier for you to identify the main ‘families’ of pole floats and understand what job each does we have selected and explained the six main shapes…
1. Dibber
A short float that’s ideal when presenting a bait in shallow water tight to the near or far bank of a commercial lake or canal. Do not use in a river. The fat tip makes the dibber highly visible so they are popular with anglers struggling to see a fine-tipped float. Best fished slightly overdepth with a split shot touching the bottom to anchor the float. Not great in windy conditions as the short stem doesn’t stabilise the float.
2. Body-Up
The fat body and distinct shoulders make this a very buoyant float that is suitable for fishing rivers, it ‘rides’ the current well and allows the angler to hold back the float against the flow to slow down the speed the hookbait goes through the swim.
Make sure the bulk of the weight added to the rig is bunched in the last third of the line to ‘bomb’ the hookbait to the bottom of the river and stop it getting lifted away by the river’s flow.
3. Round
A popular and versatile float. In the smaller sizes (up to 1gram) it is best used in stillwaters, especially if there is a wind blowing.
The wide, buoyant body and the long stem helps keep the float stable in the water in rough conditions. In the larger sizes (1.5 gram and above) this float can also be used in slow flowing rivers.
4. Pear
An elongated pear-shaped body gives this float some stability in canals and commercial fisheries. The slender shape helps make this a responsive float that efficiently registers bites from shy-biting species like roach, skimmer bream and crucians.
Good for use with maggots, casters and pinkie hookbaits especially at this time of year when bites become more subtle.
5. Body-Down
A more pronounced shape than the pear (see above) with a fatter body for greater buoyancy and stability in windy conditions. Best used in swims at least six feet deep and the bulk of the shotting should be placed in the bottom third of the rig.
6. Shallow
A short, small bodied float with a fat cane tip for buoyancy and visibility. Made for presenting hookbaits in the mid-to-upper layers of commercial lakes.

From left to right: Dibber, body-up, round, pear, body-down and shallow.
STEMS
The thin stem poking out of the base of the float’s body is called the stem. The weight and buoyancy of the stem effects the behaviour of the float and dictates when they should be used…
1. Cane
Similar to nylon - very light and strong. Use for shallow rigs but not in strong winds when the float will get blown around a lot.
2. Wire
Great when fishing in windy conditions. A long, wire stem helps keep the float stable while it also helps ‘cock’ the float quickly in the water and reduces the amount of shot needed.
3. Carbon
Similar properties to wire stems but they are lighter, this can help if you want to fish a very sensitive rig.
4. Nylon
Very light and strong. Best for ‘up-in-the-water’ rigs when you want the bait to sink very slowly.

From left to right: Cane, wire, carbon and nylon.
BRISTLES
The tip inserted into a pole float is called the bristle. The material each bristle is made from performs a different task, as this guide explains…
1. Carbon
Very sensitive because they sink, only the buoyant body keeps the tip above the water. Brittle and easily broken. Great when using small baits for shy-biting species but floats with a carbon tip are difficult to shot up, you must be precise. A thin smear of Vaseline rubbed on the tip can make it slightly more buoyant.
2. Cane
Buoyant, and strong. They are ideal for using with heavier baits, such as meat and corn, as the buoyancy helps to hold up the bait.
The strength is useful when fishing tight to lilies, weed or rushes for big carp, if the float is dragged through the vegetation the tip won’t get broken. Thicker tip allows for greater visibility.
3. Nylon
More durable than a carbon stem, slightly buoyant and therefore easier to shot up and use. Available in a variety of thicknesses, the fatter the nylon bristle the more buoyant they are.

From top to bottom: Carbon, Cane and Nylon.
Guide to PVA

It doesn't matter whether the carp are feeding well, or just picking at baits, the magical PVA tape, PVA string, PVA stocking and PVA bags are just the thing to help you put a few more big carp on the bank.
What is PVA?
PVA stands for Poly Vinyl Alcohol. It’s a water-soluble substance that can be made into solid sheets, tape, string or woven to create a mesh-type stocking. When cast into the swim, the PVA product will start to dissolve and leave a neat pile of free bait around your hook. This is something that patrolling carp find hard to resist and it’s a method that has caught many large specimens. Lee Jackson, for example, banked his former British record carp of over 60lb when using a PVA bag presentation.
Types of PVA
There are several types of PVA on the market. Each one has a distinct use...

STRING
This is a thin cord made from multiple thin strands of PVA. It’s mostly used to create ‘stringers’. This is the name given to a number of baits threaded on to a string, which is then attached to your hook. The problem with PVA string is that it shrinks in the water before dissolving. This can cause the baits to become fused together in a lump, or worse, the string won’t melt at all.
TAPE
Similar to string, except it has a flat, wide profile. Tape can also be used to form stringers or for tying off the tops of solid PVA bags. Tape also has several advantages over PVA string. It doesn’t shrink in water. Due to its thicker profile, the tape holds strung baits better, great for long-range casting. Also, this thicker profile opens a bigger hole in the free baits, allowing more scent to be released.

SOLID BAGS
Flat, solid bags that can be filled with all manner of freebies, regardless of the size of bait used. They can also be filled with just liquid, such as flavours, slimes or dips. This is a great edge in winter when you are fishing single hookbaits. The liquid puts out a strong level of attraction into the swim, but the only food item is your hookbait. Their disadvantages are that they are slow to form and tie. Always pierce solid PVA bags with a baiting needle, as this will help the trapped air escape, preventing it from floating.
MESH OR NETWORK BAGS

Made from woven PVA thread, this stocking material – which Korda named Funnel Web – has revolutionised carp fishing. Having an open weave, it doesn’t suffer from trapped air. This product comes in long lengths – five or 20 metres – allowing bags of any size to be made up. The other advantage of network bags is that they are much quicker to make than their solid counterparts.
RIG FOAM

These buoyant nuggets are either hooked on to or folded over the hook before casting. Once in the water, they hold the hook off the bottom until the nugget dissolves. The hook will then gently settle on to the bottom of the lake. Rig foam is indispensable when fishing over silt or weed. When the rig is cast in, the lead will either sink into the silt or dive into the weed and the rig foam will help stop your hook from being masked.
PVA foam tip
PVA rig foam doesn’t stay on the hook very well when making hard casts. Places three or four nuggets into some Boilie Funnel Web. Then using a Korda Kompressor stick, compress the nuggets as hard as he can. Then tie the bag off to make a small PVA bag and then attach this to your hook prior to casting. This will stay on the hook after even the hardest cast.

PVA rig foam can be attached like this, but it won’t withstand really hard casts.

Instead, create golfball-sized bags containing three PVA nuggets - this will withstand a hard cast much better.
PVA tip
To give a different presentation, use chopped boilies in your sticks as well as a groundbait mixture. This is called a 50/50 stick. The boilie chop gives the stick a different texture and attraction than pure groundbait.
To make a half-and-half, take a number of hook bait boilies and chop them using a vegetable chopper. A small amount of chopped boilies are placed in the tube, followed by a small amount of groundbait. The mixture is fully compressed and tied off. With a stringer needle, the hooklink is pulled through the sausage. It is important that the groundbait end of the sausage is facing the hook.
This ensures that the hook point is not impeded by being pulled into a piece of very hard chopped boilie.
Top 10 PVA tips

1 Always make bags in a dry environment.
2 Always carry a towel with you so you can dry your hands.
3 Keep your pre-made bags in a watertight container.
4 Make a few bags up before fishing.
5 Don’t make up sticks too early, as the oil will affect the PVA’s melt time.
6 Avoid string when using stringers as it shrinks in water. It’s better to use PVA tape.
7 Always leave a bit of room between your baits on a stringer to allow the water to get at the PVA between the baits.
8 Don’t use pure chopped boilies in your stick mix as the hook point could get masked.
9 When using solid bags, remember to pierce them before casting. This allows any trapped air escape.
10 Always use rig foam when fishing over weed or silt, as it will give your rig a much better presentation.
How to use stick floats

For some anglers, fishing a river with a stick float is the purest form of fishing. The stick float is designed to fish running water only. It is attached top, bottom and middle, via lengths of soft silicone, unlike a waggler, attached bottom only.
The aim is to smoothly run a hookbait through the swim to mimic the free offerings the angler is feeding. Putting a float through a moving water swim like this is called ‘trotting.’
Sometimes, the fish will want a bait trotting (travelling) at the same speed as the current. Sometimes, they’ll want one that moves slightly slower than the natural pace of the river. To slow down the hookbait the angler will have to ‘hold back’ his float. He does this by controlling the speed that line off his reel spool against the force of the current.
Stick floats are rated for capacity in exactly the same way as wagglers. As a general rule, aim to pick a stick float with 1xNo6 shot capacity for every foot of depth in the swim – so choose a 6xNo6 float for a 6ft deep swim. The two main types of dropper shot on stick floats are No6 and No8.
Two main shotting patterns exist – either ‘shirt button’, or ‘bulked’. Stick float rigs should be cast gently underhand to lay the shot out in a line and to avoid tangling.
Shirt Button shotting
Shot are placed down the line every six inches or so. The heaviest (No6) shot should be at the top, with the lightest (No8) at the bottom. This gives a slow, even drop so fish can grab the bait as it falls though the water, often referred to as ‘on the drop.’
Bulk shotting
Heavy shot (from No6 to BB) are bulked three quarters of the way down the line, with smaller ‘dropper’ shot below them. These larger shot are used to bomb the bait down through the water faster when target fish are on the deck in deep water.
There are many designs of stick float, with each pattern designed to tackle a different depth, speed of water, wind conditions, fishing range, or different species of fish.
There are also many different types of sight tips from bulbous heads that can be easily seen on a long trot down the swim, and tiny, pointed ones for delicate, close-range roach and dace work.
Some have ‘shoulders’ so that the float can be held back against the flow to slow the hookbait down, without the tip rising clear of the water. There are four main categories:
Light Cane Stick
A small, streamlined balsa body on a cane stem. Ideal for presenting close to the bank on slow to medium paced rivers when fishing for roach, dace and chub. Cane stick floats lay flat on the surface and will begin to cock as each shot comes to rest underneath the float. These are the best floats to use when fishign baits 'on the drop'.
Plastic Stem Stick
The cane stem has been replaced with a more robust and slightly heavier plastic variety. These floats stand upright when dropped into the water and are therefore provide added stability when fishing pacey, fairly turbulent rivers or streams.
Wire/Alloy Stem Stick
The metal-stem stick is designed to be more stable in ‘boiling’ swims. The slim but heavy wire or alloy semi cocks the float, so less shot is needed down the line.
Lignum Stick
Made from heavy African wood for fishing well out from the bank. These floats are perfect for flicking out good distances, due to the weight in the float, therefore if you need to trot the central glide or even the far bank of a river swim, a lignum stick would probably be the best float to use.
CONTROLLING A STICK FLOAT
Fishing with a stick float requires a different technique than fishing a waggler, mainly because the float is constantly on the move. Not only will you have to watch the float for bites, but you'll need to keep an eye on it to make sure it travels downstream in a straight line (so the bait travels downstream naturally).
TIP CHOICE

1. This one’s for trotting a long way down the swim. You’ll see the large tip at distance.
2. A standard dome top stick like this is suitable for most jobs on normal flowing rivers.
3. This big ‘Bolo’ is for very deep, fast rivers where you need lots of weight to sink the bait.
4. A combination of float 5 and float 6. Use on fast water but retain delicate bite indication.
5. This pronounced bullet-shape tip and large ‘shoulder’ is for holding back in fast water.
6. This fine sight tip is for spotting delicate bites from roach and dace at close range.
How to control a stick float

Fishing a ‘stick’ on a river is all about float control. With practice and patience you’ll find it one of the most thrilling methods of catching a wide variety of river species.
To successfully fish the various types of stick float you’ll need a crisp-action rod to quickly pick up lots of stretchy line on the strike, but with shock-absorbtion to cushion fragile hooklengths and keep tiny hooks in place.
In the old days, the best stick float rods had a long length of slim, solid glassfibre spliced into the tip. Today, modern technology means most hollow tip carbon match rods will fit the bill.
As long as it is light and balanced enough to be held comfortably for five hours or more, the longer the rod the better. Far Eastern-built rods of 14ft to 17ft are now common and reasonably priced. A longer rod gives greater float control and makes stick float fishing significantly easier.
You can often run the float straight off the end of the rod, almost doing away with the need to ‘mend’ the line – the stick angler’s most important job while fishing.
Mending the line involves eliminating the ‘bow’ or ‘belly’ of line that can form in front or to one side of the float as it trots down the swim. (See picture sequence, below.) This extra line can pull the float out of position, or make it act unnaturally. It also prevents a direct strike when you get a bite.
You must keep a straight, tight line between rod tip and float to trot a stick float successfully. To do this, your reel line must float. A sinking line will drag the float under and you will be unable to strike cleanly.
You can fish a normal fixed spool reel with the bail arm open and use your finger to trap and release line from the spool to allow the float to travel down the swim at the pace of the river. Some anglers favour closed-face reels, which tend to tangle the line less in wind.
On faster rivers the ultimate trotting tool is a centrepin. The power of the current is enough to pull line off a good quality, smooth-running ‘pin. Slight thumb pressure on the edge of the drum can slow the float down, ensuring a tight line between rod tip and float. Correct feeding is also vital. Aim to feed six to a dozen maggots twice during each trot down the swim.
One really handy item of equipment is a bait bib. Big pouches on the front of the bibs can hold a couple of pints of maggots that you can easily and conveniently feed without having to keep bending down to pick up bait.
If you can run a stick float through at the pace of the current, you’ll catch fish but one trick to prompt a bite is to hold the float back hard every now and again. This causes the hookbait to waft enticingly up in the water. And that can lead to a fish grabbing the bait.

'MENDING' THE LINE

1. Keep a constant lookout for ‘bellies’ forming in the line and act immediately

2. Lift the rod up and away from the float to gather the excess line causing the bow

3. With the line straightened, reel in the excess and continue on your ‘trot’
How to use curved shank hooks
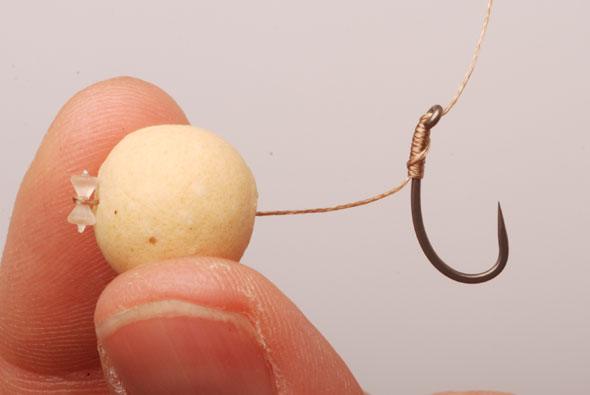
The unique shape of ‘curved shank’ hooks are designed to flip over and catch hold in the mouth of a fish as soon as it sucks in a hair- rigged bait.
You can obtain this ‘flip over’ effect with normal, ‘J’ shaped hooks but, in order to do so, you have to artificially create a curve by steaming shrink tube over a kettle.
Several big-name specimen tackle companies make curved shank hooks, and two of the finest are pictured here.

As you can see from our picture, the hooks have a pronounced curve on the normally straight shank and an ultra-sharp, long point that points towards a downturned eye.
To get the best out of curved shank hooks they must be tied to a highly flexible link like a soft braid (we used Korda Supernatural) or a stripped portion of coated braid (Korda Hybrid). A standard ‘knotless knot’ is perfect to attach the hooklink.
This soft, flexible link allows the hook to swivel freely and turn instantly to achieve the desired ‘flip’ effect. This system works equally well with pop-ups or standard bottom baits.
If you’re getting pick-ups on a standard hook rig, but failing to hook the fish, try swapping to a curved shank set-up, and we think you’ll notice the difference.

The inturned eye kicks the hookpoint into an aggressive hooking angle.

As soon as the bait is sucked in, the hook 'flips' over and pricks the fish's mouth
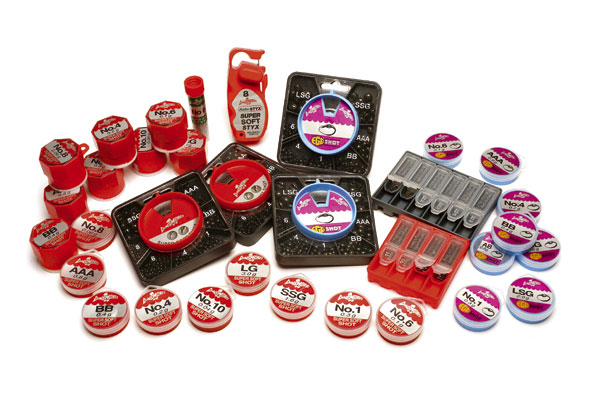
Guide to shot

Do you know the difference between a split-shot and a styl? And why do anglers have to use non-toxic shot? Here’s our in-depth guide...
WHY NON TOXIC SHOT?
THE use of all fishing lead larger than size 8 (0.06g) split-shot up to 1oz (28.35g) leger bombs was outlawed by the British government in January 1987 following concern that increasing numbers of swans were dying of lead poisoning.
X-rays revealed that birds had ingested quantities of discarded fishing and shooting lead shot along with the gravel they naturally swallow as an aid to grind up and digest the fibrous aquatic plants they feed on.
Banned lead shot was replaced by non-toxic substitutes based on lead-free metals like tin.
It is still legal to use lead ‘dust’ shot in fishing but only in size 8 down to micro size 13. These tiny shot are still toxic so make sure you use spill-proof containers on the bank and always take unwanted shot home for disposal.
It is also legal to use bombs/ leger weights weighing more than 1oz (28.35g) because birds will not pick up and swallow such large objects.

● Care should be taken when buying split-shot on holiday abroad (including the Irish Republic) and innocently bringing it back to the UK – it could well be illegal lead.
● Care should also be taken when using old split-shot bought from car boot sales, or retrieved from the attics or garages of friends or relations.
Under the Wildlife and Countryside Act there is no legal defence if you’re caught using lead shot in prohibited sizes. In court, you can be fined up to a maximum £5,000 and risk the confiscation of any equipment involved.
TYPES OF SHOT
FISHING shot comes in many different shapes. In the UK, round split-shot is most commonly used, though this can be sprayed different colours or ‘double cut’ where a deep slit takes the line and a smaller cut on the opposite side allows the shot to be opened and closed easier.

These Stotz weights look like shorter, fatter styl weights and are becoming more popular in the UK
Split-shot specialists Dinsmores sell egg-shaped shot and even hand-held Auto-Shot machines that cut a slot in a legal No8, No10 or No11 lead shot. These locate the line in the slot and then squeeze the tiny weight in place.
Another less popular type of shot is the styl generally favoured by continental pole anglers.
Whereas split-shot are generally round or egg-shaped, the styl is long and thin like a rod with a central split so they can be squeezed on to the line in the same way as a split-shot. Some match anglers argue that styls allow a bait to fall slower through the water. Styl weights differ in weight from UK split-shot sizes.
This can cause confusion because the shotting capacity of many modern pole floats on sale in Britain are expressed in styl weights – e.g. 4x8, or 4x14. (See pole float conversion guide, right, to turn them into equivalent UK split-shot sizes.)
A shorter, fatter type of styl is called a Stotz and is successfully marketed in Britain by Preston Innovations. Many commercial carp pool anglers claim Stotz don’t ‘ping’ off their pole rig line as easily as split shot because of the increased surface area that grips the mono. Stotz are sold in UK sizes 8 to 11.
CONTINENTAL STYL WEIGHTS
(Note: The higher the number, the larger the shot)
No7 =0.01g
No8 = 0.017g
No9 = 0.025g
No10 = 0.035g
No11 = 0.048g
Continental lead styls from No12 to No20 are all illegal in this country.
POLE FLOAT CONVERSION GUIDE
3x10 = 0.10g (2 x No10 shot)
4x10 = 0.15g (3 x No9 shot)
4x12 = 0.2g (5x No10 shot)
4x14 = 0.4g (6 x No8 shot)
4x16 = 0.5g (8x No8 shot)
4x18 = 0.75g (3 x No3 shot)
4x20 = 1g (4 x No3 shot)
5x20 = 1.25g (5 x No3 shot)
6x20 = 1.5g (6 x No3 shot)
UK SPLIT-SHOT WEIGHTS
Non-toxic shot
3SSG = 6 x AAA shot (4.8g)
2SSG = 4 x AAA shot (3.2g)
LG = (3g)
LSG = (2g)
SSG = 2 x AAA shot (1.6g)
AAA = 2 x BB shot (0.8g)
AB = 2 x No1 shot (0.6g)
BB = 2 x No4 shot (0.4g)
No1 = 3 x No6 shot (0.3g)
No3 = 2 x No6 shot ((0.25g)
No4 = 3 x No9 shot (0.2g)
No5 = 2 x No8 shot (0.15g)
No6 = 2 x No10 shot (0.1g)
Legal lead ‘dust/micro’ shot
(Note: The higher the number, the smaller the shot)
No8 = (0.06g)
No9 = (0.05g)
No10 =(0.04g)
No11 = (0.03g)
No12 = (0.02g)
No13 = (0.01g)

Split-shot from No8 and smaller is lead. All others to 1oz is non-toxic material
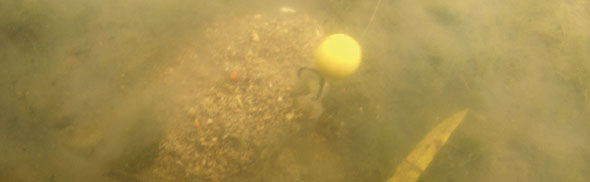
How to use marker floats

A marker float helps you to map out the water in front of you, and tell you the exact composition of the lakebed
A marker float is your underwater eyes and allows you to ‘see’ the lakebed and choose the exact spot to place your bait.
In the beginning markers were really only used as a target when spodding – hence the name – or to find the depth. Then anglers began to use braid on their marker set-ups and a whole new world opened up to them. Just like watching an underwater video, people were able to see the lakebed via the ‘feel’ transmitted through the zero stretch braid.
Now is a great time to be out with a marker set-up, learning about your local water. Face it, not everyone wants to sit for hours struggling to catch in freezing cold at this time of year.
So while the banks are quiet and you aren’t disturbing other anglers or the carp you would normally be fishing for, get out and learn your lake. A couple of hours’ work can result in a mountain of carp in the spring and summer.
Have a feel around in every swim, so you’ll not only discover the depths and features, but also what type of bottom is out there.
Make some simple notes that will guide you at a later date to anything you may find. Then, when you arrive to fish, you will be able to position your baits accurately without the risk of spooking the fish.
Setting up your marker is now simplicity itself. Lots of companies produce purpose-designed kits that will get you started in seconds. In fact, most of them even have diagrams of how to do it. Then all you’ll need is a rod and a reel loaded with braid. If you are only fishing small waters a carp rod and freespool reel will be fine.
For larger waters, more specialised equipment will be needed and will make life easier.
The technique couldn’t be more simple. Cast out the set-up and sink it on a tight line. Keep tension on the float so that it is sitting next to the lead, and then release a foot of line at a time until the float rises to the surface – that will give you your depth. Next, reel the float down again and gently pull the whole set-up across the lakebed. This is the point where you’ll gain your underwater eyes.

As the lead drags across the bottom the ‘feel’ will be transmitted through the braid back to the angler. If it crosses gravel you’ll get a very distinct ‘tap, tap, tap’ as the lead bounces off the small stones.
Silt will be a steady constant pressure, and you’ll watch the rod-tip bend slightly before the lead starts to move.
The last major thing you’ll look for is weed. When you start moving the lead it will hold, then suddenly jolt forward as it passes through a clear area or sparser weed. The harder the lead is to pull back, the denser the weed.

HOW TO SEE UNDERWATER
Left to right:Weed - lead holds, then jerks forward suddenly. Gravel - the very distinctive 'tap tap tap'. Silt - a steady constant pressure.
So there you have it – a quick fix to get you started, and your easy way of gaining your underwater eyes. Now go and ‘see’ your lake for possibly the first time.

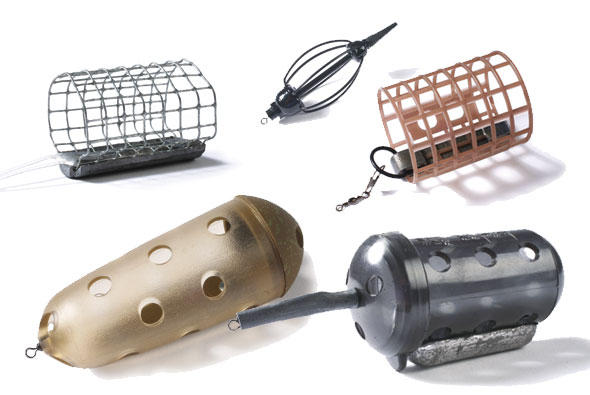
How to choose the right feeder
With so many feeders available to fishermen, selecting the correct type of swimfeeder to use can be tricky.
You may think that clipping any old feeder onto your Paternoster link or onto your free-running swivel will work for you - but the truth is it's often not that simple.
The reason why there are so many different types of swim feeder is because venues vary and circumstances vary, so manufacturers created a variety of different types to ensure that anglers can use the optimim style of feeder to suit the circumstances they are facing.
Here's our guide...
OPEN ENDED FEEDERS

These solid plastic feeders, with a few holes drilled in the sides, are best used with groundbait when feeder fishing in water deeper than four feet.
They are excellent for presenting small amounts of freebaits. To do this plug one end with groundbait, add a few freebies, then plug the other end with more groundbait to sandwich the free offerings.
MESH CAGE FEEDERS

Cage feeders are designed to release groundbait quicker than a conventional open-ended feeder.
The mesh allows water to wash out the groundbait easier. This makes cage feeders ideal when fishing in shallow water of less than four feet.
Cage feeders are not to be used in deep water as the groundbait will have been washed out long before the feeder hits the bottom.
BLOCK-END FEEDERS

This type of feeder is for use with live baits, such as maggots, pinkies or squatts.
Once cast in, the grubs slowly work their way out, leaving an enticing pile of bait around your hookbait.
The baits rate of escape can be controlled - widen the feeder’s holes for a faster release, or wrap PVC tape around the feeder to cover some of the holes to slow down the bait release.
KEEP AN EYE OUT FOR...

1. METHOD FEEDERS
Fished with a very short hooklink. Pack a ball of groundbait around the feeder before casting in, the fish will then knock the feeder about, find the hookbait close by and hook themselves.

2. PLASTIC MESH FEEDERS
These feeders are ideal for tackling snaggy swims because they rise from the bottom faster than heavier metal ones.

3. FEEDER BOMBS
These weighted feeders are aimed at the specialist angler. They’re a maggot feeder that has been designed for long distance casting,
ideal for targeting specimen fish like big roach and bream.
Pole float conversion chart

Are you stuck for the right shot to use for setting up a pole rig?
Do you know the difference between pole float sizes?
Well here's our guide to the most popular pole float sizes in styl weight and their matching weight in grammes, plus a guide to which split shot to use to cock them correctly...
|
Pole float size |
Weight |
Shot equivalent |
|
3 x 10 |
0.10g |
2 x No10 shot |
|
4 x 10 |
0.15g |
3 x No9 shot |
|
4 x 12 |
0.2g |
5 x No10 shot |
|
4 x 14 |
0.4g |
6 x No8 shot |
|
4 x 16 |
0.5g |
8 x No8 shot |
|
4 x 18 |
0.75g |
3 x No3 shot |
|
4 x 20 |
1g |
4 x No3 shot |
|
5 x 20 |
1.25g |
5 x No3 shot |
|
6 x 20 |
1.5g |
6 x No3 shot |
Shot conversion chart
Here's a guide to the weights of each non-toxic and lead split shot available to buy in the UK. It's ideal for helping you to shot your pole and float rigs perfectly to suit the conditions, depths and the presentation you desire...
0.01g
|
Split shot size |
Weight |
Shot equivalent |
||
|
3SSG |
4.8g |
6 x AAA |
||
|
2SSG |
3.2g |
4 x AAA |
||
|
LG |
3g |
- |
||
|
LSG |
2g |
- |
||
|
SSG |
1.6g |
2 x AAA |
||
|
AAA |
0.8g |
2 x BB |
||
|
AB |
0.6g |
2 x No1 |
||
|
BB |
0.4g |
2 x No4 |
||
|
No1 |
0.3g |
3 x No6 |
||
|
No3 |
0.25g |
2 x No6 |
||
|
No4 |
0.2g |
3 x No9 |
||
|
No5 |
0.15g |
2 x No8 |
||
|
No6 |
0.1g |
2 x No10 |
||
|
No8 |
0.06g |
2 x No11 |
||
|
No9 |
0.05g |
- |
||
|
No10 |
0.04g |
2 x No12 |
||
|
No11 |
0.03g |
- |
||
|
No12 |
0.02g |
2 x No13 |
||
|
No13 |
0.01g |
- |
Guide to pole elastics

If you are elasticating a pole for the first time and you are unsure of which strength elastic to use, and how many sections you need to thread it through, here's a guide to help you along...
|
Elastic strength |
No of pole sections |
Target venue and species |
|
No 1 - No 3 |
Top-1 kit |
Canals. Gudgeon, bleak, small rudd, small perch, small skimmers, ruffe |
|
No 4 - No 6 |
Top-2 kit |
Rivers, canals and lakes. Roach, rudd, perch, skimmers, small chub, carp and tench. |
|
No 8 - No 12 |
Match top-3 or power top-2 kit |
River, canal or lake. Carp, tench, chub, bream. |
|
No 14 - No 18 |
Match top-3 or power top-2 kit |
Lakes. Tench and carp in open water. |
|
No 20-plus |
Power top-2 kit |
Lakes. Big carp or for margin fishing close to snags. |
Guide to line breaking strains

Match anglers often refer to the lines they use in diameters, rather than breaking strain, which can be confusing to some.
They use this terminology when talking about the thickness of the high-tech lines they use, mostly when pole-fishing.
So, to help you understand each line's true strength we have compiled a list showing the most commonly used line diameters and their average relative breaking strains...
|
Line diameter |
Average breaking strain |
|
0.06mm |
12oz |
|
0.07mm |
1lb 2oz |
|
0.08mm |
1lb 12oz |
|
0.09mm |
2lb |
|
0.10mm |
2lb 6oz |
|
0.11mm |
2lb 14oz |
|
0.12mm |
3lb 4oz |
|
0.14mm |
4lb 12oz |
|
0.16mm |
5lb 10oz |
|
0.18mm |
6lb 8oz |
|
0.20mm |
7lb 12oz |
|
0.22mm |
9lb |
|
0.24mm |
10lb 4oz |
|
0.26mm |
11lb 6oz |