How to rig and fish with a pellet waggler
The pellet waggler is one of the best ways to put together a huge haul of commercial carp during the warmer months. It's basically a floatfishing tactic that relies on heavy feeding to bring carp into your swim and feeding just under the surface where they compete for the loosefeed.
The best bait for this style of fishing is and will always be sinking pellets of between 4mm and 10mm, depending upon the distance that they need feeding.
And although the rig - detailed below - is very very simple to create, it's the feeding that will make or break a session fishing the pellet waggler.
The key is to feed little and often, any by this we mean feed around 6-10 pellets every minute. This will create lots of tapping noises on the surface which will help attract the carp, but it will also create a constant stream of bait falling through the water.
Once the carp find this falling bait they will start to intercept it and eventually rswim up higher in the water to get at the pellets before all the other carp. Evenutally they will rise so high in the water that you will see swirls on the surface as soon as a new batch of pellets hits the surface.
And that's the time to cast out you float and let your pellet hookbait fall right on the nose of the carp underneath!
1. 3-5SSG Silverbacks from KC Angling are ideal. Others are by Drennan, Middy, Maver Preston, Ultra and Premier
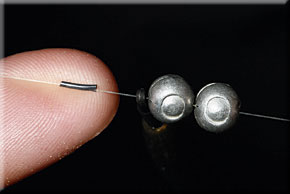
2. You have to use large SSG shot but thread lengths of GURU 0.3mm micro silicone tubing on the line and pinch shot on to this
3. The silicone acts as a buffer and stops the shot pinching directly on the mainline. This cushions the line and prevents damage
4. Leave half-inch gap between shot. This makes the float lay on the surface when it lands, making a larger splash. It flattens on the strike to improve hook-up rate
5. In open water situations where there are few snags Alex uses 4lb GURU Drag-Line on his reel and 0.20mm Shimano Silk Shock Antares as his hooklink
6. Now for the hooklink. Cut off around 15 inches of Antares 0.20mm diameter line and thread it through a GURU rubber bait band
7. Tie a four-turn grinner knot to attach the band to the end of the hooklink. Snip off the tag end of line.
8. This knot allows the band to hang straight down from the hooklink line, producing a good angle with the hook when it is attached
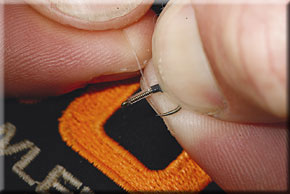
9. Thread micro silicone tubing on to the hooklink. This will help position bait against the hook at the correct angle for hooking fish
10. Thread the top end of hooklink through the back of the hook eye. Slide line through it to pull the bait band up to the bend of the hook
11. Thread the silicone over the hook point and slide it round the bend on to the shank
12. The silicone sleeve holds the line tight to the shank of the hook, keeping the bait band close to the hook point
13. Thread hooklink through the back of the hook eye and whip it down the shank. Whip away from where the hook eye is closed against the shank
14. Whip the line down the shank, making 10-11 turns of line, then thread the hooklink through the back of the hook eye again
15. Moisten coils and pull line tight. This is the knotless knot. Tie Figure of 8 loop in the hooklink and attach to mainline using a loop-to-loop connection
16. Get a hard 8mm Bait-Tech feed pellet and pinch it against the bottom of the bait band
17. Still pinching the band against the bait stretch it beyond the pellet and pull it over it. The bait is now circled by the band.
18. The band grips the bait firmly and stops it flying off the rig on the cast. You should be able to make several casts with the same bait
19. The final rig is best used in water at least five feet deep with the float set to fish the top couple of feet. Shorten or increase depth on the day.


