How to tie Alan Scotthorne's Hooklength Knot
Here Alan Scotthorne reveals the knot that he uses to join a hooklength to his fishing mainline. It's a variation of the loop-to-loop method, but with a twist. It's easy to tie and incredibly strong...
Alan Scotthorne was never really happy with using loop to loop knots for joining his mainline to his hooklength namely because it can potentially cause tangles and it's untidy.
After experimenting with lines he came up with this knot. Well, it's actually not really a knot - it's more of a way of wrapping and twisting a line onto a loop of line. This makes this knot very strong indeed, and therefore reliable enough to be used on silverfish through to commercial carp waters.
But it's developer and creator proves just how reliable and effective this knot it. If it's good enough to a five-times World Champion to use, it must be good enough for every other angler!
Here's how it's tied...
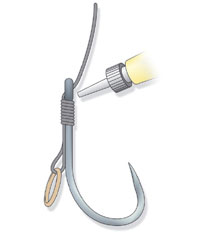
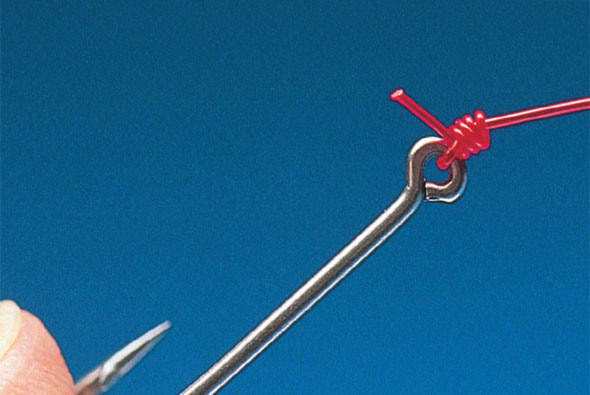
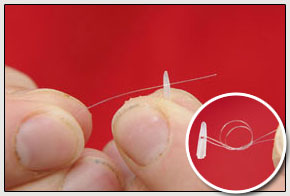
1 Tie a small loop in the end of your mainline and then pass your hooklength line through the loop like this.
2 Hold the line in your left hand and then double it up with your other hand to create a loop in the hooklength line.

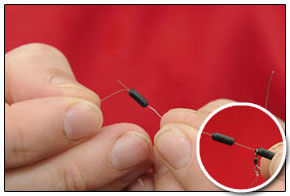
3 Twist the end of the hooklength that is held in your right fingers. This causes the line to spin and twist around the other section of hooklength line.

4 Pass the other end of line, with your hook attached, through the loop that is created when twisting the hooklength line.

5 Moisten the line and pull the knot tight. The tag ends should be trimmed right down as this knot refuses to slip.

How to tie the Domhoff fishing knot

Although detailed here using a spade end hook, the Domhoff fishing knot can be used around the shank of an eyed hook, and when tied securely this is an incredibly reliable knot to use.
It is made up of a series of eight whips around the hook shank. This creates a neat lock upon the hook that won't slip and will not lose any strength as the line is pulled tight.
Most anglers do use this knot for tying their spade end hooks (if they don't own a hook tyer) but if you're suffering lost hooks or broken knots when fishing with eyed hooks you really ought to give this knot a try as it's super-secure.
It can be used to tie the tiniest of hooks through to whopping size 2 speciimen eyed hooks - all you have to to is match the strength of line to the hook size and guage and you're on to a winner.
Here's how to tie the Domhoff fishing knot in six easy to follow stages...

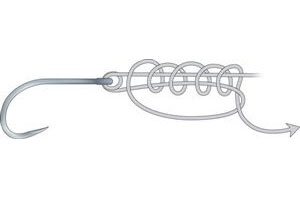
Make a loop in the end of your line. Lie the loop against the shank with about 1cm beyond the bend of the hook. Hold it tight in place between finger and thumb.

Now take the free end of the line and start to wind it up the hook shank, holding the loop between thumb and forefinger and securing the other part of the line underneath the coils. Keep everything under tension.

After eight turns or so trap the whippings with your other hand to reveal the loop.

Now pass the loose end through the loop.
Dab with a touch of saliva and tighten by pulling on the main part of the line. Make sure the line leaves the hook from the front of the spade or the eye and the coils are neat.
This is the finished knot. Tie off the tag end neatly.
How to tie the banded knotless knot
This relatively new knot is one for the angler who needs to catch, bait up and fish at speed.
It gives the angler the hooking power of the knotless knot, while at the same time provides the angler with the ability to attach hard baits like pellets, on to the hair, really quickly.
There's no need to use a drill, a baiting needle or a hair stop when using this knot - the tiny bait band grips around the circumference of the hard pellet secrely enough so that the bait can be cast.
STEP 1
Thread your hooklength through the front of your eyed hook then through a bait band. Now pass the hooklength through the back of the eye of the hook.

STEP 2
Adjust the length of the loop that holds the bait band until the top of the bait band sits at the top of the bend of the hook

STEP 3
Hold the bait band and hooklength loop securely. Take the tag end of the hooklength and whip it around the hook and hooklength loop. Whip the line around eight times, keeping tight turns at all times.

STEP 4
Ensure all the whippings are secure and tight, then make one final whip up and over the previous whippings, then thread the hooklength tag end through the back of the hook's eye.

STEP 5
Add a drop of Superglue to the whipping to secure it in place, then trim off the tag end as close as possible to the eye of the hook.

How to tie the grinner knot
This knot is widely used by match, pleasure and specialist anglers wordwide, for linking hooks and swivels to either mainline, hooklength or even braid.
It is a very strong and relaible knot that should be dampened thoroughly before it is pulled tight.
As this knot features a small amount of whipping above the swivel or hook eye it does not 'strangle' the item being tied, therefore it retains a huge amount of strength.
STEP 1
Pass your chosen hooklength through the eye of your hook or swivel twice. Pull 4ins of the hooklength through. Now form a loop with the tag end of the hooklength.

STEP 2
Thread the tag end over the hooklength and through the loop four times, making sure it exits through the loop.

STEP 3
Moisten the knot thoroughly with saliva and gradually pull it to lock the knot against your hook eye or swivel eye. Trim any waste from the hooklength tag end as close as you can to the knot.

How to tie the stop knot

The Stop Knot is commonly used by match anglers who need to floatfish a waggler in water much deeper than the length of their rod, but it is even more commonly used by predator anglers when they create their float rigs.
A well-tied Stop Knot provides a moveable point that helps prevent your float from sliding all the way along your mainline, and if it is tied using a length of flexible mono, it will cast through the rings of any match rod on the market.
Specialist anglers tend to use powergum to tie their stop knots, which will still pass through their rod's rings because of the large internal diameter of them.
STEP 1
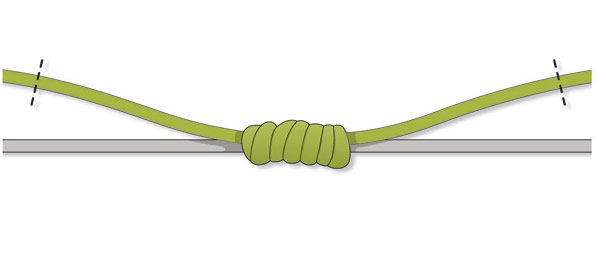
Lay a 6in length of powergum or thick mono alongside your mainline.

STEP 2
Form a loop with the powergum or mono and thread one end through the loop and over your mainline.

STEP 3
Repeat threading the powergum or thicker mainline through the loop and around your mainline four or five times.

STEP 4
Moisten the knot with saliva, slide it into position upon the mainline then pull it tight. Trim the tag ends to around an inch from the knot.
How to tie the water knot

This knot has many uses for the angler. It can be used to link hooklength to mainline, it can be used to join a paternoster link to a mainline, and it can even be used to join mono to braid.
Many angler's use this knot to link their pole mainline to the hooklength, especially when fishing delicate rigs, because it is far more direct than the more commonly used loop to loop technique.
STEP 1
Lay the two lines you wish to tie alongside each other.

STEP 2
Form a substantial loop using the two lines

STEP 3
Ensure the two lengths of line are together and thread the pair of tags ends through the loop three times.

STEP 4
Moisten the knot with saliva or water and slowly pull it tight. Trim off the tag ends accordingly to either create a straight profile when joining a mainline to hooklength, or cut the tag ends to create a paternoster link for legering purposes.

How to fish the lift method for carp, tench and bream

This technique is brilliant for tackling the margins. It was made famous by John Wilson, who has used it extensively for carp on many of Britain's lakes to catch countless fish of all sizes. It works with almost all baits, including boilies.
A The lift method works best if the float rod is placed upon rod rests. This ensures that the rod tip and the line remains stationary, and subsequently the float isn't pulled off line.
B It's best to use large, unloaded floats that offer a lot of buoyancy. When set correctly the float tip should only just break the surface. When a fish takes the bait and therefore lifts the shot that lies on the bottom, the float will rise to indicate a bite.
C Use the bare minimum of shot to lock the float upon the line. Ideally the shot should not even make the float lay flat on the water's surface - that's how little this rig requires around the float.
D You will need to plumb the depth accurately when using this rig because all the float's shot loading needs to ble placed well down the line so that it sits on the bottom. This not only anchors the float, but if it is placed at the correct depth it will pull the float down so low that only the tiniest hint of the sight tip shows above the water's surface.
Float deadbait rig for pike and zander
This rig is ideal for both pike and zander, close in or at long range. It is very simple to create and can be used in water of all depths as the float is not locked at a specific depth - it slides along the line until it hits a stop knot.
A Use a powergum stop knot followed by a bead to prevent the float from sliding all the way up the line. This rig works best when the float's depth is set deeper than the water, eg set the rig to 12ft deep when fishing in 8-10ft of water.
B Mainline needs to be at least 12lb breaking strain. This rig is best used with mono rather than braid.
C Use a bead here to prevent the sliding float from hitting the knot and the wire trace, potentially damaging it upon the cast or when playing the fish.
D Place enough large split shot upon the wire trace to anchor the rig. You may need 3SSG shot at least.
E Mount the deadbait tail first and cut off the fish's head to ensure that the juices escape, adding attraction to the bait.
F The best float to use when fishing with this rig is a straight balsa, often referred to as a pencil float. Avoid using loaded pencil floats as they simply are not sensitive enough to provide instant bite detection.

Rig for floatfishing close to islands and features
This float rig is ideal when casting tight to an island to catch the carp that patrol around its margins. As you will be casting to a feature you can actually use this rig with the line clipped up because a hooked fish will not be able to swim away from you - it can only swim to the side or towards you.
A Use a loaded, bodied float that is attached to the line with a fixed float adaptor. Alternatively a couple of tiny split shot will suffice. The best float to use is a straight bodied waggler because they pop up to the surface very quickly, ready to detect a bite straight away.
B Mainline needs to be strong enough to cope with carp and the problem of hooked fish reaching any snags. We suggest using no lighter than 4lb.
C Make sure that the depth is plumbed accurately so that the rig is set cotrrectly and that the bait touches the bottom.
D By using a swivel to link the mainline to the hooklength esnures that a replacement hooklength can be attached quickly, and as this rig will be cast a lot of times, the hooklength will not spin up as the bait revolves when it is being drawn back to the bank.
E Ideal hooklengths for this rig need to be 0.14mm and above. The best baits for this style of fishing are either sweetcorn, maggots, casters or a piece of worm.
The best pole rig for fishing with chopped worms
This simple pole rig is perfect for fishing with chopped worm for a number of reasons - it's stable so the bait remains still, it pushes the bait to the bottom quickly to avoid smaller bait-snatching fish, and it is perfect for lifting and lowering the bait to entice a bait.
A A rounded or body-down pole float is ideal for this rig. They can be held back against any surface tow well, in windy conditions.
B Always attach your pole float using three silicone strips of tubing to ensure it does not slide along the line.
C Mainlines and hooklengths for this rig should be quite strong as you may encounter tench or carp when fishing with chopped worm. A mainline of 0.14mm tied to a 0.12mm hooklength will suffice.
D Using an olivette around 10in from the bottom will ensure that the bait is forced through the depths quickly, straight past any smaller fish that may snatch at the bait as it drops. Olivettes also help steady the rig in adverse conditions.
E Use two dropper shot equally spaced between the olivette and the hook. No8 or No10 shot are ideal for this as they are light enough to provide a slow, gentle and natural drop of the bait through the final 20 inches of water.
F Fish your bait around 3-5in overdepth, and remember to use a strong hook. One of the best for chopped worm fishing is a Kamsan B711.
Rolling bait rig for river chub and barbel
This rig is brilliant for tackling chub and barbel from small rivers and streams. It requires very little tackle and can be fished with either an Avon rod, a quivertip rod or even a substantial waggler rod.
It can be fished in two styles - either by holding the rod at all times to feel for bites, or by placing the rod in rests and occasionally paying out line from the reel to allow the rig to trundle downstream.
It's a deadly technique for running baits downstream and underneath overhanging snags, weed rafts or within undercut banks where big chub and barbel live.
A You can use either braid of mono for this rig. But whichever you decide, always fish it direct to the hook. As you may be fishing tight to snags opt for a strong mono of no less than 6lb.
B The right amount of weight is an issue with this rig as you must use enough weight to keep the bait on the bottom in the flow. Using a snap link swivel stopped by a couple of BB shot is ideal as you can clip-on any additional Arlesey bombs to cope with stronger flows when roving different swims.
C Although this rig is commonly associated with meat, it can be used with almost any bait providing it sinks. Experiment with hair rigs if you are missing bites, and remember to use substantial hooks to battle with the big fish in strong flows.
How to tie the five-turn half blood knot
The half turn blood knot is one of the most widely used fishing knots for attaching swivels to line and hooks to line. It is also used in specialist fishing circles for joining split rings to lines as well.
Here we show how you can tie this handy knot in just a few simple steps.
Don't forget, though, to dampen the knot with saliva first before pulling it tight.
Like all knots, take a close look at the finished product to make sure it's nice and neat once the knot is closed down and pulled tight. A neat knot will be a strong knot.
Finally, when it comes to trimming the tag end of the knot, cut it as close as possible to the knot itself to ensure the finished product is neat and tidy.
Here's how it's done...

1. Thread the line through the eye

2. Make five turns of the tag around line

3. Take tag back to turn nearest eye

4. Pass tag through loop and lubricate

5. Pull the knot tight and trim off tag end close to the knot
How to catch more pike by wobbling deadbaits
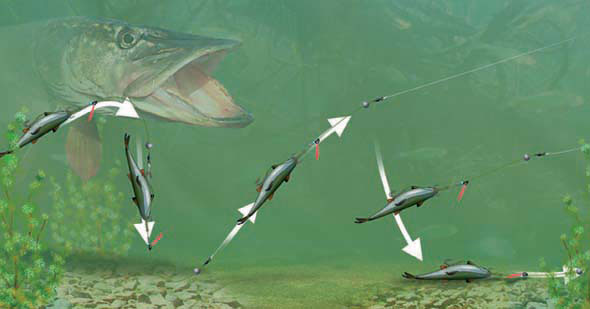
If you learn how to wobble a deadbait you can put yourself in a prime position to catch many more pike and zander from lakes, rivers, canals and drains. It is a deadly technique that predator anglers use to great effect...
All too often predator anglers will mount their deadbaits upon their pike rig, cast it out and sit for hours on end waiting for that drop-off to fall, the alarm to scream or the float to go under. Meanwhile, there could well be a double or even a twenty-pounder making its way around the marginal shelf, seeking the odd roach or two to eat, and that’s an opportunity not to be missed.
All you need is your pike rig, a full-bodied deadbait, a large split shot and that’s it!
Tie your pike rig to your mainline and pinch the split shot (an SSG or a few AA is ideal) onto the swivel end of the wire trace.
Mounting the deadbait needs to be done head first. Push one hook of the mid-trebles through the bottom lip of the deadbait and out of the top lip. Now work the bottom-most treble into the flank of the deadbait. And that’s all you need to do.
The split shot upon the line will help sink the deadbait when you stop reeling in, and a gentle flick of the rod tip will see the bait shoot upwards or sideways. Continue doing this – reeling, resting and flicking – and you’ll make your deadbait look just like an injured food fish. And that’s pretty hard for any nearby pike to ignore.
The best baits for wobbling are freshly killed trout because they wriggle and bend as they are flicked. Other great wobbling baits are long eel sections, herrings, roach and smelt. Mackerel are often just too large for wobbling.
Get more bites when feeder fishing for bream, carp and tench

If you want to get more bites when fishing a groundbait or open end feeder, try this neat trick and twitch your rig back. It’s easy to do and can trigger even more bites than you’ve ever had before. It works brilliantly for bream, carp and tench – even roach too when you’re fishing a maggot feeder.
It is very simple and relies on the fact that you’re drawing your hookbait right over your loosefeed – simple really!
After casting your feeder rig, leave it for five minutes as you may well get a bite straight away. But if you don’t it’s time to twitch your rig to tempt those fish into taking your bait.
The only thing you need to think about before you start twitching your rig is to remember the length of your hooklength. For this example, let’s say that it’s 3ft – an average length for a typical feeder rig.
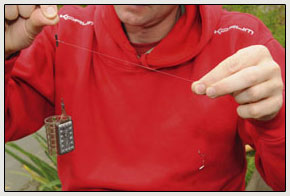
Pick up your rod and gently move it to one side to take up the slack so you have a tight line to the feeder (A).
Now gently begin to pull your rod tip further to dislodge the feeder (B). You’ll feel the feeder bounce. Once it dislodges, continue moving your rod tip very slowly by 3ft. No more than that or you will have defeated the object.
Now your feeder will have emptied the remainder of the bait trapped inside it, your hooklength will have straightened and your hookbait will have been pulled across the bottom, right on top of your feed (C).
Leave the rig in the water for another five minutes to see if you get that extra bite. If not, wind it in, re-bait and recast, and repeat the process all over again.

How to fish for carp with popped-up bread crust and bread flake
All anglers know that carp are suckers for bread crust fished on the surface in the summer, but it is often a very underused bait at all other times of the year. Here we show you how it can be used to catch more carp just off the bottom of stillwaters at any time of the year.
Bread crust and bread flake, by their very nature, are buoyant baits. So they are perfect for use just off the bottom, above any silt or blanket weed.
This is a really simple rig to create, it’s virtually tangle-free, and it’s really productive too with many carp being caught in pleasure and match sessions over the past season.
Here’s how to create it…
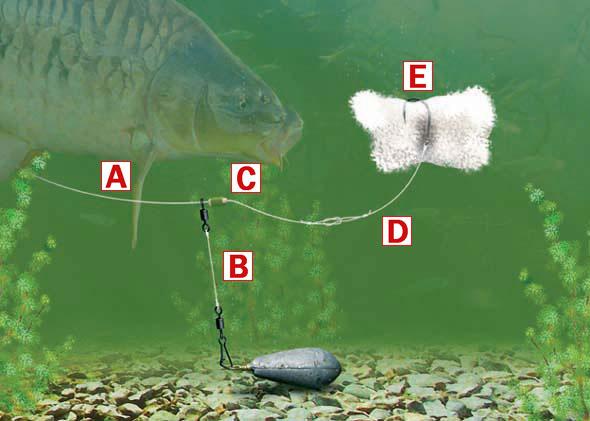
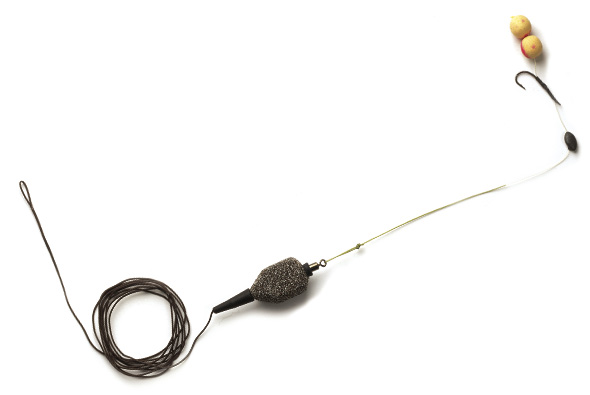
A Your mainline needs to be quite substantial as there is a high chance that you could encounter some very big carp. We would suggest using 6lb as a minimum.
B In order to ensure that the rig is as resistance-free as possible, it’s best to use a short length of line between your leger bomb and your swivel. A 4ins length of strong mainline will be ideal. At one end tie a large swivel, and at the other tie a snap link swivel as this will allow you to chance your lead in seconds if you need a different weight of lead to cast further.
C A leger stop is the ideal item to use to prevent the swivel from slipping down to the hook. If you do not have any leger stops, use a small split shot.
D Your hooklength shouldn’t be too long. Around 6ins is about right. Again you will need to choose a lien that’s strong enough for the carp, so 6lb is a good starting point.
E A large hook is paramount here. Something like a size 10, 8 or even 6 could be used as the swollen bread will help mask the hook once it’s submerged.
A note worth mentioning here is that you will need to cast very gently to prevent the bread coming off the hook. Use a gentle sweeping motion to launch the rig, rather than a punch.
How to tie a flatliner surface controller rig
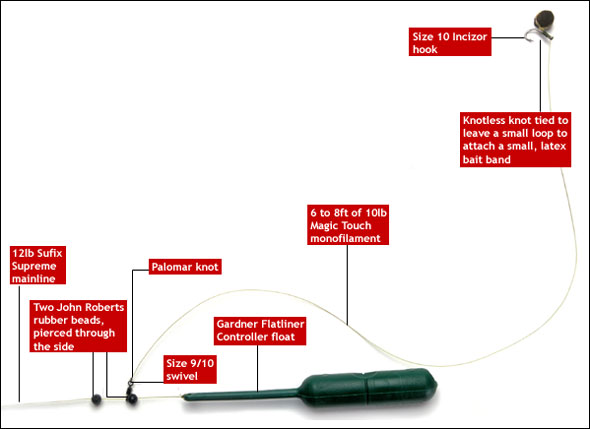
When it comes to surface fishing, the best way to do it is to keep everything simple. Always feed the swim first, get the carp taking your baits confidently and only then introduce your hook bait. Surface feeding carp are cautious at the best of times; feed them in to a frenzy and you can almost cast right on top of them!
Always cast your rig past the feeding fish, then slowly draw the hook bait back in to the feeding zone. Carp are not the best at taking baits from the surface so you need to keep a keen eye on the line and not always the hook bait. It’s best to keep the line fairly tight to the controller, not allowing for any bow in the line, therefore you’ll be able to hit takes a lot easier. It also pays to use either a floating mainline or grease your line to ensure that the mainline floats; this will also help you to hit takes swiftly.
Another tip is to use a slightly different hook bait than your loosefeed. A little edge is to use a floating pellet when feeding Chum Mixers, attached to the back of the hook using a bait band.
The rig I use is semifixed. The two John Roberts’ rubber beads used to fix the hooklength are pierced through the side using a baiting needle. The mainline is then looped over the needle and pulled through the bead. This locks the swivel in place, but if a breakage occurs the carp will easily be able to pull the hooklength from the mainline.
Give surface fishing a go as it’s the most exhilarating way of carp fishing - the anticipation is intense!
Groundbait feeder rig for river barbel, chub and bream
This simple yet very effective feeder fishing rig is perfect for catching river barbel, chub and bream. It’s easy to make and can be used in deep sluggish rivers through to fairly shallow and swift flowing rivers.
The beauty of this rig is that it can be used to catch all of our larger river species, providing you use an appropriate bait and loosefeed to tempt them.
All you’ll need to tie this rig is a variety of different weight of feeders, some eyed hooks, some hooklength braid, strong mainline, a snap link swivel and a buffer bead.
Buffer beads are small rubberised sleeves that fit over half of a swivel. They can be found at all good specialist fishing tackle stores and are ideal for stopping your swivel from hitting knots and potentially weakening them.
The most important part – and often the most technical – is choosing the right weight of feeder. The feeder must be an open end type. Cage feeders simply release their load of groundbait too quickly, whereas open end feeders hold on to the groundbait until the feeder hits the river bed.
Getting the right weight of feeder requires a few experimental casts. Pick a feeder that you think might offer enough weight to hold still in the flow, cast it out and see if the feeder remains static on the bottom. Ideally you should choose a feeder that only just holds still in the flow – one that will easily dislodge and begin rolling if a fish were to pick up the bait and nudge the feeder out of position.
Two of the best baits for this rig are either large drilled halibut pellets or fishmeal boilies – bream, barbel and chub love them. But you could use maggots, worms, casters, sweetcorn, anything you wish.
The feed you put inside the feeder ought to match the hookbait you’re using. If you decide to use a halibut pellet or a fishmeal boilie on a hair rig, you will do best to use a fishmeal groundbait and pellets in your feeder.
HOW TO TIE THIS RIG
A – Larger baits like pellets and boilies should be hair-rigged. You’ll need a strong eyed hook for this and the best way to tie a hair rig is to use the knotless knot.
If you intend to use more conventional baits, just choose a strong hook of a size to suit your chosen bait.
B – It’s your choice whether you decide to use a mono or a braid hooklength. If you decide to use a mono hooklength pick one that will cope with a barbel, so 6-8lb breaking strain will be ideal. If you opt for braid, chose a 12lb breaking strain.
C – Your loosefeed should match your hookbait. Fishmeal groundbait and pellets is an ideal match for boilies and drilled halibut pellets. This combination scores well for river specimens.
D – Your open end feeder should have enough weight in the lead to just hold still in the river’s flow.
E – Use a quick-release snap link swivel to attach the feeder, and a buffer bead to attach your hooklength.
F – Your mainline needs to be strong enough to cope with a big barbel, so choose 8lb or 10lb breaking strain.
How to make the perfect feeder rig for fishing close to islands
Anyone who fishes commercial carp waters will know that islands are a prime area to target for good carp weights. Float fishing is almost impossible due to the amount of line hanging underneath the float - this can catch in overhanging vegetation, so the only effective way to fish tight to an island is to use a feeder rig set up.
Here we show you one of the very best feeder rigs to use when fishing tight to an island feature, in a handful of easy-to-follow steps to make sure you can easily create this rig.
It's worth bearing in mind the style of feeder used here - it's a cage feeder. These feeders are the best choice to use in shallow water around an island as the large holes in the sides allow water to enter rapidly, therefore the attractive groundbait inside escapes quickly to leave a cloud of scent in the water.

1. You will need a 1oz Korum cage feeder, size 16 Korum S3 hooks, size 24 mini swivel, 0.13mm (4lb 12oz) Reflo Powerline for hooklength, Korum Rig Stops, plus Korum Quickstops and Quickstop Needle
2. First, push your hooklength through a Quickstop and tie it on with a simple overhand knot

3. Push hooklength through the hook eye – from the back – and measure out the hair length

4. Tie a knotless knot. Korum S3 hooks don’t have a gap in the eye, so they are safe with this knot

5. On the other end of the hooklength, typically 24 inches long, tie on a size 24 mini swivel with a safe knot like a six-turn grinner. This hooklength attaches on to the reel line above the feeder, helicopter style
6. Slide a Rig Stop on to reel line, add hooklength swivel then anotherStop

7. The swivel can spin freely between the Rig Stops, which slide up and down the reel line. This set-upreduces tangles, yet will pull apart if your reel line breaks so you do not tether a hooked fish

8. Now attach your cage feeder to the reel line, again using a proven knot like a grinner or half-blood. Leave a small tag end on the knot as to account for any slippage

9. Now push the swivel and Rig Stops down the reel line until they are 15cm (6in) above the feeder. Your hook will now drop 45cm (18in) below the feeder when you cast
10. The finished rig is effective and safe so it can be used at any fishery that enforces a ‘no fixed rig’ policy for fish welfare
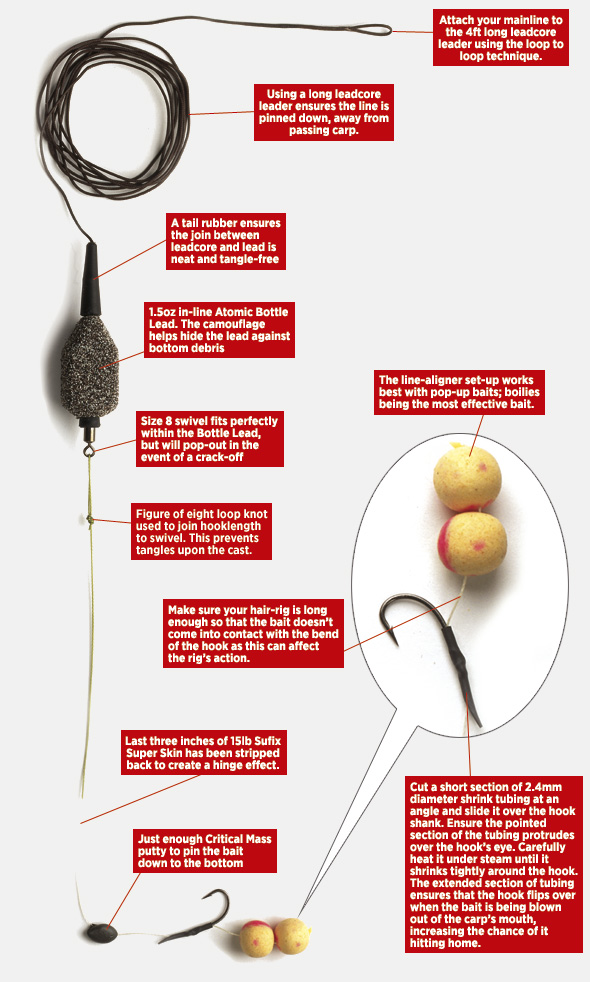
How to tie the perfect in-line big carp fishing rig
A simple tubular extension on a strong carp hook can make all the difference between a lost and landed fish. Richard Farnan explains how...
The line aligner was first published by Jim Gibbinson many years ago. The principle behind the set-up is to create an angle that in itself creates a very effective anti-eject rig.
By using a length of shrink tubing cut at an angle, you elongate the overall length of the hook’s shank. Leaving the ‘tail’ of the tubing makes the hook go into the carp’s mouth in a straight line as the fish sucks up the bait. Upon ejection the hook flexes and spins giving it more opportunities to take a hold.
This set-up is best used with popup boilies presented approximately two inches off the bottom, held in place with a small blob of putty upon the hooklength.
The loop knot at the swivel end ensures no tangling upon the cast. Personally I prefer to use an in-line lead with this set-up and by using a leadcore leader everything is pinned to the lake bed, thus not alerting the carp to any danger. This combination is very effective indeed!
How to tie a Chod rig for fishing silty venues
When fishing for carp over very silty lakes, it is essential to choose a set-up that ensures your rig will not get buried in the soft silt and ruin an otherwise good presentation. And the best rig for this is the Chod rig.
It was specifically designed for just this sort of fishing. The chod has proved to be very successful and has accounted for a lot of big fish recently. It should be used with very buoyant baits and will work superbly in silty areas.
It works upon the principle that the rig can be adjusted to position the bait anywhere along the leadcore leader, so no matter how far the lead sinks into the silt, the bait will be in a prime position to sit above the bottom debris.
This rig incorporates a spliced leadcore leader and fairly tight-fitting beads that allow the hooklink to be semi-fixed anywhere along the length of the leader. Shop-bought Chod rigs are available, for those who don't want to tie their own.
The rig has safety in mind, and the soft beads will easily pass over the spliced joining loop, allowing the hooklink to pull free of the leadcore should a breakage occur.
Here's how to tie your own Chod rig...
A Use a lightweight swivel lead - 1oz is perfect. Keep the lead as light as possible because when you are playing a fish the hooklink will slide down to the lead, so the lighter the lead, the less chance of the fish being bumped off. A short strip of silicone tubing helps neaten the lead swivel.
B This is a leadcore leader. It offers enough weight to sink to the bottom. A 3-4ft length is about right.
C If you want to fix your Chod rig you can place a bead here, between the lead and the hooklink swivel. They need to be semi-fixed - a rubber bead sitting on a short piece of silicone is perfect. It is a personal preference whether you use a stop between your ring swivel and the lead.
D Flexi ring swivel of either a size 11 or 12. It should offer just enough weight to anchor the pop-up. This type of swivel provides a full 360 degree movement, so if a carp sucks at the bait from any angle, the swivel will ensure that the bait can easily move and be sucked up.
E The top stop bead. When fishing in deep silt or weed this bead should be at least 2ft up the leader, but for cleaner bottoms it can be much closer to the lead.
F 2-4ins of very stiff mono hooklink line. ESP and Fox produce some of the best stiff links for the job. 15-20lb breaking strain is about right.
G The hook must have an out-turned eye with a D-Rig knotless knot whipping on the shank. This rig works well with a big hook, even if you are using a 14 or 16mm pop-up boilie. And the perfect bait for a Chod rig is a 14-16mm pop-up boilie that will not sink, regardless of how long the rig is submerged.