
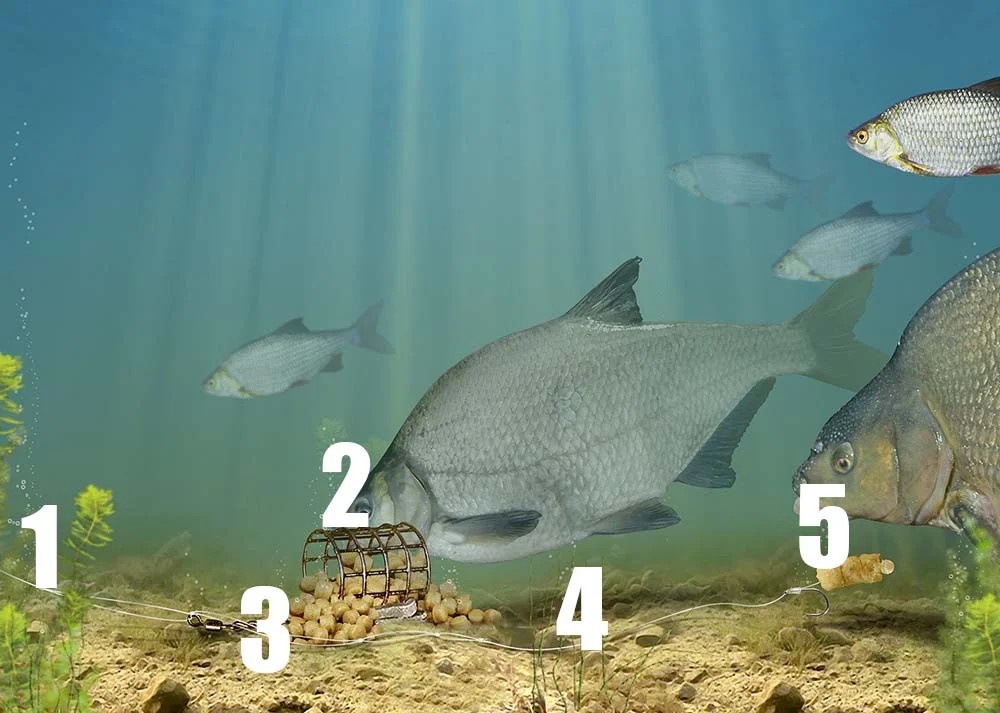
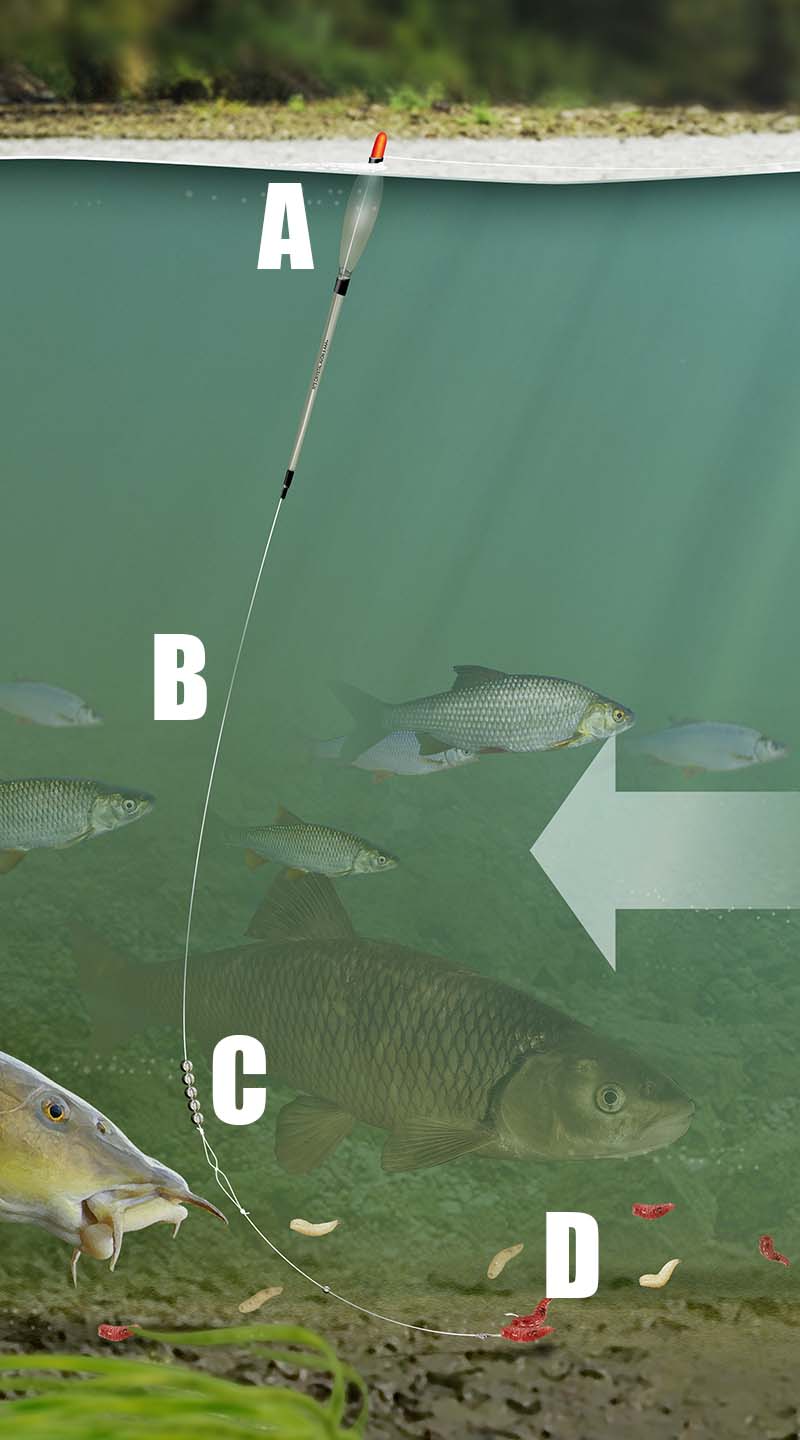
Bream Fishing Rigs | Feeder rig for bream
Commercial fisheries are about so much more than carp these days, with bream and skimmers becoming an increasingly common target for match and pleasure anglers alike.
The pole is a great way to catch them if conditions and your swim allow, but the feeder is still hard to beat for keeping a few fish going into the net.
However, you’ll not need the long distance stepped-up kit of the summer months on big lakes and reservoirs to catch them. Instead, a more refined scaled-back rig will get the job done, along with feeds and baits that give a definite nod to the commercial carp scene.
On venues such as Meadowlands Fishery in the West Midlands the skimmers happily live alongside the carp and can fill in the blanks otherwise spent waiting for a carp to find the bait. Soo follow our advice here and add some bream to your match catch…
1) Running or fixed?
Fishery rules may dictate whether or not you can use a fixed rig such as the one shown here. If both are allowed, the choice is yours. A running rig will tangle less and sees the feeder run directly on the mainline, stopped just above the hooklength. A fixed rig can result in a better bite and more bream hooked, and involves trapping the feeder inside a 6ins-8ins loop in the mainline. The feeder can still run, but will stop when the rig is pulled a certain distance by a fish picking the bait up. In this instance, it’s possible that the bream will hook itself.
2) Cage feeder
A cage is better than a plastic open-end feeder. It is made of metal and so is heavier and can be cast further with more accuracy. The contents will empty quicker too, useful on shallow lakes. In deeper swims you’ll be better off with a plastic open-end with fewer holes for the feed to get out. Pick a small model to start, as you don’t want to put in lots of bait, and go for a weight that allows you to comfortably reach the distance you want to fish at.
3) Looped boom
Whether you go for a fixed or running rig, to cut down on tangles with a fixed rig, tie several small loops in the mainline immediately below the loop that the feeder sits in. This creates a stiff ‘boom’.
4) Hooklengths
A 50cm-long hooklength is good for starters. If you find that you are getting bites but not connecting with them, shorten the link by 10cm at a time until you hook fish. Going longer can work on harder days or if you think that the fish are sitting just off bottom and watching the bait fall. A tell-tale sign of this is a sharp tap on the quivertip just as the feeder settles.
5) Top baits
Ringing the changes on the bait front is another important aspect to master. Single or double red maggot makes a good starting bait, but a redworm can work wonders on tricky days. Dead maggots are equally good, especially on silty waters, and a bait that can work on commercials is two or three small, hair-rigged expander pellets.
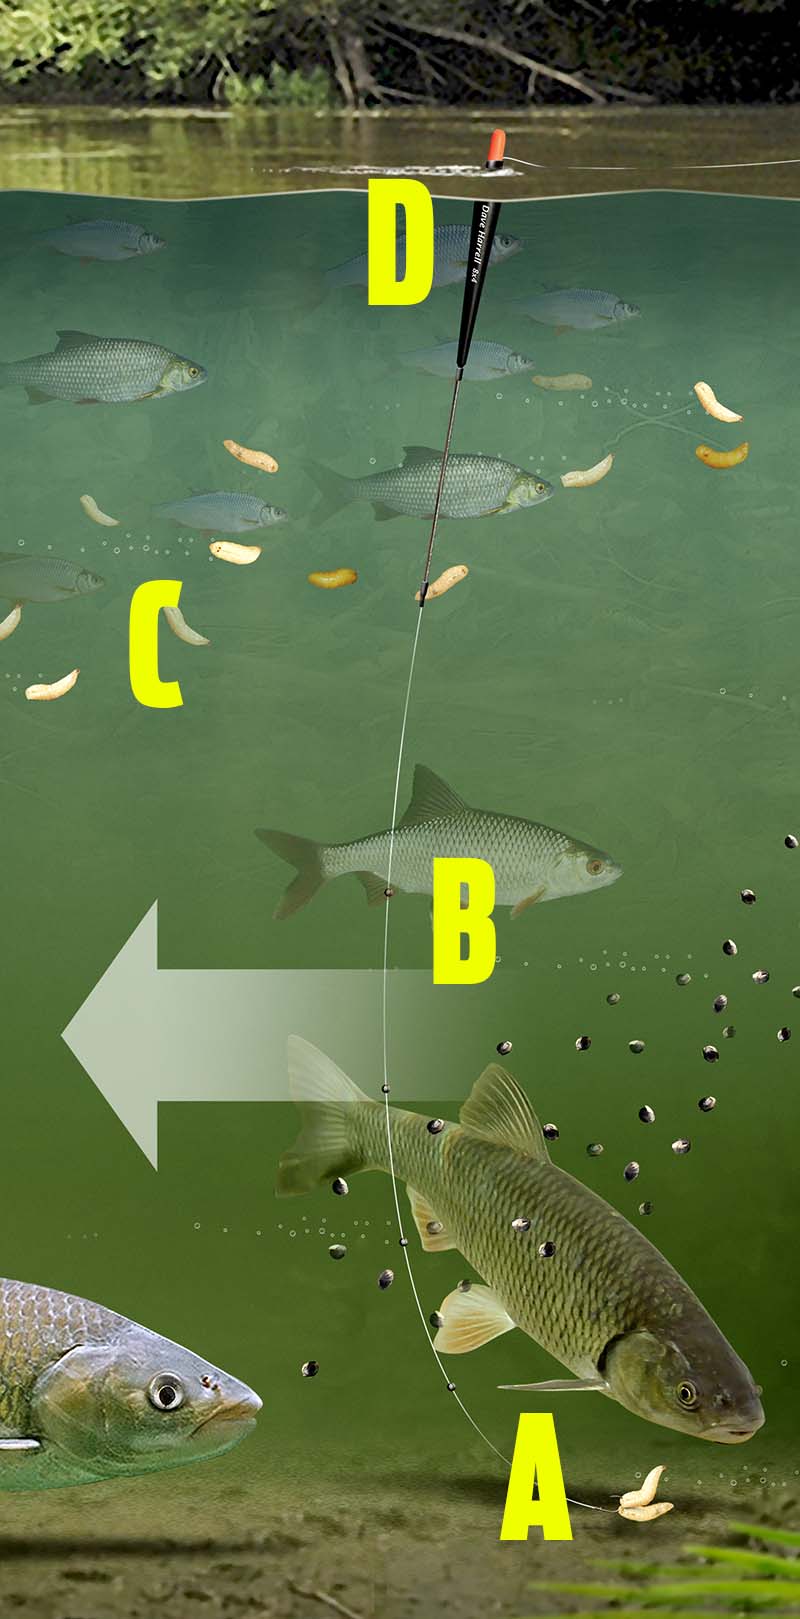
Carp fishing rigs | The pellet cone rig for carp
The cold snap has well and truly put the mockers on fishing.
Thoughts of mild weather are a distant memory – but the fish still have to feed and, with a slight change in tactics, it’s still possible to get a few bites from commercial fishery carp.
Whereas the feeder would have ruled in warmer weather, when temperatures tumble and water clears, the pellet cone takes over.
This simple approach is basically bomb fishing but with a cone of compressed micro pellets sat just above the hookbait.
Your bait is placed right in amid the feed and you have the option to feed varying amounts through changing cone size or, indeed, nothing at all by dispensing entirely with the cone.
How to make a pellet cone
• Fill your chosen cone with prepared micro pellets.
• Push a baiting needle through the cone and attach the hooklink.
• Slide the cone down the line until it rests just above the hookbait.
• Ease the cone off and attach the hooklink to your mainline.
How to tie the pellet cone rig.

Bombs
The size of lead you use will be dictated by how far you need to cast, but also the size of the cone. A big cone will be a job to cast 50 yards with a 0.5oz lead. Put simply, if the lead and cone somersault on the cast then the weight is too small. As a guide, a 1oz lead is about right for general commercial fisheries but on big reservoirs, you may want to think about upping this to 2oz.
Hooklink length
Eight inches to a foot is about right, ensuring that the lead is kept away from the cone and hookbait to avoid any chance of spooking fish in clear water. This is also long enough to eliminate the chance of tangles on the cast as the cone wraps around the lead, as can happen with a shorter link.
Which pellets?
Micro pellets are the only size you’ll manage to squeeze into a cone, but they’ll need preparing first. Soaking them in water for a few minutes and then draining them off and leaving them to dry will do the job but give this process time, allowing the water to fully penetrate and completely soften each pellet. For long casts you can add a pellet binding powder to them if you wish, although this may slow down how quickly the cone breaks up in the water.
Pellet cone sizes
Commonly, there are three cone sizes on the market. Just as with feeder fishing, which one you pick will govern how many pellets you feed. The smallest cone is ideal for cold, hard days, while the biggest size is the one to pick for big carp on mild days when the fish may be a little hungrier, or if you plan on leaving the rig out for a long time.
Carp Fishing Rigs | How to tie the mag aligner rig
Want to catch carp in the winter? Then this is the rig you’re going to need. With the carp having a reduced metabolism and appetite, now is not the time to pile in mountains of boilies, yet a carefully presented pile of ‘wrigglers’ can soon get your bobbins dancing.
As far as maggot rigs go, the mag aligner really does takes some beating. By using a large PVA mesh bag of maggots tied to a big rig ring by the lead, the mag aligner is virtually tangle-proof on the cast.
What’s more, using a fake maggot as a line aligner over the hook makes the rig extremely hard for the carp to deal with, leading to reel-churning runs in even the coldest weather
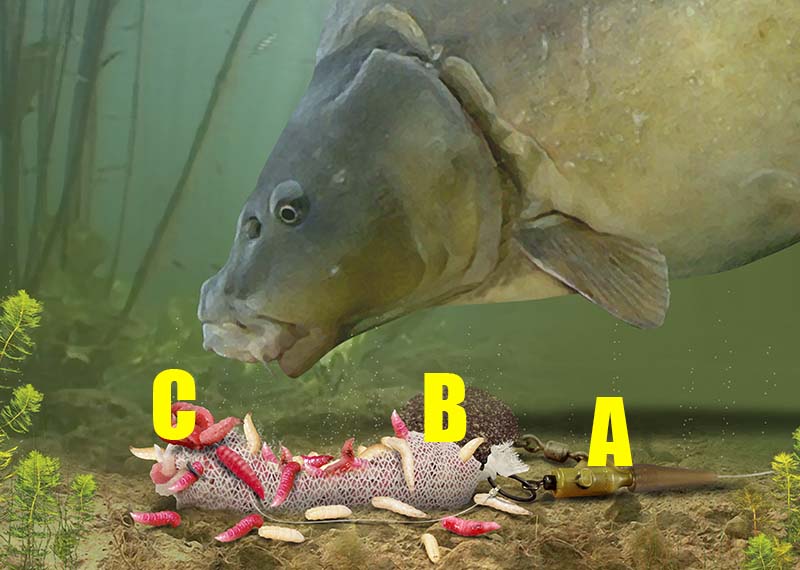
A) Terminal set-up
Use a lead clip rig or a helicopter set-up.
B) Large rig ring
Leave a tag end on the PVA bag knot and tie it to a large rig ring.
C) Anchor point
Nick the hook into the bag before casting to help prevent tangles.
How to make a Mag Aligner
1) Pierce the underside of the fat end of a fake maggot with a baiting needle and run it along the base until it exits the pointed end.

2) Tie a hook on to the end of your hooklink using a grinner knot. Grab the hooklink with the baiting needle and thread on the fake maggot.

3) When complete it should look like this. The hooklink should exit the maggot from the underside. This helps the hook to flip over.

Carp Fishing Rig | PVA bags for carp
At this time of year the carp fishing in all lakes is hard as the carp don’t want to feed as much in the cooling water. A small PVA-bag rig like this one is perfect to get a small amount of bait perfectly placed around the hookbait.
Quick tip: Make sure the contents are dry when you make up your PVA bags, a job best done at home before fishing.
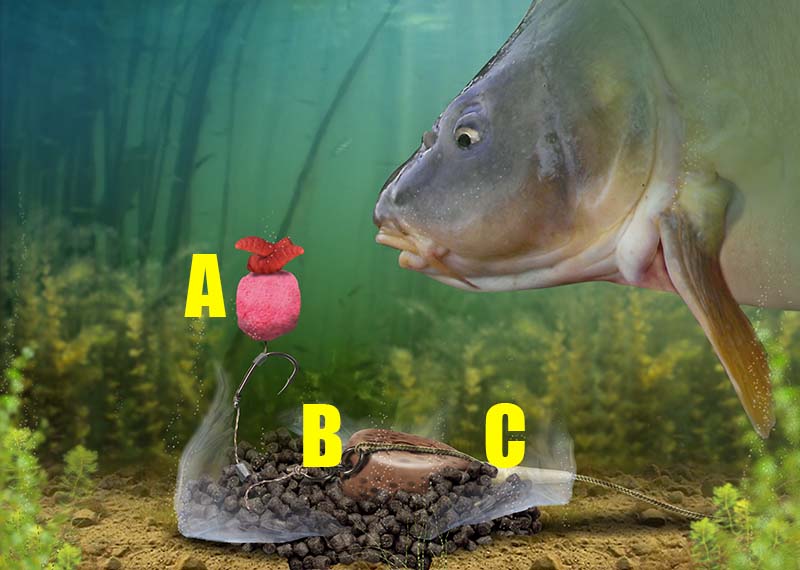
A) hookbait
Try a pop-up boilie enhanced with two live maggots on the hair.
B) The PVA bag
A PVA bag can be attached in several ways. Here it has been created around the leger weight.
C) solid or mesh?
Solid PVA bags are used when fishing for bigger carp. When fishing commercials for smaller carp and F1s, use a small mesh bag and nick it on to the hook.
Roach Fishing Rig | Stick float roach rig
Rain means added flow on our rivers and this is when the stick float comes to the fore. It’s capable of running a long way down the swim and searching a lot of water.
The waggler rarely works in these high water conditions, which means a top and bottom-style float is a must.
Highly buoyant and easy to see when trotted a long way down the swim, the stick also offers great control and stability when riding uneven water. It lets you slow the run down to half the pace of the river, or even make the tackle stand stock still.
A) Shotting
Sticks can be shotted with a bulk to keep the bait on the bottom in any strength of flow but in autumn when the fish will still be reasonably active, using a strung-out pattern (known as shirt button style) lets the hookbait behave very naturally in the swim.
Checking the float to a standstill will see the bait rise up off the deck slightly, which can often induce a bite.
B) Depth
You can fish overdepth with the stick float in slower water but to get the best out of the float, set it just touching bottom. This will stop the float from being dragged under in strong currents.
C) Bait
Go big! Double maggot or caster is a meal few roach will be able to resist, or you can take a leaf out of the specimen hunting book and use a piece of breadflake in clear water for a real specimen.
D) Feed
Regular feeding is essential to ensure a steady stream of bait is going down the peg. This will not only keep fish in the swim but also draw any sat well downstream – these will move upriver to investigate the free flow of food. Maggots, casters and hemp are all good choices, fed every cast.
Barbel Fishing Rig | Big top and bottom float rig
Targeting fast and shallow swims flanked by willow trees for big chub and barbel is adrenaline-pumping stuff.
You’ll have a real battle on your hands once a fish is hooked – and the tactic needs a very different top and bottom float set-up to a traditional stick float rig.
Owing to the pace, you need to fish a heavy Avon-style float taking several AAA shot to not only give you great control of the rig but to also get the bait down to the bottom quickly.
Lines and hooks also need to be strong, as your tackle will take a lot of punishment over the course of a five-hour session. It’s not really for the faint-hearted, but the results can be truly satisfying!
A) Float size
With the river running at full pace, your float won’t be in the swim for that long because it will soon trot out of the peg.
To get the bait to the bottom at the head of the swim, pick a big top and bottom float taking 4-5 AAA shot. This will let the float cock immediately and begin fishing because a bite can often come right at the head of the swim.
B) Pile on the pressure
When a fish is hooked, don’t stand back and admire the curve in the rod – the fish will do you in a snag! Instead, wind right down and pull hard on the fish to subdue that first run and put you in charge of the fight.
A through-actioned rod will help here, absorbing the lunges and runs without the danger of a snapped hooklink.
C) Bulk shot
In shallow swims you’ll not get bites on the drop and the aim is to get the bait down to the bottom in seconds.
This means a very simple and positive shotting pattern made up of all the float’s weight grouped into a bulk just above the hooklink. Typically this will be made up of large BB or AAA shot.
D) Proper tackle
Not only are the chub and barbel you’re aiming for of a decent size, but the riverbed may be uneven, with lots of rocks.
Naturally, a hooked fish will do its best to cut you off by rubbing the line against these snags.
It makes sense then, to use heavy tackle with a hooklink of around 0.16mm or 0.18mm and a strong size 14 or 12 hook for fishing big baits.
Pike fishing rigs | Drifter float
Pike fishing season is here but what rig will you be using this winter? As pike turn off from the idea of chasing a lure around the most logical choice is to turn your attention to deadbaiting. We’ve gone to current Drennan Cup champion Dai Gribble on what his preferred choice of pike fishing rig is.

One of the most exciting ways of catching pike at this time of year is to drift deadbaits under a float.
This allows you to cover lots of water and depths, and you can search out areas you might not be able to access from the bank or boat with other styles of pike fishing.
The key to it is a rather unique-looking float made for the job. Despite looking rather complex, this set-up is actually quite straightforward to put together and fish with.
In years gone by the biggest obstacle to fishing a drifting float effectively was getting your mainline to float, but now there is a plethora of floating braided lines available that are all perfect for the task.
Braided lines have another big advantage over mono in that they have very little stretch. This enables you to set the hooks even when the drifting float is 100 yards or more out from the bank.
Watching any pike float disappear is exciting enough, but there is something extra special about watching a float that has travelled across many yards of water sink from sight. Give it a go!

A) TRACE CHOICES
A trace is tied to the braid mainline using a five-turn grinner knot.
The trace is chosen to match the size of the bait – the bigger the bait, the bigger the hooks I use. With small baits such as a smelt or roach I choose size 8 trebles, going up to size 4 for a larger herring or mackerel deadbait.
B) DEPTH TO FISH
It helps if you have some idea of the depth of the water you are going to drift over. I like to set the float so that the bait is about 18ins from the bottom, as generally pike are lying up on or near the lakebed.
If you find the bait is catching on weed or on the bottom, wind in and reduce the depth. Similarly, if the float has travelled to the end of the drift without catching on anything you can increase the depth a little each cast.
C) SIZES TO USE
The float’s buoyancy comes from the foam, egg-shaped part of the float, and different sizes of egg allow you to use different size weights and baits.
For small baits up to about 3oz I use the smaller egg. I use a drilled bullet as weight and stop it with a small rubber bead to protect the knot.
You want the combined weight of the drilled bullet and deadbait to cock the float with the vane standing just clear of the water. Too much weight and the vane will be partially submerged, too little and it will blow over rather than move in the wind.
D) ADJUSTING THE DRIFT SPEED
The main part of the drifter float is a vane attached to a long stem. Adjusting the elastic band holding it in place can set the degree of curve in the vane. The degree of curve dictates how fast the float will travel – the greater the curve, the more the wind will catch it and the faster it will drift.
E) ATTACHING THE FLOAT
To set up a drifter float, first thread a rubber float stop on to the braid. This enables you to set the float at your chosen depth.
The float is attached by threading the braid through the long piece of tubing with a small float at the top.
The drifting part of the float is attached to the bottom end of the tubing. This means that when you strike, the float will offer little resistance and ‘fold’ over, much like a normal waggler float.
Chub fishing rig | Maggot feeder rig
One of the easier chub fishing rigs to tie makes this a deadly tactic for when you are next out on the bank. To see more chub fishing rigs like this, check out our rig page here

A) Hookbaits
By and large, double maggot is a popular choice. Go for reds or whites – chub really like these colours, especially in clear water, but don’t be afraid to try a bigger bait if small fish are a nuisance.
B) Hooks and lines
Except in snags, a soft through-actioned specialist rod lets you fish safely with size 18 or even 20 hooks if you don’t try to pull the heads off the fish - use a brand designed for bigger fish. A mainline of 4lb-5lb, coupled with a hooklength of 0.12mm or 0.14mm low-diameter line, caps things off.
C) Feeder size
Feeder size depends on the number of small fish present. If there are lots of them, a big feeder is needed to ensure some bait is left over to keep the bigger fish happy, but in colder weather when appetites are low, a tiny cut-down feeder holding just half-a-dozen maggots will get an indication when nothing else will.
D) Length of hooklink
As in most types of feeder fishing, this can change throughout the day. In clear water a longer link keeps the bait away from the feeder in among the maggots being washed down the peg by the flow. However, with colour in the river, chub can home in on the feeder and a very short link puts your bait right next to where the maggots are exiting.
Chub Fishing Rig | stick float rig
Learn how to tie one of the best chub fishing rigs with these easy steps. For more chub fishing rigs check out our rigs page here.
A) Lines and hooks
For chub, a 4lb-5lb mainline and a low-diameter hooklength of a slightly lesser breaking strain are advised. As for hooks, these should be size 16 or 14, strong but not overly thick in the wire.
B) Shotting pattern
Shot can be fished as a bulk well down the line, with a single smaller dropper shot below. In really shallow swims the lack of depth means there’s little time for the fish to see the bait falling. In deeper water you can adopt a spread-out shirt button-style pattern as here, and use smaller No6 shot to achieve a more natural fall of the bait.
C) Feeding
Loosefeed maggots, casters and hemp, with single or double maggot or caster on the hook. Feed and cast slightly downstream, and keeping the bail-arm open, pay out line to achieve a smooth trot – strike by trapping your finger on the spool. Mend the line to stay in contact with the float.
D) Float size
This is a positive tactic so you’ll not need small, delicate floats. Select a model with an alloy stem for stability and a highly visible domed top to see the float at distance. Allow a No4 shot for every 12ins of water, so in a swim 3ft deep that means a float taking three No4 shot.
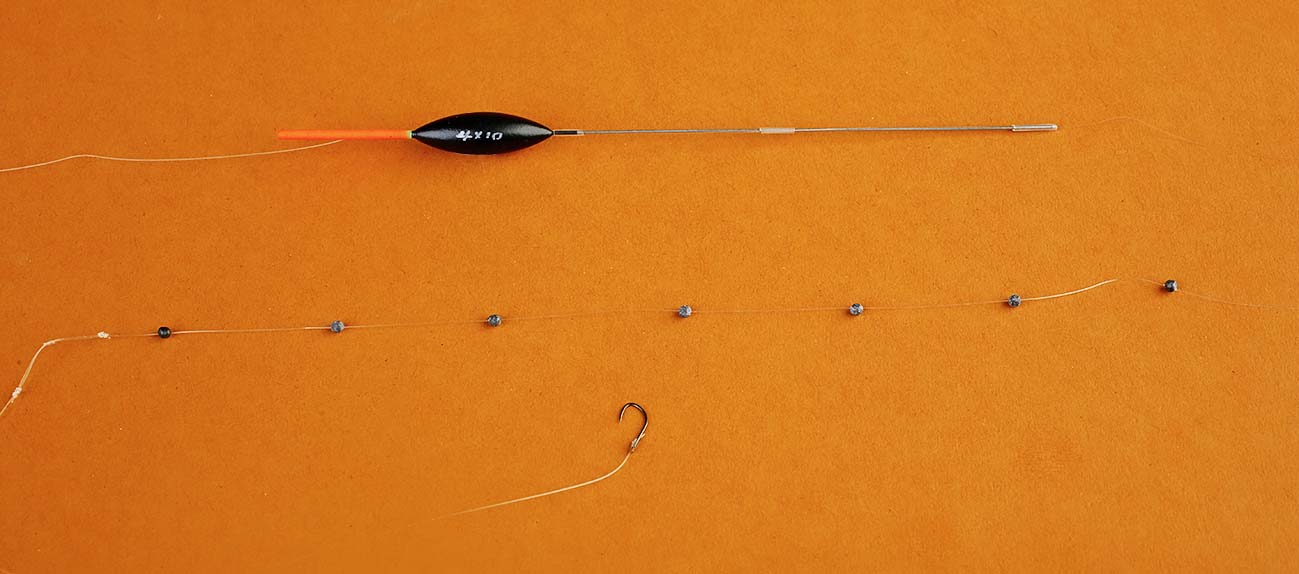
Five amazing fishing rigs
Here are five amazing fishing rigs to help you catch more next time you are on the bank. Whether you fish with a pole or a rod these rig will keep you catching all day long and give you the best chance of perfectly presenting your bait. So here are five of the best fishing rigs with Steve Ringer.
Carp Ape
The KC Carpa Ape is a versatile float pattern that I use for lots of different options, ranging from shallow work to mud-line fishing against an island.
In autumn it comes into its own for fishing across in 18ins to 3ft of water on a snake lake.
Mainline: 0.15mm Guru N-Gauge
to a 4ins hooklength of 0.14mm Pure Fluorocarbon, which I really like at this time of year when the colour starts to drop out of venues – I’m convinced it gets me those extra bites.
Hook: Size 16 or 18 Guru F1 Pellet. These are perfect for pellets, corn and even maggots.
Shotting: Normally a tightly strung bulk of No10 shot. However, if the water is very clear I will string these out more to achieve a slower fall of the hookbait. Mix it up to find out what works best on the day.

Mick Wilkinson F1 Slim
I designed this float with Mick as I wanted a slim-bodied wire stemmed float with a relatively short bristle that sits quickly when lifting and dropping the rig.
Mainline: 0.13mm Guru N-Gauge to a 4ins hooklength of 0.10mm Pure Fluorocarbon. Fluoro gives me an edge once the water starts to clear.
Hook: Size 18 Guru F1 Pellet for maggot and pellet work. This fine-wire hook is spot on for F1 fishing and is easily s’ ’carp too.
Shotting: This depends on whether I am maggot or pellet fishing. For maggots I’ll always opt for a loosely strung bulk of No11 shot and for pellets a tightly strung bulk. My theory has always been that shy-biting F1s follow maggots down before sucking them in, so a slowly-falling hookbait is important.
This is backed up by the fact that when maggot fishing most bites come just as the float settles.
Pellets seem very different. I always feel a more positive shotting pattern works better.

Carpa Perfect/Gloucester
My favourite pattern for deep-water silver fish work, I use this for all my Irish work as well as winter pellet fishing for skimmers.
This float features a wire stem so is super-stable, plus it has a thick bristle, meaning it’s easily visible in even the poorest of conditions.
Float size depends on depth and conditions. As a guide, for deep-water skimmer fishing in fair conditions I will opt for 1.25g.
Mainline: 0.15mm Guru N-Gauge – quite heavy, but this helps to minimise tangles when shipping in and out at speed. Hooklength is 6ins of 0.12mm Pure Fluorocarbon. There is always the chance of a rogue carp, and this gives me a good chance of landing it.
Hook: Size 16 Guru F1 Pellet.
Shotting: Slightly different to the norm. In deep water I like to fish with positive droppers, so I use double No9s with the first pair 7ins from the hook and the next two 7ins above this. Then, a further 7ins-8ins further up, I have my olivette and shot.
Something I do on all my heavy rigs is fix a few small half-styls a few inches above my olivette. These allow me to fine tune the bristle of the float during the session.

Mick Wilkinson steady
If I had to pick one float to do the lot on commercials, then this would be it! There isn’t a single bait that I wouldn’t fish with it. Pellets, corn, meat and even maggots, the Steady is perfect for them all. It’s also a float I will use on both short and long pole where carp are concerned.
I’m a firm believer that light floats produce more bites once the water starts to clear. I’ll often use a 4x10 float in depths of 4ft-6ft, to give that all-important slow- falling hookbait that appears as natural as possible.
Mainline: For carp it’s 0.17mm Guru N-Gauge to a 6ins hooklength of 0.15mm in the same material.
Hook: Size 16 super LWG which
covers me for both meat and corn hookbaits, as well as maggots and pellets.
Shotting: Loosely strung bulk of No10s, with the bottom shot 6ins from the hook and the rest of the droppers spaced at 1.5ins-2ins intervals above this.
The idea is to get a slow and even fall of the hookbait – when carp fishing in the colder months most bites tend to come just as the float settles, indicating that the carp has spotted the hookbait and followed it down.
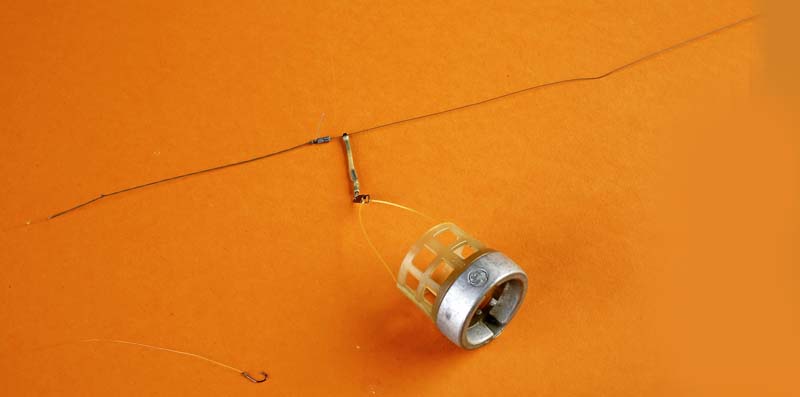
Running Feeder Rig
One question I get asked more than any other is how to tie my running feeder rig, which I now feel I have pretty much spot on in terms of knowing I’m always fishing tangle-free.
This is the rig I use for everything from the World Feeder Championships to Ireland. It can be used with or without a shockleader, and whether I use one or not really depends on the distance at which I am fishing.
1: Thread a link on to the line. The one in the picture is a prototype Guru link which is based on my own version. You’ll notice it’s covered in shrink tube, which eliminates any tangle-causing sharp edges or tags. I prefer a short link of 1.5ins.
2: Fix two No8 Stotz on the line.
3: Tie a 3ins twizzled loop below the Stotz.
4: Slide the Stotz down to the knot at the top of the 3ins twisted loop.
5: Tie a 1ins loop in the end of the 3ins twisted loop.
6: Attach your hooklength to this loop, loop-to-loop style.
Perch Fishing Rig | Prawn rig for big perch
Now that the weather is cooling down, these popular predators are starting to feed in earnest, and the good news is, you can catch them using the same methods from almost every fishery in the land!
There are many ways of catching perch, but for this week’s Catch 22 Challenge we thought we’d put you on to a fantastic way of putting a specimen in your net.
Prawns are a wonderful bait for perch! Their fishy aroma and soft texture make them irresistible and a legered prawn, cast into the right area on a river, lake or canal, will soon be taken. Both raw and cooked prawns work, and they take colour and flavour really well too. Try dyeing them red!
Perch love features, whatever these might be, from dumped shopping trolleys on city-centre canals to marginal reeds on commercials. Other favoured areas are lock cuttings, weir pool slacks, close to fishing platforms, beneath overhanging trees and around aerators.
Of course, it helps to fish where there are healthy stocks of small silver fish to eat. Find both features and prey fish, and a big perch or two, will certainly not be far away. Even relatively featureless areas will hold perch if they contain lots of silvers.
Quite wary of any resistance, big perch should be targeted with a sensitive set-up. Try fishing with a fine quivertip, or with the rod pointing at the leger and the reel’s bail-arm open with a drop-off indicator fitted. Here is the rig to catch them using prawns...
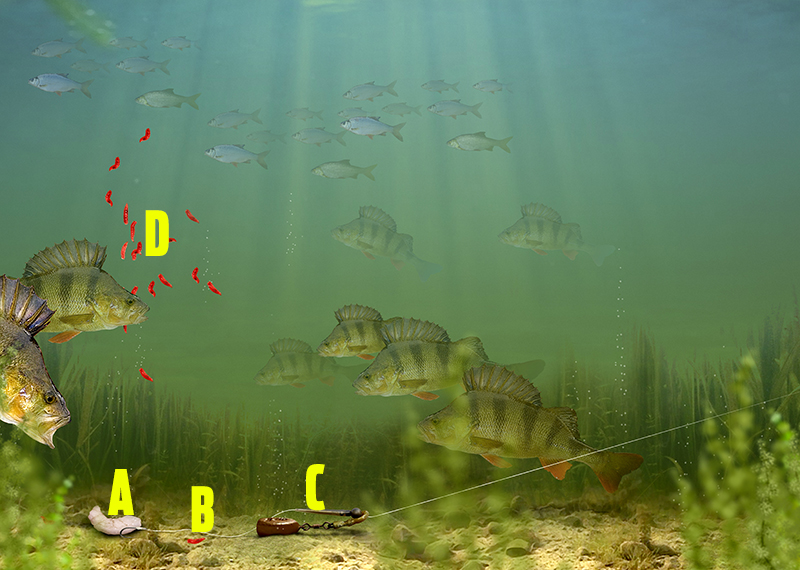
A) Hook and hookbait
Hair-rigging is best, which also allows you to use a smaller, less obtrusive hook. Go for a size 10 or 8.
B) Hooklink
Use a hooklink of around 18ins-2ft of 6lb mono. This will keep the bait far enough away from the lead not not arouse any suspicions from a big, wary predator.
C) Free-running lead
Use a 1oz leger weight heavy enough not to move during the run – changing the feel of resistance to the taking fish – but light enough to not cause too much disturbance when cast. The lead is free-running to reduce the chance of the perch feeling it and dropping the bait.
D) Feeding
If you’re fishing within catapult range for perch, use red maggots, which will attract small prey fish. For longer distances, chunks of prawns are ideal.
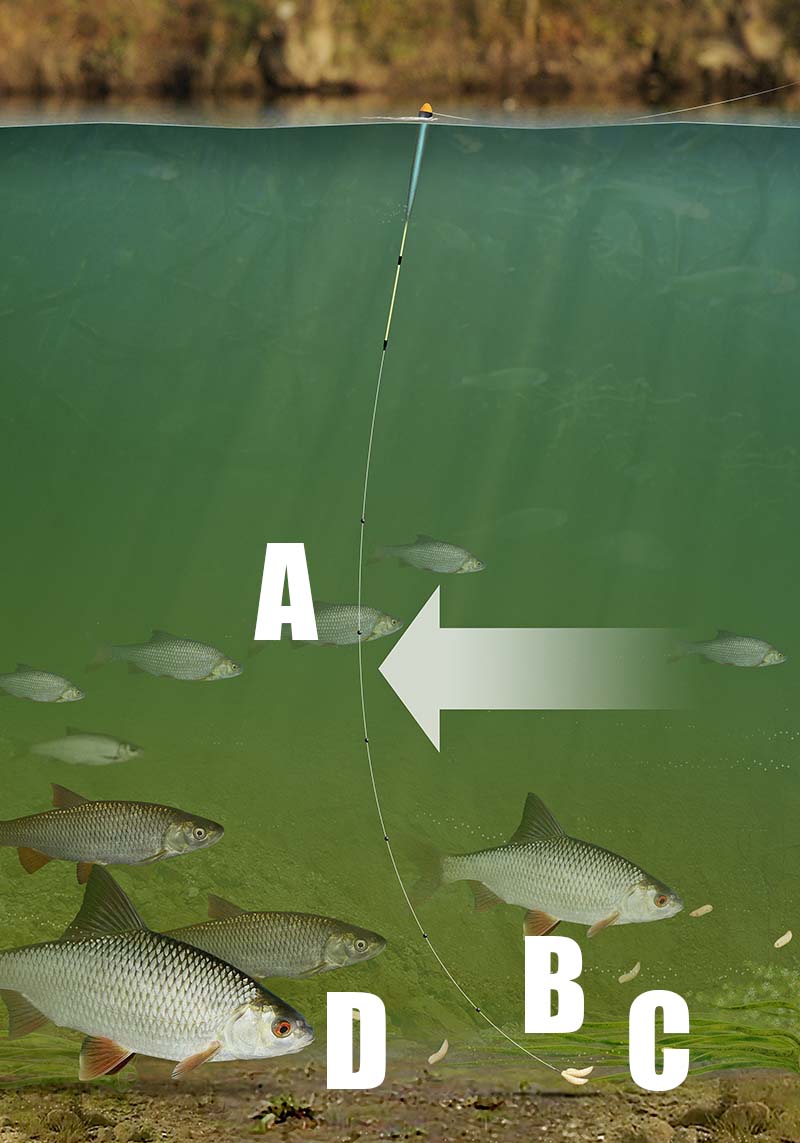
Roach Fishing Rig | River waggler rig
Few tactics are more fun than running a waggler down a steady stretch of your local river and putting together a mixed bag of chub, roach and other silver fish.
When the conditions are right this is a very successful style of angling, with fish often being caught on the drop as well as when the hookbait is tripping along the riverbed.
Many anglers struggle with this tactic, for two simple reasons. First, they attempt to fish like this when the wind is blowing downstream. This will make presentation very difficult, as the wind will constantly pull the float off line. The type of waggler and its shotting pattern have to be correct, too, to avoid tangles and to present a slow-sinking bait.
Use a waggler with a thick, buoyant tip that resists being dragged off line or under when the hookbait catches the bottom.
Spread the shot evenly to ensure a constant sinking rate and to avoid tangles.
If you follow these simple steps your set-up will work effectively, giving you some fantastic sport.
1) Float adaptor
A float adapter enables the float to be changed quickly and offers little resistance on the strike.
2) Even speed of fall
No6 shot set at 2ft intervals down the line help the hookbait to fall through the water at a natural speed.
3) Maggot hookbait
Big chub and smaller silver fish will both readily take a double red maggot hookbait on a size 18 hook
How to tie a river waggler rig

1) A float adaptor like this enables you to change the size of the float and helps the float fold flat, creating less resistance on the strike.

2) Set the float at the rough depth of the swim and lock it with AAA shot. If the float is rated to 4AAA+ use four AAAs around it.

3) Tie a size 18 hook to an 18ins length of 2.5lb line. This is strong enough to tame any larger chub, yet fine enough to bring plenty of bites.

4) Attach the hooklength to the mainline using a loop-to-loop knot. This ensures the hooklength can be easily changed.

5) Place a No8 shot about 6ins above the hook. This will accentuate bites, and should be set so that it is just touching the river bed.

6) Fix No6 shot at 2ft intervals above the tell-tale shot. These straighten the line on the cast so the hookbait sinks at a natural speed.
Chub Fishing Rig | Clear waggler for big chub
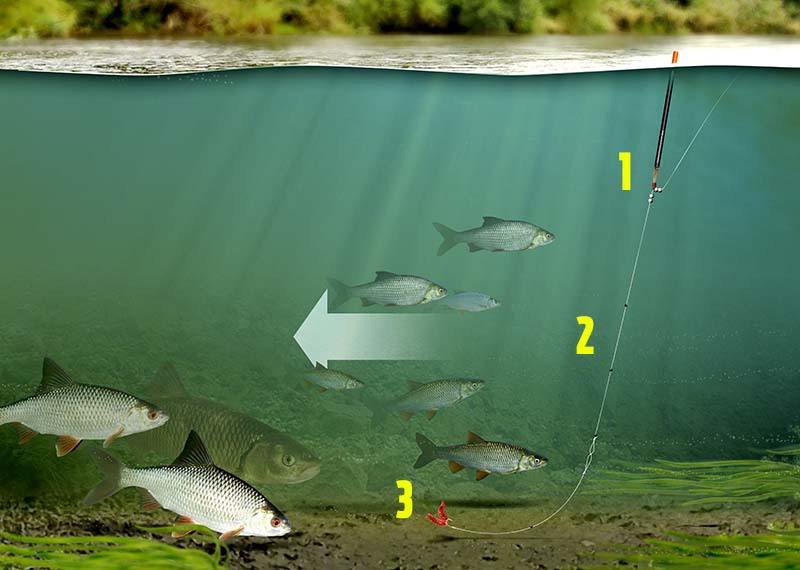
If you’re looking to catch a shoal of chub, or those in a pressured venue where larger baits can be ignored, you can’t beat a maggot approach.
Many anglers think that maggots are only for small fish, yet some proper monsters can be tempted on the little wrigglers.
You can present maggots in several ways, but by far the best is under a waggler float, in a simple trotting scenario.
You will target the same swims as when freelining or link-legering. Once again, try to locate fish with the use of polarising glasses.
Once you’ve found them, a catapult full of maggots deposited upstream of the shoal should gain their interest, and it’s hugely exciting to watch as the loosefed grubs are devoured.
Importantly, never be too eager to present your hookbait – a constant stream of loosefeed will whip the fish into a frenzy. Only when you have several chub competing avidly is it time to introduce your hookbait.
Try to deliver your float alongside a pouchful of maggots. As the float travels downstream with the flow, we’re sure it won’t remain visible for long…
1) Float

A waggler attached with float stops enables easy depth changes and causes less damage to your mainline than split shot. The float should be as small as possible and made from clear plastic, so as not to spook wary fish. A loaded float of around 2AAA is more than adequate, as seldom do you need any weights down the line towards the hookbait.
2) Mainline
A mainline of 4lb-5lb breaking strain is ideal. Choose a brand specifically made for floatfishing.
3) Shotting pattern
Depending on the depth at which you are fishing, and the pace of flow, you may or may not need any shot on the line. If you do, a strung-out shirt button-style string of No4 and No6 shot gives the hookbait a natural looking fall – something that will definitely result in more bites.
4) Hooklength v straight through
Different situations demand a slightly different approach. In open-water swims you can attach a pre-tied hooklength, which will always win you more bites. A strong spade end hook in size 18 attached to 3lb monofilament is ideal. In swims which present hazards such as snags or weed growth, it is advisable to fish straight through, tying a strong size 18 to your mainline.
5) Hookbait
A double maggot hookbait is hard to beat, especially as it helps disguise your hook amid the free offerings. Never use more than two maggots, though, as the chub may notice the difference. If it is really hard to win a bite, you could drop down to a single maggot presented on a size 20.
6) Tackle
A balanced set-up is essential to ensure fish are landed on light lines and small hooks. However, you will, in certain cases, need a bit of backbone to stop lively chub. A stepped-up float rod with a soft tip creates the ideal blank for trotting, with a length of at least 13ft creating several advantages, such as line and fish control. A fixed-spool reel is favoured over other types, although a centrepin can be used too.
Chub fishing rig | Link leger rig
Wanting an easy way to catch chub? Then look no further than this great rig that will help you catch more next time you are on you local river!

Hookbait
A large piece of bread flake is often impossible for a chub to refuse. They are also suckers for natural baits, such as lobworms and slugs.
Mainline
A mainline with a breaking strain of around 6lb is ideal for this style of fishing, as it is strong enough to cope with the harsh snags in the river, along with stopping powerful summer chub, which fight relentlessly.
Hook
A big size 6 or 4 tied direct to your mainline helps create a strong hookhold, and a suitable frame for attaching large baits. Don’t be afraid to use a hook this large – chub have bucket-sized mouths!
Link Leger
If necessary, a link leger can be easily created by trapping a separate section of monofilament between float stops. On to this, pinch SSG shot to add the required weight to hold bottom. That said, you will generally get a better response from a bait which isn’t static, meaning it may be best to have just enough weight to ‘bounce’ the bait across the bottom in the flow.
PERCH FISHING RIG | How to tie a perch float rig

You will need...
• 3AA bodied waggler
• 5lb mainline
• 4lb hooklength
• Size 10 Nash Fang Uni hook
Here’s a precisely set-up float rig to eliminate the resistance perch hate, which also has the benefit of working well for targeting even larger species
Perch are very obliging fish that can be caught in many different ways, but one of the finest has to be on float-fished worm or prawn.
These larger baits help to deter small fish from picking up your bait giving you a good chance of latching on to a larger than average specimen.
Perch do not like a moving bait, so it is much better to nail it to the lakebed by fishing slightly overdepth with a small shot to anchor the float in position.
Having plenty of shot down the line also helps to keep the rig in place and stop it from being moved around.
Perch bites are normally very bold, but with this rig you can shot the float down so that only the tip is showing when the No.4 shot rests on the bottom.
Should you cast out too far, the shot will not be on the bottom and the float will disappear, telling you that you need to fish a little closer. This rig will also work well for other larger fish – bream, tench and carp.

1. Lock the float in position with two BB shot. These shot should not be pinched on too hard, so they can be moved to adjust the depth once you start fishing

2. The bulk of the shot, made up of several BBs is positioned at just over half depth. This group of shot will get the hookbait down quickly and give the rig stability

3. Tie a double overhand loop knot in the end of the mainline. The loop should be about 2cm in length. The hooklength will later be attached to this

4. Cut off 45cm of 4lb clear line to make the hooklength. It is important to use a hooklength that is lighter than the mainline in case you need to pull for a break

5. Tie a size 10 hook on to the hooklength using a spade-end knot that has first been passed through the eye. This is a very strong knot, ideal for hook with large eyes

6. Next, tie a simple double over-hand loop in the end of the mono hooklength. The hooklength should ideally be about 20cm in length once finished

7. Add a No.4 shot 12cm above the hook. When setting the depth ensure that this shot is on the bottom to secure the hookbait in place

Large baits such as lobworms help to pick out the bigger perch in your swim
Rudd fishing rig | Bread on the float
If there’s one fish species that sums up summer fishing then a big, golden rudd must be it! These stunning fish, with their surface feeding habits, are the epitome of warm-weather angling.
Rudd are famous for taking baits in the upper layers of the water, and they’re adept at picking off small insects which fall into the water from surrounding vegetation.
This makes fishing for them with baits such as casters and slow-falling maggots a great tactic, especially on the float.
However, rudd will take a
big bait too and one of the best is breadflake – a bright bait they can’t fail to miss – and one which is soft and easily sucked in by these rather greedy fish.
Watching big rudd taking floating breadcrust or flake on a sunny day is one of the great sights of summer.

1) Hookbaits
Floating crust or flake is a great starting bait, as it matches your loosefeed, but the fish can become cagey later in the session after you’ve caught a few.
This is when it can pay to use breadflake. Be sure to give the flake a bit of a squeeze so it falls slowly through the upper layers of the water.
2) How far out?
You usually need to fish only a couple of rodlengths out for rudd if you’ve got them feeding properly, but make sure you’ve got enough weight in the float to follow the fish if they spook and move further out.
3) Mainline and hooks
Most anglers will fish ‘straight through’ when rudd fishing to aid presentation of the hookbait, as a knot can easily be seen by the fish in clear water.
Depending on the size of fish, pick a floatfishing line of around 3lb-4lb.
Eyed hooks are usually favoured by specimen rudd anglers, as the extra bit of metal helps when moulding a piece of bread around the hook. Size depends on the size of fish and hookbait but most anglers use between a 10 and 14 for specimen fish.
4) Length of the rig
A 3ft distance between float and bait is a good starting point to help prevent rudd being spooked by the waggler, but be prepared to extend this if the fish do show signs of spooking.
It’s not unheard of to end up using several feet of line in very clear water.
5) Loaded floats
Stealth is the key when fishing for rudd up in the water so a small pellet waggler (normally used for catching carp shallow) or a loaded, clear plastic waggler is perfect for the job. You’re looking for a float that doesn’t dive too deep on the cast, as this will spook the fish.
It’s important to use a loaded float so you don’t need to place shot down the line, as this will constantly drag the hookbait down or back towards the float. Instead of having shot around the base of the float, fix the waggler in place with three float stops – one above the float and two below. This allows you to easily alter the distance between float and hookbait.
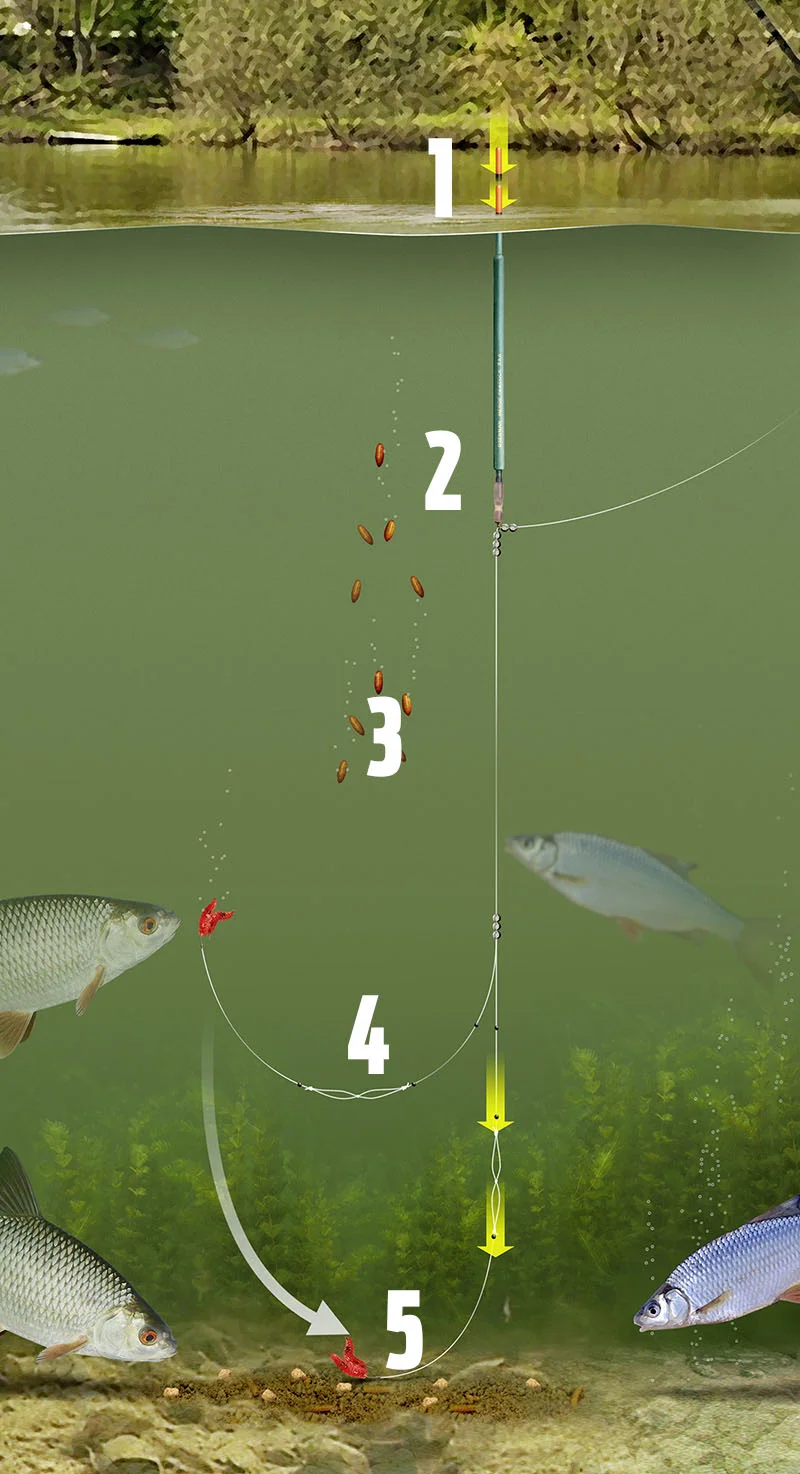
Tench Fishing rigs | Maggot feeder rig
Tench love maggots, and a maggot feeder rig gives you the best of both worlds – a pile of maggots presented right on top of your hookbait and an inline feeder set-up to help hook a fish once it has sucked in the bait.
Maggot feeders have accounted for some of the biggest tench caught in the UK, but they also perform brilliantly when you’re after numbers of smaller fish. Repeated casting allows you to build up a bed of bait in the swim.
You’ll need a fair few pints of bait, though, and a gallon fed over a 24-hour session is far from being unheard of!

1) Inline is best
Using a fixed feeder is a no-no on waters with a lot of weed and snags that can tether a fish. Inline maggot feeders, that take a swivel pushed into their end, will stop the feeder and also give you something to attach the hooklength to.
2) Short hooklink
You must have the hookbait near your feed. That means fishing with a short mono hooklength of 4ins hanging directly off the feeder. A shorter link also increases the chance of a hook-up when a tench takes the bait.
3) Fake maggot trick
To help with hooking tench, slip a fake rubber maggot on to the hook shank and over the eye.
This helps to act as a line-aligner and flip the hookbait over when the bait is sucked in by a fish. Alongside this, use three live maggots to impart a bit of extra movement to the hookbait.
4) Go big for baits
You’re going to be using large hooks with this rig (sizes 12 to 14), so pick a hookbait to match. Three or four red or white maggots are perfect.
5) Find a firm lakebed
A maggot feeder rig works best on firm lakebeds that have gravel or hard patches of silt with a minimum of weed.
Roach fishing rig | The waggler
The waggler is the approach that most anglers began their fishing career using.
On a mixed commercial fishery where bites are the name of the game, it’s ideal for a relaxing day catching quality roach with the odd bonus surprise thrown in.
Roach are a species that will feed at all depths, and because of the waggler’s versatility compared to that of the feeder, you can target fish feeding from a foot deep to hard on the bottom, making changes throughout the day to keep in touch with the fish.
Rod and line tactics mean that if you hook a carp or two, you’ve or every chance of getting them out – something that can’t be said for a pole armed with a light rig!
1) Insert or straight?
Insert and straight wagglers perform very different jobs. For all-round fishing the insert can be fished with the bait falling through the water (known as on the drop) or hard on the bottom.
It can also be used for fishing shallow, and can be identified by the thin insert tip. The straight waggler is better for fishing on the bottom, often with a few inches of line laid on the lakebed to present a still bait. The straight waggler has a thick, blunted tip.
2) Float size
If you need a decent cast to find the fish a 3AAA float is about right. If you plan on catching fish close in on the drop a big float isn’t needed. Prepared anglers will carry a range of float sizes, to cover all eventualities, but a 2AAA straight or insert waggler will deal with most jobs.
3) Feeding
What you feed should be based on where you want to catch the fish in the swim. That means using maggots, hemp and casters for fishing off bottom or on the drop, changing to a groundbait attack for catching on the bottom.
A steady trickle of loosefed maggots or casters (a dozen fed every few minutes) will work for catching off bottom.
If you go down the groundbait route, two or three balls with casters and hemp added will get the swim going. You can then loosefeed over the top or rely on a top-up of the odd ball of groundbait when bites fade away.
4) Space the shot
The waggler should be fixed with large AAA or BB locking shot but closer to the hook should be No8 or No10 shot, enough to sink the tip right down. You should end up with five or six shot down the line.
Push these together as a large bulk just above the hooklength for fishing on the bottom or space them between hook and float to give the bait a slow natural fall through the swim.
5) Hookbaits
Classic roach baits are red maggots, casters or small pieces of worm fished as singles or doubles, but a bold big bait can sometimes score.
That means a grain of sweetcorn or even a piece of breadflake are both worth slipping on to the hook now and again.
Barbel fishing rigs | PVA bag rig for rivers
Landing a bait in weed without getting caught up is no problem with the ultimate rig – a solid PVA bag with pellets and the rig inside.
It will sink through weed with ease. Load the bag with a mixture of halibut pellets sizes, and use a short hooklength so the bait will finish up close to the feed.
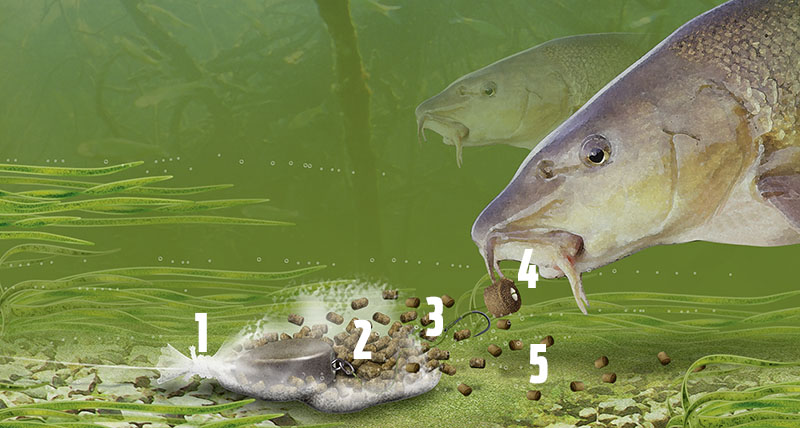
1) PVA
Solid PVA is a must here as you’ll be putting the hook inside the bag, which can snag on mesh. Choose a fast breakdown PVA so you’re fishing and ready for a bite in the minimum amount of time. Be sure that the bag is big enough to fit the lead, hooklink and a reasonable amount of feed inside.
2) All inside the bag
Add pellets first, then the lead, hooklink and bait. Add more pellets, then tie it off around the top of the lead. The lead must be dry before it goes in or moisture may start the breakdown process!
3) Short hooklink
Because the PVA bag will deposit the feed in a tight spot, you want your hookbait to be close by – so that makes a long hooklength unnecessary. A short 3ins-4ins link running from the bottom of the lead will keep the bait right in amid the feed.
4) Hookbait
Small baits score best on clear summer rivers, and a 10mm or 12mm pellet will get more takes.
5) Pellet sizes
Barbel love rummaging around amid gravel and stones and a mix of different-sized pellets ensures that your feed closely mimics the riverbed. Go for 4mm and 2mm or micro halibut pellets with a few bigger 6mm baits added. You can even crush some pellets into a coarse powder to add to the bag.
Barbel fishing rigs | Pellet feeder for chub and barbel
One tactic is synonymous with catching barbel on rivers – the blockend feeder. Allowing you to put a stream of bait into the tightest of spots that can’t be accessed with a waggler, the blockend has caught thousands of barbel down the years. Maggots are most often associated with the tactic, but in recent years pellets have come increasingly to the fore.
Barbel seem to love the taste and smell of halibut pellets, especially in coloured water, and unlike maggots, they won’t pull in dace and bleak that can prove to be a real pain to the angler in search of a few big barbel.
Use pellets and you know that when the bite alarm goes off or the rod top heaves over, it’ll be a barbel!

1) Always use a running rig
The chances of a barbel finding a snag are high, even if the angler concerned is highly skilled, so if disaster does strike and the line breaks, you don’t want the fish to be towing a heavy feeder around.
By having the feeder running on the mainline, stopped by a bead with a tail rubber to cut down on tangles, you can fish safe in the knowledge that no harm will come to a lost fish.
2) Feeder weight
This is decided by the power of the flow and how far you need to cast. Obviously, the feeder must be heavy enough to reach its destination but once it’s settled, it should only just hold bottom.
A fish that takes the bait will easily dislodge the feeder, causing a big ‘drop back’ bite on the quivertip. Too heavy and the feeder won’t move – the fish will feel the disturbance and drop the bait.
To get the right balance, pick a feeder that’s slightly lighter than needed and then add some extra lead. This can be in the form of specially-made stick-on weights or a length of lead strip, available from DIY shops. Add one small piece at a time until the feeder just holds bottom.
3) Length of hooklink
When it comes to the hooklength, as in any type of feeder fishing, this can vary from a short 12ins tail to a long flowing trace of up to 4ft. Start with around 2ft, but if positive bites are coming quickly and no fish are hooked, shorten this by three or four inches at a time.
Likewise, if you get knocks but nothing develops, lengthen the hooklength until you get hook-ups.
4) Serious tackle
You can’t leave anything to chance with tackle, as barbel are powerful fish that will be found in the main flow of the river.
A robust 8lb or 10lb mainline to a hooklink of 8lb is a minimum, matched to a large forged hook in sizes 16 to 12. An eyed hook will also allow you to fish with a pellet in a band, or drilled and hair-rigged.
5) Go for halibuts
Where pellets are concerned, it’s tough to beat halibuts. Their oily make-up offers more attraction in coloured water than a plain carp-style pellet. Big is best, so starting on an 8mm bait and working up to a 12mm is a sensible move. Inside the feeder, cram a mix of pellet sizes such as micros, 4mm and a few 6mm offerings.