
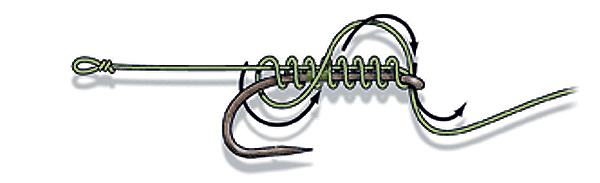
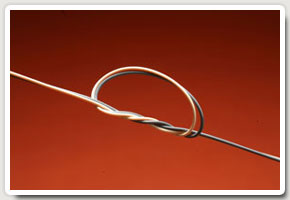
How to tie Alan Scotthorne's Hooklength Knot
Here Alan Scotthorne reveals the knot that he uses to join a hooklength to his fishing mainline. It's a variation of the loop-to-loop method, but with a twist. It's easy to tie and incredibly strong...
Alan Scotthorne was never really happy with using loop to loop knots for joining his mainline to his hooklength namely because it can potentially cause tangles and it's untidy.
After experimenting with lines he came up with this knot. Well, it's actually not really a knot - it's more of a way of wrapping and twisting a line onto a loop of line. This makes this knot very strong indeed, and therefore reliable enough to be used on silverfish through to commercial carp waters.
But it's developer and creator proves just how reliable and effective this knot it. If it's good enough to a five-times World Champion to use, it must be good enough for every other angler!
Here's how it's tied...
1 Tie a small loop in the end of your mainline and then pass your hooklength line through the loop like this.
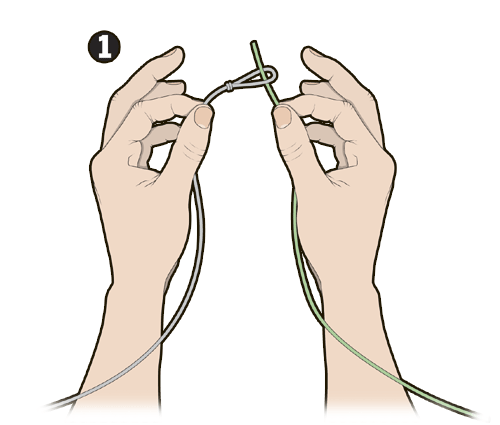
2 Hold the line in your left hand and then double it up with your other hand to create a loop in the hooklength line.

3 Twist the end of the hooklength that is held in your right fingers. This causes the line to spin and twist around the other section of hooklength line.

4 Pass the other end of line, with your hook attached, through the loop that is created when twisting the hooklength line.

5 Moisten the line and pull the knot tight. The tag ends should be trimmed right down as this knot refuses to slip.

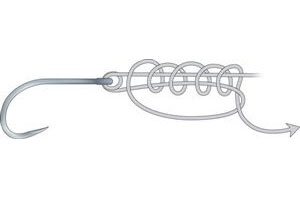
How to tie the Domhoff fishing knot

Although detailed here using a spade end hook, the Domhoff fishing knot can be used around the shank of an eyed hook, and when tied securely this is an incredibly reliable knot to use.
It is made up of a series of eight whips around the hook shank. This creates a neat lock upon the hook that won't slip and will not lose any strength as the line is pulled tight.
Most anglers do use this knot for tying their spade end hooks (if they don't own a hook tyer) but if you're suffering lost hooks or broken knots when fishing with eyed hooks you really ought to give this knot a try as it's super-secure.
It can be used to tie the tiniest of hooks through to whopping size 2 speciimen eyed hooks - all you have to to is match the strength of line to the hook size and guage and you're on to a winner.
Here's how to tie the Domhoff fishing knot in six easy to follow stages...

Make a loop in the end of your line. Lie the loop against the shank with about 1cm beyond the bend of the hook. Hold it tight in place between finger and thumb.

Now take the free end of the line and start to wind it up the hook shank, holding the loop between thumb and forefinger and securing the other part of the line underneath the coils. Keep everything under tension.

After eight turns or so trap the whippings with your other hand to reveal the loop.

Now pass the loose end through the loop.
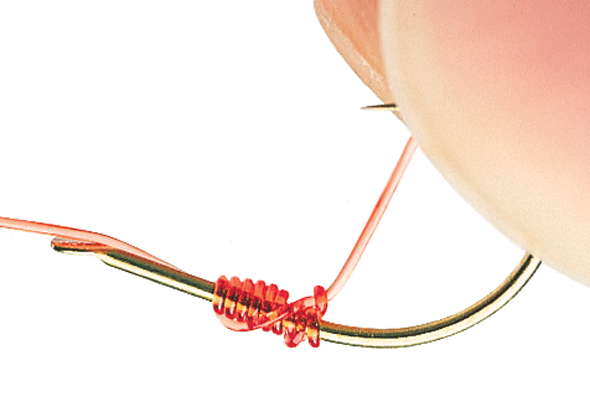
Dab with a touch of saliva and tighten by pulling on the main part of the line. Make sure the line leaves the hook from the front of the spade or the eye and the coils are neat.
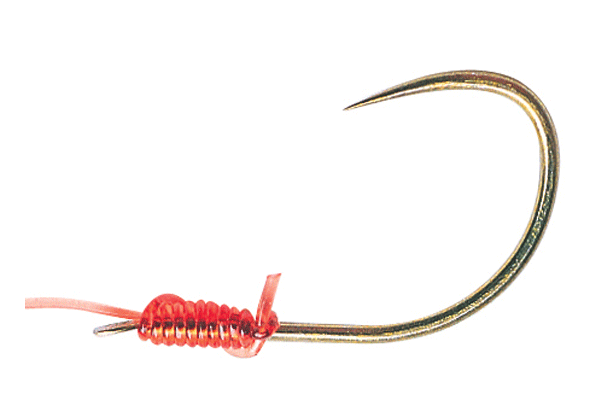
This is the finished knot. Tie off the tag end neatly.
How to tie the banded knotless knot
This relatively new knot is one for the angler who needs to catch, bait up and fish at speed.
It gives the angler the hooking power of the knotless knot, while at the same time provides the angler with the ability to attach hard baits like pellets, on to the hair, really quickly.
There's no need to use a drill, a baiting needle or a hair stop when using this knot - the tiny bait band grips around the circumference of the hard pellet secrely enough so that the bait can be cast.
STEP 1
Thread your hooklength through the front of your eyed hook then through a bait band. Now pass the hooklength through the back of the eye of the hook.

STEP 2
Adjust the length of the loop that holds the bait band until the top of the bait band sits at the top of the bend of the hook

STEP 3
Hold the bait band and hooklength loop securely. Take the tag end of the hooklength and whip it around the hook and hooklength loop. Whip the line around eight times, keeping tight turns at all times.

STEP 4
Ensure all the whippings are secure and tight, then make one final whip up and over the previous whippings, then thread the hooklength tag end through the back of the hook's eye.

STEP 5
Add a drop of Superglue to the whipping to secure it in place, then trim off the tag end as close as possible to the eye of the hook.

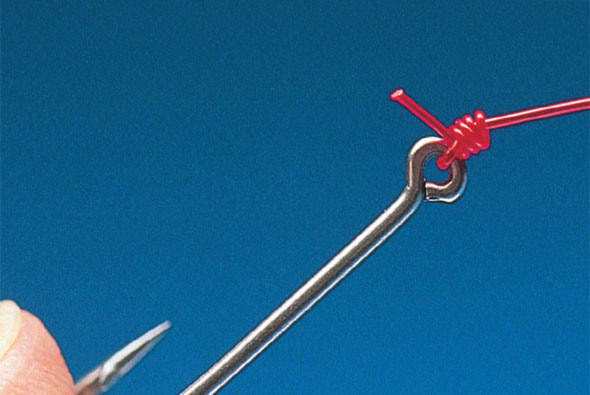
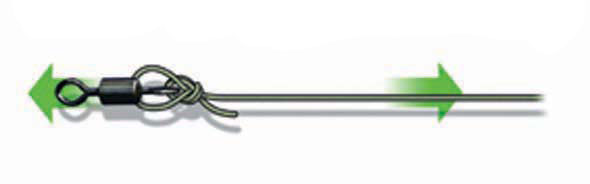
How to tie the grinner knot
This knot is widely used by match, pleasure and specialist anglers wordwide, for linking hooks and swivels to either mainline, hooklength or even braid.
It is a very strong and relaible knot that should be dampened thoroughly before it is pulled tight.
As this knot features a small amount of whipping above the swivel or hook eye it does not 'strangle' the item being tied, therefore it retains a huge amount of strength.
STEP 1
Pass your chosen hooklength through the eye of your hook or swivel twice. Pull 4ins of the hooklength through. Now form a loop with the tag end of the hooklength.

STEP 2
Thread the tag end over the hooklength and through the loop four times, making sure it exits through the loop.

STEP 3
Moisten the knot thoroughly with saliva and gradually pull it to lock the knot against your hook eye or swivel eye. Trim any waste from the hooklength tag end as close as you can to the knot.

How to tie the stop knot

The Stop Knot is commonly used by match anglers who need to floatfish a waggler in water much deeper than the length of their rod, but it is even more commonly used by predator anglers when they create their float rigs.
A well-tied Stop Knot provides a moveable point that helps prevent your float from sliding all the way along your mainline, and if it is tied using a length of flexible mono, it will cast through the rings of any match rod on the market.
Specialist anglers tend to use powergum to tie their stop knots, which will still pass through their rod's rings because of the large internal diameter of them.
STEP 1
Lay a 6in length of powergum or thick mono alongside your mainline.

STEP 2
Form a loop with the powergum or mono and thread one end through the loop and over your mainline.

STEP 3
Repeat threading the powergum or thicker mainline through the loop and around your mainline four or five times.

STEP 4
Moisten the knot with saliva, slide it into position upon the mainline then pull it tight. Trim the tag ends to around an inch from the knot.
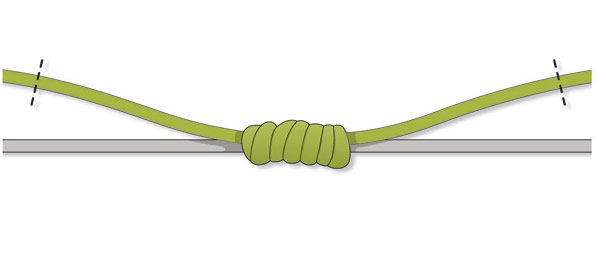
How to tie the water knot

This knot has many uses for the angler. It can be used to link hooklength to mainline, it can be used to join a paternoster link to a mainline, and it can even be used to join mono to braid.
Many angler's use this knot to link their pole mainline to the hooklength, especially when fishing delicate rigs, because it is far more direct than the more commonly used loop to loop technique.
STEP 1
Lay the two lines you wish to tie alongside each other.

STEP 2
Form a substantial loop using the two lines

STEP 3
Ensure the two lengths of line are together and thread the pair of tags ends through the loop three times.

STEP 4
Moisten the knot with saliva or water and slowly pull it tight. Trim off the tag ends accordingly to either create a straight profile when joining a mainline to hooklength, or cut the tag ends to create a paternoster link for legering purposes.

How to tie the five-turn half blood knot
The half turn blood knot is one of the most widely used fishing knots for attaching swivels to line and hooks to line. It is also used in specialist fishing circles for joining split rings to lines as well.
Here we show how you can tie this handy knot in just a few simple steps.
Don't forget, though, to dampen the knot with saliva first before pulling it tight.
Like all knots, take a close look at the finished product to make sure it's nice and neat once the knot is closed down and pulled tight. A neat knot will be a strong knot.
Finally, when it comes to trimming the tag end of the knot, cut it as close as possible to the knot itself to ensure the finished product is neat and tidy.
Here's how it's done...

1. Thread the line through the eye

2. Make five turns of the tag around line

3. Take tag back to turn nearest eye

4. Pass tag through loop and lubricate

5. Pull the knot tight and trim off tag end close to the knot
How to tie the knotless knot hair rig
The knotless knot hair rig is perhaps the most valuable of all knots for those anglers who wish to catch a big fish.
The reason why it's so valuable is because it allows the angler to easily and quickly tie a rig that enables the bait to be presented off the hook.
It might sound strange to a newcomer that the bait should be presented away from the hook, but tying the rig in this way ensures that the fish does not feel the hook the instant it takes the bait, and also that the point of the hook remains proud at all times, creating a superb hookhold each and every time.
Using the knotless knot hair rig also allows baits that can't otherwise be presented directly on to the hook - like rock hard pellets and pop-up boilies.
Those baits can be drilled right through to allow the hair to be threaded through them, then locked in place using a boilie or hair stop.
Here's how to tie it...
STEP 1

Tie a tiny loop in the end of your hooklength line, trim off the tag end and thread the line through the back of your eyed hook.
STEP 2

Pull the hooklength through the eye of the hook until the hair hangs the desired length from the bend of the hook. Now hold the hair securely and begin whipping the hooklength around the hook shank and the hair.
STEP 3
Keep the whipping as tight as possible, continuing whipping down the hook shank until they sit adjacent to the point of the hook. Now make one final whip up and on top of the previous whippings. Finally thread the end of the hooklength through the back of the hook's eye once more. Pull and tie to your mainline or rig.

How to tie the figure-of-8 knot
If you are looking for a knot for tying your hooklength to the end of your fishing mainline, the figure of eight knot is the one for you...
It's a really easy knot to tie and when tied correctly and used correctly, will provide a small loop that can be used to lock on another loop in another length of line - for example, your hooklength or ready-tied hooklengths.
The best thing about using this knot and method to attach two lengths of line together is that if you push the knots together after the loops have been joined together, you can actually thread the hooklength out from the mainline loop making it really quick and easy to switch to either a thinner or a thicker hooklength in seconds.
Here's how to tie the figure of eight knot.

STEP 1: Fold your mainline into a loop.
STEP 2: Fold it back across itself.

STEP 3: Wrap the loop around the back of the folded lines and thread it back through the main loop.

STEP 4: Adjust the knot size, wet the line and tease it together, pulling on the loop, the mainline and the tag end at the same time.
How to tie the overhand loop knot

If you are seeking a knot for tying your hooklength to the end of your fishing mainline, the overhand loop knot is absolutely perfect...
It's a really easy knot to tie and when tied correctly and used correctly, will provide a small loop that can be used to lock on another loop in another length of line - for example, your hooklength or ready-tied hooklengths.
The best thing about using this knot and method to attach two lengths of line together is that if you push the knots together after the loops have been joined together, you can actually thread the hooklength out from the mainline loop making it really quick and easy to switch to either a thinner or a thicker hooklength in seconds.
Here's how to tie the overhand loop knot...
STEP 1: Double your mainline to create a large loop

STEP 2: Fold the loop over to form another loop.

STEP 3: Pass the first loop at least twice through the second loop.

STEP 4: Moisten the knot with saliva and pull it tight. Trim the knot and you are away.
STEP 5
Follow the same process with your hooklength and pass it through.
USING THE OVERHAND LOOP KNOT TO ATTACH A LOOP TO ANOTHER LOOP

How to tie the Palomar knot
If you wish to hook and land seriously big fish, the Palomar knot is one knot that you ought to learn how to tie. It provides excellent grip upon both swivels and hooks, it retains masses of strength and it’s a very reliable knot to use too.
It is a very simple knot to learn – anyone can tie this knot – and once mastered you will be sure that your link between line and fish is a strong one.
The reason why it is so strong is because two lengths of line pass through the hook or swivel so the load is spread out equally upon the line, as opposed to having just the one length of line wrapped through the eye of the hook or swivel.
What’s more, the more you pull this knot, the more secure it becomes.
Here’s how to tie it…
STEP 1
Fold your line over and thread it through the eye of the swivel or hook.

STEP 2
Now loop the doubled-up line over and pass the tag end through the loop you have just formed.

STEP 3
Pass the end of the doubled-up line over the swivel of the hook.

STEP 4
Work the knot closed with your fingers and dampen it with saliva. Now gently pull the swivel or hook and the line away from each other to tighten.

STEP 5
The finished knot should be compact and neat. Trim off the tag end and away you go!

How to tie a tucked water knot

Follow the steps below to learn how to tie a tucked water knot...
Place a shorter length of leader, say about 12 inches, next to the main leader as shown.

Now make a loop with both lengths making sure they remain together as one. You’re now ready to for the knot.
Pass the the loose ends (furthest from the fly line) through the loop at least two times. Many anglers prefer three or four times.

Moisten the knot and pull ends tight so the knot beds down neatly. Choose the loose end pointing towards the point fly as the dropper.

To make your droppers stick out away from the main leader, take the loose end (pointing away from the fly line) and tuck.

Moisten and gently draw tight. NOTE: This tucked knot suits standard mono and not fluorocarbon.