
Carp Fishing Rigs | How to tie the mag aligner rig
Want to catch carp in the winter? Then this is the rig you’re going to need. With the carp having a reduced metabolism and appetite, now is not the time to pile in mountains of boilies, yet a carefully presented pile of ‘wrigglers’ can soon get your bobbins dancing.
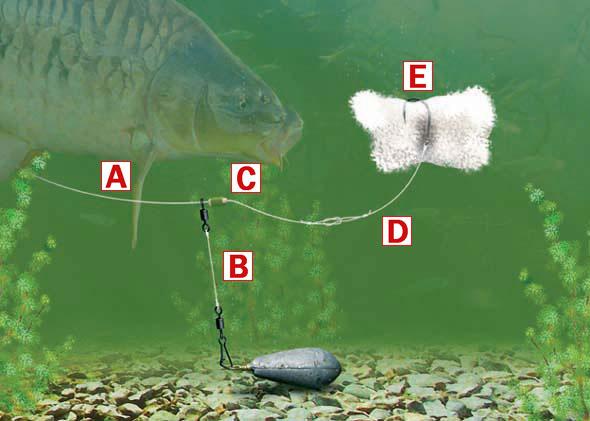
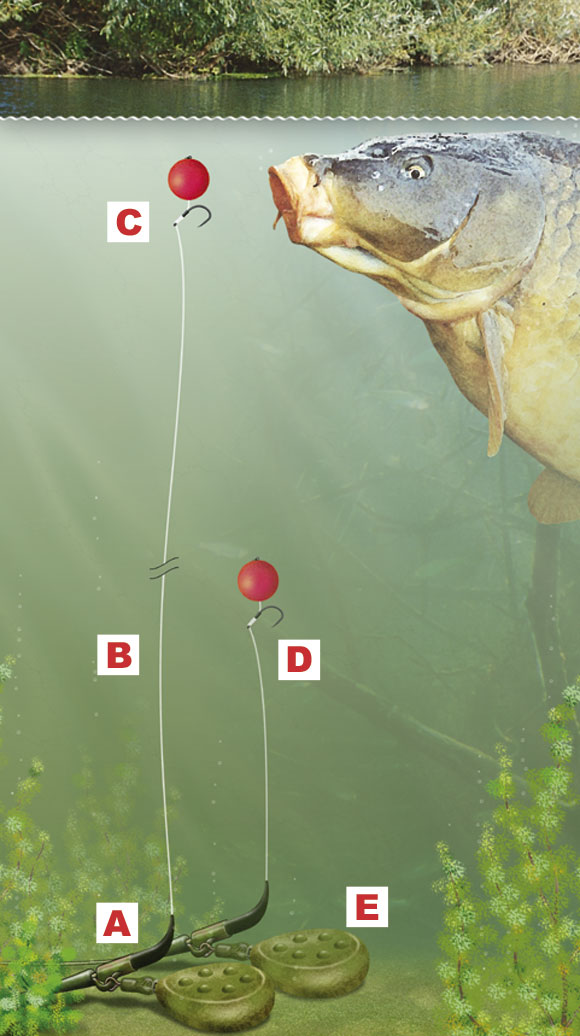
As far as maggot rigs go, the mag aligner really does takes some beating. By using a large PVA mesh bag of maggots tied to a big rig ring by the lead, the mag aligner is virtually tangle-proof on the cast.
What’s more, using a fake maggot as a line aligner over the hook makes the rig extremely hard for the carp to deal with, leading to reel-churning runs in even the coldest weather
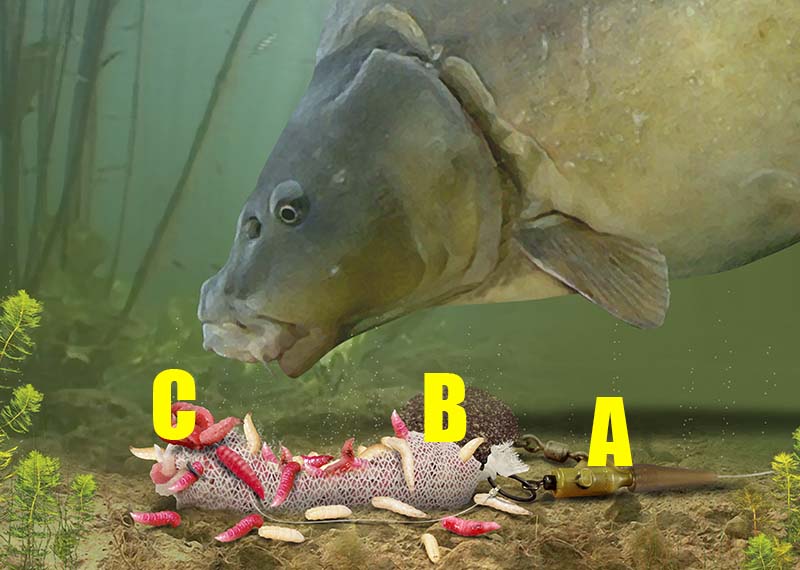
A) Terminal set-up
Use a lead clip rig or a helicopter set-up.
B) Large rig ring
Leave a tag end on the PVA bag knot and tie it to a large rig ring.
C) Anchor point
Nick the hook into the bag before casting to help prevent tangles.
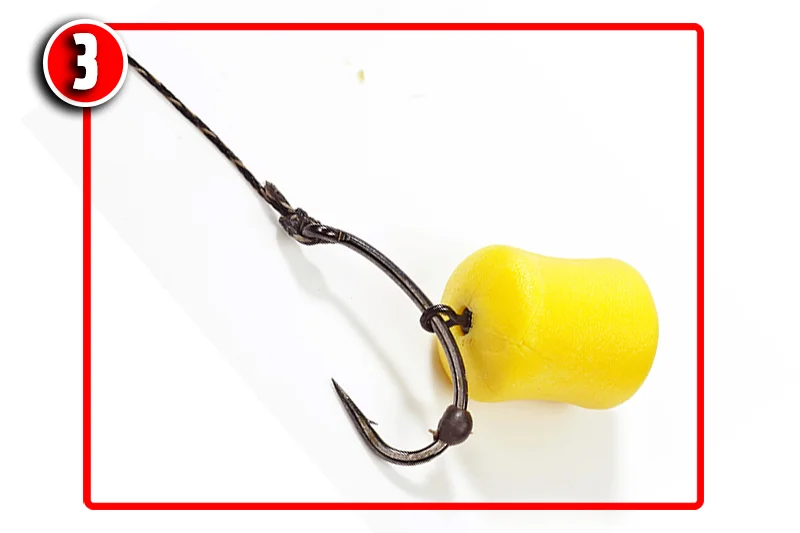
How to make a Mag Aligner
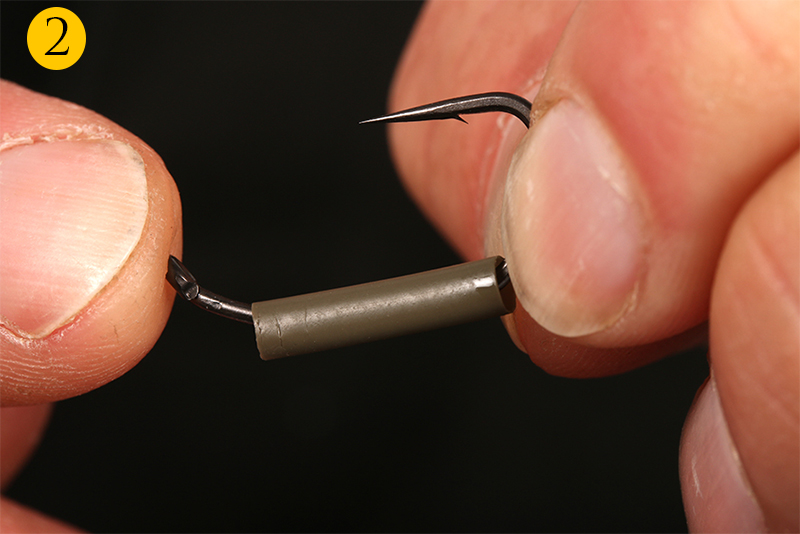
1) Pierce the underside of the fat end of a fake maggot with a baiting needle and run it along the base until it exits the pointed end.

2) Tie a hook on to the end of your hooklink using a grinner knot. Grab the hooklink with the baiting needle and thread on the fake maggot.

3) When complete it should look like this. The hooklink should exit the maggot from the underside. This helps the hook to flip over.

Carp Fishing Rig | PVA bags for carp
At this time of year the carp fishing in all lakes is hard as the carp don’t want to feed as much in the cooling water. A small PVA-bag rig like this one is perfect to get a small amount of bait perfectly placed around the hookbait.
Quick tip: Make sure the contents are dry when you make up your PVA bags, a job best done at home before fishing.
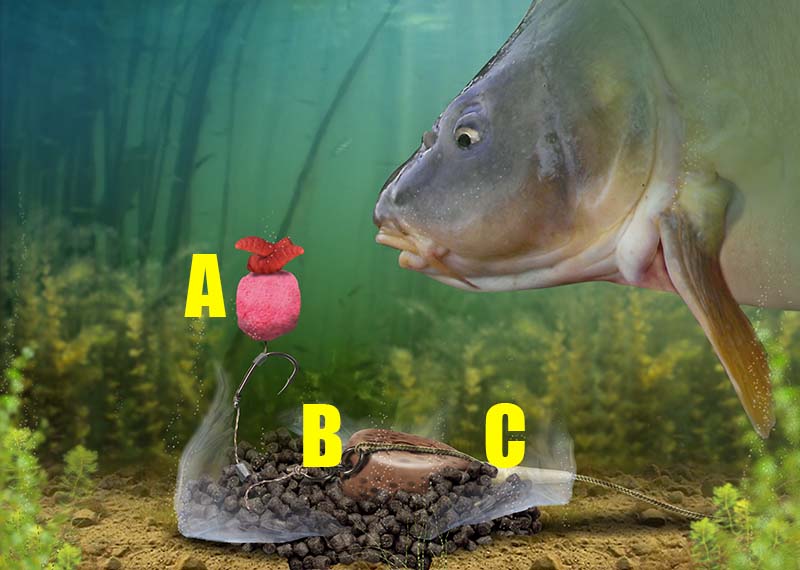
A) hookbait
Try a pop-up boilie enhanced with two live maggots on the hair.
B) The PVA bag
A PVA bag can be attached in several ways. Here it has been created around the leger weight.
C) solid or mesh?
Solid PVA bags are used when fishing for bigger carp. When fishing commercials for smaller carp and F1s, use a small mesh bag and nick it on to the hook.
How to tie | Specimen method feeder rig
Imagine if there was presentation that allowed you to present a hookbait over any type of lakebed - even thick weed - leave a tight pile of freebies around your hookbait and the chances are no one else on your lake is using it.
Sounds too good to be true, doesn’t it? Well if you delve into the back of your tackle cupboard you’ll probably unearth exactly what you need for this deadly set-up.
Around 15-years ago Method feeders were all the rage. Visit any day-ticket lake and compacted balls of groundbait could be seen being cast out from all pegs. But in recent years pellets and PVA in its various forms have seen the Method feeder all but resigned to the annals of carp fishing history.
One of the main disadvantages of PVA is that you are limited to which baits you can use. Anything that is too wet and not PVA friendly will cause your bag to melt before it hits the water. There are no such problems with a Method feeder. The only real limit to what you can add to your Method mix is your imagination. These allows you to create bespoke mixes that no one else on your water will be using.
Use a short supple hooklink like you would when fishing a solid PVA bag creates a bolt effect as any fish that picks up the hookbait will quickly come into contact with the full weight of the feeder and set the hook.

1) Baits such as a single grain of fake corn or a 12mm boilie work well on the Method
2) A 4in hooklink ensures that fish quickly come into contact with the full weight of the feeder
3) An anti-tangle sleeve helps to push the hooklink away from the feeder
4) Compacting bait around the frame enables you to present a bait over virtually any type of lakebed - even thick weed
5) The Method can be fished on either tubing or leadcore
How to tie | Carp and tench float leger rig
An important rig for any budding carp, tench or bream angler is the float ledger rig as it helps target species which prefer an absolutely static bait. Use strong line and hooks with this rig, and big baits such as worms, bread, or mini boilies.
A large bodied waggler is required as the buoyant stem is less likely to be pulled under by the tow. Bites are normally indicated by the float shooting under.
A good tactic is to find the bottom of the marginal shelf – where the bottom levels out – and then set the float slightly overdepth. Now, when you tighten up the line, the float will slowly sink down to the correct position and the line will be tight from rod to the leger weight.
If you find yourself fishing a lake this year with the wind blowing straight towards you, or from side-to-side, and holding position is proving impossible, then try out this very effective, but surprisingly underused rig to give you the correct bait presentation to encourage bites. Check out our step by step guide below and tie it yourself.

Trap the float on the mainline with two float stops. The float should be a large bodied waggler as this is more stable in undertow

Use a swivel leger weight of between ¹/2 to 2/3 ounce. This should be free-running on the mainline for sensitive bite indication

Thread a mini buffer bead on to the mainline and then attach a mini swivel to the mainline using a four-turn grinner knot
Tie a size 12 hook to 10 inches of 5lb hooklength line. Use either a grinner or through-the-eye whipping knot

You need to keep the hooklength short – about 4in-6in will be perfect. Tie the end of this to the mini swivel
The lead weight will sit just above the buffer bead, creating a bolt-effect. Adjust the float so that just the tip is showing


The helicopter feeder rig
The helicopter feeder has become a mainstay for a great many anglers fishing for species as diverse as specimen roach, tench and carp.
This rig has two main advantages. It is very tangle-proof, especially when higher diameter line is used for the hooklength and also an effective bolt rig, meaning that most bites will be very positive.
Coupled with a maggot feeder, this is an excellent set-up for big roach. With a larger oval maggot feeder, it lends itself well to fishing for tench. The hooklength should be as short as possible, generally around 3in-6in, which can be quite tricky to tie, but persevere, because the resulting rig is well worth the effort.
The hooklength should be stopped just above the feeder, although not so close that the hook can accidently foul the feeder on the cast. As a general rule, the closer the hooklength is to the feeder the more bites you will get.
This is the ideal rig to tie if you plan to fish a ‘sleeper’ rod while float fishing, because generally the bites are unmissable. For this reason, it pays to use a reel with a freespool facility that can give line when a fish bolts away.
How to tie
Cut off 20cm of Power line. This hooklength should not be too fine to avoid tangles

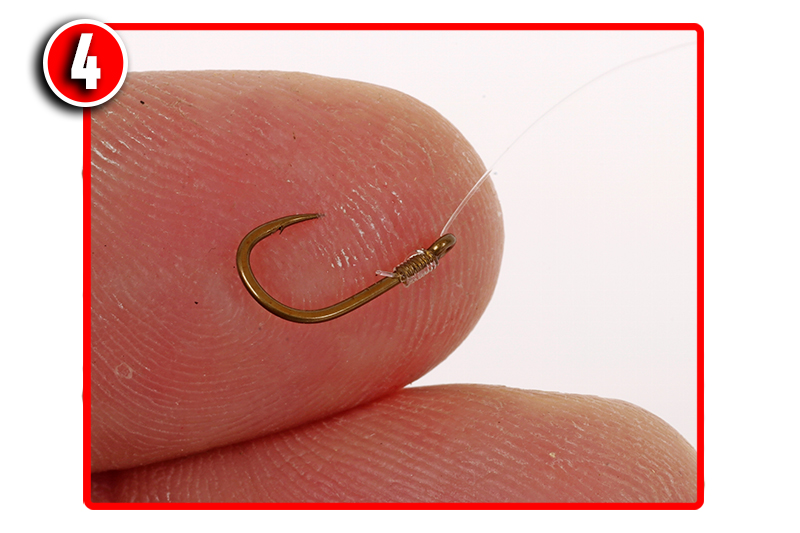
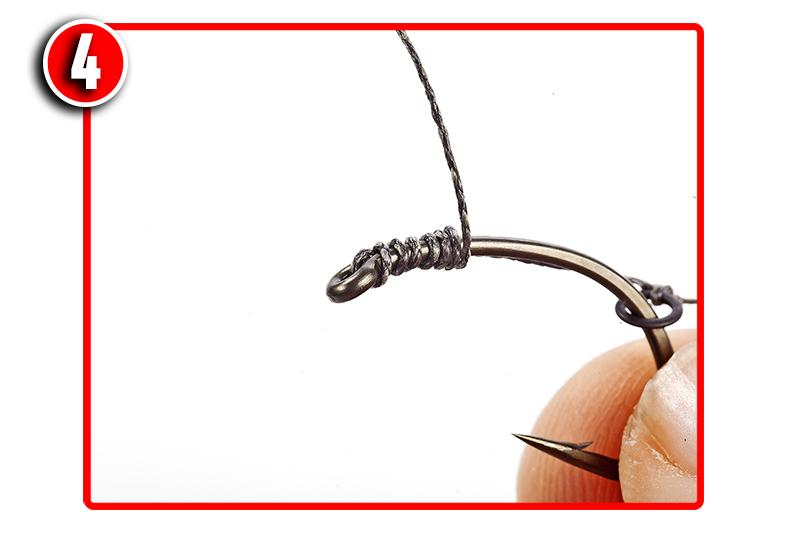
Tie on the eyed hook using a through-the-eye whipping knot with 12 turns, for a great angle

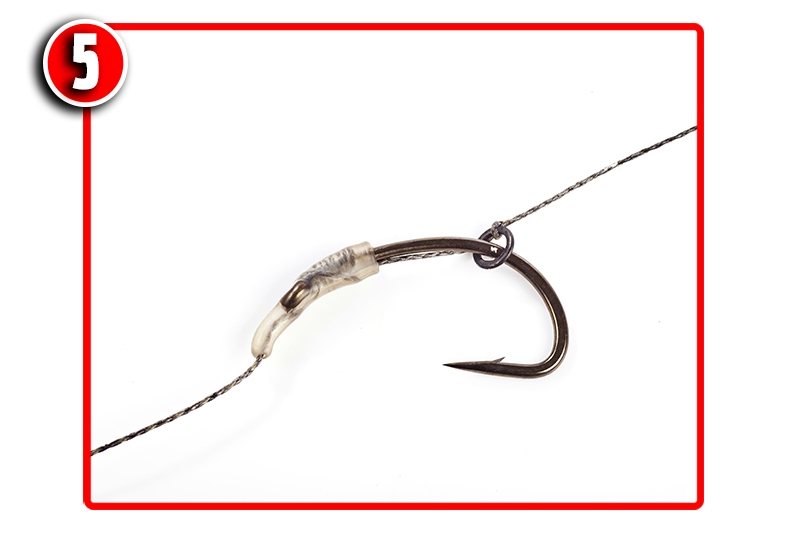
Thread a Rig Sleeve on to the other end of the hooklength, tapered end towards the hook

Tie on a Micro Rig Swivel using a twice-through-the-eye four-turn grinner knot

Thread a soft Line Stop on to the mainline, which should be at least 6lb to avoid breakages

Thread on the hooklength swivel, followed by a second Line Stop leaving a 5mm gap
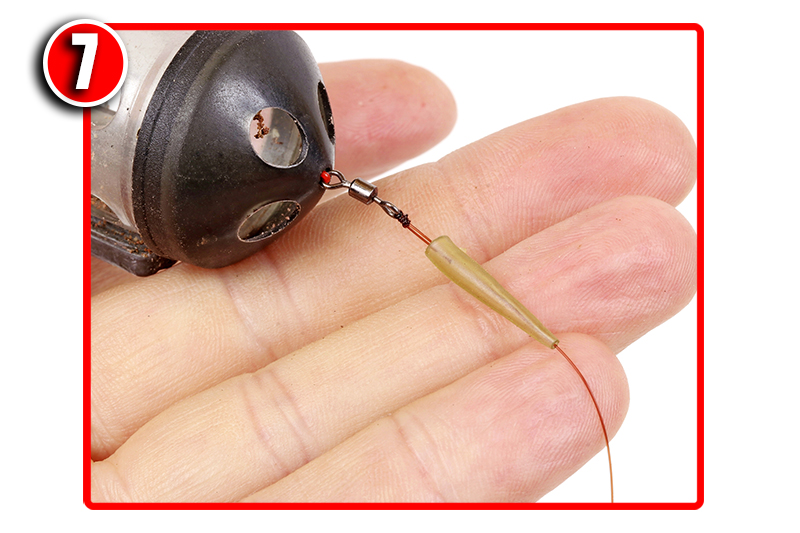
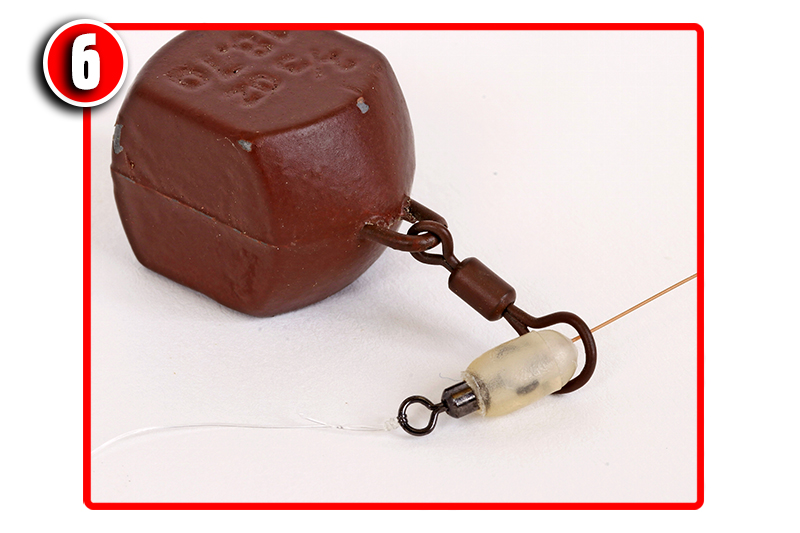
Thread another Rig Sleeve on to the mainline. Tie on swimfeeder using a four-turn grinner

Slide the stops and hooklength into position so that the hook rests just above the feeder
How to tie the snowman rig
If you can’t decide whether to use a bottom bait or a pop-up rig, then why not try a snowman instead... it’s the best of both worlds!
In essence, it’s a standard boilie threaded on to a hair rig, with a smaller pop-up threaded on after it. Once on the bottom, the pop-up stands proud, acting like a beacon to any passing carp. Such a bait arrangement allows you to mix and match your baits. For example, you could use a dull, fishy-flavoured bottom boilie, with a bright, fruity pop-up.
Snowman rigs are highly versatile and can be used with any lead set-up, and with just about any length or type of hooklink.
How to tie

Strip back about 6ins of the outer layer from the coated braid. Form a small overhand loop in the end.

Secure a small metal rig ring loosely in place with an overhand knot, just below the hair loop.

Set the rig ring about 1.5ins from end of the loop, then secure firmly with a second granny knot.
Position the rig ring opposite the hook’s barb, then attach the hook using a knotless knot.
At this point you can add a hook aligner over the eye of the hook. This will help with hook-ups.

Finally, add a few small ‘mouse droppings’ of tungsten putty to the hooklink to nail it to the deck.
How to tie the method feeder rig
Method feeders are a staple among match anglers and, with a few tweaks, can also be used to target big carp, tench and bream.
The only changes you need to make to turn it into a rig capable of landing any carp that swims are to strengthen the component parts and increase the size of the hookbait and loosefeed.
The Method is perfect for ‘runs waters’ or for targeting carp in pressured venues that have seen it all when it comes to rigs.
How to tie the hooklink

Tie on a curved shank hook. We’ve used a palomar knot here, but a grinner is also fine to use.

Thread a micro rig swivelover the point and down the shank, followed by a small hook bead.
Position the hook bead and then attach the bait to the swivel using bait floss or a small bait band.

Tie a swivel to the other end. Make sure it is a snug fit in the base of the frame of the Method feeder.
How to load the method feeder

Put your chosen ingredients into a bait tub. Dampen the comtents and make sure they bind together well.

Place your hookbait in the fat end of the supplied mould and bury it with your Method mix.

Firmly press the feeder into the mould, with the hooklink positioned as shown above.

Remove the frame from the mould. Some frames have push-button releases. You’re ready to cast out!
The adjustable zig rig
As the temperatures begin to rise this clever set-up will enable you to change the depth of your hookbait and search the water column for carp
Carp can spend much of their time up in the water column, especially in spring when the surface layers are warmed by the strengthening sun.
You could fish the margins or on top of gravel bars to present a bottom bait at the same depth as the carp, but in deeper venues a zig rig that presents a buoyant bait in mid-water can be much better. While this tactic is most often used on prolific venues, it has also accounted for some very large carp in recent years.
The adjustable zig not only works in any depth of water, but enables the height of the bait to be instantly adjusted, simply by retrieving or releasing line to reset the float height. The float also creates a bolt-effect, making bites easier to hit with fewer opportunities missed. You can also use the float to quickly gauge the depth of the swim. Try starting with the zig bait at half depth. If this produces no bites, then let the bait rise closer to the surface until you find the carp.
How to tie

Tie a size 10 Nash Fang Gaper hook to a one-metre length of 10lb Zig Line using a simple ten-turn knotless knot

Thread a Zig Aligner on to the hook so that the banded section sits opposite the point of the hook like this

Stretch the band on the Zig Aligner and insert zig foam. Place the black foam on the bottom so it’s easier for carp to see it from below

Tie a Ring Swivel to the other end of the hooklength using a twice-through-the-eye, four-turn grinner knot

Thread the metal ring and Zig Float on to the mainline. The metal ring ensures that the float will rise even when fished in weed

Tie the Ring Swivel to the end of the mainline using a four-turn grinner knot and pull into the hole on the top of the Zig Float
The solid PVA bag rig
As presentations go, solid PVA bags offer a number of advantages that few other set-ups can rival.
Firstly, because the rig is safely packed inside the bag, they can be fished over pretty much any lakebed type and you can be confident your hookbait will be presented effectively. There’s no need to worry about the hook becoming masked by any weed or detritus as it falls through the water. This makes it perfect for casting towards showing fish when you’re unsure of what the lakebed is like.
A short hooklink in conjunction with an inline lead offers unrivalled hooking potential as fish come into contact with the weight of the lead much quicker. Cast out on it’s own, this set-up could easily bury into silt but, as it’s placed inside the bag, this isn’t a problem.
Tying up a few bags prior to your session means you can have all three rods fishing in no time at all and, once the bag melts, you’re left with an irresistible mouthful of bait around your hookbait.
How to make a solid PVA bag
Step 1)

Start by placing a small quantity of your mix in the bag followed by your hookbait. Then add more bait, followed by the lead and then top up with yet more bait mix.
Step 2)

Ensure contents are tightly packed and twist the open end around the lead’s tail rubber
Step 3)

You can carefully lick the twisted section or use PVA tape to keep it all sealed in place
Step 4)

Once the top is sealed, push in the corners at the base of the bag
Step 5)

Moisten the folds and then press them down to create a neat aerodynamic bag for casting.
How to tie: A supple braid hookline for solid PVA bags
Step 1)

Take a short length of supple braid and attach to a curved shank hook using a knotless knot
Step 2)

Trim the tag end of the knotless knot and then slide a small rig swivel on to the hook
Step 3)

This needs to be followed by a small rubber hook bead to trap the swivel in place
Step 4)

Cut a 1cm length of shrink tubing and push it down over the eye of the hook, and steam.
Step 5)

Attach the hookbait by threading it on to a doubled length of fluorocarbon, then blobbing
Step 6)

This is what the finished rig should look like. Its hooking potential in unrivalled.
How to tie the ronnie rig!
Gardner tackle's Lewis Rhead walks us through the rig of the moment and how to tie it...
There are rigs and then there is the "Ronnie rig". Some rigs stand the test of time and work year after year. Others are more transient in nature, their tangible benefits are the figment of a twisted mind, and they don’t offer any real advantage in terms of catching carp or being easy to tie!
This one, however, is very special. It’s a rig that’s been used successfully on the quiet for a few years now, being deployed as a tool pivotal in catching some phenomenal big carp from a number of waters. But now the word is out and everyone want's to know how to tie this amazing rig

The Ronnie rig is easy to tie and offers the benefits of a super-consistent low pop-up presentation, fished the height of a hook and a swivel of off the lakebed, but without the issues of a naked hook eye that has the potential to snag in landing-net meshes (one of the main problems associated with the original 360-style rigs).
It offers all the advantages and awesome rig mechanics of the hinged stiff rig, but without the need to trying to fish it low to the lakebed, which isn’t the optimum arrangement. When it’s tied right, those of us that have used it extensively have pure unadulterated confidence in it because hook-pulls are almost non-existent. I can’t remember pulling out of a single fish with the Ronnie rig.
Luckily, it’s amazingly simple to construct thanks to the use of a size 12 Covert Kwik-Lok Flexi Ring Swivel mounted on the eye of the hook. That, combined with a Gardner Mugga hook, offers a highly aggressive, fast-reacting presentation that is ruthless in the extreme!
It’s also extremely versatile. I always have a number of pre-prepared hook sections ready to go, and I tailor the hooklink material to suit the lakebed or the lead arrangement.
That could mean a lead clip with a long, supple, skinned hooklink such as Ultra Skin in silt, or a helicopter-style arrangement and a Subterfuge fluorocarbon boom on clean sand and gravel.
Personally, I think balancing it like a hinged stiff rig works best – so the hookbait is slow to sink. Why? If you overbalance the hook by moulding putty around the shrink tube, the hook has a tendency to lie over further and this inhibits it from twisting and turning as quickly as it could (the same drawback you get with a hinged stiff rig).
Realistically, mounting the swivel through the eye means you need to use a ‘nice’ sized hook, and the size 4 Mugga or Continental Mugga are both perfect. You know, some rigs work with some hooks better than others, and this is the one. The Mugga’s curved swept shank and 20-degree inturned eye complement and enhance the mechanics, lining up the shrink tube naturally in a way that gives maximum ‘twistiness’.
Variants of some rigs come and go, but the Ronnie rig is one that I know will stand the test of time. Like all presentations, it isn’t the panacea of all things riggy, but what it is is the best low pop-up rig that I have used.
Now it's time to show you how to tie this amazing rig so you can go out and use it for yourself!
How to tie
Step 1)

Start by cutting a 1cm length of large Covert shrink tubing.
Step 2)
You then position the shrink tubing on the hook shank.
Step 3)

Attach the hook to a size 12 Kwik Lok Flexi Ring swivel.
Step 4)

The crook will distort slightly as it is opened up.
Step 5)

So once the hook eye is in place squeeze the crook closed with pliers.
Step 6)

Now bring the shrink tubing back down the hook to this position.
Step 7)

Carefully shrink the tubing down using the steam from a kettle.
Step 8)

Now you can slide a size 20 Target Swivel on to the hook.
Step 9)

Follow this with a hook stop to keep the swivel in place
Step 10)

Position the hook stop opposite the barb as shown here.
Step 11)

Attach your pop-up hookbait with some bait floss.
Step 12)

Mould some tungsten putty around the shrink tube to balance the bait.
How to tie Alan Scotthorne's Hooklength Knot
Here Alan Scotthorne reveals the knot that he uses to join a hooklength to his fishing mainline. It's a variation of the loop-to-loop method, but with a twist. It's easy to tie and incredibly strong...
Alan Scotthorne was never really happy with using loop to loop knots for joining his mainline to his hooklength namely because it can potentially cause tangles and it's untidy.
After experimenting with lines he came up with this knot. Well, it's actually not really a knot - it's more of a way of wrapping and twisting a line onto a loop of line. This makes this knot very strong indeed, and therefore reliable enough to be used on silverfish through to commercial carp waters.
But it's developer and creator proves just how reliable and effective this knot it. If it's good enough to a five-times World Champion to use, it must be good enough for every other angler!
Here's how it's tied...
1 Tie a small loop in the end of your mainline and then pass your hooklength line through the loop like this.
2 Hold the line in your left hand and then double it up with your other hand to create a loop in the hooklength line.

3 Twist the end of the hooklength that is held in your right fingers. This causes the line to spin and twist around the other section of hooklength line.

4 Pass the other end of line, with your hook attached, through the loop that is created when twisting the hooklength line.

5 Moisten the line and pull the knot tight. The tag ends should be trimmed right down as this knot refuses to slip.

How to fish the lift method for carp, tench and bream

This technique is brilliant for tackling the margins. It was made famous by John Wilson, who has used it extensively for carp on many of Britain's lakes to catch countless fish of all sizes. It works with almost all baits, including boilies.
A The lift method works best if the float rod is placed upon rod rests. This ensures that the rod tip and the line remains stationary, and subsequently the float isn't pulled off line.
B It's best to use large, unloaded floats that offer a lot of buoyancy. When set correctly the float tip should only just break the surface. When a fish takes the bait and therefore lifts the shot that lies on the bottom, the float will rise to indicate a bite.
C Use the bare minimum of shot to lock the float upon the line. Ideally the shot should not even make the float lay flat on the water's surface - that's how little this rig requires around the float.
D You will need to plumb the depth accurately when using this rig because all the float's shot loading needs to ble placed well down the line so that it sits on the bottom. This not only anchors the float, but if it is placed at the correct depth it will pull the float down so low that only the tiniest hint of the sight tip shows above the water's surface.
Rig for floatfishing close to islands and features
This float rig is ideal when casting tight to an island to catch the carp that patrol around its margins. As you will be casting to a feature you can actually use this rig with the line clipped up because a hooked fish will not be able to swim away from you - it can only swim to the side or towards you.
A Use a loaded, bodied float that is attached to the line with a fixed float adaptor. Alternatively a couple of tiny split shot will suffice. The best float to use is a straight bodied waggler because they pop up to the surface very quickly, ready to detect a bite straight away.
B Mainline needs to be strong enough to cope with carp and the problem of hooked fish reaching any snags. We suggest using no lighter than 4lb.
C Make sure that the depth is plumbed accurately so that the rig is set cotrrectly and that the bait touches the bottom.
D By using a swivel to link the mainline to the hooklength esnures that a replacement hooklength can be attached quickly, and as this rig will be cast a lot of times, the hooklength will not spin up as the bait revolves when it is being drawn back to the bank.
E Ideal hooklengths for this rig need to be 0.14mm and above. The best baits for this style of fishing are either sweetcorn, maggots, casters or a piece of worm.
The best pole rig for fishing with chopped worms
This simple pole rig is perfect for fishing with chopped worm for a number of reasons - it's stable so the bait remains still, it pushes the bait to the bottom quickly to avoid smaller bait-snatching fish, and it is perfect for lifting and lowering the bait to entice a bait.
A A rounded or body-down pole float is ideal for this rig. They can be held back against any surface tow well, in windy conditions.
B Always attach your pole float using three silicone strips of tubing to ensure it does not slide along the line.
C Mainlines and hooklengths for this rig should be quite strong as you may encounter tench or carp when fishing with chopped worm. A mainline of 0.14mm tied to a 0.12mm hooklength will suffice.
D Using an olivette around 10in from the bottom will ensure that the bait is forced through the depths quickly, straight past any smaller fish that may snatch at the bait as it drops. Olivettes also help steady the rig in adverse conditions.
E Use two dropper shot equally spaced between the olivette and the hook. No8 or No10 shot are ideal for this as they are light enough to provide a slow, gentle and natural drop of the bait through the final 20 inches of water.
F Fish your bait around 3-5in overdepth, and remember to use a strong hook. One of the best for chopped worm fishing is a Kamsan B711.
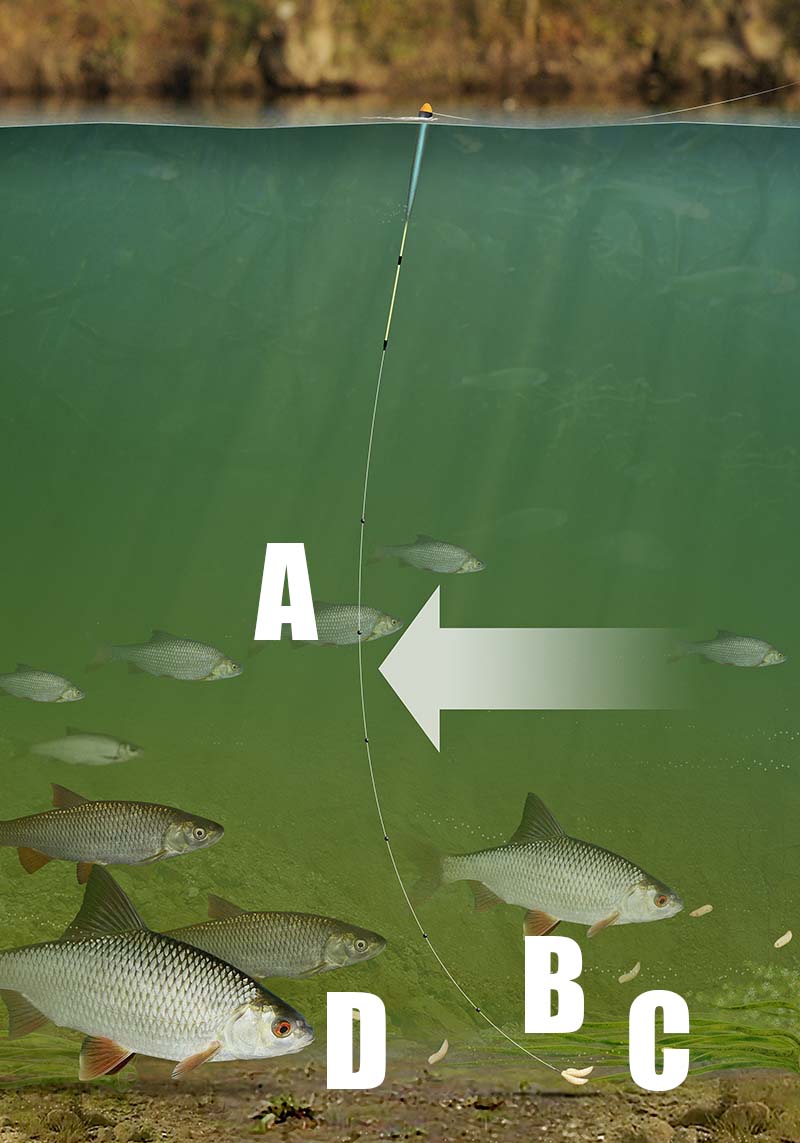
Get more bites when feeder fishing for bream, carp and tench

If you want to get more bites when fishing a groundbait or open end feeder, try this neat trick and twitch your rig back. It’s easy to do and can trigger even more bites than you’ve ever had before. It works brilliantly for bream, carp and tench – even roach too when you’re fishing a maggot feeder.
It is very simple and relies on the fact that you’re drawing your hookbait right over your loosefeed – simple really!
After casting your feeder rig, leave it for five minutes as you may well get a bite straight away. But if you don’t it’s time to twitch your rig to tempt those fish into taking your bait.
The only thing you need to think about before you start twitching your rig is to remember the length of your hooklength. For this example, let’s say that it’s 3ft – an average length for a typical feeder rig.
Pick up your rod and gently move it to one side to take up the slack so you have a tight line to the feeder (A).
Now gently begin to pull your rod tip further to dislodge the feeder (B). You’ll feel the feeder bounce. Once it dislodges, continue moving your rod tip very slowly by 3ft. No more than that or you will have defeated the object.
Now your feeder will have emptied the remainder of the bait trapped inside it, your hooklength will have straightened and your hookbait will have been pulled across the bottom, right on top of your feed (C).
Leave the rig in the water for another five minutes to see if you get that extra bite. If not, wind it in, re-bait and recast, and repeat the process all over again.

How to fish for carp with popped-up bread crust and bread flake
All anglers know that carp are suckers for bread crust fished on the surface in the summer, but it is often a very underused bait at all other times of the year. Here we show you how it can be used to catch more carp just off the bottom of stillwaters at any time of the year.
Bread crust and bread flake, by their very nature, are buoyant baits. So they are perfect for use just off the bottom, above any silt or blanket weed.
This is a really simple rig to create, it’s virtually tangle-free, and it’s really productive too with many carp being caught in pleasure and match sessions over the past season.
Here’s how to create it…
A Your mainline needs to be quite substantial as there is a high chance that you could encounter some very big carp. We would suggest using 6lb as a minimum.
B In order to ensure that the rig is as resistance-free as possible, it’s best to use a short length of line between your leger bomb and your swivel. A 4ins length of strong mainline will be ideal. At one end tie a large swivel, and at the other tie a snap link swivel as this will allow you to chance your lead in seconds if you need a different weight of lead to cast further.
C A leger stop is the ideal item to use to prevent the swivel from slipping down to the hook. If you do not have any leger stops, use a small split shot.
D Your hooklength shouldn’t be too long. Around 6ins is about right. Again you will need to choose a lien that’s strong enough for the carp, so 6lb is a good starting point.
E A large hook is paramount here. Something like a size 10, 8 or even 6 could be used as the swollen bread will help mask the hook once it’s submerged.
A note worth mentioning here is that you will need to cast very gently to prevent the bread coming off the hook. Use a gentle sweeping motion to launch the rig, rather than a punch.
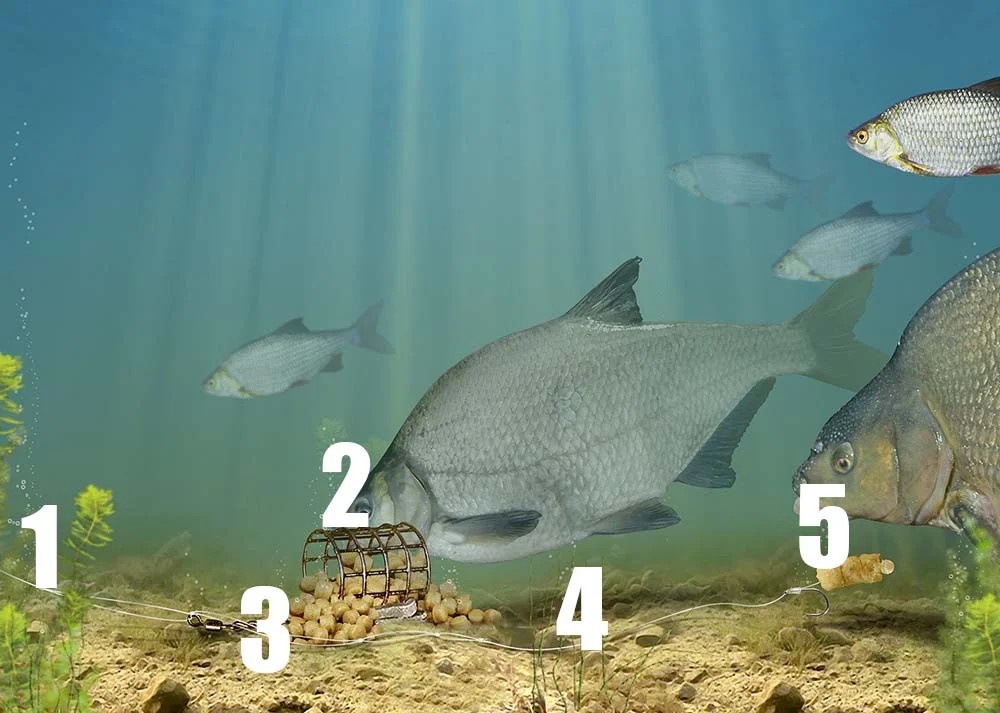
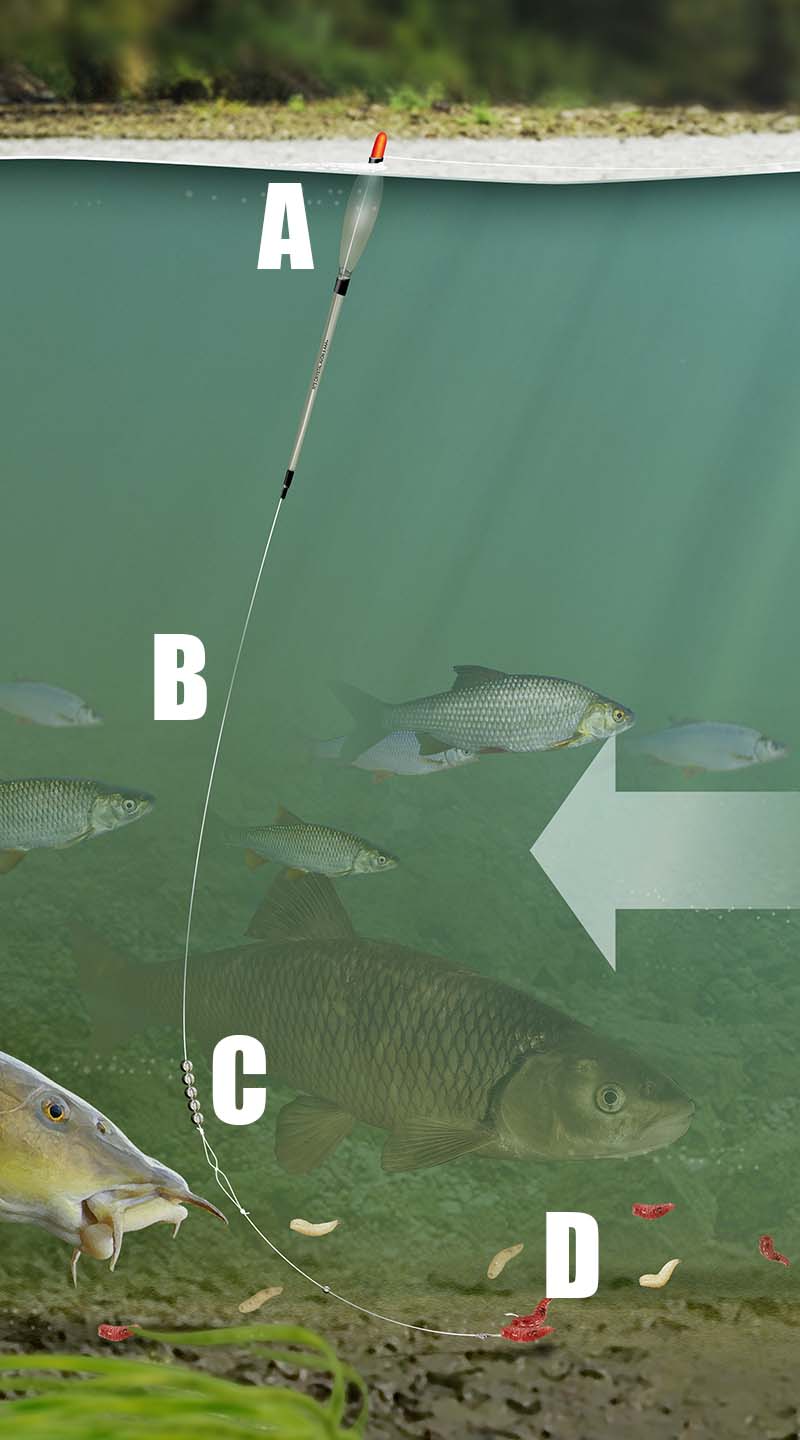
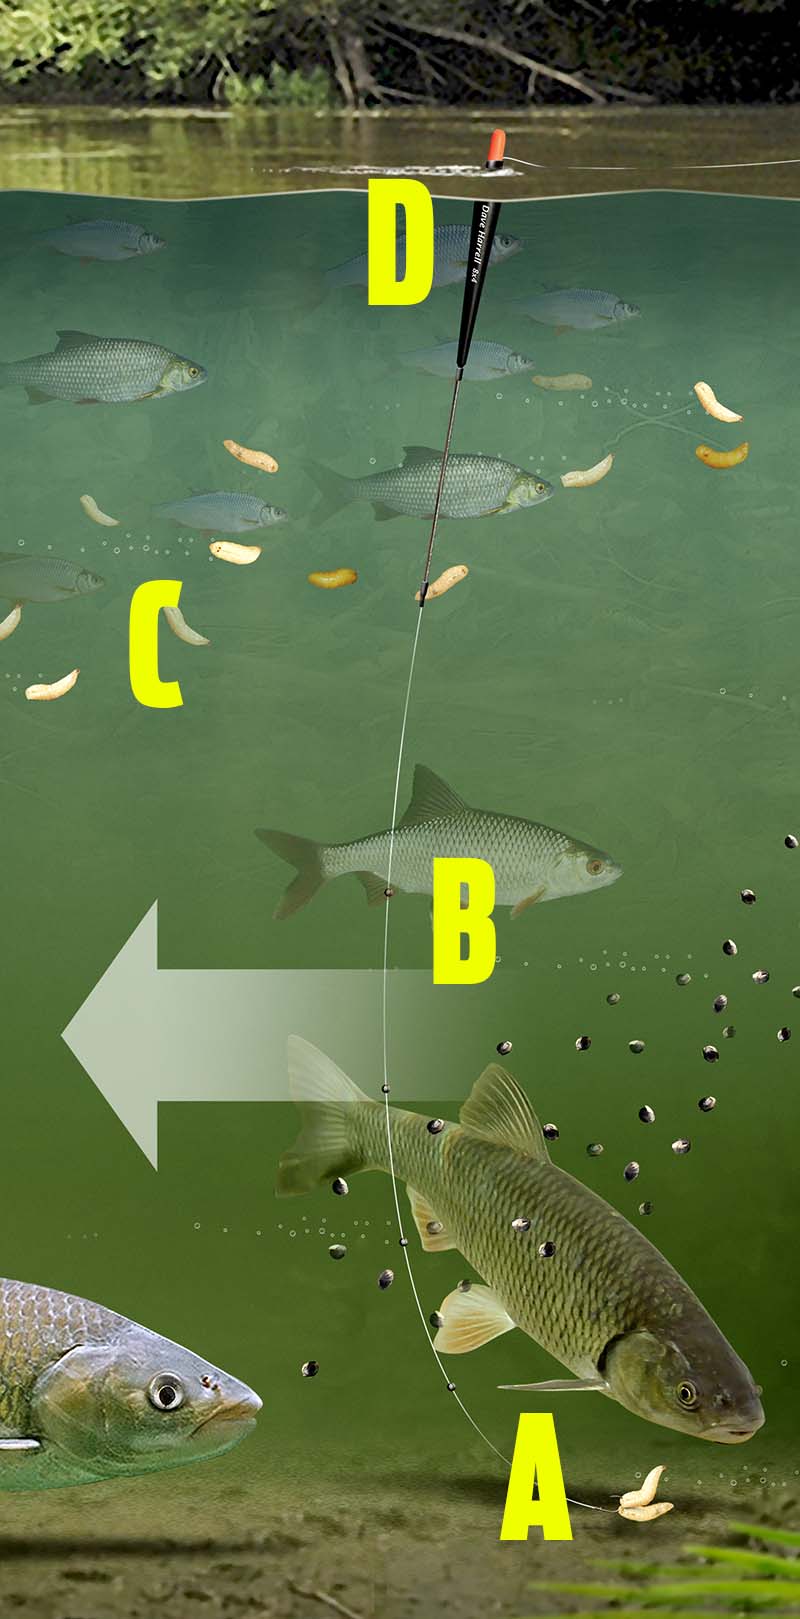
Groundbait feeder rig for river barbel, chub and bream
This simple yet very effective feeder fishing rig is perfect for catching river barbel, chub and bream. It’s easy to make and can be used in deep sluggish rivers through to fairly shallow and swift flowing rivers.
The beauty of this rig is that it can be used to catch all of our larger river species, providing you use an appropriate bait and loosefeed to tempt them.
All you’ll need to tie this rig is a variety of different weight of feeders, some eyed hooks, some hooklength braid, strong mainline, a snap link swivel and a buffer bead.
Buffer beads are small rubberised sleeves that fit over half of a swivel. They can be found at all good specialist fishing tackle stores and are ideal for stopping your swivel from hitting knots and potentially weakening them.
The most important part – and often the most technical – is choosing the right weight of feeder. The feeder must be an open end type. Cage feeders simply release their load of groundbait too quickly, whereas open end feeders hold on to the groundbait until the feeder hits the river bed.
Getting the right weight of feeder requires a few experimental casts. Pick a feeder that you think might offer enough weight to hold still in the flow, cast it out and see if the feeder remains static on the bottom. Ideally you should choose a feeder that only just holds still in the flow – one that will easily dislodge and begin rolling if a fish were to pick up the bait and nudge the feeder out of position.
Two of the best baits for this rig are either large drilled halibut pellets or fishmeal boilies – bream, barbel and chub love them. But you could use maggots, worms, casters, sweetcorn, anything you wish.
The feed you put inside the feeder ought to match the hookbait you’re using. If you decide to use a halibut pellet or a fishmeal boilie on a hair rig, you will do best to use a fishmeal groundbait and pellets in your feeder.
HOW TO TIE THIS RIG
A – Larger baits like pellets and boilies should be hair-rigged. You’ll need a strong eyed hook for this and the best way to tie a hair rig is to use the knotless knot.
If you intend to use more conventional baits, just choose a strong hook of a size to suit your chosen bait.
B – It’s your choice whether you decide to use a mono or a braid hooklength. If you decide to use a mono hooklength pick one that will cope with a barbel, so 6-8lb breaking strain will be ideal. If you opt for braid, chose a 12lb breaking strain.
C – Your loosefeed should match your hookbait. Fishmeal groundbait and pellets is an ideal match for boilies and drilled halibut pellets. This combination scores well for river specimens.
D – Your open end feeder should have enough weight in the lead to just hold still in the river’s flow.
E – Use a quick-release snap link swivel to attach the feeder, and a buffer bead to attach your hooklength.
F – Your mainline needs to be strong enough to cope with a big barbel, so choose 8lb or 10lb breaking strain.
How to tie a Chod rig for fishing silty venues
When fishing for carp over very silty lakes, it is essential to choose a set-up that ensures your rig will not get buried in the soft silt and ruin an otherwise good presentation. And the best rig for this is the Chod rig.
It was specifically designed for just this sort of fishing. The chod has proved to be very successful and has accounted for a lot of big fish recently. It should be used with very buoyant baits and will work superbly in silty areas.
It works upon the principle that the rig can be adjusted to position the bait anywhere along the leadcore leader, so no matter how far the lead sinks into the silt, the bait will be in a prime position to sit above the bottom debris.
This rig incorporates a spliced leadcore leader and fairly tight-fitting beads that allow the hooklink to be semi-fixed anywhere along the length of the leader. Shop-bought Chod rigs are available, for those who don't want to tie their own.
The rig has safety in mind, and the soft beads will easily pass over the spliced joining loop, allowing the hooklink to pull free of the leadcore should a breakage occur.
Here's how to tie your own Chod rig...
A Use a lightweight swivel lead - 1oz is perfect. Keep the lead as light as possible because when you are playing a fish the hooklink will slide down to the lead, so the lighter the lead, the less chance of the fish being bumped off. A short strip of silicone tubing helps neaten the lead swivel.
B This is a leadcore leader. It offers enough weight to sink to the bottom. A 3-4ft length is about right.
C If you want to fix your Chod rig you can place a bead here, between the lead and the hooklink swivel. They need to be semi-fixed - a rubber bead sitting on a short piece of silicone is perfect. It is a personal preference whether you use a stop between your ring swivel and the lead.
D Flexi ring swivel of either a size 11 or 12. It should offer just enough weight to anchor the pop-up. This type of swivel provides a full 360 degree movement, so if a carp sucks at the bait from any angle, the swivel will ensure that the bait can easily move and be sucked up.
E The top stop bead. When fishing in deep silt or weed this bead should be at least 2ft up the leader, but for cleaner bottoms it can be much closer to the lead.
F 2-4ins of very stiff mono hooklink line. ESP and Fox produce some of the best stiff links for the job. 15-20lb breaking strain is about right.
G The hook must have an out-turned eye with a D-Rig knotless knot whipping on the shank. This rig works well with a big hook, even if you are using a 14 or 16mm pop-up boilie. And the perfect bait for a Chod rig is a 14-16mm pop-up boilie that will not sink, regardless of how long the rig is submerged.
Prevent foul hooking carp when margin fishing
We've all done it at some time - foul hooked a carp in the fin or flank when pole fishing tight to the margins or an island. It's almost inevitable that the feeding carp will, at some time, swim into our lines and become foul-hooked.
Not only is this unsporting, but playing a foul-hooked carp is twice as hard as normal, putting your pole, elastic, hook and line under incredible pressure that often ends in disaster.
Although we cannot guarantee that this technique will prevent carp becoming foul-hooked, it will certainly decrease the chance of that happening. And in turn it will increase your confidence too.
Here's how it's done and how to tie it...
The key tackle requirements are a strong hook (eyed or spade end, it doesn't matter), strong mainline and a short dibber pole float. Then you'll need a handful of No8 shot to dot the float down to the bulbous sight tip.
When we say strong mainline, choose a high-tech line of around 0.18mm to 0.22mm diameter (between 6-10lb). That will be strong enough to cope with the rigors of this style of fishing.
All your shot should be placed together, in a line, below mid-depth.
You'll also need strong pole elastic. A grade 18 will be spot on, but you may get away with a 16 if the fish aren't enormous.
Finally, to fish this technique effectively you will need to use as short a line between pole tip and float. The reason for this is simple. You're going to have to push your rig as close to the margins or island as is possible. Having a short length of line above the float will help you do this effectively.
Plumb the depth carefully as your bait should just rest on the bottom an inch or two. Now you're ready to take the swim on, feed it and start catching.
The trick to the effectiveness of this rig is really very simple. If your rig is presented as close as possible to the margins it'll be positioned just out of the way of the feeding carp. Also, when a carp does pick up your bait and you strike, there's a very high likelihood that the carp will swim directly away from the margins and into open water, where you'll be able to gain control of it quickly. Obviously there's no way the carp can swim forwards, because of the island or the bank.
Take a look at the diagrams below and you'll see why it's important to fish as close as possible to the feature.
THE RIGHT WAY
THE WRONG WAY


How to tie a Zig rig to catch carp mid-water
The zig-rig is a devastating rig for catching carp when they are feeding high in the water, in mid-water and feeding right on the surface.
It works around the same principle as a standard semi-fixed bolt rig – the only difference is the length of the hooklength.
The lead set-up is very simple. Here it comprises a large swivel lead attached to the line using a safety clip. A swivel joins the mainline to the hooklength, but here it’s covered in a short length of tubing to prevent tangles.
The hooklength must be a clear line (fluorocarbon is best) so as not to spook the fish, and the length of it must be shallower than the depth of water.
To find the water depth you may need to use a marker float set up, then from this you will be able to find the depth and then create a hooklength long enough to present the bait at the required depth – sometimes just 6in under the surface works best – sometimes mid-depth will get you more bites.
Bite registration ought to be the same set-up as you normally use – an alarm and an indicator.
A Remember to use a length of tubing over the swivel as this will prevent tangles.
B Fluorocarbon line is best for this rig, but clear mono will also catch you fish.
C Use a large pop-up boilies as this will provide the buoyancy to suspend the bait well off the bottom.
D In mild water conditions, a bait presented at mid-water will gain you more takes.
E Use a gripper-style lead to hold the bottom securely as you will never know if you have cast your rig onto a steeply-shelving bottom.