
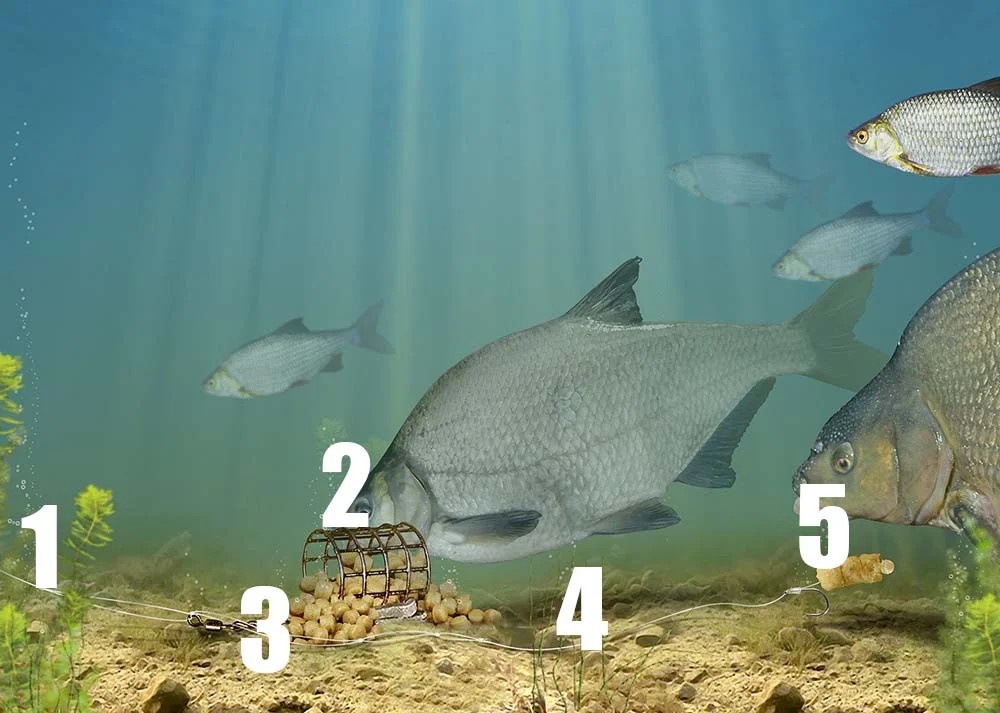
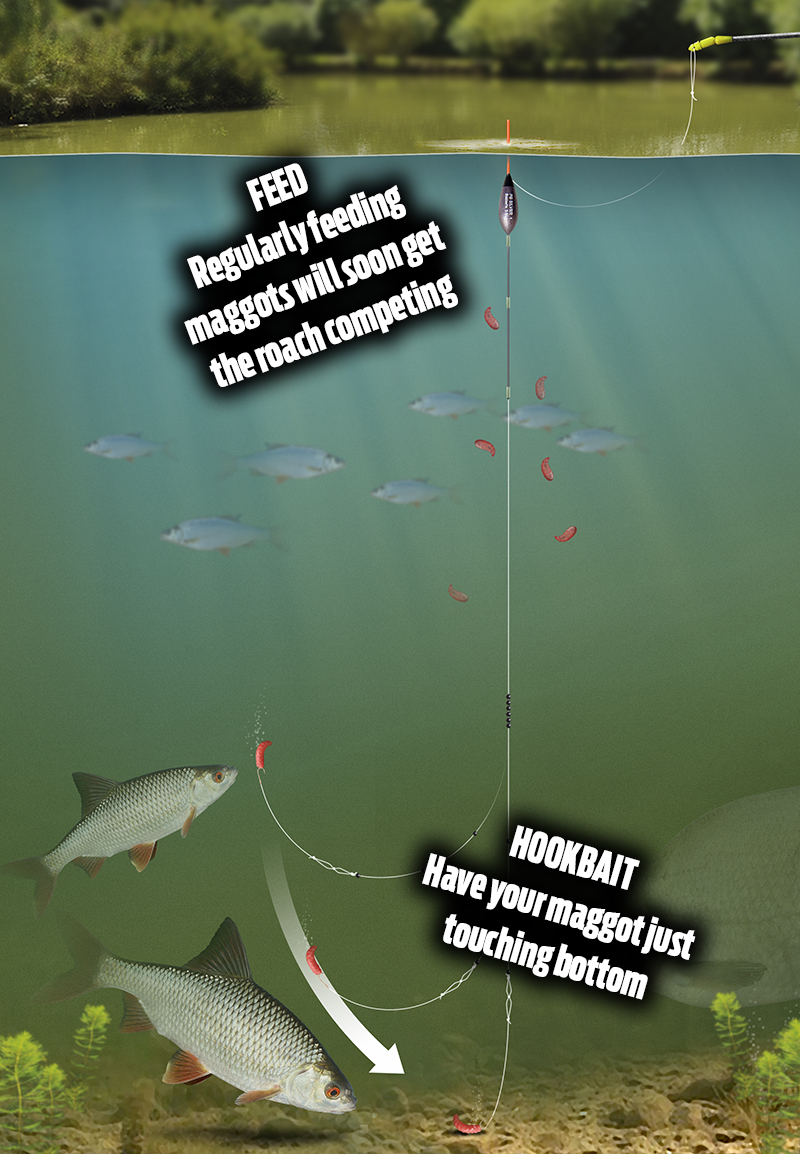
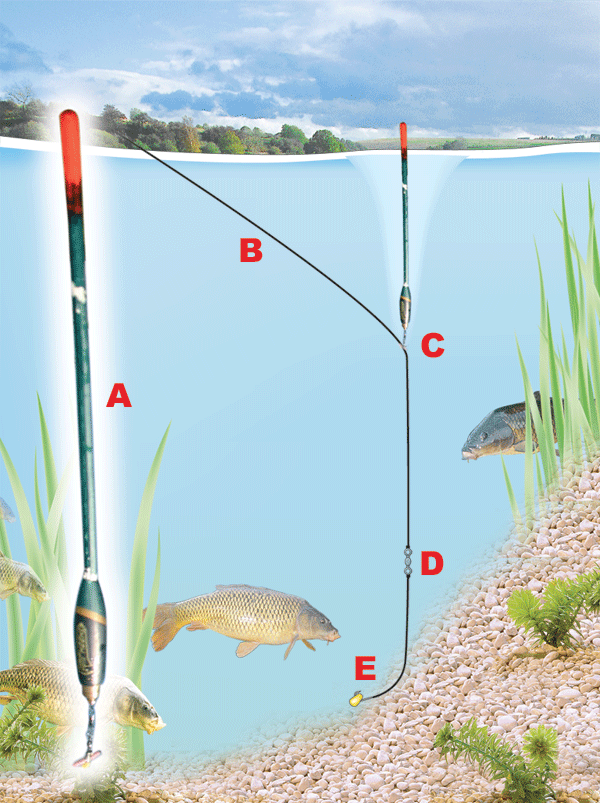
Bream Fishing Rigs | Feeder rig for bream
Commercial fisheries are about so much more than carp these days, with bream and skimmers becoming an increasingly common target for match and pleasure anglers alike.
The pole is a great way to catch them if conditions and your swim allow, but the feeder is still hard to beat for keeping a few fish going into the net.
However, you’ll not need the long distance stepped-up kit of the summer months on big lakes and reservoirs to catch them. Instead, a more refined scaled-back rig will get the job done, along with feeds and baits that give a definite nod to the commercial carp scene.
On venues such as Meadowlands Fishery in the West Midlands the skimmers happily live alongside the carp and can fill in the blanks otherwise spent waiting for a carp to find the bait. Soo follow our advice here and add some bream to your match catch…
1) Running or fixed?
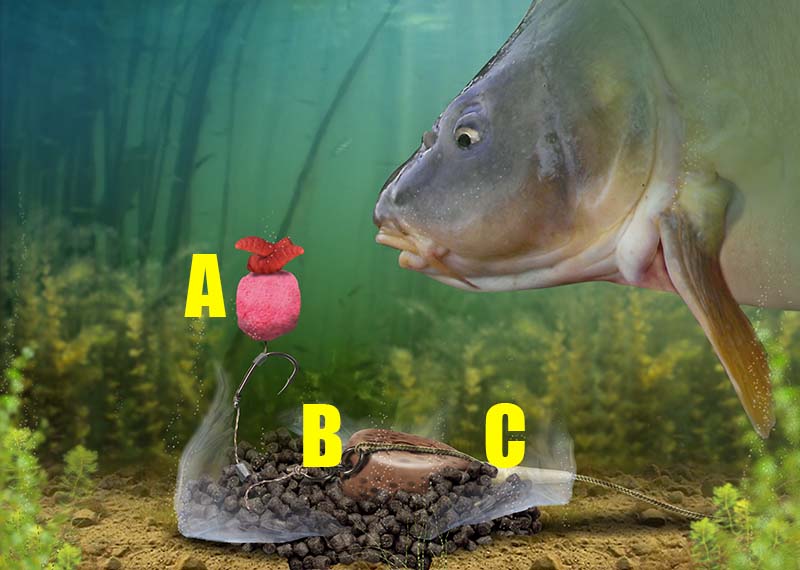
Fishery rules may dictate whether or not you can use a fixed rig such as the one shown here. If both are allowed, the choice is yours. A running rig will tangle less and sees the feeder run directly on the mainline, stopped just above the hooklength. A fixed rig can result in a better bite and more bream hooked, and involves trapping the feeder inside a 6ins-8ins loop in the mainline. The feeder can still run, but will stop when the rig is pulled a certain distance by a fish picking the bait up. In this instance, it’s possible that the bream will hook itself.
2) Cage feeder
A cage is better than a plastic open-end feeder. It is made of metal and so is heavier and can be cast further with more accuracy. The contents will empty quicker too, useful on shallow lakes. In deeper swims you’ll be better off with a plastic open-end with fewer holes for the feed to get out. Pick a small model to start, as you don’t want to put in lots of bait, and go for a weight that allows you to comfortably reach the distance you want to fish at.
3) Looped boom
Whether you go for a fixed or running rig, to cut down on tangles with a fixed rig, tie several small loops in the mainline immediately below the loop that the feeder sits in. This creates a stiff ‘boom’.
4) Hooklengths
A 50cm-long hooklength is good for starters. If you find that you are getting bites but not connecting with them, shorten the link by 10cm at a time until you hook fish. Going longer can work on harder days or if you think that the fish are sitting just off bottom and watching the bait fall. A tell-tale sign of this is a sharp tap on the quivertip just as the feeder settles.
5) Top baits
Ringing the changes on the bait front is another important aspect to master. Single or double red maggot makes a good starting bait, but a redworm can work wonders on tricky days. Dead maggots are equally good, especially on silty waters, and a bait that can work on commercials is two or three small, hair-rigged expander pellets.
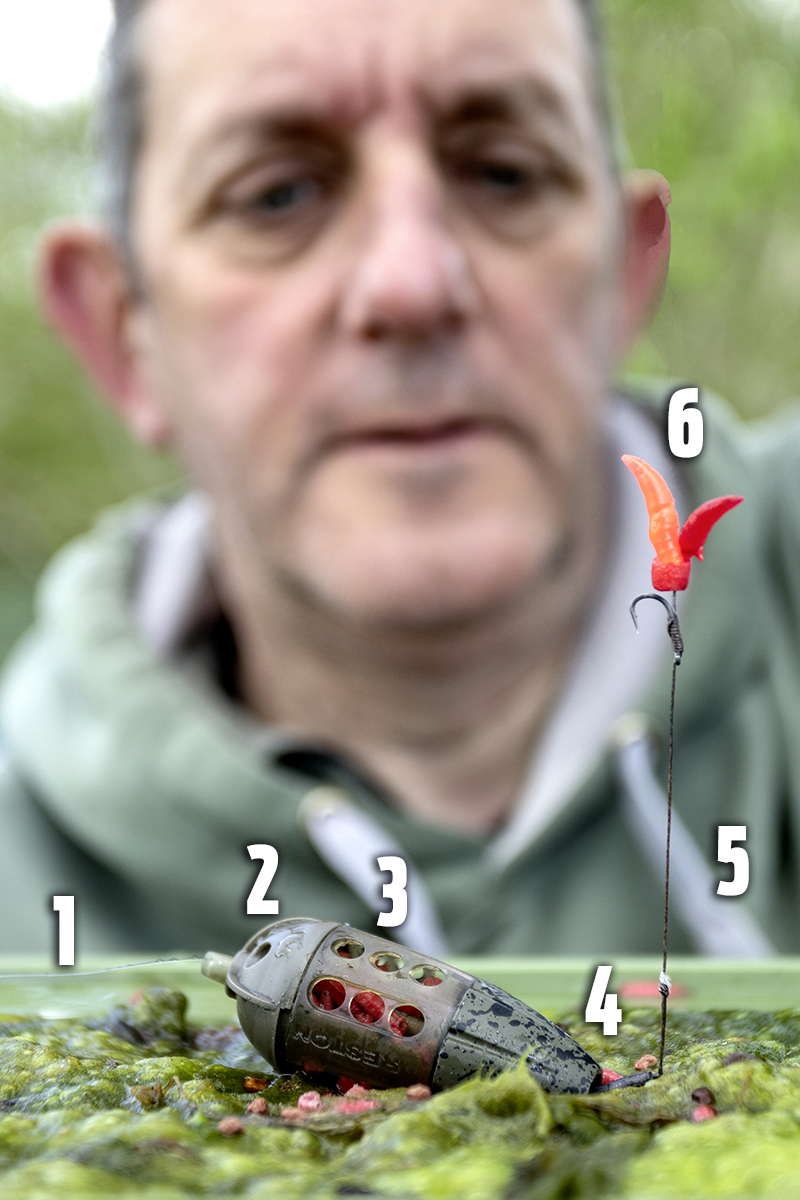
How to tie Dai Gribble's inline feeder rig
1) Mainline
Always use an abrasion-resistant mainline, as it will be exposed to weed in your swim at some point. I use Korum Xpert Reel Line or Gardner Pro in 12lb.
My rig doesn’t include tubing above the feeder. I’ve found that bare line cuts through weed much more effectively, useful when a hooked fish tries to bury itself in the vegetation!
2) Inline feeder
Streamlined, inline feeders such as the new Preston ICS and Korum Grub feeder are less prone than others to getting caught up in weed.
Inline rigs are best for weedy swims as when a hooked tench gets into weed the pressure from the rod moves the feeder first, leaving you in direct contact with the fish.
With a helicopter rig the feeder is always trailing the fish and is more prone to getting snagged.
3) What to feed
Live maggots that have crawled out of the feeder and into the weed will keep the tench grubbing around in my swim for ages.
I generally use reds, but have done well with whites too.
4) Go heavy
The ICS feeders I use are 45g, weight-forward designs which makes them easy to cast with accuracy, while the position of the weight aids the bolt effect of the rig so the fish will hook themselves.
5) Hooklink
I’ve found buoyant baits are best presented using a fine braided hooklink material, and I use 4ins of Drennan Gravel Braid tied to a size 10 or 12 Korum Specimen hook.
Tench can easily eject small baits, but a short hooklink converts most pick-ups into unmissable runs.
However, if I’m facing a lot of weed on the bottom I’ll switch to a longer, stiffer hooklink of around 6ins.
I’ll use Avid Captive Coated hooklink and will strip back the last inch of the coating near the hook end to give the hookbait more flexibility – vital for ensuring good hook-ups.
6) Pop-up hookbait
The aim is to lift the hooklink vertically from the feeder, and I use a combination of rig foam and imitation maggots to achieve this.
I vary the colour of the artificial maggots and will try two or three red ones on one rod and a combination of red and fluoro on the other.
A combo of red and either yellow or orange maggots often gets more bites early on in a session but the tench can soon wise up to these.
If one combo works well, switch both your rods over to the same mix.
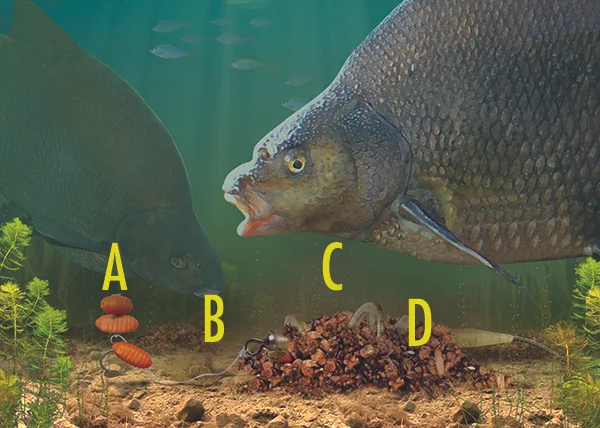
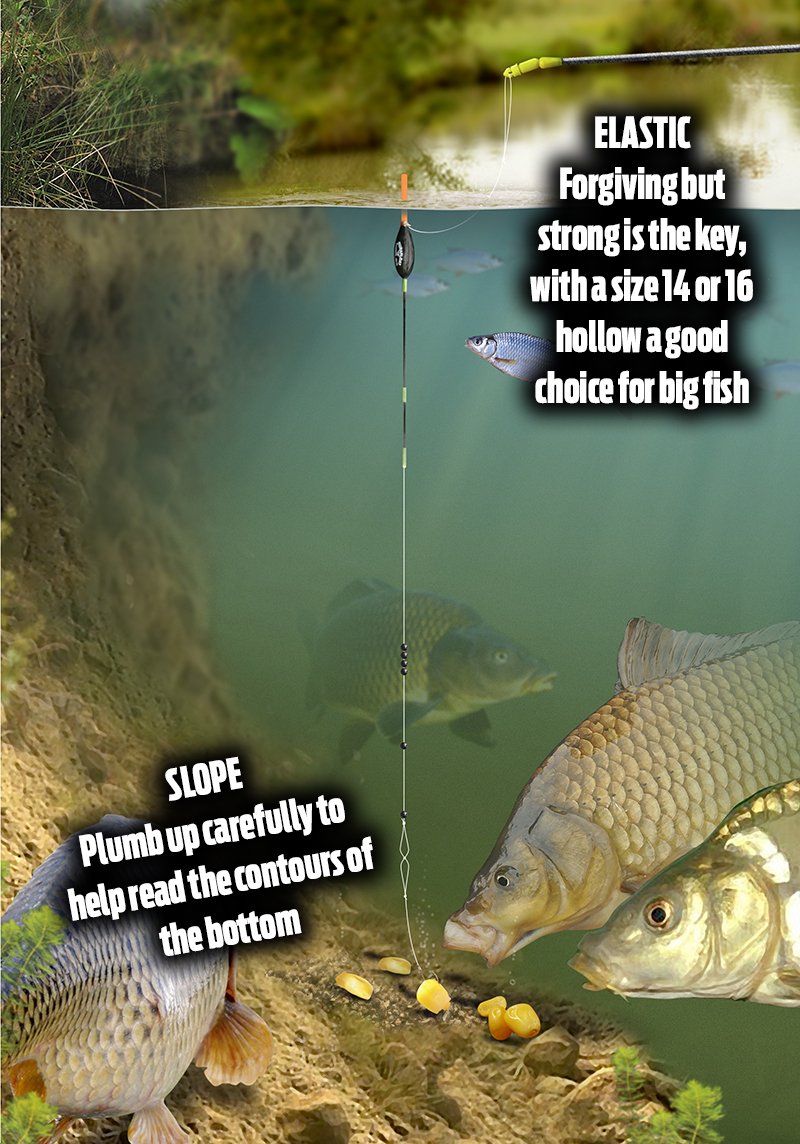
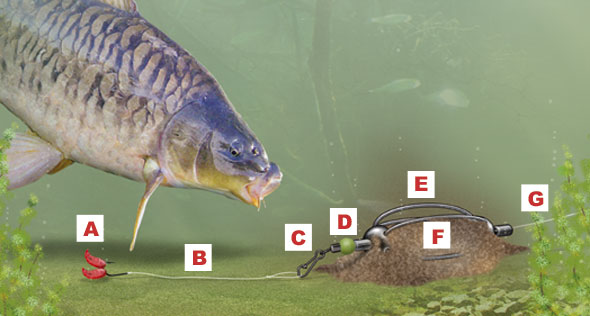
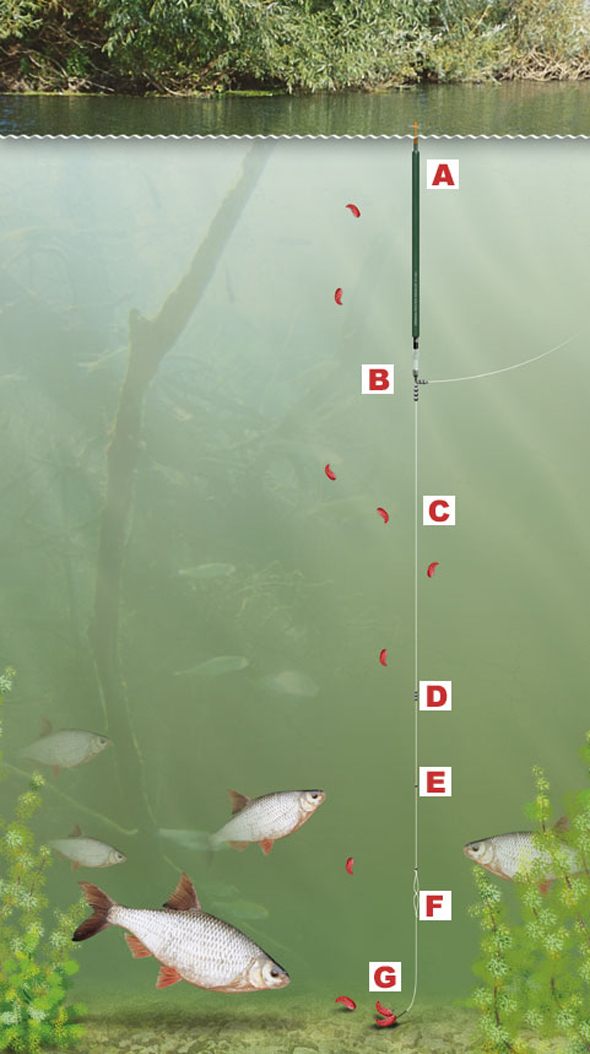
Cage feeder rig for bream fishing
Match-style cage feeder
there are few more classic ways of catching bream than the cage feeder fished at range on big lakes. It’s the go-to method for match and pleasure anglers alike and still accounts for numerous big match wins, despite the advent of the Method feeder.
At this time of year, fishing for bites is the name of the game. A tidy net of smaller skimmers plus the odd proper bream is more than welcome, but if you plan on fishing the cage feeder, you have to first think about how much bait is going into the water.
There’s no place for piling in lots of bait at the start as you would in the summer – a more gradual baiting up attack will reap rewards and that means making just a few early casts to deposit three or four loads of groundbait and freebies into the swim and then then relying on each cast to top the peg up.
Running or fixed?
Fishery rules may dictate whether you can use a fixed rig such as the one shown here. If both are allowed, the choice if yours. A running rig will tangle less and sees the feeder run directly on the mainline, stopped just above the hooklength. A fixed rig can result in a better bite and more bream hooked. It involves trapping the feeder inside a 6ins-8ins loop in the mainline. The feeder can still run, but will stop when the rig is pulled a certain distance by a fish picking the bait up. In this instance, it’s possible that the bream will hook itself.
A) Top baits
Ringing the changes on the bait front is an important skill to master. Double red maggot makes a good starting bait, but a worm or even a grain of corn can pick off the bigger bream. Dead maggots are equally good, especially on silty waters, and don’t forget double caster as a super bait if you are feeding plenty in the feeder.
B) Hooklengths
A 50cm hooklink is good for starters. If you are getting bites but missing them, shorten the link by 10cm at a time until you hook fish. Going longer can work on harder days, or if you think that the fish are sitting just off bottom and watching the bait fall.
C) Groundbait and goodies
If your venue sees a lot of pellets fed, add fishmeal to your groundbait mix. A 50/50 split of sweet bream groundbait and fishmeal will work, but modern sweet fishmeal groundbaits will do the job for you. Darker groundbaits work better in clear conditions. On a commercial, add micro pellets. On natural lakes casters, dead pinkies and finely-chopped worm are best.
D) Cage feeder
A metal cage feeder is heavy and can be cast a long way. The contents empty fast, especially useful in shallow water. On deep lakes, you may be better using a plastic open-end with fewer holes for the feed to get out of. Pick a medium model of a weight that allows you to reach the distance you want to fish at.
E) Looped boom
To cut down on tangles with a fixed rig, tie several small loops in the mainline immediately below the loop that the feeder sits in. This creates a stiff boom that will ensure the hooklength sits at an angle away from the feeder on the cast.

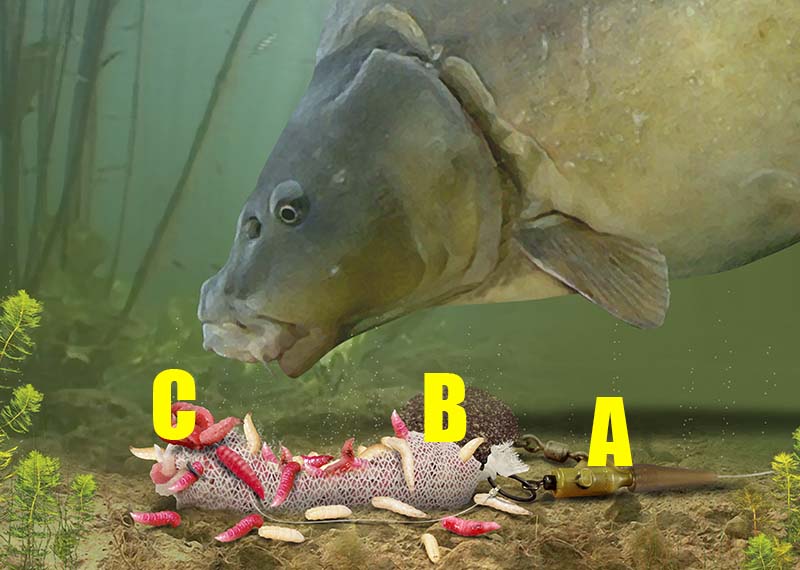
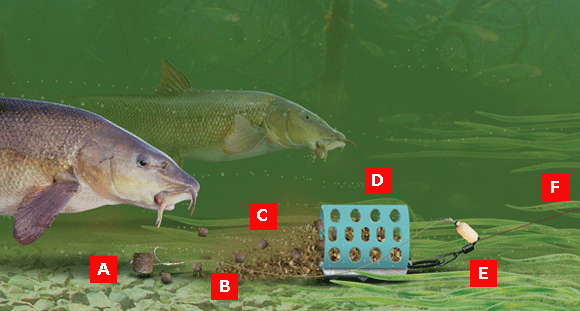
Specimen method feeder rig for bream
Specimen-style Method feeder
Big bream require a very different approach compared to that of a match angler. Regular casting and changes to the rig and hookbaits, are replaced by a bait and wait approach.
This can see one cast made every six or seven hours, biding your time for the bream to find the carpet of feed put in before you start fishing. Much of the action can take place after dark, so that means fishing with bite alarms and a rig that will help a fish to hook itself. A large, heavy Method feeder with a short hooklink and a hair-rigged bait on a tight line direct to the rod means that a bream picking up the bait will run and trigger your bite alarm.
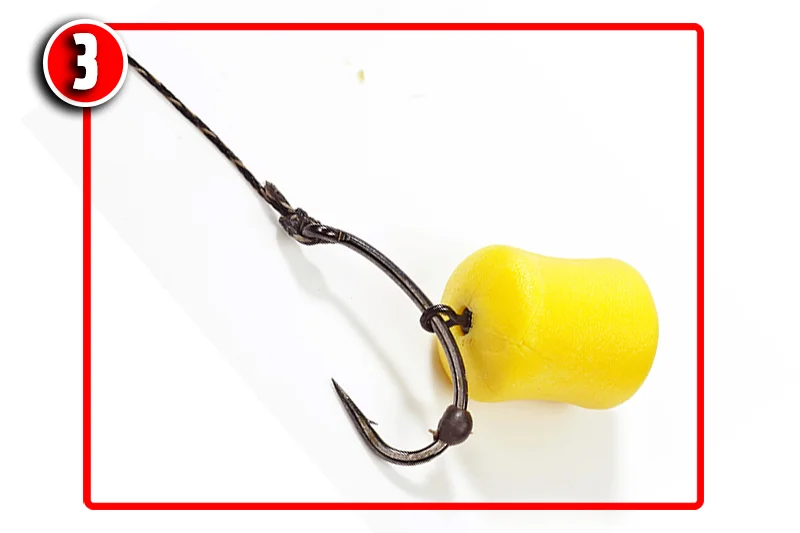
A) Fake baits are best
To stop your hookbait being whittled away by little fish use rubber corn, maggots or casters. Rubber casters, in particular, are very good when you’re putting plenty into the swim. Fish three on a hair rig. If there’s a bit of weed on the bottom, invest in buoyant fake baits to sit just off the lakebed.
B) Short braided hooklinks
The Method feeder involves short 4ins hooklinks whether you’re after carp on a commercial or big bream on a vast lake. A shorter link helps the self-hooking effect and many specimen hunters use braid instead of mono, as it is stiffer and more robust.
C) Feeder size
Go big with your Method feeder in terms of both weight and size. A big feeder will let you get more bait around it, and a heavy model will cast far enough – most big bream fishing takes place on a good long cast. Don’t be afraid of using a 50g feeder to hit the spot. Naturally, the feeder will run on the mainline.
D) What’s in the mix?
Bream love groundbait, so this should make up the bulk of your feed to go around the feeder – but adding plenty of bits and bobs to it will help keep the fish milling around. Hemp, micro pellets, casters and dead maggots will make a good base mix but ensure that your groundbait is very sticky so it can accommodate all these particles and stick around the feeder for a long cast.
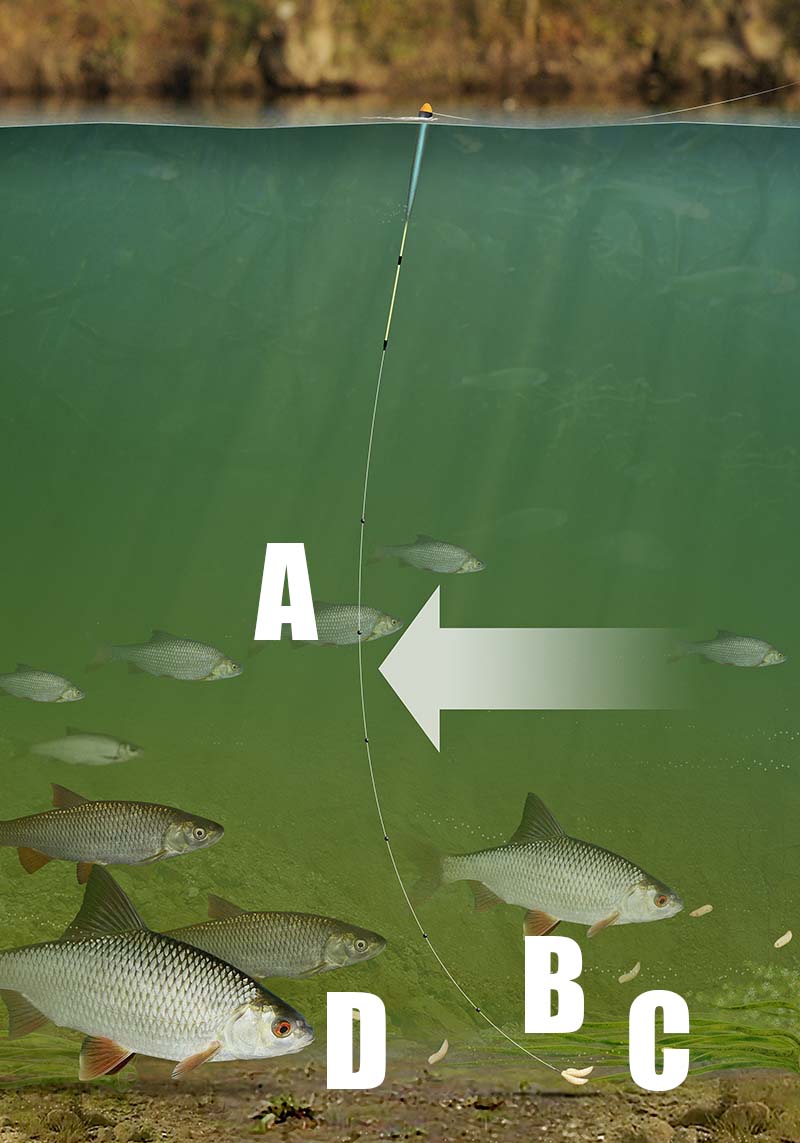
How to tie | The slow sinking feeder
During summer fish will often be stationed well up in the water, especially on deeper lakes where they will find a depth where the light-levels and temperature suit them.
At short range this situation is ideal for fishing a waggler rig with the shot well spread so that the hookbait falls at a slow rate, matching that of the free offerings.
But what if you are fishing beyond float range? On big rivers, reservoirs and large gravel pits, roach, rudd and bream will often not come within 30 metres of the bank. This is where the on-the-drop feeder comes into its own.
By using a long hooklength and a lightweight feeder the time it takes the rig to settle is extended, giving fish plenty of time to intercept the hookbait on the drop.
Bites can be expected at any time. It is not uncommon for the quivertip to never signal the feeder touching down, as a fish intercepts the bait in mid-water. Also, bites can be expected within seconds if the feeder does hit the bottom. There is no point in leaving the feeder once the rig has settled on the bottom.
Within a minute or so of casting, wind in, rebait and recast to keep a constant cloud of attractive bait falling through the water column.

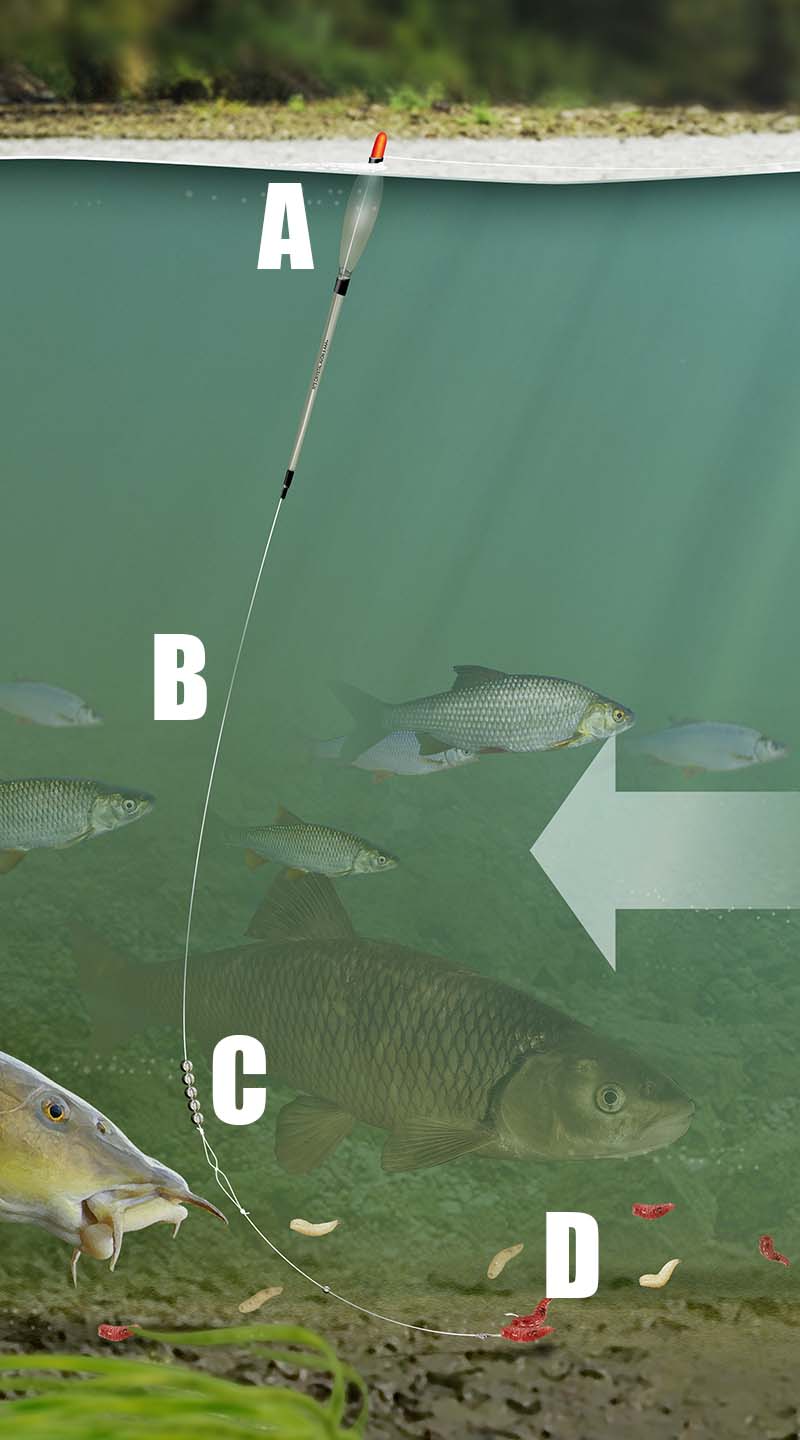
Thread a Medium Grip Mesh feeder on to your mainline. Choose a feeder weight of around 14g-28g

Follow the feeder with two small rubber beads. These act as a shock-absorber cushioning the feeder on the cast

Fold over the last 30cm ofmainline and tie a large loop. Next, tie four further loops inside the large loop at regular intervals

Ensure that the beads and feeders come to rest on the uppermost knot. If they slide over, tie a second knot over the first

Cut off a 120cm length of hooklength. Use hooklengths of 90cm-180cm to vary the sinking speed of the hookbait

Tie on the hook using a spade-end knot where the hooklength line has been first passed through the eye of the hook

Once you’ve attached the hook, tie a figure-of-eight loop knot in the other end of the hooklength

To complete the rig, simply attach the hooklength to the mainline using a loop-to-loop knot


Top 5 pole rigs that you need to try!
No matter where you choose to fish this month, you can guarantee that your target species will come close to the bank in search of food now that the temperatures have risen sharply.
When this happens, the pole is an unbeatable item of tackle but the sort of rig you use with it will dictate whether you get just a few bites or have a session that you won’t forget in a hurry.
Paying careful attention to your terminal tackle and bait choices is vital if you want to make the most of your time on the bank, as is getting the subtle details such asshotting and float patterns spot on.
We reveal the five most deadly spring pole rigs that are almost certain to help you and your friends put more fish in the net.
The Worm Rig

GOOD FOR: Putting together big mixed bags of quality bream and tench on stillwaters.
TACKLE: Use a rugby ball-shaped float with 5lb mainline, a 4lb hooklength and size 14 or 16 hook.
HOOKBAIT: Half or a full worm will appeal to both species at this time of year.
The Maggot Rig
GOOD FOR: Quality roach that will only feed if the hookbait looks natural.
TACKLE: Keep it light with 3lb mainline, a 2lb hooklength and a size 18 or 20 hook.
HOOKBAIT: Red maggots will keep the bites coming. Alternate between single and double.
The Pellet Rig

GOOD FOR: Catching F1s and carp in open water swims on commercials.
TACKLE: A narrow float will help you spot every bite. Use 5lb mainline to a 4lb hooklength and a size 16 hook.
HOOKBAIT: Start with a 4mm expander, switching to a banded pellet if small fish show.
The Margin Rig
GOOD FOR: Catching the biggest carp and F1s in the lake, especially late in the session.
TACKLE: Don’t risk getting bust by a big carp and use 6lb mainline to a 5lb hooklength. A strong float with a thick tip is a must.
HOOKBAIT: Corn is unbeatable in the margins.
The Meat Rig

GOOD FOR: Fishing in open water for carp, F1s, big bream and tench on commercials.
TACKLE: A balanced rig helps catch all species. Use 5lb mainline, 4lb hooklength to a size 16 hook.
HOOKBAIT: A 6mm cube of meat will catch all species that are stocked in the fishery.
How to tie the method feeder rig
Method feeders are a staple among match anglers and, with a few tweaks, can also be used to target big carp, tench and bream.
The only changes you need to make to turn it into a rig capable of landing any carp that swims are to strengthen the component parts and increase the size of the hookbait and loosefeed.
The Method is perfect for ‘runs waters’ or for targeting carp in pressured venues that have seen it all when it comes to rigs.
How to tie the hooklink

Tie on a curved shank hook. We’ve used a palomar knot here, but a grinner is also fine to use.

Thread a micro rig swivelover the point and down the shank, followed by a small hook bead.
Position the hook bead and then attach the bait to the swivel using bait floss or a small bait band.

Tie a swivel to the other end. Make sure it is a snug fit in the base of the frame of the Method feeder.
How to load the method feeder

Put your chosen ingredients into a bait tub. Dampen the comtents and make sure they bind together well.

Place your hookbait in the fat end of the supplied mould and bury it with your Method mix.

Firmly press the feeder into the mould, with the hooklink positioned as shown above.

Remove the frame from the mould. Some frames have push-button releases. You’re ready to cast out!
Tommy Pickering | How to make my simple groundbait feeder rig!
This is my favourite set-up for all my open end feeder fishing. It’s a very simple rig for wire cage and plastic frames, and the stiff boom which is tied in the end of the mainline means tangles are kept to a minimum.
As it’s free running it’s completely safe, too. Use it for bream, tench, roach, perch and even carp. All you need is your reel line, your feeder with a swivel eye or snap link attached, a packet of No8 Preston Stotz weights and your chosen hooklength.

Try this simple and tangle-free feeder set up.
Step 1.

Take the mainline or shockleader between thumb and first finger of both hands and twist in opposite directions to twizzle it together.
Step 2.

Ensure that the length of the twizzled line is longer than that of the feeder and link, to stop the two tangling when you cast the finished rig.
Step 3.

Bring the twisted line back over itself to form an overhand loop knot. Pass the end through itself twice and pull to tighten the knot properly.
Step 4.

You’re now left with a twisted section of line of around 6ins long, called a boom. Trim the tag end to reduce line spin when reeling in.
Step 5.

Now slide the swivel eye of the snap link attached to your feeder on to the twisted line and over the knot of the stiff boom.
Step 6.
Attach two No8 Stotz to the mainline just above the twisted section, with the feeder above. These butt against the knot and stop the feeder too.
Step 7.

Time to add your hooklength, which you will probably have already tied. Push the hooklength loop over the end of the twisted boom.
Step 8.

Put the hook itself through the end loop in the twisted boom. Then pull the whole hooklength through with it as it goes through.
Step 9.

The loop-to-loop forms like this - you may need to flick the hooklength over its own loop knot to achieve this perfect connection. Pull tight.
How to tie Alan Scotthorne's Hooklength Knot
Here Alan Scotthorne reveals the knot that he uses to join a hooklength to his fishing mainline. It's a variation of the loop-to-loop method, but with a twist. It's easy to tie and incredibly strong...
Alan Scotthorne was never really happy with using loop to loop knots for joining his mainline to his hooklength namely because it can potentially cause tangles and it's untidy.
After experimenting with lines he came up with this knot. Well, it's actually not really a knot - it's more of a way of wrapping and twisting a line onto a loop of line. This makes this knot very strong indeed, and therefore reliable enough to be used on silverfish through to commercial carp waters.
But it's developer and creator proves just how reliable and effective this knot it. If it's good enough to a five-times World Champion to use, it must be good enough for every other angler!
Here's how it's tied...
1 Tie a small loop in the end of your mainline and then pass your hooklength line through the loop like this.
2 Hold the line in your left hand and then double it up with your other hand to create a loop in the hooklength line.

3 Twist the end of the hooklength that is held in your right fingers. This causes the line to spin and twist around the other section of hooklength line.

4 Pass the other end of line, with your hook attached, through the loop that is created when twisting the hooklength line.

5 Moisten the line and pull the knot tight. The tag ends should be trimmed right down as this knot refuses to slip.

How to fish the lift method for carp, tench and bream

This technique is brilliant for tackling the margins. It was made famous by John Wilson, who has used it extensively for carp on many of Britain's lakes to catch countless fish of all sizes. It works with almost all baits, including boilies.
A The lift method works best if the float rod is placed upon rod rests. This ensures that the rod tip and the line remains stationary, and subsequently the float isn't pulled off line.
B It's best to use large, unloaded floats that offer a lot of buoyancy. When set correctly the float tip should only just break the surface. When a fish takes the bait and therefore lifts the shot that lies on the bottom, the float will rise to indicate a bite.
C Use the bare minimum of shot to lock the float upon the line. Ideally the shot should not even make the float lay flat on the water's surface - that's how little this rig requires around the float.
D You will need to plumb the depth accurately when using this rig because all the float's shot loading needs to ble placed well down the line so that it sits on the bottom. This not only anchors the float, but if it is placed at the correct depth it will pull the float down so low that only the tiniest hint of the sight tip shows above the water's surface.
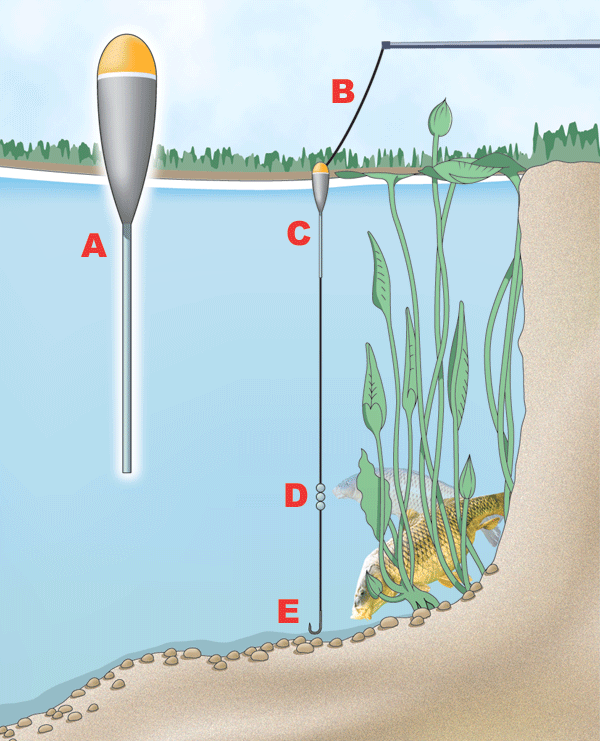
Rig for floatfishing close to islands and features
This float rig is ideal when casting tight to an island to catch the carp that patrol around its margins. As you will be casting to a feature you can actually use this rig with the line clipped up because a hooked fish will not be able to swim away from you - it can only swim to the side or towards you.
A Use a loaded, bodied float that is attached to the line with a fixed float adaptor. Alternatively a couple of tiny split shot will suffice. The best float to use is a straight bodied waggler because they pop up to the surface very quickly, ready to detect a bite straight away.
B Mainline needs to be strong enough to cope with carp and the problem of hooked fish reaching any snags. We suggest using no lighter than 4lb.
C Make sure that the depth is plumbed accurately so that the rig is set cotrrectly and that the bait touches the bottom.
D By using a swivel to link the mainline to the hooklength esnures that a replacement hooklength can be attached quickly, and as this rig will be cast a lot of times, the hooklength will not spin up as the bait revolves when it is being drawn back to the bank.
E Ideal hooklengths for this rig need to be 0.14mm and above. The best baits for this style of fishing are either sweetcorn, maggots, casters or a piece of worm.
The best pole rig for fishing with chopped worms
This simple pole rig is perfect for fishing with chopped worm for a number of reasons - it's stable so the bait remains still, it pushes the bait to the bottom quickly to avoid smaller bait-snatching fish, and it is perfect for lifting and lowering the bait to entice a bait.
A A rounded or body-down pole float is ideal for this rig. They can be held back against any surface tow well, in windy conditions.
B Always attach your pole float using three silicone strips of tubing to ensure it does not slide along the line.
C Mainlines and hooklengths for this rig should be quite strong as you may encounter tench or carp when fishing with chopped worm. A mainline of 0.14mm tied to a 0.12mm hooklength will suffice.
D Using an olivette around 10in from the bottom will ensure that the bait is forced through the depths quickly, straight past any smaller fish that may snatch at the bait as it drops. Olivettes also help steady the rig in adverse conditions.
E Use two dropper shot equally spaced between the olivette and the hook. No8 or No10 shot are ideal for this as they are light enough to provide a slow, gentle and natural drop of the bait through the final 20 inches of water.
F Fish your bait around 3-5in overdepth, and remember to use a strong hook. One of the best for chopped worm fishing is a Kamsan B711.
Get more bites when feeder fishing for bream, carp and tench

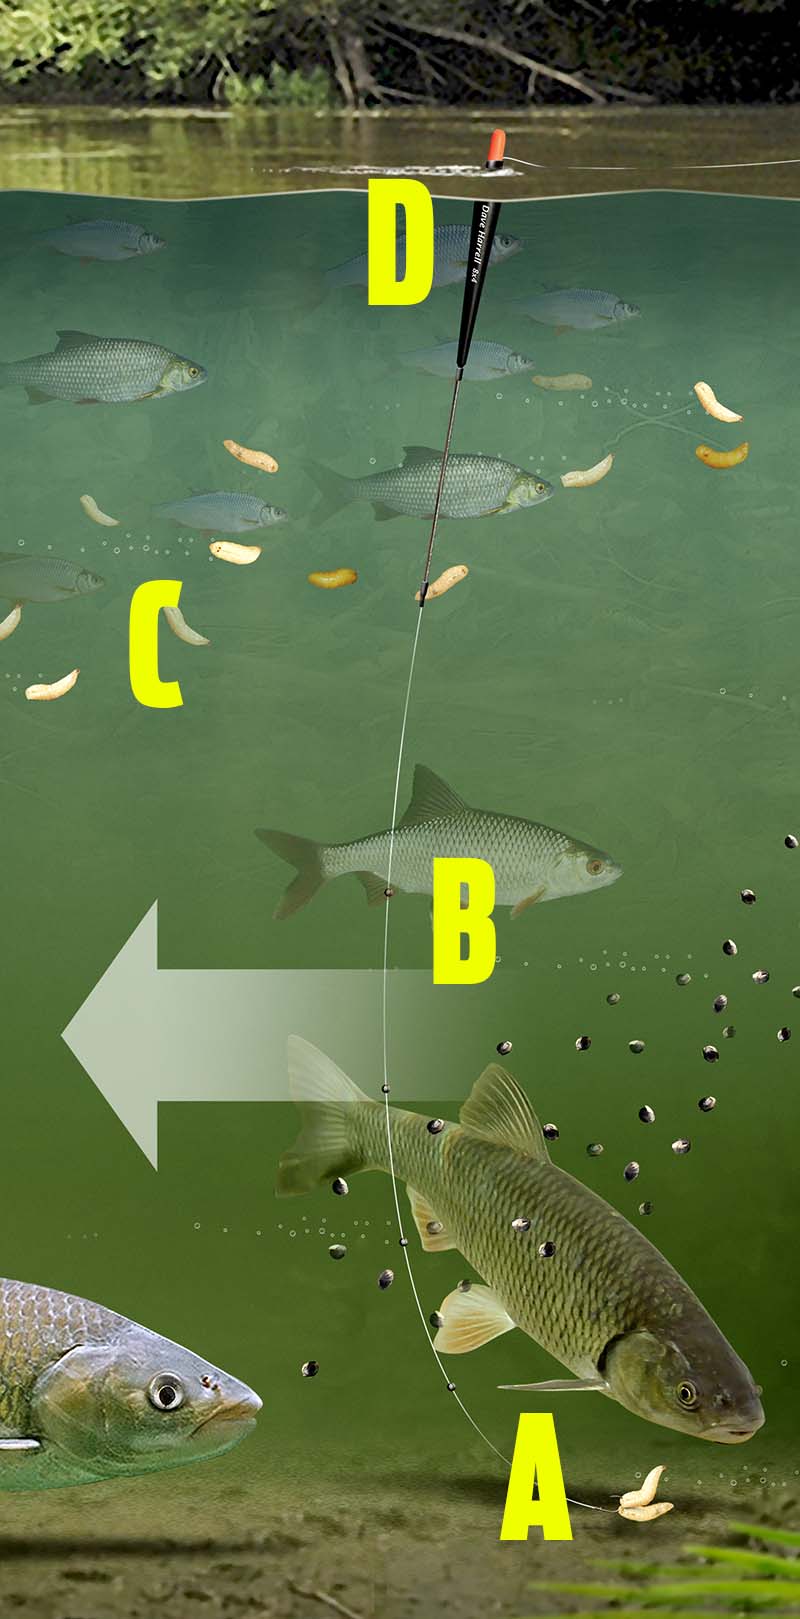
If you want to get more bites when fishing a groundbait or open end feeder, try this neat trick and twitch your rig back. It’s easy to do and can trigger even more bites than you’ve ever had before. It works brilliantly for bream, carp and tench – even roach too when you’re fishing a maggot feeder.
It is very simple and relies on the fact that you’re drawing your hookbait right over your loosefeed – simple really!
After casting your feeder rig, leave it for five minutes as you may well get a bite straight away. But if you don’t it’s time to twitch your rig to tempt those fish into taking your bait.
The only thing you need to think about before you start twitching your rig is to remember the length of your hooklength. For this example, let’s say that it’s 3ft – an average length for a typical feeder rig.
Pick up your rod and gently move it to one side to take up the slack so you have a tight line to the feeder (A).
Now gently begin to pull your rod tip further to dislodge the feeder (B). You’ll feel the feeder bounce. Once it dislodges, continue moving your rod tip very slowly by 3ft. No more than that or you will have defeated the object.
Now your feeder will have emptied the remainder of the bait trapped inside it, your hooklength will have straightened and your hookbait will have been pulled across the bottom, right on top of your feed (C).
Leave the rig in the water for another five minutes to see if you get that extra bite. If not, wind it in, re-bait and recast, and repeat the process all over again.

Groundbait feeder rig for river barbel, chub and bream
This simple yet very effective feeder fishing rig is perfect for catching river barbel, chub and bream. It’s easy to make and can be used in deep sluggish rivers through to fairly shallow and swift flowing rivers.
The beauty of this rig is that it can be used to catch all of our larger river species, providing you use an appropriate bait and loosefeed to tempt them.
All you’ll need to tie this rig is a variety of different weight of feeders, some eyed hooks, some hooklength braid, strong mainline, a snap link swivel and a buffer bead.
Buffer beads are small rubberised sleeves that fit over half of a swivel. They can be found at all good specialist fishing tackle stores and are ideal for stopping your swivel from hitting knots and potentially weakening them.
The most important part – and often the most technical – is choosing the right weight of feeder. The feeder must be an open end type. Cage feeders simply release their load of groundbait too quickly, whereas open end feeders hold on to the groundbait until the feeder hits the river bed.
Getting the right weight of feeder requires a few experimental casts. Pick a feeder that you think might offer enough weight to hold still in the flow, cast it out and see if the feeder remains static on the bottom. Ideally you should choose a feeder that only just holds still in the flow – one that will easily dislodge and begin rolling if a fish were to pick up the bait and nudge the feeder out of position.
Two of the best baits for this rig are either large drilled halibut pellets or fishmeal boilies – bream, barbel and chub love them. But you could use maggots, worms, casters, sweetcorn, anything you wish.
The feed you put inside the feeder ought to match the hookbait you’re using. If you decide to use a halibut pellet or a fishmeal boilie on a hair rig, you will do best to use a fishmeal groundbait and pellets in your feeder.
HOW TO TIE THIS RIG
A – Larger baits like pellets and boilies should be hair-rigged. You’ll need a strong eyed hook for this and the best way to tie a hair rig is to use the knotless knot.
If you intend to use more conventional baits, just choose a strong hook of a size to suit your chosen bait.
B – It’s your choice whether you decide to use a mono or a braid hooklength. If you decide to use a mono hooklength pick one that will cope with a barbel, so 6-8lb breaking strain will be ideal. If you opt for braid, chose a 12lb breaking strain.
C – Your loosefeed should match your hookbait. Fishmeal groundbait and pellets is an ideal match for boilies and drilled halibut pellets. This combination scores well for river specimens.
D – Your open end feeder should have enough weight in the lead to just hold still in the river’s flow.
E – Use a quick-release snap link swivel to attach the feeder, and a buffer bead to attach your hooklength.
F – Your mainline needs to be strong enough to cope with a big barbel, so choose 8lb or 10lb breaking strain.
How to use a chubber float for fishing shallow and fast rivers or streams
The short, fat and dumpy chubber float is perfect for fishing shallow and fast river glides or trotting on streams. It’s capable of carrying a lot of shot, due to the size and buoyancy of the float. This is perfect because fast, shallow swims need a lot of lead down the line to ensure that the bait is pushed down to the bottom right where the fish are.
A typical chubber rig is simple to tie, and here’s how…
A Your mainline ought to be a floating one. Drennan Floatfish is perfect. Choose a breaking strain that matches the fish that you are likely to catch. A 3lb line will be adequate for most situations, but you may need to step up to 5 or even 6lb if there are lots of big barbel present.
B The chubber float needs to be attached to the mainline using three rubbers – one just under the sight tip, one in the middle and one at the base of the float.
C There are two ways to shot a chubber float – either use a string of large shot (BBs, AAs or even SSGs) placed around 1ft from the hook, or alternatively use an olivette. This creates a much smaller and neater bulk of weight.
D Because chubbers should be fished in fast water, the fish don’t have that much time to check out the hooklength, so this sort of rig can be fished straight through to your hook. You still need to match the hook size to the size of the bait you are using.

In-line Method feeder rig for carp, bream and tench
The Method feeder is a devastating item of tackle for the commercial carp angler as it not only attracts fish to the swim, but it’s easy to use and easy to catch fish with!
To create this rig you’ll need to thread an in-line Method feeder upon your strong mainline – between 8lb and 12lb is ideal. Next thread a small bead onto your mainline and tie on a strong swivel.
The hooklength you will need should be very short and very robust, again between 8lb and 12lb breaking strain line is ideal. And an ideal length would be between 3in and 6in, because the bait needs to be presented as close as possible to the feeder.
Ideal baits for fishing the Method ought to be the best baits being used on the venue at the time, so ask the venue owner or regulars before you arrive to give you an idea of what to use for the best results.
Groundbait to mould around the feeder is quite important as not all groundbaits work. Ideally choose a specific Method Mix as these groundbaits bind together well and will therefore stick to the frame of the feeder.
You’ll need to mix the groundbait with a little water then take a small handful and press it into the frame of the feeder. Then, using both hands, squeeze a little more groundbait around the frame so that it is completely hidden by the mix. Don’t overfill the feeder as you’ll struggle to cast it out.
The best rods for this style of fishing are either power feeder rods or 2.5lb test curve carp rods.
The key to a good Method Feeder session – as with all forms of feeder fishing – is to consistently hit the same spot to build up a bed of bait that the carp will be drawn to.
A Use the best baits on the venue at the time you’re fishing. Ring first and you’ll get the right info!
B Use a very short and strong hooklength as bites can be savage when fishing the Method. A 3-6in length of 8-12lb line or braid will be perfect.
C A snap link swivel will allow you to tie two or three hooklength and bait them up when you are waiting for a take. Then, after landing a fish you’ll be able to release the old hooklength and clip on a new one quickly and easily.
D Remember to use a bead to absorb the shock of the feeder on the swivel knot during casting.
E In-Line Method Feeders are best because if your line snaps the fish can pull the rig free from the heavy weight.
F Remember to use a specific Method Mix for your groundbait as it will bind to the feeder correctly and stick to it during the cast.
G Your mainline will need to be tough enough to stand up to the pressure of fishing this technique – 8lb to 12lb mainline is best.
How to plumb the depth when floatfishing a waggler
Close in
Hold the plummet in one hand and your rod in the other – flex the tip of the rod slightly by pulling the line taught. Open the bail arm of the reel. Swing the rod upwards, let go of the plummet and take your finger off the spool to cast the plummet into the swim. Timing and a smooth motion is crucial, so do it very slowly to begin with to gain practice. Casting the plummet in this fashion minimises the disturbance it causes when it hits the water – but you can cast it overhead just like you would a float if you can’t master this way.
At distance
Pinch an SSG weight onto your hook (inset). Cast it into the swim in an overhead fashion. As long as the SSG is enough to sink your float it will take it out of sight if you are too shallow. When you can only see the fluorescent part of the float, it is set at a dead depth.
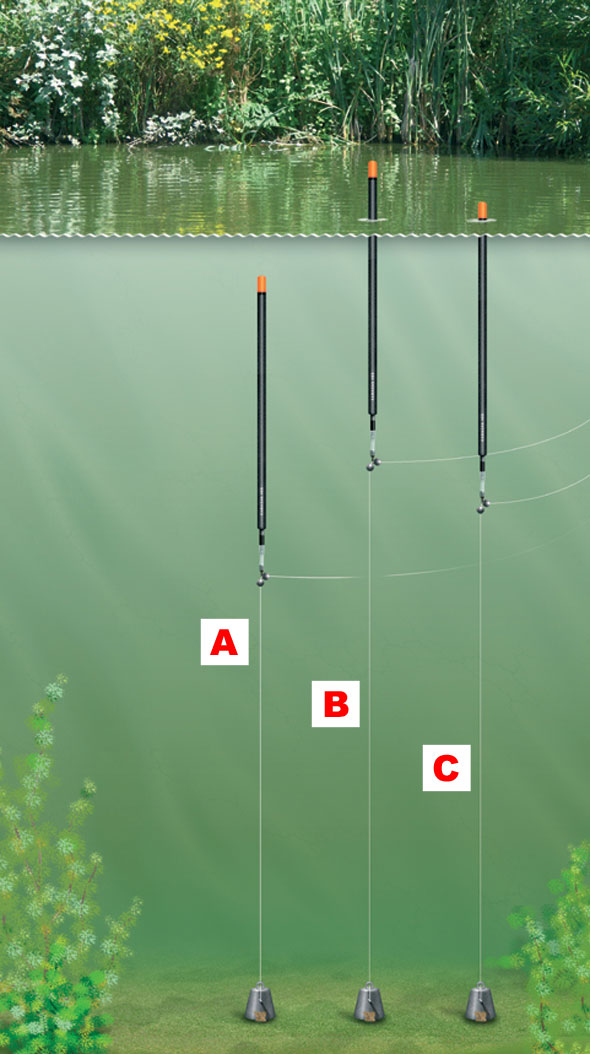
A. This shows you are too shallow.
B. This shows you are slightly too deep.
C. This shows you are just on the bottom.
How to find the depth when pole fishing
Plumbing and finding the depth of the lake, canal or river when pole fishing is a lot easier than finding the depth when you're float fishing because you can simply lower the plummet into your swim and gently drop it onto various areas of the swim to gain a true picture of the venue's depth.
It's a vital part to a successful session as it will give you a true picture of what's under the water and therefore give you a great insight into where you should be feeding and placing your bait.
You can also use your plummet to locate any underwater obstacles too by gently 'swinging' the plummet through the swim to see if it becomes lodged against anything that's submerged.
Here's how to go about finding the depth on your pole line...
STEP 1
Pass your hook through the eye in the plummet
STEP 2
Secure your hook into the cork in the base of the plummet.
STEP 3
Lower the plummet into the swim below the end of your pole.
STEP 4
Add a section of pole at a time and plumb around the swim, lowering the plummet straight down, not at an angle, to ensure an accurate reading of the swim.
STEP 5
Once you have got the exact depth of the swim, hook your hook into the base of your pole top kit. This will pull the elastic out slightly and secure your rig. With Tipp-Ex, mark the point where the top and the bottom of your float sit against the pole. This means you always have a point to refer back to should you change the depth you are fishing during the day.
A. This shows the float is set too shallow
B. This shows the float is set too deep
C. This shows the float is set perfect
Catch huge carp from the margins with the margin dibber rig
No matter what the depth is tight to the margins of your local commercial carp fishery, this rig will catch you fish from there. It is one of the best rigs to use to catch the huge carp that patrol the outer perimeter of all commercial carp lakes countrywide.
A A short, fat and dumpy dibber pole float is best for tackling the shallow water in the margins. Often these floats are only 3 or 4in long, so therefore they won't interfere with the carp in water only a foot deep. They are seriously strong too, and because of the buoyancy in the tip they are ideal for use with big baits like meat and multiple grains of corn.
B Mainlines and elastic must be strong when fishing in the margins as you are not only dealing with big fish, but you are also fishing really close to snags. Ideally use 0.16mm lines at least, and elastics no lighter than grade 16.
C Attach your pole float using three strips of silicone tubing - this will help lock the float upon the line securely.
D Use only a few shot to cock the float. Three No8 may be perfect. Group the shot together below half depth to push the bait to the bottom quickly.
E Your hook must be set so that it either just touches the bottom or is fished slightly overdepth. The margins often slope quite steeply, so plumbing the depth is absolutely critical to successful margin fishing.
Simple waggler rig to catch fish overdepth
This is a simple, straightforward waggler rig that will catch fish from stillwaters, canals and rivers. It’s the basic float rig that every angler ought to know how to tie.
The float is locked onto the line using a silicone float adaptor (these allow a quick change of float whenever required) and is locked in place using the vast majority of shot either side of the adaptor.
You’ll find the number and sizes of shot needed to cock the float printed on the side of the float. This will give you a guideline as to the amount of shot needed.
Next place a few much smaller dropper shot just below mid-depth (a few No6 or No8 shot will ideal).
After this place another two or three No8 shot equally spaced between the last shot and the hook. These will provide a slow and gentle fall of the bait through the last few inches of water.
You will need to plumb the depth really carefully so you know how deep to set the rig, and aim to set the rig 4-6in overdepth so that the bait settles on the bottom.
Most fish feed on the bottom, so this is a good place to start presenting your bait.
A Add enough shot to the rig so that your float’s sight tip just breaks the surface.
B Use a silicone float adaptor to attach the float onto your line, and lock the float in place using the vast majority of shot.
C Your strength of line needs to match the species of fish you are likely to catch. For small fish use between 2.5-4lb, and for carp use between 4-8lb.
D This group of No6 or No8 shot need placing just below mid-depth.
E Spread two or three No8 shot equally between the last group of shot and the hook.
F Your hooklength needs to be slightly weaker than the mainline so if a breakage occurs, it will occur here and not on your main rig.
G Aim to present your baited hook on the bottom at the start of the session as it’s here that most fish will feed. Present the bait between 4-6in overdepth at the start.