
River Fishing Tips | Roach on hemp with Alex Bates
Few baits are more synonymous with roach than hempseed.
Whether as feed or on the hook, it’s a must-have with the handy knack of picking out the better stamp of fish.
Match anglers know the value of hemp for bumping up their weight in the closing stages of a competition on rivers, drains and canals, while for the pleasure angler it’s a bait that works from the word go.
There are a few downsides to using hemp, mainly because it can be a faff to get a grain on the hook and that sometimes, for some strange reason, the roach just don’t want to know.
The positives outweigh the negatives, though, and hemp remains a cheap and effective feed to put into groundbait or introduce via a catapult, avoiding nuisance species such as bleak and tiny rudd and dace.
It’s not just roach that like the stuff either – barbel and chub anglers on big rivers will pile the ‘seed’ in to great effect.
For me, though, hemp remains a bait to use in the final few hours, even on a pleasure session. This week I’ll explain why that is and show how going away from the little-and-often loosefeeding ploy of old works miles better and ensures that every time the float goes under, it’s a stamp roach…

ALL in the timing
For how long can you catch on hemp? Unless you are on a lot of fish and they take hemp from the word go, I plan to concentrate on fishing the seed in the final 90 minutes to an hour of a session, especially on the narrow drains and rivers of the Fens.
Over time, the roach that you’ll be catching on breadpunch or pinkies down the middle of your peg will slowly move across to seek some sanctuary, and you need to be ready to follow them over and keep catching.
If I don’t catch on hemp at first I will go back to fishing my other lines, keep feeding and try again in 20-30 minutes. Traditionally, the last hour, when the light begins to fade, is normally when the hemp line is solid with fish.
Find the depth
A lot of far-bank swims on venues like the Old River Nene at March are on the shallow side, so that makes finding a sensible depth to fish in vital. This is 2ft 6ins, enough water to catch in consistently without spooking the shoal too much. A feature really helps as well, so pegs with a moored boat or some reeds are prime hemp territory.
If the ideal depth is a good few metres off the far bank I’m not concerned – as long as I am fishing going up the far-bank slope into the shallower water, that’ll do. My advice is to set the rig to 2ft 6ins and then plumb around until you find what you’re looking for.
Clear water best
Roach feed well in coloured water when I’m fishing pinkies, maggots and groundbait, but I find that this isn’t the case with hemp.
Whether it’s a sight thing I don’t know, but when the river or drain has a lot of colour in it, hemp is never that good. Catch a venue with just a tinge in the water and you’re in business.
When conditions are gin-clear it’s often hemp that can get a few bites when you’re struggling on other baits.

Different feeding
I find that the more hemp that you feed, the less you catch, so you don’t want to be firing it in all day. All this does is pull in even more small fish.
That goes against the classic way of feeding hemp, which used to be a dozen grains fired in over the float every couple of minutes – but if you want that better stamp of roach, you need to keep the catapult on your side tray and not in your hands!
My feeding sees a full 250ml pole pot of hemp go in at the start and I’ll then loosefeed 40 to 50 grains every 10 minutes until I actually begin fishing across on hemp.
I then feed nothing at all unless I think the roach are backing away down the peg or going further across the swim.
Then, giving them another big pouchful of seed will bring them back to where you want them.
Dripping hemp in little-and-often will still catch, but I find you miss more bites and catch a much smaller size of roach.

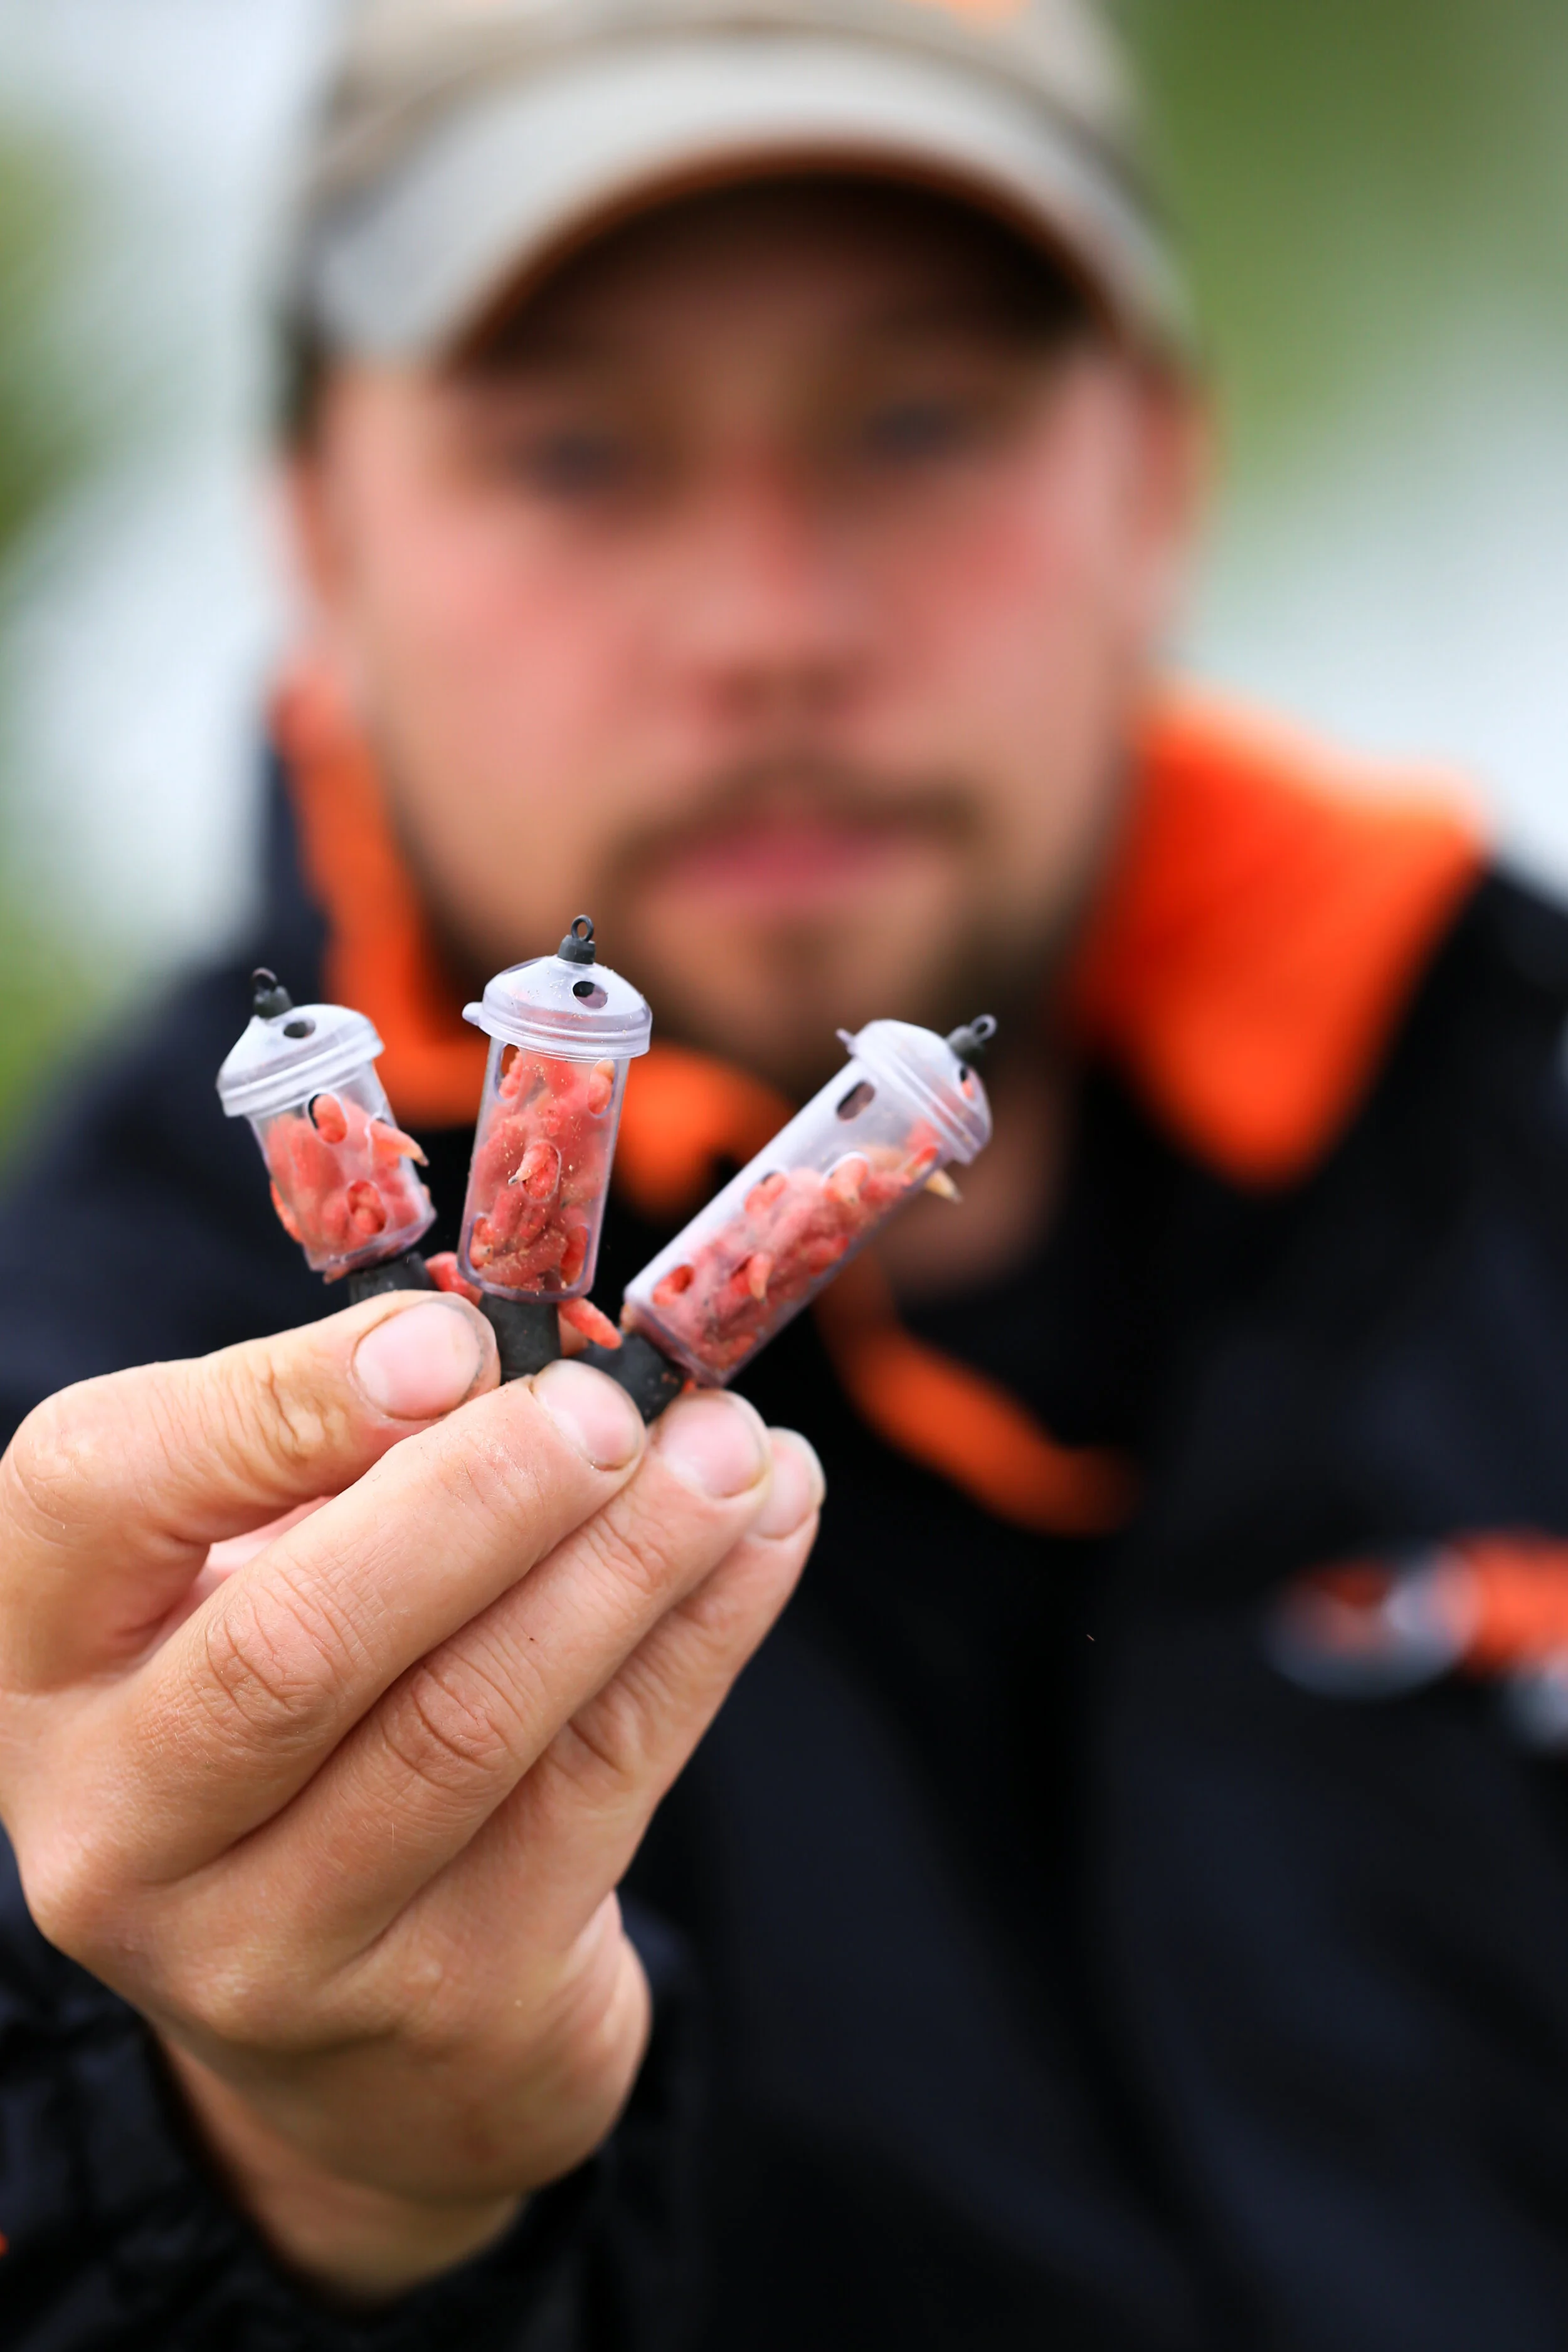
Home-cooked hemp
Tinned hemp is not much use for the hook, so I cook my own by soaking it for a day before cooking the seeds for an hour in a saucepan on the hob.
However, I also remove a few handfuls to use for the hook just before I finish cooking, as these seeds won’t have split as much.
Tinned hemp is okay for feed, but I like to cook my own as that way I can always be sure of the size and quality of the grains.
This is where so many people struggle and end up vowing never to fish hemp again! The reality is that it is dead easy to hook if your hemp is cooked correctly, and there are two common ways to do it.

Hooking hemp
The first involves punching a hole in the back of the grain and then hooking it as you would a maggot. You can catch several fish on the same grain, making it good for really solid pegs. My prefered method, though, is to push the hook into the split of the grain then move it round so it locks into place but pulls through on the strike. Choose a grain with a small split and it will grip perfectly.

Hemp rigs
Because you are fishing shallow water, pole rigs need to be super-light. My favourite is a 0.1g Sensas Basey, shotted with strung tiny No12 shot across the bottom half of the rig.
The end result is a super slow fall of the hemp, but I only strike when the float buries totally, ignoring any knocks as the rig is settling. In clear water, this slow fall, I am positive, allows the roach to see the hemp, follow it down and take it.
Lines are equally light, with 0.12mm mainline and a 0.09mm hooklink and a size 19 Hayabusa 128 wide gape hook. Elastic is a solid No4. A light elastic is important, as it will prevent hooked fish being pulled up in the water to splash on the surface, which can in turn spook its mates.

River Fishing Tips | Punch for winter roach with Alex Bates
Few baits are cheaper and easier to use than bread, whether you’re in search of a big autumn river chub or a monster carp off the top in summer.
For the winter match and pleasure angler, a bag of Warburtons sliced comes into its own on rivers, canals and drains when roach are on the agenda.
Fished as ‘punch’, small discs of bread that swell up once in the water, bread seems to have the knack of catching when all else fails and often picks up a better class of roach than maggots, casters or pinkies. This makes it a must-have in cold weather and on clear venues.
The basics of breadpunch fishing are relatively easy to follow, but according to top matchman Alex Bates, it is in the feeding where the men are sorted from the boys, so to speak.
Get it wrong and your catch rate will falter, but sort the feeding out early on and a truly massive net of roach is on the cards.
Tackle & Bates tackle shop boss Alex has been brought up fishing his local Old River Nene in March, where breadpunch reigns supreme in winter, and has seen how fishing with this bait has evolved over the years. It’s gone from an attacking method with regular balls of feed thrown in, to a more austere feeding and fishing ‘in-out’ line of attack.

Many fish on his local drains and rivers respond to bread so he took the Angling Times cameras to the River Welland in the Lincolnshire market town on Spalding to run through the do’s and don’ts of winter punch fishing.
Alex’s advice was a bit of an eye-opener on a venue packed with so many fish!
It’s all about feeding
“The first thing to say about punch fishing is that it’s not about throwing in a ball every chuck, even on pegs that are full of fish!” Alex warned. “I find this only ever works if you have a lot of little roach in front of you, but we always want to catch as big a stamp of fish as we can so you have to feed differently.
“My approach is to introduce bread feed as you would on a canal, a ball at a time, and then fish it out. This basically means adding another ball only when the size of the fish has dropped, or they show signs of moving down the peg. So, if you start getting plagued by little roach or the bites are coming miles down the peg, that’s the time to feed again.”

Small balls work best
“Don’t be tempted to feed too much of the bread mix as this can make the peg worse rather than better,” he revealed.
“I make a ball roughly the size of a golf ball or a little bigger, and I know it will stay where it’s landed. Punch crumb is heavy and doesn’t get wafted about if the pace of the river changes or, as can happen in March and Spalding, it begins to flow the other way completely!”
What depth?
“Punch fishing to me is all about finding the better stamp of fish, so you’ll need to change depth from a few inches off bottom to an inch or two overdepth.
“If there are few little fish about, fishing off deck can work well and this is when the pencil float is best – but on the SF2 pole float I fish this just overdepth to help slow it down,” he said.
Simple bread rigs
“There’s nothing very complicated about my rigs, and I tend to fall back on two types for different jobs,” he said. “The first is a 0.3g Rive 3 pencil pattern for when the river is not running too hard. if it flows, I change to a Drennan SF2 0.4g float as this has a slight shoulder to let me slow the rig down in the flow.
“The pencil is shotted with a bulk and one dropper to get the punch down fast while the SF2 has a spread bulk. The pencil allows me to work the bait by lifting it up and down in little flow and even fish just off bottom, whereas the SF2 is designed to be held back slightly and run through the swim at roughly half pace.
“By keeping a tight line I can see every indication. There’s also less resistance to a fish with the spread pattern so you can see the bite quicker,” Alex added.
“My favourite punch hook is a size 19 Hayabusa 128 fished with 0.12mm main, a 5ins 0.09mm hooklink and a No5 solid elastic.”

Best hook bread
“On the hook I use Warburtons Toastie straight from the orange bag for a very soft bait that can work well if the fishing is hard.
“On good pegs, this changes to Warburtons in the blue bag. I microwave each slice for 10 seconds on full power in the morning and then pop them in a plastic takeaway tub with the lid on,” explained Alex.
“This results in a slightly tacky bread that won’t swell up too much and stays on well for shipping out.
“However, it has to be right, and the acid test is whether the piece of punch stays on after the strike. If you are coming back with the bread still on the hook, it is too tacky!
“I also cut each slice into quarters so I use them up faster, and this also means I am fishing with fresher bread as opposed to using a full slice, which can take an hour or so to use up.
“In that time the slice will have dried out, whereas a quarter won’t last as long and so is perfect. Best punch sizes are 4mm or 5mm,” he added.

Alex’s feed for fishing breadpunch
“You can go down two routes here, either using liquidised white bread or punch crumb – both have their place,” Alex said. “Liquidised bread is quite active and fluffy and helps gets bites when fish are few and far between.
“Punch crumb is heavier, goes straight down and gives off little in the way of particles, so it’s ideal when you’re on a lot of fish that you want to keep on the bottom and catch fast.
“My favourite mix is two bags of plain white breadcrumb and a bag of Sensas Punch Crumb. I’ll add a little gravel to this when mixed to help it sink every time.
“I mix the bread feed the night before to a damp consistency. Then in the morning I spray it with an atomiser to bring it back to the right consistency. You should be able to squeeze a ball with one hand easily. If it shows signs of falling apart after the squeeze, give it another spray.”


Commercial Fishing Tips - Mix your method feed and catch more carp with Bob Nudd
At this time of year, you need to think a little more carefully about your approach to keeping the bites coming on commercial fisheries.

This applies as much to the feeder as it does to the pole and waggler… especially when it comes to the feed you put around it.
I’ll still use a Method feeder now, simply because it puts your hookbait right on top of your feed. I’ll lean towards a small feeder, although I’ll always make sure there’s enough weight on it to allow an easy cast to my chosen spot – that’s normally 20g-30g.
The feeder itself is always an inline flatbed-type, which I know will settle exactly as I want it on the lake bed. The set-up is simple, with the feeder running on the main line and stopped by a buffer bead attaching the main line to the 4ins hooklength.
Cold-weather feed

When it comes to what feed to put around the feeder, this seems to go in cycles. A few years ago, fishmeal groundbait was all the rage, but more recently dampened micro-pellets have taken over.
These days, I like a 60:40 mix of micros and groundbait at the start of a session when I’m not sure just the carp are going to feed.
If bites come thick and fast, the carp are clearly feeding well and in this instance I will try feeding just micros and eliminating the groundbait.
However, if it becomes apparent that it’s going to be a tough day, it might be worth easing back on the pellets and feeding only groundbait instead. This will attract fish without feeding them too much. The answer is to have a small bowl of dampened pellets and another one of mixed groundbait so can change the proportions as the day progresses.
The beauty of a Method feeder is that you can use a mould to ensure you feed exactly the same amount every cast, but it’s more than that. With every loaded feeder being the same shape and weight, your casts will be much more consistent, especially if you use the reel’s line clip to ensure accurate distance every time.
What hookbaits

As far as hookbaits are concerned, my ‘banker’ starting offering will always be a hard 6mm pellet attached to band on a hair rig with the help of a pellet bander.
Other hookbait options at this time of year include sweetcorn, three or four dead red maggots, or a brightly-coloured wafter.
It’s amazing how a change from of hookbait to another can bring an instant result.

River fishing tips | Fish the feeder for floodwater bream with Kelvin Tallet
Hopefully by the time you read this, the floods in your area will have subsided or at least begun to.
I live in the West Midlands, and I’m lucky in that there is a wide variety of rivers to fish. Except in the most extreme conditions, I can usually find somewhere to go. And as someone who loves running water more than anything else, I will go out of my way to find fishable areas.
Even when there is extra water in a river, as long as it can be accessed and fished safely, there will be fish to be caught.
Deep areas, the inside of bends, lock cuttings and backwaters will all produce fish, and it’s amazing what species will turn up in places you least expect. You’ll even catch out in the main flow, although fishing here can be challenging!
Warm flood
Of all the fish in our rivers, two species seem to positively thrive in what I would describe as a ‘warm flood’. This is where the river has been high and coloured for a few days, debris has been washed away, and levels have settled or maybe started to fall.
In these conditions, barbel and bream make good targets and it was bream I decided to fish for during a trip to the Warwickshire Avon near Stratford recently.
The famous Lido stretch of the river here offers numerous swims which vary tremendously according to the state of the river. Some that are hardly worth fishing in normal levels can suddenly produce when there’s extra water in the river, and for today’s session I visited one of these in the hope of catching some bream.
I’m sure there are swims on your local river that become similarly transformed in a flood. The fish you catch may not be huge, but the feeling of satisfaction can be immense when your quivertip goes round or drops back and you feel that tell-tale ‘thud’ of something worth catching on the other end.
Plenty of feed
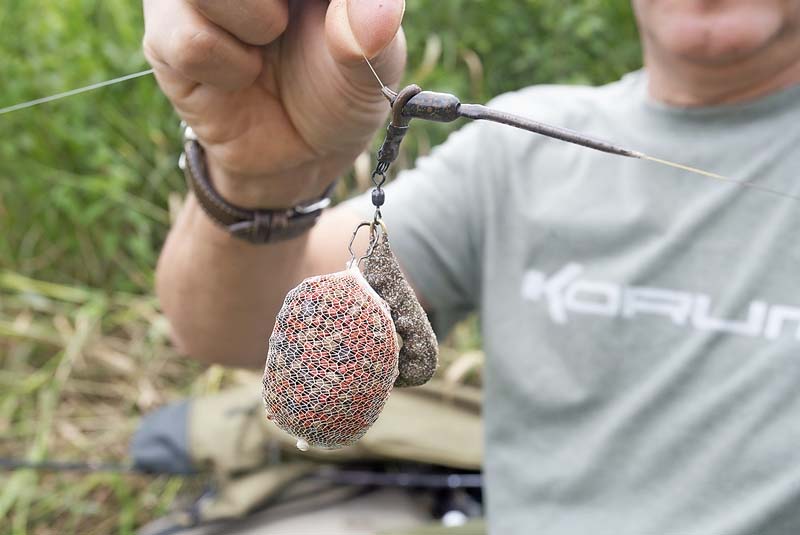
Today’s session was always going to be feeder job with bream the target. My plan was to introduce a decent bed of bait at a nice comfortable cast towards the main flow, but not right in it.
I began with six big feederfuls of groundbait to which I’d added plenty of chopped worms and red maggots. Once the feeder had hit bottom I ‘struck’ to release the feed, and once I was happy I set my rig up. This incorporated a feeder with 1oz of lead attached – not a heavy weight but enough to hold bottom in the moderate flow. Had the flow had been stronger, a heavier feeder would be required.

The rig
Slide a Korum Feedabead on to the mainline.
Clip your chosen feeder on to the Feedabead.
Tie a quick-change bead on to the end of the mainline.
Attach a 2ft hooklength to the quick-change bead. The hooklength had a 9ins loop at the top, knotted at 3ins intervals to make three smaller loops acting as a boom.
Finally, fix a small shot 4ins above the hooklink to create a mini bolt rig

The session
It was a beautiful early winter’s day and I really fancied it for a few fish, but instead of the hoped-for bream, my first fish after 20 minutes was a small perch.
Not the ideal start, but I needn’t have worried because on the next cast the tip jagged round again and this time it was decent skimmer bream, which looked a picture in the sunlight. Another soon followed, again on worm tipped with a dead maggot on a strong size 16 hook, before bites stopped.
I wondered whether this might be because the fish were feeding well and they wanted more bait, so I added two more baiting feeders, this time with more worms added. This worked a treat as three more skimmers followed in the next half-hour.
Again, bites ceased, so two more big feeders of bait went in and the skimmers returned, along with a couple of roach and another perch. So it continued, and I ended the day with eight skimmers, two roach and two perch – an extremely pleasing result at a time when many anglers wouldn’t have gone anywhere near their local river!

CLUB INFORMATION
Kelvin was fishing the Lido stretch of the Warwickshire Avon near Stratford. Visit www.leamingtonangling.co.uk for details
Pike fishing tips | Make a wafter deadbait with Paul Garner
I find that slow-sinking or wafter deadbaits are very effective.
They will not only see you get more runs, but will increase the number of pike that you land, too.
There are loads of ways of producing a slow-sinking bait, but using Deadbait Sticks is my favourite.
1: Select a stick a third of the bait’s length. A short length of rigging wire in the end enables it to be fixed to the trace.
2: Carefully push the stick into the bait, – through the mouth (whole baits) or into the body cavity if it is a tail section.

3: Tie the rigging wire to the top treble hook on your trace so that the Deadbait Stick is secured.

4: Test the bait in the margins. If it is too buoyant, add a swan shot or two to the trace just above the hooks.
Commercial fishing tips | Catch more beyond your pole line with Cameron Hughes
A common problem in the clearing water of commercial fisheries at this time of year is having a pole line you have been catching well on suddenly die a death.
From regular bites, the swim suddenly appears devoid of life and you’re left scratching your head as to what to do next. Do you feed more aggressively to trigger a response or carry on in the hope that things will return to normal given time?
Both these could work, of course, but for me the answer lies in changing tactics completely and digging out the waggler rod. Casting past that original pole swim into ‘new’ water will always find fish that may have backed off from the disturbance created from catching well on the pole.
It’s not a tactic that will catch lots of fish – I tend to use it more as another option if the pole fades or if I feel that my original catching area needs a rest. It’s definitely an enjoyable way of fishing in the way we used to be before the pole began to rule all.
You can catch carp on the waggler, but it’s for silver fish where the float really comes into its own. Roach and skimmers are famed for backing off the main feed area as a session progresses and they also feed at all depths. This allows the use of a lightly shotted waggler to search the depths and find where the fish are.
My local fishery, Rycroft near Derby, is a typical commercial venue full of silver fish, and I’m currently in the middle of a silver fish series on there where the waggler plays a vital part in my match plan.
It’ll work just as well, though, if not better, on a pleasure session – so for a bit of practice and to show the benefits of time spent on the float, I’m tackling the Carp Lake, home to some big old roach and plenty of chunky skimmers.

Why fish the float?
It’s an enjoyable way to fish that works when the going gets tough and the fish show signs of shoaling up towards the middle of the lake, which is always beyond pole range. The fish are there and catchable, but you need to find a way to get to them. The waggler is the only sensible option, and I use it as an ‘occasional’ tactic to rest the pole or search around if things show signs of slowing down.
I may only catch half-a-dozen fish on it, but they tend to be a bit bigger on the float. At the end of the day, these are fish that I probably wouldn’t have caught if I’d stayed on the pole.

The right distance
You can cast a waggler as far as you like, but going too far will mean you struggle to feed accurately. I always loosefeed on the waggler for commercial roach and skimmers and want the feed to spread slightly but not too far.
A distance of 20m-25m, wind depending, is about right. This is far enough away from the pole line for you to catch any fish that have backed away.
Always loose feed
Groundbait can work if you are catching lots of skimmers and bream but a waggler allows you tofish through the water to get bites at all levels – so loosefeeding is the best course. Maggots are good when things are really hard but if it’s still relatively mild I’ll always go for casters, which will catch the quality fish.
I’m also quite aggressive with the amount I feed, typically 40 casters at a time to create a reasonable-sized catching area to cast around in – but this can change quite quickly if I am not catching as well as I’d like. If bites are slow in coming, cutting back on the feed will come into play, so let the fish tell you how much bait they want!
Top hookbaits are single or double caster, but I would always start on a single red maggot to get a few bites and work out exactly what’s in the swim before I make the change to caster.

Casting about
Because of that slight spread of loosefeed, the cast doesn’t need to be in the same spot every time, but it makes sense to return to the same area if you are catching. By all means drop the odd chuck slightly past this or off to one side.
As to how long to wait before casting again, I’m quite active so I will cast, let the rig settle and wait 30 seconds. If there’s no bite, I’ll twitch the float around a yard, wait another 30 seconds and then wind in.
Ideally, I should get an indication just as the bait settles or shortly afterwards – the only time I would leave the float in for longer is if I was catching bream and skimmers on the bottom and not roach.

River fishing tips - Make a chub cake with Paul Garner

Buoyant ‘cake’ is a brilliant bait for chub, and also makes a great surface bait in the summer months. You can incorporate just about any ingredients or flavours that you want, making it a very adaptable hook offering.
Crack four large eggs into a bowl and add a teaspoonful of Scopex flavour.

2. Slowly add some Scopex Squid boilie mix to the eggs, stirring vigorously as you go.

3. Stop when a thick runny soup is produced and pour the mix into a greased and foil-lined baking tray.

4. Bake in the oven at 160°C for about 30 minutes. Take it out when the surface begins to brown.

5. Let the cake cool down naturally then cut it into bait-sized pieces. Use it fresh, and freeze any surplus.

Pike fishing tips - Dai Gribble's top five deadbaits

Smelt
If I could use only one bait for pike it would be smelt. They are incredibly versatile and can be used with every method. They have an unusual smell that is a little like cucumber, but pike love them. Their pale colour makes for a very visible bait that’s ideal for drifting or popping up above weed. They are tough so can be cast long distances and used for wobbling and trolling.
Mackerel
Whether it be a small ‘Joey’ mackerel fished whole or half a larger mackerel, they make outstanding baits. I’m sure one of the main reasons for this is that they are very oily, which draws pike to them from a long way away, even in coloured water. Mackerel are quite dense and streamlined, making them the best choice if you need to cast a bait a long way.
Sardines
Like mackerel they are very oily and I reckon pike prefer them to any other sea bait. There is one major drawback – they are extremely soft. This is not an issue when they are frozen but once they thaw out they are prone to flying off the hooks. However, at short range, by hooking sardines with the top hook in the gill plates they can withstand a much firmer cast.
Roach
Pike are used to eating roach as part of their natural diet. On occasions pike will show a marked preference for roach over sea baits and for this reason I usually start a session with one rod baited with a roach. Often roach deadbaits have the swim bladder intact, making them perfect for popping up – just add shot to the trace to set how far up they will sit.

Lamprey
On some waters lampreys outfish every other bait, and on others they rarely produce a run. No other deadbait comes close to them in terms of the amount of blood they exude, and I like to slit the gills with a sharp knife to maximise the amount of blood leaking out. It is worth doing this every cast as it is amazing how much pike-attracting blood there is in a relatively small bait, even when it has been in the water for hours.
Commercial fishing tips | Bomb out a maggot feeder in the cold with Dan Hull
Think feeder for carp on commercial fisheries and most anglers will instantly reach for the Method... and who can blame them?
The effectiveness of this type of feeder is well known, and it works superbly in winter for putting a hookbait just inches away from a small dollop of feed.
Are you missing a trick, though, by automatically choosing the Method? As the water cools, the appetite of carp and F1s for pellets diminishes and maggots begin to play more of a part in our plans, especially when fishing the pole – so why should the same not apply to feeder fishing?
To introduce maggots through a feeder there really is only one choice... the maggot feeder. This is better-known for catching chub and roach on rivers, but the maggot feeder can be devastating for commercial carp when they’re not interested in larger helpings of feed.
Maggots are the ultimate trigger bait to get fish feeding, and are so often what we turn to for getting a bite when all else fails. They also catch everything that swims and so aren’t as selective as pellets. This is handy on cold days, when anything gracing the landing net is more than welcome.

Feeder choices
Classic-style maggot feeders aren’t really designed for longer casts on commercial carp waters so you’re better off picking up a newer design that is more streamlined and will cast a long way with ease.
I use a Middy Carp Bomb Feeders, which has a loading in the base and a slimline shape to hel with consistent, accurate casts. My ploy is to begin with a bigger feeder to get bait into the peg but then scale down to a smaller model once I begin to get bites. This will give the carp just enough freebies to keep them in the swim without filling them up.
Not just maggots!
I don’t put only maggots in the feeder. In addition there are fluoro pinkies in the mix to give the fish something a bit different and to also provide me with an alternative hookbait if I’m struggling for a bite.
The ratio is 60:40 red maggots to pinkies, with single maggot or double pinkie my main hookbait – although double maggot will come into play if the fishing is good.
Have more options
It’s convenient to have just one line to keep fishing and building up all day, but this limits your chances of catching well – if I were fishing the pole I’d have two or three spots to feed and fish, so I don’t see why it should be any different on the feeder.
That means a line on a long cast of say 40m and then a second one at around 20m, depending on the depth of the lake you are fishing. So long as these two lines put you in the maximum depth on the lake, you’re in business.

Pack the feeder
Maggots will soon wriggle out of a feeder, so I take a bit more time to fully pack them in on each cast to stop this happening.
They’ll have no problem getting out once the feeder hits bottom and provided you are using a small Carp Bomb Feeder, there’s no need to worry about introducing too much feed.
Accuracy is vital so you don’t end up with a spread of bait over too wide an area. ‘Keep things tight’ is the motto here, so if the feeder doesn’t land where you want it to, wind in and cast again.
Bite times
The fish will tell you how long to leave the feeder in before casting again, but as the water cools this time will lengthen, and up to a 20-minute wait might be needed.
That’s as long as I would wait, but I would begin by casting every 10 minutes to keep a reasonably regular amount of maggots going in. Then, when I begin catching, I can change this according to how fast I am getting an indication.
Tackle bits and bobs
Although my lines are reasonably strong, made up of 0.20mm M-Tech Carp Commercial mainline to a hooklink of 0.16mm Lo-Viz, the hook is very small to suit fishing with single maggots.
A size 20 KM-4 is small but very strong, and will land big carp easily while getting you more bites in clearing water.
When it comes to hooklink length, this too varies. On some days the fish will sit well off the feed or follow the bait down as it falls before taking it, meaning a long link is better.
On others they’ll be on the feeder immediately with a fast bite, which is where a short link catches better.


Canal fishing tips | Winter tips for a mixed bag of fish
When you’re faced with a lot of fish to catch in your swim, surely you’ll need an equally large amount of bait to feed and keep what’s in front of you happy?
Well, that’s not entirely the case. As winter draws near, I’ve found that less is more. By using a more frugal feeding strategy, I can catch quicker, better-quality fish into the bargain. It’s all to do with giving the fish little choice as to what they eat.
If you pop your hookbait in among a continual stream of feed or several large balls of groundbait it’ll take the fish longer to find what’s on the hook compared to if they have only a minimal amount of bait to get stuck into.
Feeding regularly also seems to pull in more small fish, so if we’re talking quality, almost starving them on to the hook is best.
So, after bagging a load of rudd on the waggler early on in my session on the Stainforth & Keadby Canal at Wykewell it was time to have a look on the pole for some big fish – we’re talking skimmers, big roach, perch and perhaps even a tench – all for the price of just a few balls of groundbait and some chopped worm, casters and dead red maggots!

Getting the feeding right
We’re talking minimal feed, but how much goes in at the start?
My peg is always home to lots of fish at this time of year so I don’t need to ladle the bait in to pull those skimmers and roach into the swim.
Instead, two large balls of groundbait are ample. To these I’ll add a little finely-chopped worm, a few casters and some dead maggots.
From this point I will top up either when the bites fade or I begin to catch small silver fish or little perch.
This extra feed takes the form of a nugget of groundbait around the size of a large walnut, nothing more and nothing less. Feed more and those fish become harder to catch because there’s more choice for them to eat.
This way of fishing and feeding also rules out using a catapult to introduce casters, for example, over the top. I want the fish to be feeding on the bottom and over my groundbait to keep everything tidy and to be eating what’s already gone in, which is precisely where my hookbait will be.

In the mix
Groundbait is a simple affair, a 50/50 split of Mainline Match Pro Active and Sweet Marine. The Marine has some fishmeal in it, and although the jury is out with a lot of anglers as to whether skimmers on natural waters really like fishmeal, I’m in the ‘yes’ camp mainly because pleasure anglers on this canal do use pellets and the fish are used to them.
The next job is to be stringent about how many goodies go into the crumb.
Because I want the fish to find my hookbait, I need to limit the options available so we’re talking just a reasonable sprinkling of casters and dead maggots but a good pinch of chopped worm, as this is what skimmers like the most. Fill each ball with too much feed and it’ll take you longer to catch.

Be accurate
Feeding so little, I’m not creating a large area over which to run my rig, in fact, I won’t be running it at all. By having a far-bank marker lined up I know exactly where the groundbait is on the bottom of the canal and, as a result, where to lower my rig in and hold it still.
This catches the better fish on the canal, whereas I find that putting any movement into the rig only results in a small fish.
To keep everything tight, a relatively short length of line between pole and float is a must – no more than a metre.
Where to fish
Big fish on canals do like to live in the deepest water down the middle, but they’re also partial to moving slightly up the far-bank slope where you’ll find less in the way of weed or potential snags, so this is where I’d base my attack.
In my peg, this is around 13m out, a nice comfortable distance to fish and essentially where the main depth begins to shallow up from the middle, going perhaps a metre up the slope. I’m aiming to find around 8ft of water.
Big hookbaits, big fish
There’s little point in trying to catch quality fish with the wrong hookbaits, so this means maggots and pinkies are off the bait list. Instead, double caster is unbeatable, especially for big roach, while skimmers love a head section of dendra worm around a couple of centimetres long.
To further cut down on the chances of a small fish taking the bait I lower my rig directly down on to the feed. Laying it in to one side runs too much of a risk of a tiny rudd grabbing the bait.

Winning rig
To try and avoid small-fish trouble, a sensible float is needed to get the bait down fast so for 8ft of water, a 0.8g or 4x18 Perfect Gloucester is just the job.
This is set three to four inches overdepth to keep everything still over the feed and is shotted with a bulk of shot set about 2ft from the hook and then two No10 droppers between this and the hooklink.
The droppers will give the bait a slow fall close to the bottom and, therefore, the chance of a big rudd or even a skimmer sitting off bottom grabbing it.
The rest of the rig is balanced stuff, light enough to get bites but with enough steel to land a tench or bream.
That means 0.13mm Guru N-Gauge mainline to an 0.09mm hooklink, a size 18 Pole Special hook and a No6 solid elastic.


Match fishing tips | Switch to braid and catch more silvers on the feeder
Stillwater feeder fishing has never been more popular! It’s not just for big bream and carp either. Large bags of silver fish cal also be taken on a feeder, which really comes into its own when you need to fish beyond the range of pole or float.
However, missing bites from roach and skimmer bream can be a nightmare on the feeder, especially if you’re using stretchy monofilament as your mainline.
Preston Innovations man Mick Vials, a member of the England Feeder squad, has a simple solution… use braid on the reel instead of mono. Over to Mick…

Why use braid?
“The best thing about using braid is its lack of stretch, so that even the tiniest movement at the hook will register and give you something to strike at.
“If a roach or bream picks up the hookbait and gives a tentative bite when using mono your tip might not move because of the stretch in the mainline. A bite on braid should see a gentle lift of the rod, and with any luck the fish will be on. Don’t strike hard, and use a fine quivertip.
“Braid also has a much lower diameter than mono. That means you can cast much more easily – it cuts through the air and any wind with no problems at all.
“I use 0.1mm Preston Innovations Absolute Feeder Braid for my feeder work for silvers, coupled with a few feet of shockleader of 8-10lb mono.
“This shockleader aids casting and landing fish as it has a little stretch, but it’s not long enough to adversely affect the rig’s sensitivity.”
My feeder rig
“The rig is simplicity itself. I slide a link swivel on to the shockleader and twist the last 6ins to form a 3ins loop which I then secure with a figure-of-eight knot. A small loop is then tied at the end of the large twisted loop and the hooklength attached to that.
“Finally, I fix a No8 Stotz against the twisted loop and attach my feeder to the link swivel to form a ‘boom’ – a length of line that sits away from the feeder to reduce the chance of tangles and line damage. It’s important that the long twisted loop hangs slightly below the feeder, as in the photo.”
Carp fishing tips | How to accurately cast every time!
Increasingly these days, carp anglers quantify the distances they are fishing at in ‘wraps’, rather than in the traditional units of feet, metres or yards.
This obsessive attention to accuracy can be pivotal to success. The last thing you want is to bait up a promising-looking spot out in the pond, then cast your baited rigs 10 yards past it.
The way to make sure that your freebies and baited rig are sitting side by side is by using short poles known as distance sticks.
They are simple to use too, once you have got the hang of it.
Once you’ve mastered the art, you’ll wonder how you ever got by without them!
Learn the basics
To begin with you need to use a marker rod, or a bare lead on the end of a braided mainline, to find the potential ‘spot’ that you want to fish to. This could be anything ‘promising’, such as a gravel bar, the edge of a drop-off or a clear spot amid weed.
Once you’ve found the spot, you need to tighten down gently until you are in direct contact with the lead. Keeping the rod in the typical casting release position, you then need to put the line in the clip on the reel and wind in the lead.
Next, poke your two distance sticks (you can use banksticks if need be) into the ground 12ft (a rodlength) apart on the bank behind your swim.
Then, placing the lead next to one of these sticks, feed out line from the reel and move the rod-tip towards the other stick. It’s important not to let the line spill off the spool freely when you’re doing this, but to instead keep it under light tension. Go round the other stick with the mainline, all the while keeping it quite taut, and back round the other stick in a ‘figure-of-eight’ motion.
Keep doing this until you reach the point where the line is in the clip, all the while keeping a tally of how many ‘wraps’ you have made. It’s then possible, using simple maths, to work out the exact distance that your ‘spot’ is from the bank, and for you to replicate this with your fishing rods, ensuring that you loosefeed, and fish, precisely the same area.
Build a mental map
Over the course of a season, you can use this method to record a host of your favourite ‘spots’ around a lake.
In a notepad, jot down details of the distance they are from the bank, and any notable trees or other landmarks on the horizon that they line up with.
By doing so, whenever you turn up at the lake, you’ll be able to land on the money every single time. And you won’t even need to use the marker rod to do so – simply refer to your notes.
It’s also easy for anglers to share information using this uniform measurement. Some fishery owners and helpful venue regulars will even alert fellow anglers to known hotspots using this ‘code’.
Marking the line
For all its advantages, using distance sticks can be a time-consuming process, especially if you are casting regularly. That’s where the use of marker elastic comes in.
Essentially, it’s the same as pole elastic, and many carpers choose to use exactly that, as it can be cheaper. Both are absolutely ideal for tying around your mainline without causing damage.
The resultant knot – which, essentially, is an old-fashioned ‘stop-knot’ – should be tied at the distance you are fishing at, so that you don’t need to weave your line around sticks. Just cast out and wait for the sound of the elastic going through the rod rings to alert you to your desired distance.
Clip up the line and simply aim your next cast at your spot.
How to use distance marker sticks
1) ‘Clip up’ to your desired spot and space your marker sticks a rodlength (12ft) apart.

2) Put the lead at one end. Release line by working it from one stick to the other.

3) A figure-of-eight motion will stop the line slipping off the sticks and prevent tangles.

4) Count off each length (wrap). It is easier if you start at the same end each time.

5) Make a note of how many ‘wraps’ it is to your chosen spot, for future reference.

Perch fishing tips | Top four lures to use for perch success
There are loads of lures that will catch perch, but not all of them are effective all of the time. The key to success is knowing when to use each one to its best advantage. The rule of thumb that I work to is based upon water temperature. The warmer the water, the more positively you can fish with larger lures and faster retrieves. In the depths of winter, the opposite is true. Only the smallest movements are needed, and smaller lures tend to score better. So let’s take a look at some top picks for the months ahead.
What colour lure to use
Over the years my thoughts on lure colours have changed a lot. They may differ from conventional wisdom but have been proved successful time and time again.
There is no right or wrong colour, so it’s worth having a few variations. Water temperature and clarity both play their part in deciding on the best colours.
Autumn clear water – I like bright colours at this time of the year. Slime Curd and Headlight are among my favourites.
Autumn murky water – The strong silhouette of a dark lure tends to be best under these conditions. Go for colours like Sangria and Motor oil.
Winter clear water – These are among the toughest conditions to catch in, but brighter colours still tend to win out. I like Official Roach and Bass Orange when the going gets tough.
Winter murky water – Once again, the strong silhouette of a darker lure tends to be my favourite, and Seaweed and Sweet Plum are stand-out patterns.
Crankbaits - Best used in October/November
These small hard lures are my favourite way to catch perch, and when the water is still relatively warm they take some beating.
Use lures in the 6cm-9cm range, as these are ideal for perch, and pay attention to the diving depth of the lure. The bigger the vane on the front of the lure, the deeper it will dive.
By far the best shape of crankbait for perch is a short, stumpy body that produces a really fast wiggle action. For some reason this drives perch crazy, and in clear water you can watch them pick up on the vibrations and zoom towards the lure from several metres away.
Perch are often still quite spread out at this time of the year and can take some finding. This is where crankbaits score, because they can be worked quickly through a swim.
Try fan-casting, covering the water in front of you in a series of casts from left to right. If you don’t have any hits straight away, move on to the next swim.

Shads - best used in November/December
With the water temperatures dropping away, the perch are often a little less active and will tend to hug the bottom more closely. This calls for a lure that can be fished a little slower and – crucially – closer to the bottom without snagging up. Soft shads are perfect for this job, especially when fished on a weedless rig.
Lure size is starting to become more important now. Try lures in the 4cm-9cm range, depending upon the size of perch that you are fishing for.
Rig these on a matching wide gape hook, ranging from a size 1/0 to a 3/0.
Instead of hooking the lure through the back, thread the hook on sideways for a simple weedless rigging. This will help you avoid the majority of snags, but still gives a clean hook-up when a perch bites down on the lure.

Drop shot - best used in December/January
With the water temperature now falling quite low and still dropping, the perch are much less active and will often hug the bottom and any features tightly.
Gone are the days of expecting perch to chase lures – now a bait has to be presented right on their noses to bring a bite.
This is where drop-shotting really comes into its own, as the weight on the end of the line ensures that the bait is held right in front of the perch for the whole of the retrieve.
With the lure set at about 30cm off the bottom, it will be impossible for the fish to ignore it. Ever so slowly edge the lure along the bottom, leaving a good 10-second pause before moving it again. Very often bites will come when the bait is static.
Smaller lures prove their worth at this time of the year.
Small shads and worms measuring around 4cm-6cm are perfect, even when targeting specimen perch.

Creature baits - Best used in January/February
With conditions now stable but cold, the perch will be amid cover and may only feed for short periods around dawn and dusk. Their natural prey of small fish and invertebrates will be harder to catch, though, so they will be hungry. Once again, a slow approach, close to cover and hard on the bottom, will pay dividends.
Texas rigging was developed for catching bass in heavy weed, but it works just as well for perch when the bait needs to be inched along the bottom. The ideal bait is a small rubber ‘creature’, which could be anything from a worm shape to a crayfish.
The ideal lure has a slim profile allowing it to be rigged weedless, so it can be worked along the bottom without snagging.
Go for 4cm-6cm lures rigged on a size 4/0 wide-gape hook, and expect bold bites as the perch grab these plastic creatures.

River fishing tips | Choose the waggler over the pole
As we head towards winter, it’s all too easy to bank on the precision and great presentation offered by the pole.
By doing so, though, you’re immediately limiting yourself, in my opinion, in terms of flexibility.
The pole is brilliant for catching in one tight area over your feed, but you can be left wanting for the chance to fish further out or off to one side to see if the fish have moved slightly. With a waggler, you can achieve this in seconds.
On deep canals such as the ones close to me in South Yorkshire, the waggler becomes a key tactic to have up your sleeve and can sometimes totally outfish the pole in clear water, or when there are a lot of fish to catch quickly.
It’s also a classic and easy method to fish, and one that doesn’t need thousands of pounds’ worth of long pole to achieve. Most of us were brought up fishing the waggler, so it’s nice to be able to leave the pole in the bag and go back to basics.

Why wagglers score
For me there are three reasons to use the float over the pole. First, speed. It’s much quicker to cast out and wind in fish than it is shipping 14m or 16m of pole in and out on a busy bank.
Seond, in clear water the fish will be much happier without a pole being wafted over their heads... and finally, the waggler gives you the versatility to cast around the peg to seek out fish if bites are few and far between in one spot. The pole cannot do any of these.
Going the distance
If you plan on having a long pole line, make sure there’s enough space between this swim and where you’re fishing the waggler.
The range you pick must be able to be reached with your loosefeed, so around 18m is good.
If you have a feature like a boat in front of you, there’s the temptation to cast tight up to it but I wouldn’t – instead I would make sure there’s a few metres between the float and the boat to let me go further over if the fish back off.
Try fishing shallow
I know we’re in November, but until the really cold weather hits, I’m a firm believer in still being able to catch off bottom, especially on those big canals.
Roach, rudd, hybrids and even skimmers will be sat here, but the big question is, how far off bottom do I need to come?
This can be 2ft off the deck in 9ft of water, and if rudd are present, we could be talking as little as 2ft below the surface.
It’s something you need to work out as the day goes on. As a rule, I would begin on the bottom and go shallower if bites were coming as the bait was falling, or if I was catching a lot of rudd.
No-tangle waggler rig
The days of big shot around the float base are gone, and this means no more tangles. I’ll use loaded floats, but try and fish as light a loading as possible. For most casts, a 1.5g loaded float is bang on.
My favourite is a loaded fine-tipped peacock insert waggler. This float needs only a moderate strength cast to hit the spot and is stopped by two Guru Line Stops. Down the line are evenly spaced three No9 shot, which leaves just a tiny bit of float showing so that I can easily see any hold-ups on the float from fish picking the bait up on the drop.
Tackle talk
Mainline is robust 0.18mm (5.3lb) Guru Pulse Pro to a Guru ready rig of 0.10mm N-Gauge and a size 18 Pole Special hook – I couldn’t tie them any better myself! The Pole Special is also a fine waggler hook so don’t be put off by the name.
That just leaves rods, and a 12ft through-actioned model will do nicely as there’s not the need for the extra reach of a 13ft or 14ft rod.

Feeding
Loosefeed is the way to go here, but how often the catapult is brought into action can vary.
To begin with I’ll feed 15 to 20 maggots every third cast. Only if I am having a lot of grief from small fish will I switch to feeding every cast to ensure enough maggots are about to keep the better fish on the hunt.
I could use casters, but I think maggots sink more slowly and give me a better chance of catching on the drop.
Hookbaits
This is single or double maggot – casters are crushed too easily when you miss a bite – and I prefer a bronze or fluoro pink maggot by choice. When using a double maggot I will hook them through the pointed end to leave more hookpoint showing, which I’m positive means more bites turned into fish in the net.

Getting Twitchy
Seldom do I leave the float sat completely still in the peg. My waggler routine is to cast, let the float settle, and if I’ve not had an indication after 30 seconds, give the bait a twitch by turning the reel handle once. After another 30 seconds I’ll wind in and repeat but hopefully, the float will have gone under by this point!
How to find the quality fish with Bob Nudd
Even though I’m a small-fish man at heart, there’s still nothing to match the excitement of running a float down a river swim and striking into something substantially bigger on the other end!
Be it a perch, chub, bream or tench, targeting quality fish on rivers is a totally different challenge to setting your stall out for a bag of small roach.
Yet the tactics, baits and feeding are surprisingly simple, and the rewards can be relatively quick in coming.

This is especially true when fishing smaller, more intimate, rivers where there’s less water to play with. My local Old River Nene in March town centre is one such example, being only around 13m or 14m wide with an average depth of 5ft down the middle.
Now, the Old Nene may be best known for its winter roach sport and it may not look that much cop at first glance – but in October, it’s home to some big fish as well, especially quality rudd, skimmers, eels, perch and even the chance of a tench or three – fish that seem to vanish when the cold weather arrives.
But that’s not for a good few weeks yet, so it really is time now to go there with better quality fish in mind. I’d say that’s true of many smaller rivers.
A bit of colour in the water will also help, but even in clear water there’s still every chance of a few fish that will pull your elastic out of the pole.
My approach for these fish revolves around fishing the pole at a comfortable distance and using groundbait, chopped worm and casters, three items that all fish love and which should avoid the smaller species that the Old Nene is also full of.
To put it into practice, I’ve come to the scout hut section of the river where there’s a good chance of some skimmers and one or two lovely golden rudd.
Move the rig
A lot of better fish are caught by holding the rig dead still over the feed, but I don’t do this all of the time.
Instead, the float will be inched through the peg slowly to cover a good few yards of the swim, just to see if the fish prefer a moving bait or are sat just downstream of the feed.
Having around 2ft of line between pole and float helps here, but in stronger flows this would be lengthened to as much as 5ft to let me cover more of the peg. In terms of plumbing up, I set the float to be fished three inches overdepth.

The session
Kicking off on double maggot, it doesn’t hit the bottom as a string of rudd hold the float up and swim off! Changing to caster and redworm is no better, and even half a dendra results in the same, but this is normal just after feeding. The fish are pulled in and go a little mad, swimming about everywhere.
After an hour and plenty of rudd, things settle and the worm gets to the bottom. Chunky perch are first to arrive, and a couple of rudd getting on for 1lb also get in on the act. With few small fish about, I can now revert to baits more suited to skimmers. Double caster catches a few rudd-bream hybrids, quality roach and hand-sized skimmers.
After two hours it’s time for a top-up, and thankfully the small fish don’t reappear. After a few perch something bigger is on, but I get the sneaking suspicion it’s an eel. At 2lb it puts up a right old scrap. Ten minutes later I hook another big fish, again on caster, but it snags me and the hook pulls. I have no idea what it was!
From this point on, it’s a case of running the float through – this seems best on the day – topping up with another ball when the small fish turn up and taking what I can. None of those bream or skimmers show, but with rudd, hybrids, roach, perch and small skimmers coming one a chuck, it’s a lovely day’s fishing. The beauty of it is that you never know if that next run through is going to produce a monster!
Hookbaits
This is a case of trial and error, starting bait always being two fluoro pink maggots. If small fish are a problem, it’s on to double caster and then two halves of redworm.
Failing all that, it’s a 2ins-long piece of dendrobaena worm. As a rule, dendras seem to catch more perch, with the rudd and skimmers preferring maggots or casters, so I try to spend as much time as I can fishing the latter.
Big rigs
Because I could hook a tench or even a carp on this river, tackle must be sensible. I’ll fish 0.16mm Browning Hybrid Power mono mainline to a 12ins hooklink of the same line but in 0.14mm diameter. Hook is a size 14 Kamasan B512 to an orange grade Browning Microbore hollow elastic that works out at around a No8 in old money.
With this gear, I’m confident of landing anything I hook.
Floats also need to be big, not only to deal with the flow but also to get around small fish that with a light pattern can easily hold the bait up as it falls. For me, it’s a 1.5g pear-shaped pattern that’s been designed for me by DT Floats. By using an olivette and a couple of No9 droppers relatively close to the hook I can be sure that the bait will go straight to the bottom. If it doesn’t, I simply push the olivette and shot together to create one bulk.
Pick the right line
The first job is to decide where to fish. At March, the river is typical in that there are two shallow shelves close in and right across that slope down to a deep central channel used by boats. This is where I’d expect the better fish to be and the good news is that it only takes around 7m or 8m of pole to be fishing here.
It’s true that this central channel can attract rubbish, branches and weed, so it is well worth running a rig through the swim before you do anything else to check exactly what’s waiting under the surface.
With some careful plumbing up, though, you will find a clear spot to run over.

Feeding
This involves groundbait, worms and casters which will appeal to a range of species with less chance of pulling in small perch or eels, which worm and caster fed on its own can. I’ll cup three big balls in at the start, making sure to pack them with as much worm and caster as I can.
Groundbait mix is 50/50 Van Den Eynde Black Turbo and Gold Pro Bream, to which I add some yellow Sinking Crumbs to make them stand out on the bottom.
This is my go-to mix for skimmers and better fish in Ireland and it works just as well back home. I mix this the night before to make it relatively inactive and on the dry side to take into account the moisture from the worms and casters.
To form three balls I simply cup an amount in both hands three times and transfer it into another tub. I then put in a good handful of casters and a full pole cup of chopped dendra worms that are cut to a fine texture as opposed to large chunks.
I chop the worms in the cup, as I find it much easier than using a bait tub. The lot is mixed together and each ball potted in using a far-bank marker on a point that is just downstream of my fishing position.

Topping Up
Another ball of groundbait and worm goes in when the bites fade or small fish begin to dominate, but one ball is ample.
Feed any more and you run the risk of putting the quality fish off or pulling in too many bits.
This is also why I don’t loosefeed over the top, as it would only encourage small rudd, roach and bleak to move in.

FiVE things you need to know about keeping safe in floodwater.
After being swept with torrential rainfall, many of Britain’s rivers are well above their normal level.
There is still some fantastic fishing on offer, but safety is of paramount importance when tackling a flooded river.
Here are five things you need to know about keeping safe on the bank…

Check online
Check the river levels to give you an indication of whether the water is rising or dropping, and help you anticipate fluctuating levels. The flood information site is very reliable and updated throughout the day. See www.flood-warning-information.service.gov.uk
Use a marker
It’s easy to lose track of what the river’s doing through the day, but using a depth marker will alert you to any sudden changes. Some rivers have markers in place, but if you can’t see one a bankstick with strips of marker tape works well.
sit well back
The last thing you want is to place yourself in a precarious position on the bank, so sit well back from the water’s edge.
Take a rope
Steep and slippery banks can be a nightmare to get down, and up. Tie a strong rope to a nearby tree or peg it into the top of the bank to help you.
Wear a lifejacket
Perhaps a little extreme, but a lifejacket can literally be a lifesaver if you do end up in the river.
Match fishing tips | Adapt your feed to catch more carp
Those colder mornings and darker evenings we’re now starting to see will have been felt by the fish we’re after each weekend.

But while you can scale down hooks and lines and fish different parts of your swim, if you don’t get your feeding right there’s little chance of a steady day’s fishing in the first place.
I’m not saying that you need to go into full winter mode yet, but it pays to start trimming back on how much bait you are feeding at the start of a session and during it.
Big potting, for example, using a large pole cup on your cupping kit, begins to lose the effectiveness it enjoyed through the summer, so replace it with a small pot on the pole-tip to regulate how much bait is going in. What you feed is also worth thinking about. Meat and corn can still work but the fish may be far more responsive to micro pellets or dead maggots.
There’s a lot to take in and, of course, no two days are quite the same... but as a rule in October, I do begin to make changes regarding how I feed for commercial fishery carp and F1s in the margins…
How much feed and when to feed it?
For carp I would use the larger Matrix Flexi Pot, which takes around 75ml of bait. This is filled to the top each time. I feed all this in one go to form a precise pile of feed on the bottom over which I can present my rig.
However, I don’t feed like a robot, in other words every time I drop in. I prefer to introduce bait only when I think that the pile of pellets already fed has been disturbed by a feeding fish, when I need to put more in to recreate that homing-in point for the carp.
Feed – small or large?
It’s micro pellets every time, perhaps with a little bit of groundbait on the odd occasion on venues that have a track record of responding to groundbait.
My favourite micro pellets are Spotted Fin Go2. I soak these so they take on as much water as they can, as this ensures that every single one will sink quickly.

The difference between carp and F1s
There’s one change that I make for these two species, and that’s the size of Flexi Pot used. For F1s, I drop down to the 25ml pot to introduce much less feed than for ‘proper’ carp.
Open-water fishing
Faced with deeper water well away from the bank, pots aren’t so important and I’ll often pick up a catapult. The thinking is that there are more fish to catch at this range and they’ll be on the bottom, so I fire in 4mm or 6mm pellets depending on the size of fish I’m after.
There’s no hard-and-fast rule to this, but I’ll only feed if I am trying to attract carp into the swim or once I have hooked a fish, never directly over the top of a rig that’s in the water and fishing.
Barbel Fishing Tips | How to catch more barbel on PVA bags
There are some occasions while river fishing for chub and barbel when you need to switch tactics from a feeder to a bomb, especially at this time of year, when the fish have had a lot of feeders thrown at them.
Right now it can really pay to go down the bomb and PVA bag route.
Mesh PVA bags are a great way of introducing free offerings close to your hookbait, and right now I’m using dry baits such as maggots, pellets or chopped boilies.
Here are a few tricks which will help you with your presentations…
Make knots small
Before making your first bag, tie a knot in the end of the mesh and trim it neatly with sharp scissors. This minimises the residue left when the PVA melts in contact with water.
Use a loader
A tight bag should break down quickly in water. So use a PVA mesh on a loading tube. Compress the bait, twist the PVA tightly, tie an overhand knot and tighten it down.
Don’t go too big
Big bags can be unwieldy. I like the finished bag to be not much bigger than a golf ball.
Save mesh
Before cutting your bag off the length of PVA, tie a second overhand knot close to the knot you tied to seal the bag – a 5mm gap is ideal (see picture). This minimises waste, and the knot will be a starting point for your next bag.

Hooking bags
Attaching the bag directly to the hook is the best option when fishing at longer range and using longer hooklengths, as the bag helps to prevent tangles.
If you are hair-rigging a bait, the easiest way is to nick the hook under a few strands of mesh.
Make sure the hook and associated bait are dry first or the bag will melt and fall off.
Clip a bag on
Alternatively, use a carp clip link – I use Avid PVA Links – to attach your PVA bag to the lead end of your rig. The knot on the PVA bag slides into a narrow groove on the clip, holding it in place on the cast.
I prefer this way if I’m fishing in faster or deeper water, where the lead helps to get the bag down to the bottom quicker.
Match Fishing Tips | Put the pole away and catch more on your rod!
It’s all too easy to tie yourself down to the pole on commercials.
It can be a supremely effective tactic on these fish-packed waters, but how about a day on waggler and feeder instead? You might be surprised at the results!
Kieron Rich loves catching carp on these two methods, and over the years he has perfected a way that allows him to get the most from his swim while leaving the pole in the bag.

Feeder first
At the start of any session it’s best to target an area of the swim where the fish naturally live.
An obvious spot is tight to an island, and Kieron believes this is your best bet for a steady start.
“Islands usually have plenty of vegetation that the fish feel confident feeding close to. Even if they spook after you’ve hooked one, they’ll never be far away. They might not be the biggest stamp carp at the start but they’ll keep you busy while you wait for the waggler line to spring into life.
“A small cage feeder packed with micro pellets and baited with a 4mm pellet is ideal. All the time I’ll be priming the waggler line by catapulting in half-a-dozen 8mm pellets every minute for at least an hour.”
Explore the layers
“Even after two hours of feeding pellets into the swim, you might not see any signs of fish in the peg. But more often than not they are simply sat too deep to break the surface with alluring swirls.
“That’s why I always plumb the depth at the start of the session and, when it comes to fishing the spot, I always start on the bottom.
“If I don’t get any bites within a few minutes then it is back to the feeder, and I will continue feeding.If I miss bites, however, that means the fish are sat above my hookbait and I need to shallow up.
“I also steer away from using a big waggler. My Middy Crystal Insert creates minimal disturbance, and any fish feeding in the zone will continue to do so. On many fisheries, the days of using big ‘splasher’ wagglers are long gone.
“Oh, and these days bites on the waggler can be extremely subtle, so make sure you strike at even the tiniest of dips.”

Carp Fishing Tips | Top ten tips for stalking big carp!
After a spring and summer of having rigs, marker floats and spods thrown at them from every conceivable angle, carp in day-ticket waters can become wary of visiting the lake’s main features and open water areas favoured by anglers.
One area where they feel far safer is in the margins, especially if these also provide some form of cover, yet very few anglers ever even consider fishing in ‘the edge’. Successful stalking isn’t rocket science, so follow our top tips and you could transform your autumn catches…
1) Bait and rotate
Identify several marginal spots you like the look of and bait them all lightly before visiting them in rotation. It may take the fish several hours to find the traps you’ve set, but before too long you’ll be able to rule out some and concentrate on others. The carp will already have their favoured margin spots – your job is to find them.

2) Cut out the glare
In order to be able to gauge the depth, the presence of snags and the presence of carp, you’ll need a decent pair of polarising sunglasses - arguably the most important piece of kit for a margin angler. They take the glare off the surface and will help you see what the carp are up to in the swim, which direction they enter and leave it from, and how they are reacting to rigs and any bait introduced.

3) Watch the wind
It helps to know from which direction the wind will hit the banks of your lake, pushing the carp towards them. Most modern smartphones come with built-in compasses, so if you have one, use it! Carp will often follow a fresh wind, and so should you. Fish living in clear pits find areas of freshly-coloured water irresistible.
4) Keep quiet!
There’s little point prepping spots and then blundering along the bank, scaring the fish into the next county. You have to keep noise to an absolute minimum. Carp can feel vibrations caused by a heavy footfall, so creep about as much as possible. Whenever you can, wear dull clothing… and definitely no white T-shirts!

5) Pin it down
When targeting carp in clear, shallow water it’s vital to pin your end tackle down so it doesn’t spook wary carp feeding in the margins. Try placing your rig in a ‘dummy margin’ and see what aspects of it catch your eye the most. If it stands out to you, it’ll be obvious to pressured carp too.
Use Tungsten droppers or putty at intervals to keep both the hooklink and the few feet of line above the rig nailed firmly to the deck.

6) Lower your rigs gently
You’d be surprised at the noise a lead makes when thudding down on the deck, especially if it’s a hard substrate. If you can, lower your rigs into position rather than flicking them out. By doing this it’s also possible to pick out individual carp as they feed right at your feet.
7) Mixed offerings
Mix up the types and sizes of bait you use to prime spots in the edge. This keeps the carp guessing and gives you loads of hookbait options. Hemp, corn, pellets, tiger nuts and boilies (chopped and whole) are all good, but why not try also meat, paste or chunks of Peperami, introduced by hand or lowered in using a baiting spoon?

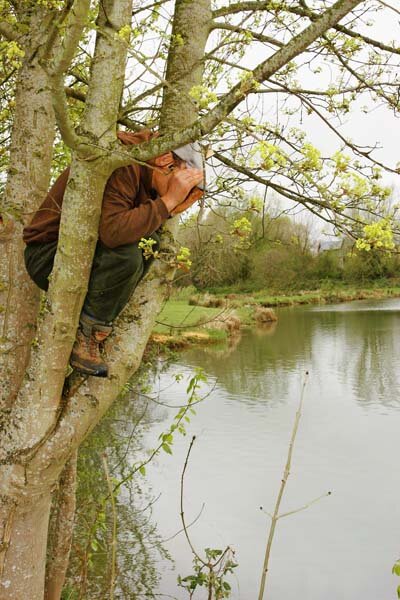
8) Gain elevation
If fishery rules allow and you’re confident doing so, climbing trees around the periphery of a lake will massively improve your view of proceedings and allow you to gauge just how many fish are visiting your spots… and how big they are. This can also help you make choices about the best spots on which to position your hookbaits.
9) Use a safe, solid rig
This is not the time to be messing about with fancy rigs and presentations. Inline leads are tailor-made for stalking, and offer the best hooking mechanics. If you set it up ‘drop-off style’ the lead will also be ejected on the take, leaving you in direct contact with the fish, meaning less chance of it snagging up during the fight.
10) Seek sanctuary
Carp are fond of cover, but fishing for them alongside snags or directly under overhangs is a recipe for disaster, and bad angling practice. Instead, pick a spot to bait up that is at least a few yards away from the obstruction so that you have more than a fighting chance of extracting any fish that you hook.