
Pinned down helicopter rig for snag fishing

Snag fishing knowledge and understanding how to fish really close to weed, reeds and underwater features is a great skill to have as it can help you put many more big, heavy, specimen carp on the unhooking mat.
We all know that snags are like a magnet to big carp - they use them as cover, plus the carp feed on waterlife that lives or drifts into the snag or feature.
Here you'll find how to create the perfect rig for snag fishing, and how best to use it...
Remember these rules when creating a rig for snag fishing: Use a flying back lead and rig tubing with putty or wire to keep the line above the rig pinned down to the lake bed. A pear lead can be used on a flat bottom, but try a Grippa for slopes. Finally, to allow easy release of the lead, push the tail rubber only one-third of the way on to the safety clip.
How to tie a Zig rig to catch carp mid-water
The zig-rig is a devastating rig for catching carp when they are feeding high in the water, in mid-water and feeding right on the surface.
It works around the same principle as a standard semi-fixed bolt rig – the only difference is the length of the hooklength.
The lead set-up is very simple. Here it comprises a large swivel lead attached to the line using a safety clip. A swivel joins the mainline to the hooklength, but here it’s covered in a short length of tubing to prevent tangles.
The hooklength must be a clear line (fluorocarbon is best) so as not to spook the fish, and the length of it must be shallower than the depth of water.
To find the water depth you may need to use a marker float set up, then from this you will be able to find the depth and then create a hooklength long enough to present the bait at the required depth – sometimes just 6in under the surface works best – sometimes mid-depth will get you more bites.
Bite registration ought to be the same set-up as you normally use – an alarm and an indicator.
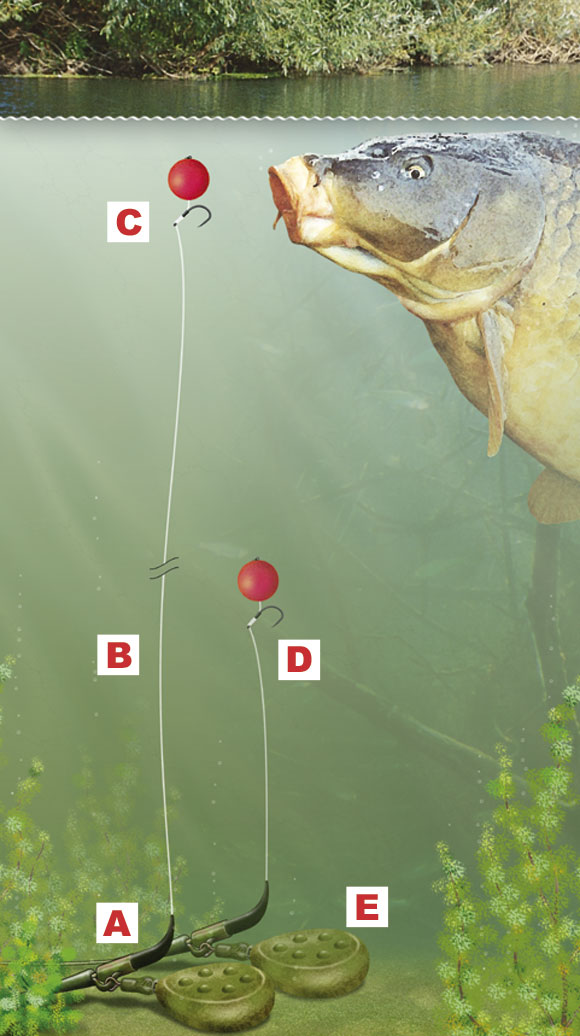
A Remember to use a length of tubing over the swivel as this will prevent tangles.
B Fluorocarbon line is best for this rig, but clear mono will also catch you fish.
C Use a large pop-up boilies as this will provide the buoyancy to suspend the bait well off the bottom.
D In mild water conditions, a bait presented at mid-water will gain you more takes.
E Use a gripper-style lead to hold the bottom securely as you will never know if you have cast your rig onto a steeply-shelving bottom.
How to find underwater features using a marker float rig
This simple yet amazingly effective marker float rig diagram will enable you to ‘see’ all those hidden underwater features and therefore ensure you can place your bait right where you need it.
This rig can be cast to various spots around the lake to not only find the depth in that particular spot, but also to find out what lies on the bottom – weed, gravel, mud or silt.
With a little experience you can very quickly figure out the exact make-up of the bottom of the lake you are fishing and determine which areas are likely to hold the fish and therefore where you think you will be best casting your bait.
All you need to create this set up is a spare carp rod (preferably around 2.75lb test curve), a reel loaded with strong braid, a marker float, a heavy swivel lead (of around 2oz or more), a length of strong monofilament, a strong baiting needle, a cork ball and a run ring with bead.
The reason for using a strong rod and strong braid is so the angler can ‘feel’ the bottom of the lake. Basically the combination of strong stiff rod and braid helps transmit every knock and bump of the lead along the bottom to the angler’s hands. It’s hard to describe in words, but with a little practices you’ll be able to tell exactly what lies on the bottom by the feeling you get through the rod and braid when the leads moves.
Building the link for the rig
Creating this rig is really very simple… Cut off 14in of your strong monofilament and tie one end to your swivel lead. Now pierce the cork ball with your baiting needle and draw the strong monofilament through it so the ball is trapped upon the line. Now tie the run ring to the end of the strong line.
To complete this link, push the cork ball onto the base of the run ring. You could glue this in place if you wish.
Setting up the rig
Thread your braid through the guides of your spare 2.75lb test curve carp rod and pass it through the run ring of the link you made earlier. Now thread the braid through the run ring’s bead and then tie it onto the base swivel of the marker float. Job done!

Using the rig
You must cast this rig with a fluid motion – not a jerky cast – so you don’t tangle it. And once the rig lands gently wind the reel’s handle to send the large marker float down to the bottom where it will contact the link and lock up.
You’ll feel this through the rod, when the float hits the link and the line tightens fully.
Now open the reel’s bale arm and pay out line 1ft at a time, remembering to count as you go and remember to add the 12in (1ft) that forms the link. Keep paying out line and counting until you see the float break the surface. Whatever figure you arrive at – that’s the depth.
Remember that figure, or better still write it down, and then gently wind the float back down again until it locks up against the link.
Now gently pull the rod around to your side, while keeping the reel locked up, and drag the lead along the bottom.
You’ll feel various things through the rod depending upon the substance that the lead travels over.
If the lead hits into weed, the rod might well lock up solid and then jerk round again as you pull on the lead.
If the lead passes over flat mud or through silt you’ll feel a constant but smooth pressure.
If the rod passes over gravel or rock you’ll feel a definite tap-tap-tap feeling through the rod.
Once you’ve pulled the rod right round to your side, swing it around again to point directly at the lead, wind down again slowly and pay out line until the float pops to the surface, counting the depth as you go.
Do this many times in a wide variety of places around the lake and you’ll begin to build up an excellent picture of the bottom of the lake with all its little dips, troughs, gravel bars, weed beds and ledges.
Get the right distance


If you find a real corker of a feature there's only one way to ensure that you hit that spot. Cast to it with your marker float and once you've found it again, clip the line around your line clip.
Wind the rig in and place both your marker float rod and your fishing rod onto rod rests and open the bale arm. Now walk the marker float and the fishing rig out until the line hits the clip. Once you've done that, place the rigs onto the ground, walk back to the rods and clip up the line of your fishign rod.
Now you'll always cast the right distance and hit that spot every single time you cast!

If you are new to this rig and aren’t exactly sure what you ought to be feeling through the rod when you pull your lead across mud, gravel, silt or into weed then try this trick… Simply visit a lake that has all those features in the margins, drop your lead onto those features, walk the rod away from them and simply drag the lead across or into the features and note what it feels like through the rod.
How to make a surface controller rig for floater fishing
Fishing for carp off the top with a surface controller rig is perhaps one of the most exciting ways to catch carp. You can see them patrolling the upper layers looking for food, and that can send the adrenaline levels off the scale as the huge barrel-like shapes approach your hookbait.
But, although it’s an exciting technique, it’s incredibly frustrating too as hitting bites can be extremely difficult – the carp can nudge the bait or at best take it and spit it out well before you’ve managed to strike the hook home.
One way to prevent this happening is to use a semi-fixed bubble float bolt rig on the surface – it’s deadly, camouflaged against the water’s surface and self-hooking.
Take a look at the diagram below to find out what you need to create this brilliant surface rig.

A Use a substantial mainline such as 8-12lb breaking strain. You’ll need mainline strong enough to land the fish you’re targeting.
B The Fox In-Line Controller Floats are clear, they can be filled with water, they are almost invisible to fish and they can be semi-fixed upon the line. Open up the two plugs and submerge until they are half-full with water. Now thread it upon your line.
C Tie on a size 12 swivel to the end of your mainline and push it into the base of the controller float to fix it in place.
D Your hooklength line needs to be strong, clear and of a low diameter. Clear high-tech pole lines are perfect for this, and 8lb to 10lb breaking strain is about right.
E Attach your buoyant hookbait by either gluing it to the back of the hook shank, using a bait band or by hair-rigging it.
Tying a snowman rig for catching big carp
All big-carp anglers are searching for that extra-special trick that can lead to another huge carp landed. One great way to do this is to combine a pop-up boilie with a bottom boilie and present a snowman rig.
Why is it called a snowman rig? You only need to look at the diagram and you can see – the bait just looks like a snowman. The bait is actually two boilies presented on top of each other.
To do this you will need a sinking boilie and a pop-up boilie. They don’t need to be the same flavour or the same colour. In fact they are better if they aren’t the same.
Having a lighter pop-up boilies sitting on top of a darker bottom boilie will help it stand out. And why not have two different flavours of boilies? You’ll provide the fish with a smell combination that they will probably have never encountered.
A favourite among the big-carp anglers in the office is to use a fishmeal bottom bait combined with a pineapple pop-up bait – a deadly pairing.
Here’s what you need to do…
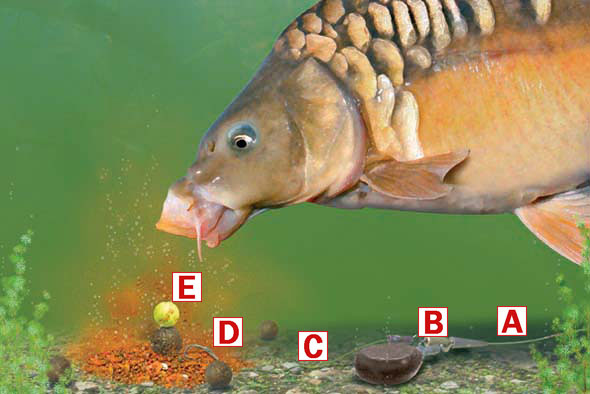
A Your mainline should be strong enough to land the carp that you are fishing for. Most big-carp venues can be fished with 12lb line, but if there are loads of snags present you will be better using 15 or even 18lb line.
B Use a simple semi-fixed helicopter rig set-up for this rig. They can be made from a lead clip pack available from all good tackle shops. The tail rubber is threaded onto the line first, followed by the plastic lead clip. The lead’s swivel needs to be attached to the clip and the components pushed together securely.
C For best results use a braided hooklength, of around 6ins, in a colour that matches the bottom of the venue you are fishing. It will need attaching to the mainline using a swivel that will fit inside the lead clip.
D Use a knotless knot to create a hair-rig upon your hook. Remember to match the size of the hook to the size of the bottom boilies you are using.
E When attaching the bait to the hair, thread on the sinking boilies first and follow this with your pop-up boilie. Lock the baits onto the hair using a bait stop or a small strip of grass.
How to tie a simple helicopter rig for specimen fishing
The helicopter rig forms the basis of the vast majority of big carp fishing set-ups used by specimen anglers. It’s incredibly simple to create and its fish-safe too. This means that if the rig is created properly, a fish is hooked and the mainline breaks or the lead becomes snagged, the lead and line will eject from the rig.
You don’t require much in the way of terminal tackle to tie this rig – five things in fact. They are: a lead, a swivel, a lead clip with tail rubber, a carp hook of a size to match your bait and some hair stops. An offcut of your strong mainline could be used for your hooklength if you wish, but some anglers prefer to use camouflaged braid. And in this example a tiny piece of silicone tubing has been threaded onto the hair and hook to produce a line-aligner rig.
This set-up works upon the principle that the short hooklength combined with a heavy lead ensures that when a fish picks up the bait it will very quickly feel the weight of the heavy lead and then bolt off, hooking itself in the process. That’s when your bobbin rises and your alarm screams.
It can be used in the margins or as far as you can cast. It can be used on lakes, rivers and canals, and it can be used throughout the year. This is one rig that you really ought to know how to tie, it really is that important.
Here’s how to tie it…
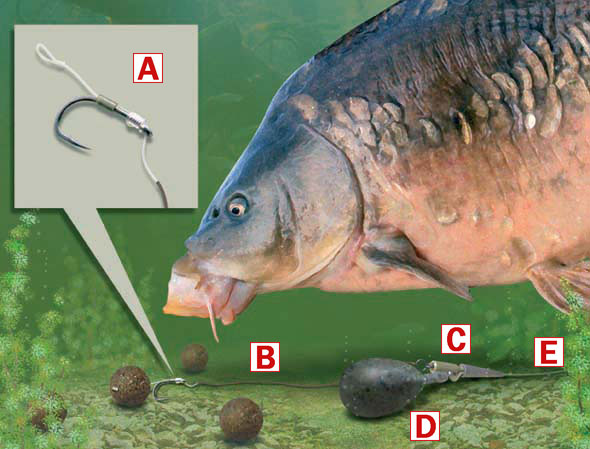
A Tie a hair-rig and attach your bait so that it almost touches the bend of the hook. Here a tiny piece of silicone tubing has been threaded onto the hair and hook in order to align the hair upon the hook shank.
B Although you could use a length of strong mono (10-12lb is ideal) most anglers prefer to use a braided line that matches the colour of the venue’s bottom. Use a hooklength of between 6ins and 12ins to ensure you create a bolt rig effect. Tie a swivel onto the end of your hooklength.
C This is a lead clip. It is available in packs from many different specialist tackle manufacturers and comprises a plastic lead clip and tail rubber. The tail rubber should be threaded onto the line first, then the plastic clip and the hooklength swivel should be tied onto the end of the mainline.
D Your lead needs to have a swivel and quite heavy. 2oz is around the minimum weight, but you may need to go as heavy as 5oz to keep the rig stationary when fishing for big barbel in powerful, flooded rivers. Attach the lead’s swivel to the line clip and push the clip and tail rubber together to secure the rig.
E An ideal mainline for fishing in this way is 12lb, but if you are fishing extremely snaggy and weedy waters you may need to go as heavy as 15lb or even 18lb.