
Barbel fishing rigs | PVA bag rig for rivers
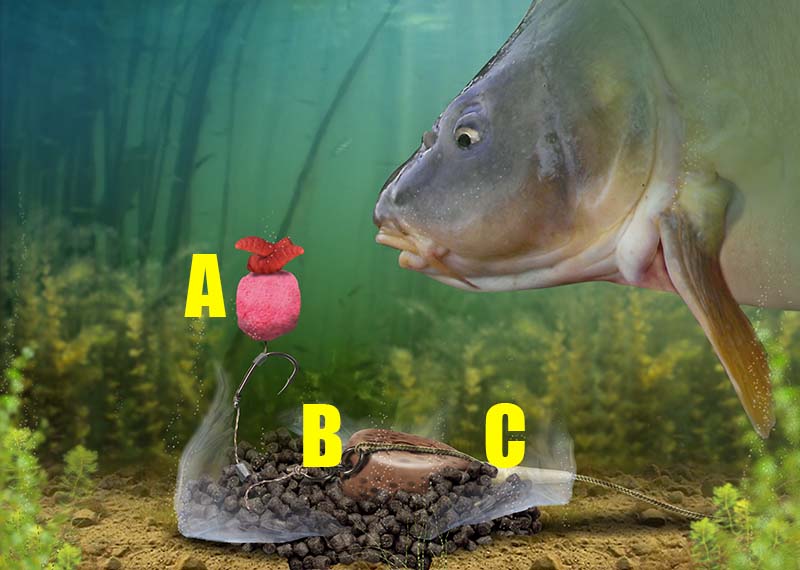
Landing a bait in weed without getting caught up is no problem with the ultimate rig – a solid PVA bag with pellets and the rig inside.
It will sink through weed with ease. Load the bag with a mixture of halibut pellets sizes, and use a short hooklength so the bait will finish up close to the feed.
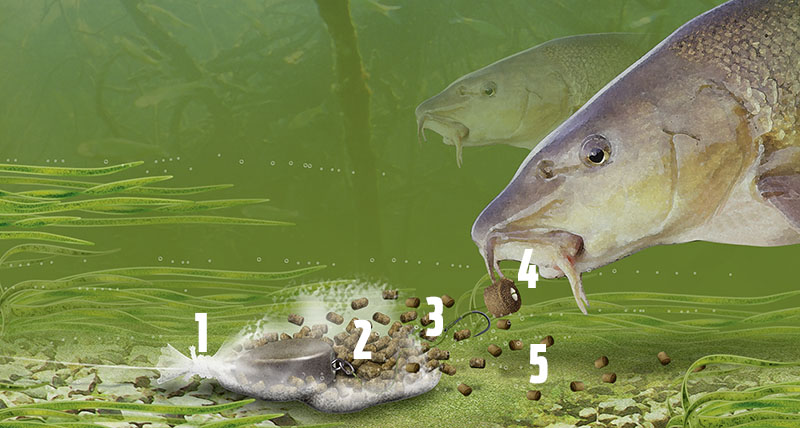
1) PVA
Solid PVA is a must here as you’ll be putting the hook inside the bag, which can snag on mesh. Choose a fast breakdown PVA so you’re fishing and ready for a bite in the minimum amount of time. Be sure that the bag is big enough to fit the lead, hooklink and a reasonable amount of feed inside.
2) All inside the bag
Add pellets first, then the lead, hooklink and bait. Add more pellets, then tie it off around the top of the lead. The lead must be dry before it goes in or moisture may start the breakdown process!
3) Short hooklink
Because the PVA bag will deposit the feed in a tight spot, you want your hookbait to be close by – so that makes a long hooklength unnecessary. A short 3ins-4ins link running from the bottom of the lead will keep the bait right in amid the feed.
4) Hookbait
Small baits score best on clear summer rivers, and a 10mm or 12mm pellet will get more takes.
5) Pellet sizes
Barbel love rummaging around amid gravel and stones and a mix of different-sized pellets ensures that your feed closely mimics the riverbed. Go for 4mm and 2mm or micro halibut pellets with a few bigger 6mm baits added. You can even crush some pellets into a coarse powder to add to the bag.
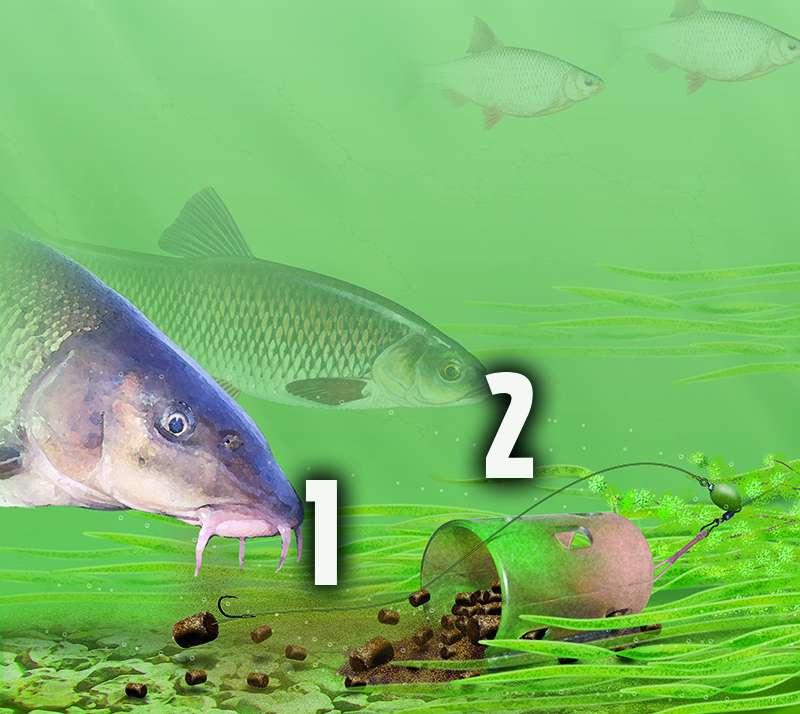
Barbel fishing rigs | Pellet feeder for chub and barbel
One tactic is synonymous with catching barbel on rivers – the blockend feeder. Allowing you to put a stream of bait into the tightest of spots that can’t be accessed with a waggler, the blockend has caught thousands of barbel down the years. Maggots are most often associated with the tactic, but in recent years pellets have come increasingly to the fore.
Barbel seem to love the taste and smell of halibut pellets, especially in coloured water, and unlike maggots, they won’t pull in dace and bleak that can prove to be a real pain to the angler in search of a few big barbel.
Use pellets and you know that when the bite alarm goes off or the rod top heaves over, it’ll be a barbel!

1) Always use a running rig
The chances of a barbel finding a snag are high, even if the angler concerned is highly skilled, so if disaster does strike and the line breaks, you don’t want the fish to be towing a heavy feeder around.
By having the feeder running on the mainline, stopped by a bead with a tail rubber to cut down on tangles, you can fish safe in the knowledge that no harm will come to a lost fish.
2) Feeder weight
This is decided by the power of the flow and how far you need to cast. Obviously, the feeder must be heavy enough to reach its destination but once it’s settled, it should only just hold bottom.
A fish that takes the bait will easily dislodge the feeder, causing a big ‘drop back’ bite on the quivertip. Too heavy and the feeder won’t move – the fish will feel the disturbance and drop the bait.
To get the right balance, pick a feeder that’s slightly lighter than needed and then add some extra lead. This can be in the form of specially-made stick-on weights or a length of lead strip, available from DIY shops. Add one small piece at a time until the feeder just holds bottom.
3) Length of hooklink
When it comes to the hooklength, as in any type of feeder fishing, this can vary from a short 12ins tail to a long flowing trace of up to 4ft. Start with around 2ft, but if positive bites are coming quickly and no fish are hooked, shorten this by three or four inches at a time.
Likewise, if you get knocks but nothing develops, lengthen the hooklength until you get hook-ups.
4) Serious tackle
You can’t leave anything to chance with tackle, as barbel are powerful fish that will be found in the main flow of the river.
A robust 8lb or 10lb mainline to a hooklink of 8lb is a minimum, matched to a large forged hook in sizes 16 to 12. An eyed hook will also allow you to fish with a pellet in a band, or drilled and hair-rigged.
5) Go for halibuts
Where pellets are concerned, it’s tough to beat halibuts. Their oily make-up offers more attraction in coloured water than a plain carp-style pellet. Big is best, so starting on an 8mm bait and working up to a 12mm is a sensible move. Inside the feeder, cram a mix of pellet sizes such as micros, 4mm and a few 6mm offerings.
How to tie | The pellet feeder rig
Twenty years ago you’d never had thought of fishing pellets on a river for barbel, but today they’re the go-to bait for many anglers.
Nuisance species such as perch, roach and eels aren’t keen on pellets, so that lets the barbel angler fish in confidence, knowing that when the bite alarm goes off it should be their target fish on the other end.
Pellets can be used on the float, but it’s with a feeder that they work best, fished on a Method feeder or in an open-end where a mixture of micros, 4mm and 6mm halibut pellets are mixed with a little fishmeal groundbait, finished off with a hair-rigged 10mm or 12mm halibut pellet hookbait.
The fishy smell of the pellets draws the fish in, making the feeder effective on powerful rivers like the Trent and Severn.
1) Mixing pellets
The best catches come to those anglers giving the barbel a mix of pellet sizes to browse over. Invest in everything from micros to big 10mm or 12mm baits.
2) Method or open-end?
If your river is relatively slow in pace, a Method feeder can catch but, for strong flows, an open-end feeder can get more bait into the swim on each cast.


Rig for floatfishing close to islands and features
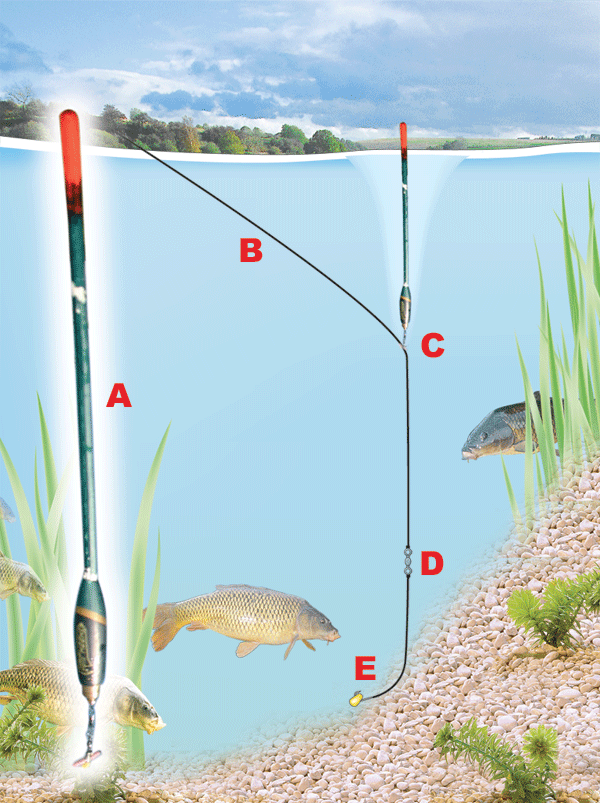
This float rig is ideal when casting tight to an island to catch the carp that patrol around its margins. As you will be casting to a feature you can actually use this rig with the line clipped up because a hooked fish will not be able to swim away from you - it can only swim to the side or towards you.
A Use a loaded, bodied float that is attached to the line with a fixed float adaptor. Alternatively a couple of tiny split shot will suffice. The best float to use is a straight bodied waggler because they pop up to the surface very quickly, ready to detect a bite straight away.
B Mainline needs to be strong enough to cope with carp and the problem of hooked fish reaching any snags. We suggest using no lighter than 4lb.
C Make sure that the depth is plumbed accurately so that the rig is set cotrrectly and that the bait touches the bottom.
D By using a swivel to link the mainline to the hooklength esnures that a replacement hooklength can be attached quickly, and as this rig will be cast a lot of times, the hooklength will not spin up as the bait revolves when it is being drawn back to the bank.
E Ideal hooklengths for this rig need to be 0.14mm and above. The best baits for this style of fishing are either sweetcorn, maggots, casters or a piece of worm.
Rolling bait rig for river chub and barbel
This rig is brilliant for tackling chub and barbel from small rivers and streams. It requires very little tackle and can be fished with either an Avon rod, a quivertip rod or even a substantial waggler rod.
It can be fished in two styles - either by holding the rod at all times to feel for bites, or by placing the rod in rests and occasionally paying out line from the reel to allow the rig to trundle downstream.
It's a deadly technique for running baits downstream and underneath overhanging snags, weed rafts or within undercut banks where big chub and barbel live.
A You can use either braid of mono for this rig. But whichever you decide, always fish it direct to the hook. As you may be fishing tight to snags opt for a strong mono of no less than 6lb.
B The right amount of weight is an issue with this rig as you must use enough weight to keep the bait on the bottom in the flow. Using a snap link swivel stopped by a couple of BB shot is ideal as you can clip-on any additional Arlesey bombs to cope with stronger flows when roving different swims.
C Although this rig is commonly associated with meat, it can be used with almost any bait providing it sinks. Experiment with hair rigs if you are missing bites, and remember to use substantial hooks to battle with the big fish in strong flows.
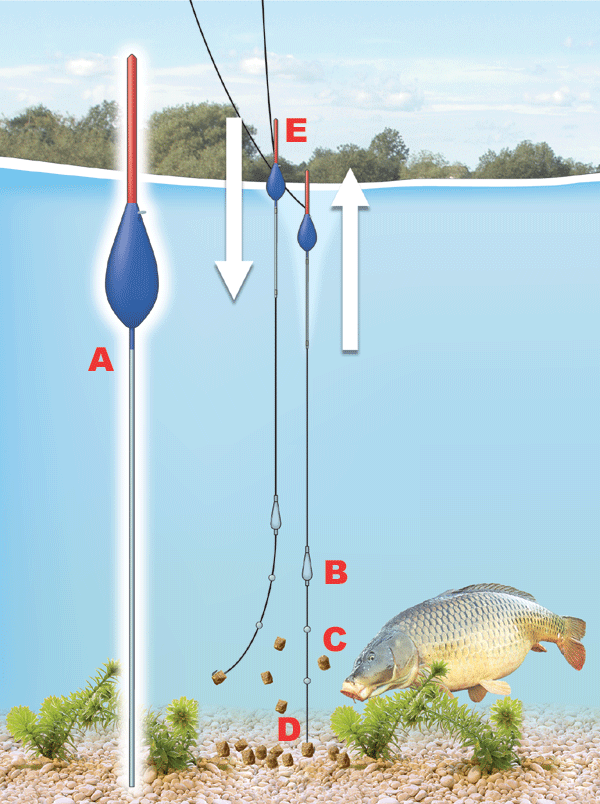
Get more bites when feeder fishing for bream, carp and tench

If you want to get more bites when fishing a groundbait or open end feeder, try this neat trick and twitch your rig back. It’s easy to do and can trigger even more bites than you’ve ever had before. It works brilliantly for bream, carp and tench – even roach too when you’re fishing a maggot feeder.
It is very simple and relies on the fact that you’re drawing your hookbait right over your loosefeed – simple really!
After casting your feeder rig, leave it for five minutes as you may well get a bite straight away. But if you don’t it’s time to twitch your rig to tempt those fish into taking your bait.
The only thing you need to think about before you start twitching your rig is to remember the length of your hooklength. For this example, let’s say that it’s 3ft – an average length for a typical feeder rig.
Pick up your rod and gently move it to one side to take up the slack so you have a tight line to the feeder (A).
Now gently begin to pull your rod tip further to dislodge the feeder (B). You’ll feel the feeder bounce. Once it dislodges, continue moving your rod tip very slowly by 3ft. No more than that or you will have defeated the object.
Now your feeder will have emptied the remainder of the bait trapped inside it, your hooklength will have straightened and your hookbait will have been pulled across the bottom, right on top of your feed (C).
Leave the rig in the water for another five minutes to see if you get that extra bite. If not, wind it in, re-bait and recast, and repeat the process all over again.

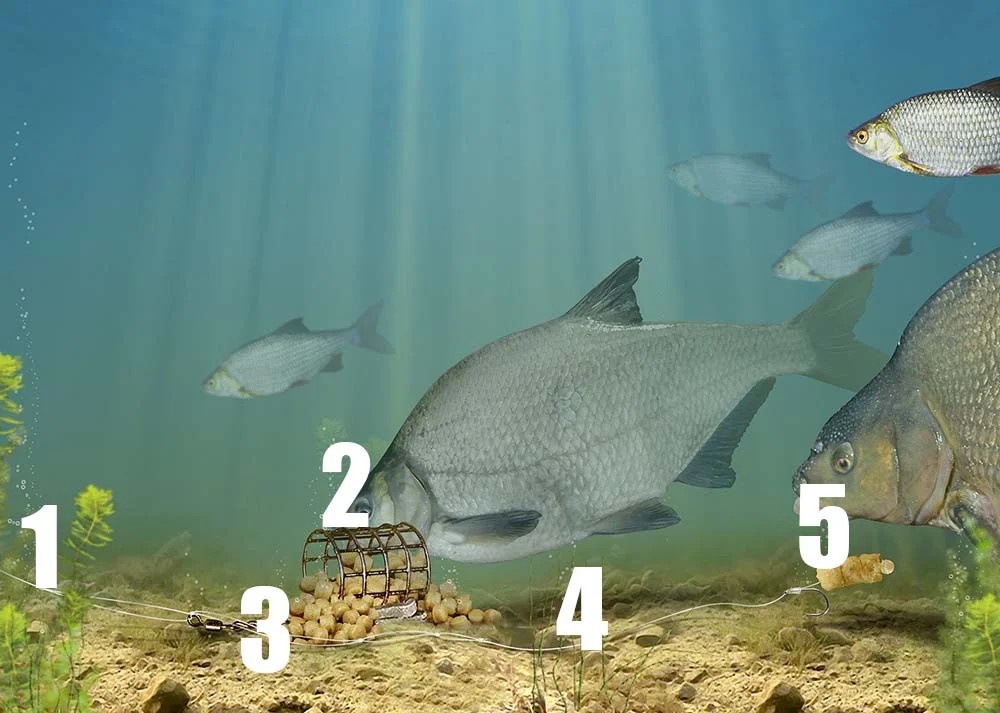
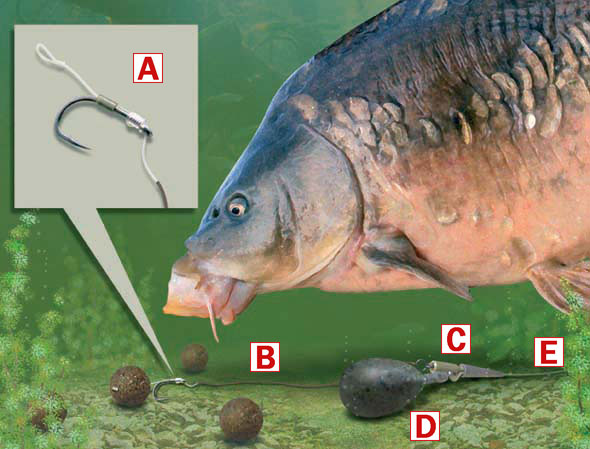
Groundbait feeder rig for river barbel, chub and bream
This simple yet very effective feeder fishing rig is perfect for catching river barbel, chub and bream. It’s easy to make and can be used in deep sluggish rivers through to fairly shallow and swift flowing rivers.
The beauty of this rig is that it can be used to catch all of our larger river species, providing you use an appropriate bait and loosefeed to tempt them.
All you’ll need to tie this rig is a variety of different weight of feeders, some eyed hooks, some hooklength braid, strong mainline, a snap link swivel and a buffer bead.
Buffer beads are small rubberised sleeves that fit over half of a swivel. They can be found at all good specialist fishing tackle stores and are ideal for stopping your swivel from hitting knots and potentially weakening them.
The most important part – and often the most technical – is choosing the right weight of feeder. The feeder must be an open end type. Cage feeders simply release their load of groundbait too quickly, whereas open end feeders hold on to the groundbait until the feeder hits the river bed.
Getting the right weight of feeder requires a few experimental casts. Pick a feeder that you think might offer enough weight to hold still in the flow, cast it out and see if the feeder remains static on the bottom. Ideally you should choose a feeder that only just holds still in the flow – one that will easily dislodge and begin rolling if a fish were to pick up the bait and nudge the feeder out of position.
Two of the best baits for this rig are either large drilled halibut pellets or fishmeal boilies – bream, barbel and chub love them. But you could use maggots, worms, casters, sweetcorn, anything you wish.
The feed you put inside the feeder ought to match the hookbait you’re using. If you decide to use a halibut pellet or a fishmeal boilie on a hair rig, you will do best to use a fishmeal groundbait and pellets in your feeder.
HOW TO TIE THIS RIG
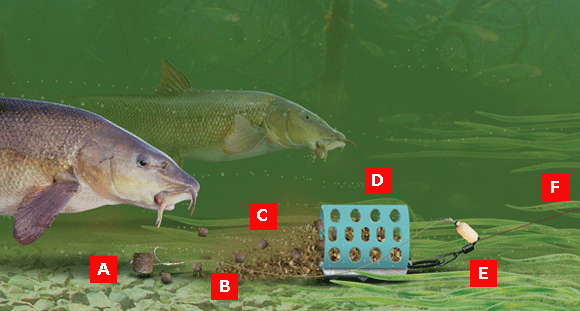
A – Larger baits like pellets and boilies should be hair-rigged. You’ll need a strong eyed hook for this and the best way to tie a hair rig is to use the knotless knot.
If you intend to use more conventional baits, just choose a strong hook of a size to suit your chosen bait.
B – It’s your choice whether you decide to use a mono or a braid hooklength. If you decide to use a mono hooklength pick one that will cope with a barbel, so 6-8lb breaking strain will be ideal. If you opt for braid, chose a 12lb breaking strain.
C – Your loosefeed should match your hookbait. Fishmeal groundbait and pellets is an ideal match for boilies and drilled halibut pellets. This combination scores well for river specimens.
D – Your open end feeder should have enough weight in the lead to just hold still in the river’s flow.
E – Use a quick-release snap link swivel to attach the feeder, and a buffer bead to attach your hooklength.
F – Your mainline needs to be strong enough to cope with a big barbel, so choose 8lb or 10lb breaking strain.
How to use a chubber float for fishing shallow and fast rivers or streams
The short, fat and dumpy chubber float is perfect for fishing shallow and fast river glides or trotting on streams. It’s capable of carrying a lot of shot, due to the size and buoyancy of the float. This is perfect because fast, shallow swims need a lot of lead down the line to ensure that the bait is pushed down to the bottom right where the fish are.
A typical chubber rig is simple to tie, and here’s how…
A Your mainline ought to be a floating one. Drennan Floatfish is perfect. Choose a breaking strain that matches the fish that you are likely to catch. A 3lb line will be adequate for most situations, but you may need to step up to 5 or even 6lb if there are lots of big barbel present.
B The chubber float needs to be attached to the mainline using three rubbers – one just under the sight tip, one in the middle and one at the base of the float.
C There are two ways to shot a chubber float – either use a string of large shot (BBs, AAs or even SSGs) placed around 1ft from the hook, or alternatively use an olivette. This creates a much smaller and neater bulk of weight.
D Because chubbers should be fished in fast water, the fish don’t have that much time to check out the hooklength, so this sort of rig can be fished straight through to your hook. You still need to match the hook size to the size of the bait you are using.

In-line Method feeder rig for carp, bream and tench
The Method feeder is a devastating item of tackle for the commercial carp angler as it not only attracts fish to the swim, but it’s easy to use and easy to catch fish with!
To create this rig you’ll need to thread an in-line Method feeder upon your strong mainline – between 8lb and 12lb is ideal. Next thread a small bead onto your mainline and tie on a strong swivel.
The hooklength you will need should be very short and very robust, again between 8lb and 12lb breaking strain line is ideal. And an ideal length would be between 3in and 6in, because the bait needs to be presented as close as possible to the feeder.
Ideal baits for fishing the Method ought to be the best baits being used on the venue at the time, so ask the venue owner or regulars before you arrive to give you an idea of what to use for the best results.
Groundbait to mould around the feeder is quite important as not all groundbaits work. Ideally choose a specific Method Mix as these groundbaits bind together well and will therefore stick to the frame of the feeder.
You’ll need to mix the groundbait with a little water then take a small handful and press it into the frame of the feeder. Then, using both hands, squeeze a little more groundbait around the frame so that it is completely hidden by the mix. Don’t overfill the feeder as you’ll struggle to cast it out.
The best rods for this style of fishing are either power feeder rods or 2.5lb test curve carp rods.
The key to a good Method Feeder session – as with all forms of feeder fishing – is to consistently hit the same spot to build up a bed of bait that the carp will be drawn to.
A Use the best baits on the venue at the time you’re fishing. Ring first and you’ll get the right info!
B Use a very short and strong hooklength as bites can be savage when fishing the Method. A 3-6in length of 8-12lb line or braid will be perfect.
C A snap link swivel will allow you to tie two or three hooklength and bait them up when you are waiting for a take. Then, after landing a fish you’ll be able to release the old hooklength and clip on a new one quickly and easily.
D Remember to use a bead to absorb the shock of the feeder on the swivel knot during casting.
E In-Line Method Feeders are best because if your line snaps the fish can pull the rig free from the heavy weight.
F Remember to use a specific Method Mix for your groundbait as it will bind to the feeder correctly and stick to it during the cast.
G Your mainline will need to be tough enough to stand up to the pressure of fishing this technique – 8lb to 12lb mainline is best.
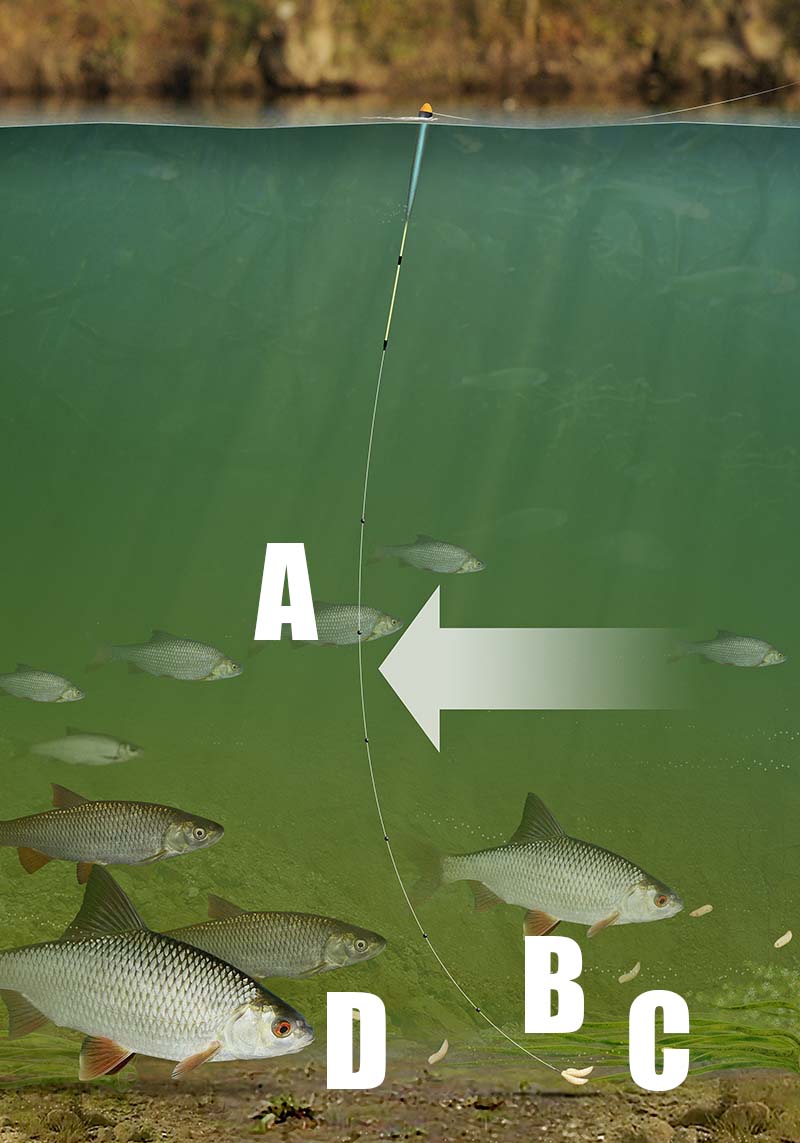
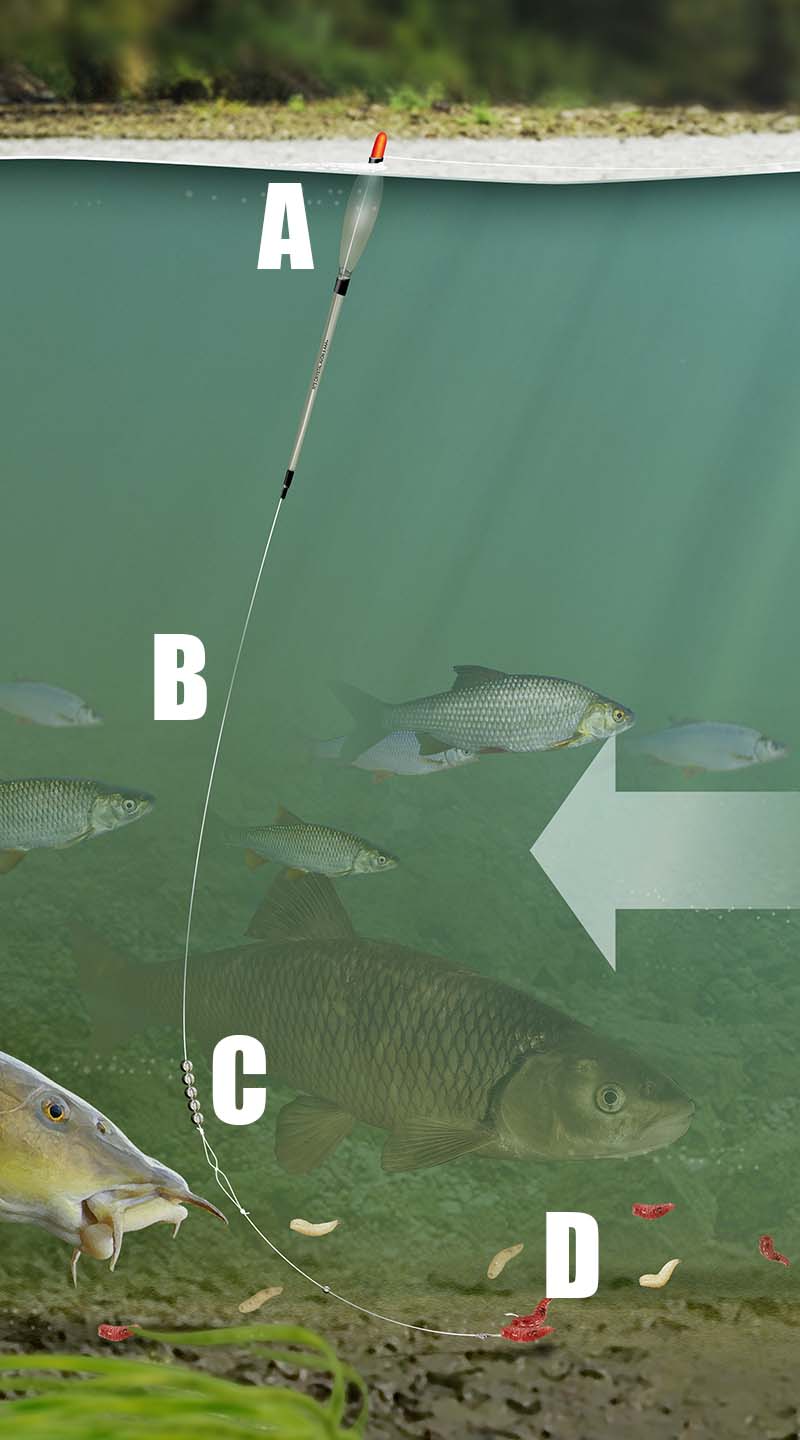
How to plumb the depth when floatfishing a waggler
Close in
Hold the plummet in one hand and your rod in the other – flex the tip of the rod slightly by pulling the line taught. Open the bail arm of the reel. Swing the rod upwards, let go of the plummet and take your finger off the spool to cast the plummet into the swim. Timing and a smooth motion is crucial, so do it very slowly to begin with to gain practice. Casting the plummet in this fashion minimises the disturbance it causes when it hits the water – but you can cast it overhead just like you would a float if you can’t master this way.
At distance
Pinch an SSG weight onto your hook (inset). Cast it into the swim in an overhead fashion. As long as the SSG is enough to sink your float it will take it out of sight if you are too shallow. When you can only see the fluorescent part of the float, it is set at a dead depth.
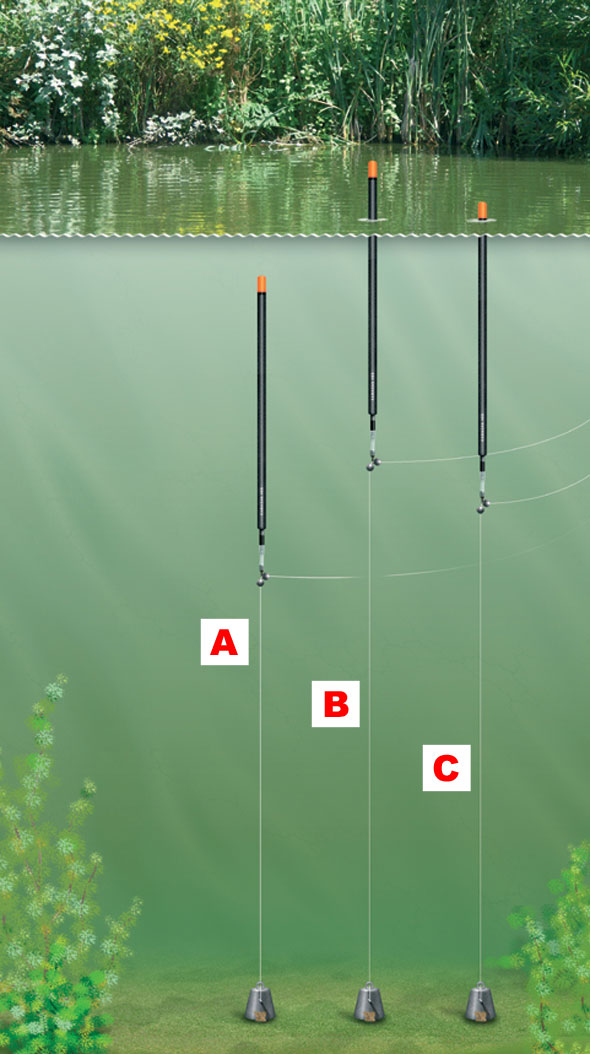
A. This shows you are too shallow.
B. This shows you are slightly too deep.
C. This shows you are just on the bottom.
How to find the depth when pole fishing
Plumbing and finding the depth of the lake, canal or river when pole fishing is a lot easier than finding the depth when you're float fishing because you can simply lower the plummet into your swim and gently drop it onto various areas of the swim to gain a true picture of the venue's depth.
It's a vital part to a successful session as it will give you a true picture of what's under the water and therefore give you a great insight into where you should be feeding and placing your bait.
You can also use your plummet to locate any underwater obstacles too by gently 'swinging' the plummet through the swim to see if it becomes lodged against anything that's submerged.
Here's how to go about finding the depth on your pole line...
STEP 1
Pass your hook through the eye in the plummet
STEP 2
Secure your hook into the cork in the base of the plummet.
STEP 3
Lower the plummet into the swim below the end of your pole.
STEP 4
Add a section of pole at a time and plumb around the swim, lowering the plummet straight down, not at an angle, to ensure an accurate reading of the swim.
STEP 5
Once you have got the exact depth of the swim, hook your hook into the base of your pole top kit. This will pull the elastic out slightly and secure your rig. With Tipp-Ex, mark the point where the top and the bottom of your float sit against the pole. This means you always have a point to refer back to should you change the depth you are fishing during the day.
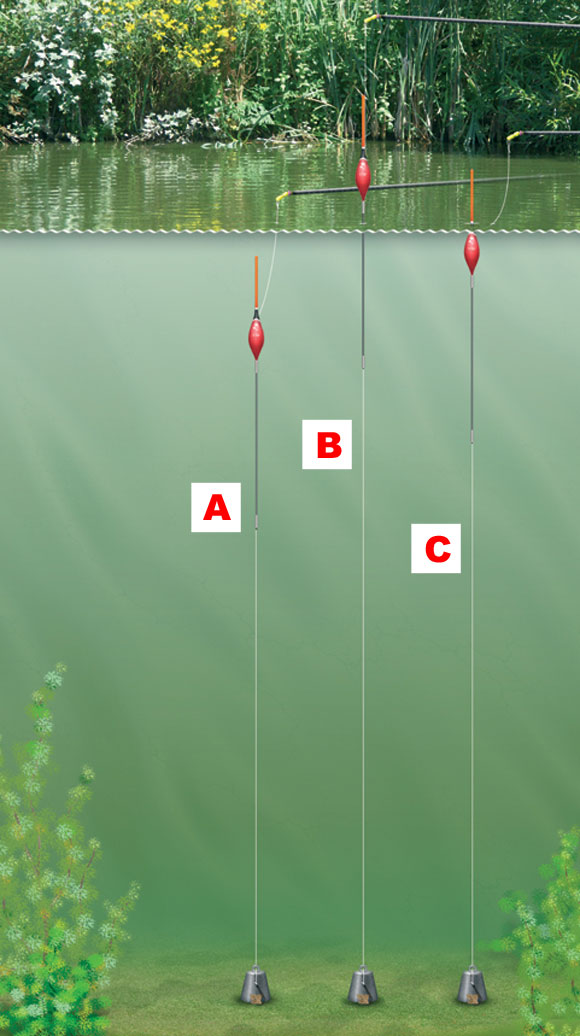
A. This shows the float is set too shallow
B. This shows the float is set too deep
C. This shows the float is set perfect
Simple waggler rig to catch fish overdepth
This is a simple, straightforward waggler rig that will catch fish from stillwaters, canals and rivers. It’s the basic float rig that every angler ought to know how to tie.
The float is locked onto the line using a silicone float adaptor (these allow a quick change of float whenever required) and is locked in place using the vast majority of shot either side of the adaptor.
You’ll find the number and sizes of shot needed to cock the float printed on the side of the float. This will give you a guideline as to the amount of shot needed.
Next place a few much smaller dropper shot just below mid-depth (a few No6 or No8 shot will ideal).
After this place another two or three No8 shot equally spaced between the last shot and the hook. These will provide a slow and gentle fall of the bait through the last few inches of water.
You will need to plumb the depth really carefully so you know how deep to set the rig, and aim to set the rig 4-6in overdepth so that the bait settles on the bottom.
Most fish feed on the bottom, so this is a good place to start presenting your bait.
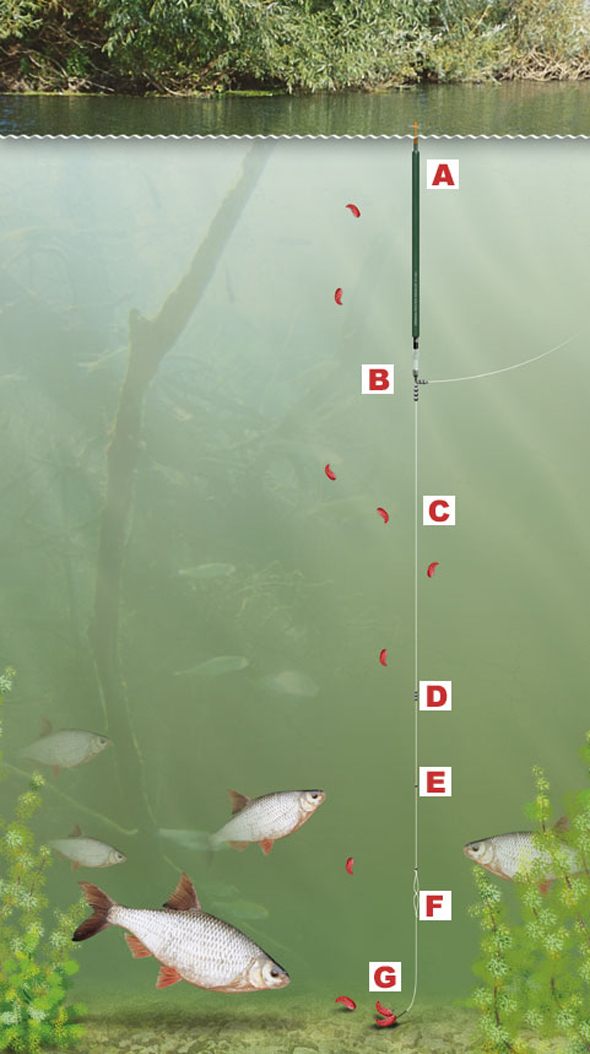
A Add enough shot to the rig so that your float’s sight tip just breaks the surface.
B Use a silicone float adaptor to attach the float onto your line, and lock the float in place using the vast majority of shot.
C Your strength of line needs to match the species of fish you are likely to catch. For small fish use between 2.5-4lb, and for carp use between 4-8lb.
D This group of No6 or No8 shot need placing just below mid-depth.
E Spread two or three No8 shot equally between the last group of shot and the hook.
F Your hooklength needs to be slightly weaker than the mainline so if a breakage occurs, it will occur here and not on your main rig.
G Aim to present your baited hook on the bottom at the start of the session as it’s here that most fish will feed. Present the bait between 4-6in overdepth at the start.
How to tie a resistance-free running feeder or leger rig
The resistance-free running rig has to be one of the simplest leger and feeder rigs a fisherman ought to know how to tie, and it’s deadly too. It will work on rivers, lakes and canals, for almost all British freshwater fish, and below you'll find out how to tie it...
This rig can be used with a groundbait feeder, a blockend feeder or a straight lead, and it can be used with a very short hooklength or a really long one – the choice is yours.
This rig is ideal as it allows the angler to swap and change the weight, style of type of leger/feeder being used in seconds. You simply unclip the Feedabead or snap link swivel and swap the feeder/leger over. This is handy if you need extra weight to cast through a wind. Maybe you’ve fed enough and want to switch to a smaller feeder. Or perhaps you want to search the water for signs of fish and wish to switch to a straight lead – you can do it all with this rig.
Here’s how to tie it…
A Your mainline needs to be strong enough to cope with the fish you are likely to catch. An average day on an average stillwater will require 4-6lb line.
B Thread a Korum Feedabead or snap link swivel onto your mainline and follow this with a small bead.
C Now securely tie on a micro swivel. Micro swivels are tiny and therefore they weigh very little, so a fish that takes the bait won’t be able to feel the weight of this tiny swivel.
D Clip your chosen weight onto the Feedabead or snap link swivel. It could be a groundbait feeder, a blockend feeder or a straight lead.
E Your hooklength choice will again depend upon the size of fish present in the venue. The best hooklengths are high-tech lines as these offer great strength for a reduced diameter, meaning you’ll get more bites and stand a better chance of landing the fish you hook. A good starting point for general fishing will be 0.10mm, but step up to something like 0.16mm if you are hitting into lots of big carp.
F Your hook needs to match the size of your chosen bait.
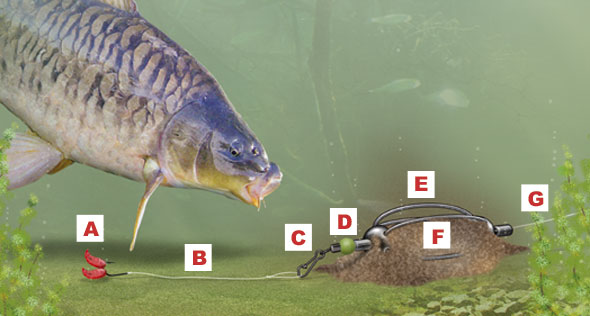
How to tie a simple helicopter rig for specimen fishing
The helicopter rig forms the basis of the vast majority of big carp fishing set-ups used by specimen anglers. It’s incredibly simple to create and its fish-safe too. This means that if the rig is created properly, a fish is hooked and the mainline breaks or the lead becomes snagged, the lead and line will eject from the rig.
You don’t require much in the way of terminal tackle to tie this rig – five things in fact. They are: a lead, a swivel, a lead clip with tail rubber, a carp hook of a size to match your bait and some hair stops. An offcut of your strong mainline could be used for your hooklength if you wish, but some anglers prefer to use camouflaged braid. And in this example a tiny piece of silicone tubing has been threaded onto the hair and hook to produce a line-aligner rig.
This set-up works upon the principle that the short hooklength combined with a heavy lead ensures that when a fish picks up the bait it will very quickly feel the weight of the heavy lead and then bolt off, hooking itself in the process. That’s when your bobbin rises and your alarm screams.
It can be used in the margins or as far as you can cast. It can be used on lakes, rivers and canals, and it can be used throughout the year. This is one rig that you really ought to know how to tie, it really is that important.
Here’s how to tie it…
A Tie a hair-rig and attach your bait so that it almost touches the bend of the hook. Here a tiny piece of silicone tubing has been threaded onto the hair and hook in order to align the hair upon the hook shank.
B Although you could use a length of strong mono (10-12lb is ideal) most anglers prefer to use a braided line that matches the colour of the venue’s bottom. Use a hooklength of between 6ins and 12ins to ensure you create a bolt rig effect. Tie a swivel onto the end of your hooklength.
C This is a lead clip. It is available in packs from many different specialist tackle manufacturers and comprises a plastic lead clip and tail rubber. The tail rubber should be threaded onto the line first, then the plastic clip and the hooklength swivel should be tied onto the end of the mainline.
D Your lead needs to have a swivel and quite heavy. 2oz is around the minimum weight, but you may need to go as heavy as 5oz to keep the rig stationary when fishing for big barbel in powerful, flooded rivers. Attach the lead’s swivel to the line clip and push the clip and tail rubber together to secure the rig.
E An ideal mainline for fishing in this way is 12lb, but if you are fishing extremely snaggy and weedy waters you may need to go as heavy as 15lb or even 18lb.
How to tie a stickfloat rig ideal for trotting on slow flowing rivers and streams
Trotting a small river for roach, chub, bleak, dace and skimmer bream is a fantastic way to spend a day fishing. It’s an active method that involves flicking your rig out, paying out line from the reel, mending the line to make sure the float travels along the right line, and occasionally holding back the float to make the bait flutter off the bottom. Then wham. The float ducks under and a fish is on. Brilliant!
This type of fishing requires a different approach to stillwater fishing where the float is cast overhead. A stickfloat rig needs to be cast underarm, from one side. This means that tangles can prove a problem, but not if you have set your rig up correctly. And this one, below, is not only ideal for catching fish at all depths as the bait falls, but it’s also virtually tangle free! Here’s what you need to do…
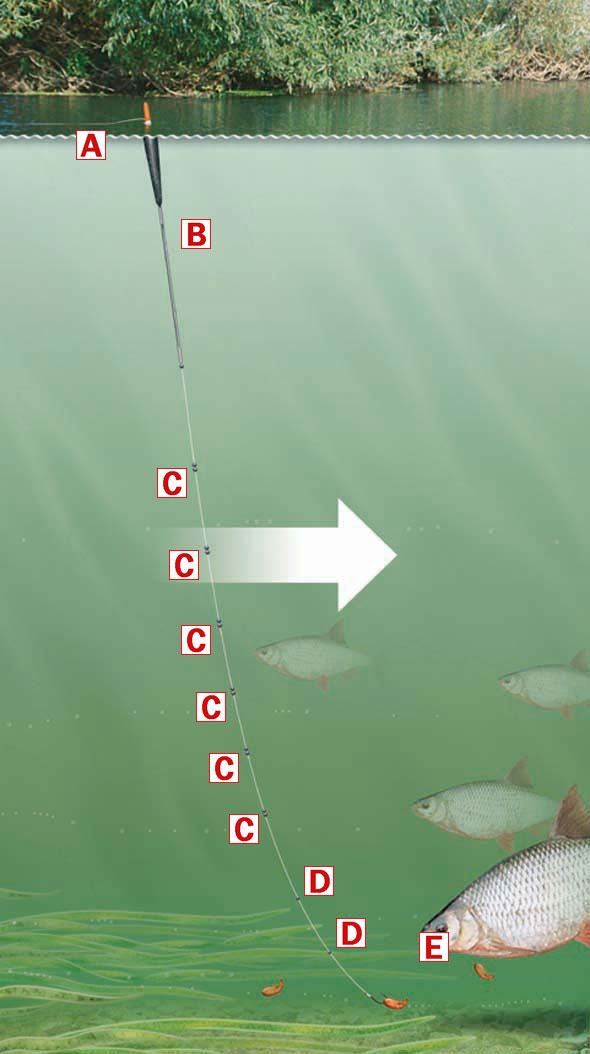
A Choose a light floating mainline, something like 2-3lb Drennan Floatfish would be ideal for this rig. The floating line lifts off the water easily, therefore you can mend your line to keep control of the float really easily, plus you’ll be able to strike fast bites easier too.
B The best type of float to use when fishing slow-paced rivers and streams is a plastic, cane or carbon stemmed stickfloat as these are nice and light. It needs to be attached to the line using three rubbers. Thread them onto the line first and then pass the float inside the rubbers. One rubber needs to be positioned under the sight tip, the other in the middle and the final one over the stem. Once you have found the correct depth, mark it using a single No8 shot directly underneath the float.
C The shot needs to be equally spaced down the line, but the majority of the weight needs to be positioned in the top two-thirds of the rig. Here pairs of shot have been used, equally spaced down the line. Pairs of No8 or No6 shot are ideal.
D The last two shot should be set singularly to produce a slow and natural fall of the hookbait through the last foot or so of water. No8 shot are ideal for this.
E As with all rigs, your hook needs to suit the bait that you are fishing with.
How to float fish a river with a Crowquill Avon trotting rig
The crowquill Avon is a very underused float nowadays, but it’s one of the very best for tackling pacey, powerful or deeper rivers where plenty of shot is needed to get the bait down to the feeding fish.
The float itself is quite long and features a large and long balsa body that requires a lot of shot to cock it correctly, and that’s perfect for pushing the bait down through powerful flows.
Because the crowquill Avon is produced from natural quills, it’s often bent, but that needn’t worry you as the float will still perform perfectly well.
Here’s how to set one up…
A Your mainline needs to be quite strong as you are likely to encounter quality fish using this rig. A 4-6lb floating line would be ideal because the floating lines give you better float control and a faster line pick-up on the strike.
B Attach the crowquill Avon float using a couple of float rubbers. Thread the rubbers onto your mainline first and pass the sight tip through the top rubber and the float stem through the bottom rubber.
C Shot the float with a bulk of large split shot around 18ins from the hook. A string on BBs, AAs or even SSGs are perfect, depending upon the size of the float being used.
D Use a single tell-tale shot around 8ins from the hook. This is a positive rig so a fairly large No1 shot will be adequate.
E Use a hook of a size to match your bait.
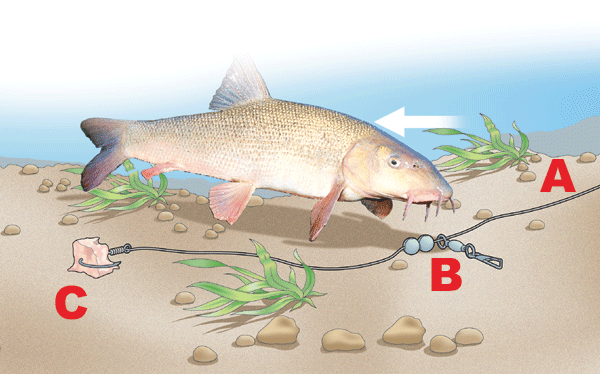
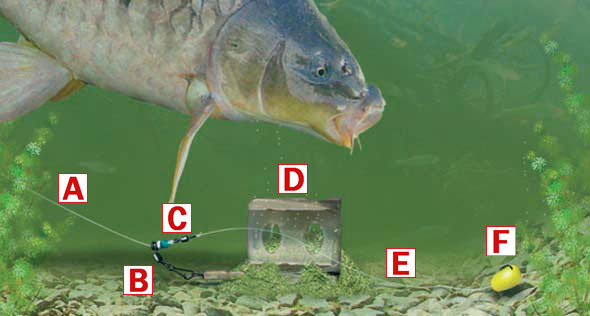
Snag-free link legering rig for big barbel and chub
Barbel love to hide under or tight to streamer weed, sunken branches, tree roots and other submerged obstacles. That makes catching them really difficult.
Static leger rigs may seem to be the answer, but often they aren’t. A mistimed or an inaccurate cast might see the heavy rig land bang in the middle of the obstruction – not only snagging up, but also disturbing the fish in the swim.
If you’re overly tentative with your cast, your rig might land too far away and the barbel won’t want to move out from the sanctuary of the feature to take the bait, especially in daylight hours.
These are the times when a neat link leger rig really comes into its own.
A correctly balanced link leger not only allows the angler to reach the desired distance upon the cast, but it also allows you to let the bait trip gently downstream.
No longer will you have to accurately cast your rig onto an area the size of a dinner plate. With a link leger you can cast upstream of the fish-holding spot and gradually work it downstream right next to or even underneath the feature.
The key to a successful link leger rig is to use the right amount of weight upon the link. Basically you’ll need to squeeze enough split shot onto the link to ensure that the rig sinks quickly and just holds the bottom when the rod is placed upon the rests.
If you leave the rod alone, the rig will remain in place until a fish takes the bait or a large twig or strand of weed hits the mainline as it is swept downstream.
But if you gently lift the rod tip to dislodge the rig it will rise up off he bottom and be swept downstream a little closer to the snag. Now place the rods in the rest ready to detect your next bite.
You can slowly and steadily repeat this until the rig lies exactly where you want it to be.
But this link leger rig offers something a little unique. The split shot can quite easily fall off the link if they become snagged, therefore this rig is very fish-friendly and safe. It’s the perfect rig to use when you’re fishing very tight to snags.
HOW TO TIE A LINK LEGER RIG
You don’t need a huge array of tackle to create this rig. You will need some large split shot, your hook, your chosen hooklength material (braid or mono), strong mainline (around 6-8lb is ideal), a strong swivel and a swivel bead.

A – Your hook needs to match the species and the size of bait you are using. When fishing for barbel, use a very strong hook
B – Your hooklength needs to be strong enough to cope with the fight of a barbel. If you decide to use mono, opt for lines in the region of 6-10lb breaking strain. If you decide to use braid to camouflage it against the venue bottom, use 12lb breaking strain.
C – The best method of connecting your mainline to hooklength is to use a swivel.
D – A swivel bead is the perfect accessory for attaching the leger link. Thread your mainline through the bead end and thread 6ins of strong line through the swivel. Fold this line over and lock the two lengths of line together using enough split shot to hold the rig onto the bottom. The beauty of this style of creating a link leger is that the split shot can quite easily fall off the link if it becomes snagged, leaving you free to play the fish back to the net.
E – Your mainline needs to be reliable and strong. 6-10lb breaking strain is ideal for most barbel fishing situations.
Presenting expander pellets on the bottom with the pellet deck rig
This rig is ideal for presenting expander pellets on the bottom for carp, tench and bream. It can be used in depths of 3ft or more and when fished correctly it can tempt bites when all other pellet rigs fail.
A Use a long, body-down pole float for this style of fishing. One having a long plastic bristle is perfect as bite registration will be near instant.
B Cock the float with an olivette to form a bulk. This needs to be positioned around 12in from the hook.
C Place two dropper shot equally spaced between the olivette and the hook. Ideally they should be No10 shot that are light enough to create a gentle and natural fall of the bait through the final few inches of water.
D The hookbait should be set so that it just touches the bottom, so accurate plumbing is vital with this rig.
E The best way to tempt extra bites with this rig is to loosefeed little and often with sinking pellets, then lift and lower your rig regualrly. This gives the expander pellet plenty of movement, and the simple waft of the bait dropping down to the bottom can bring a bite when a static bait is often ignored.