Carp Fishing Rigs | How to tie the mag aligner rig
Want to catch carp in the winter? Then this is the rig you’re going to need. With the carp having a reduced metabolism and appetite, now is not the time to pile in mountains of boilies, yet a carefully presented pile of ‘wrigglers’ can soon get your bobbins dancing.
As far as maggot rigs go, the mag aligner really does takes some beating. By using a large PVA mesh bag of maggots tied to a big rig ring by the lead, the mag aligner is virtually tangle-proof on the cast.
What’s more, using a fake maggot as a line aligner over the hook makes the rig extremely hard for the carp to deal with, leading to reel-churning runs in even the coldest weather
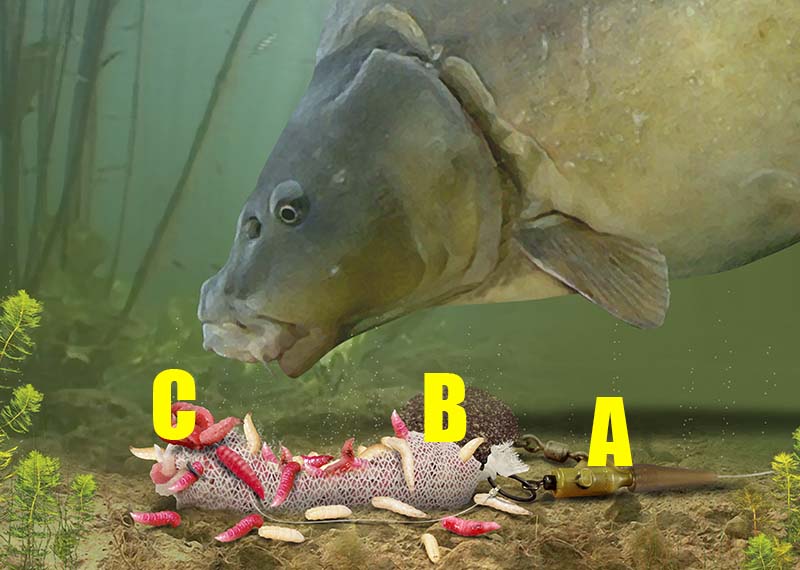
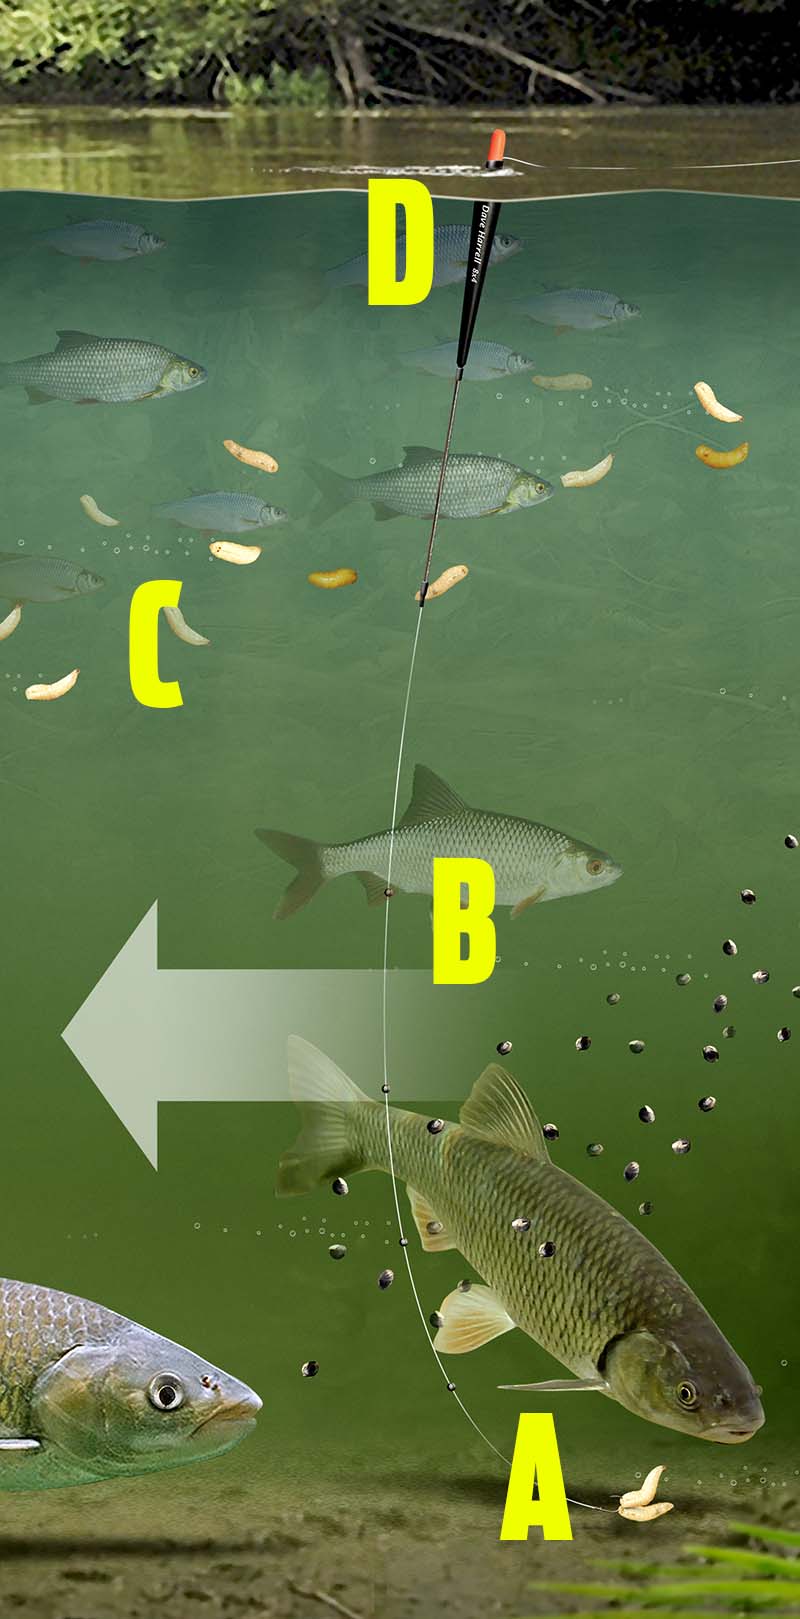
A) Terminal set-up
Use a lead clip rig or a helicopter set-up.
B) Large rig ring
Leave a tag end on the PVA bag knot and tie it to a large rig ring.
C) Anchor point
Nick the hook into the bag before casting to help prevent tangles.
How to make a Mag Aligner
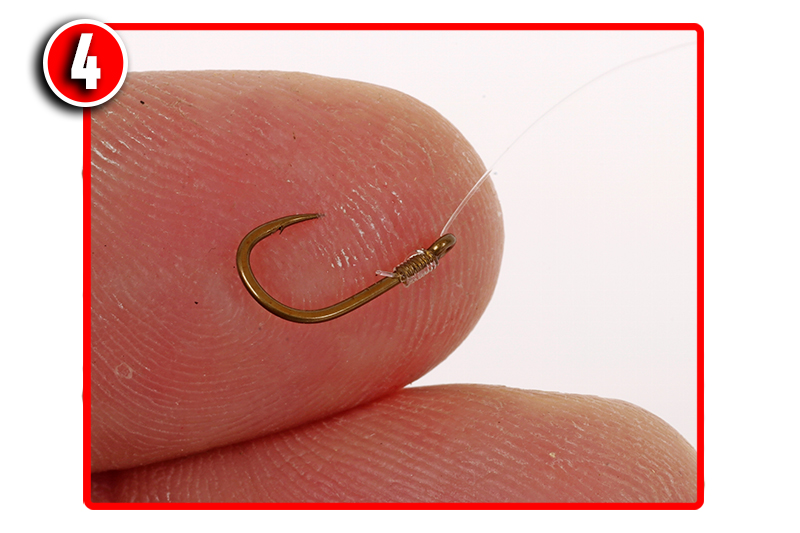
1) Pierce the underside of the fat end of a fake maggot with a baiting needle and run it along the base until it exits the pointed end.

2) Tie a hook on to the end of your hooklink using a grinner knot. Grab the hooklink with the baiting needle and thread on the fake maggot.

3) When complete it should look like this. The hooklink should exit the maggot from the underside. This helps the hook to flip over.

Carp Fishing Rig | PVA bags for carp
At this time of year the carp fishing in all lakes is hard as the carp don’t want to feed as much in the cooling water. A small PVA-bag rig like this one is perfect to get a small amount of bait perfectly placed around the hookbait.
Quick tip: Make sure the contents are dry when you make up your PVA bags, a job best done at home before fishing.
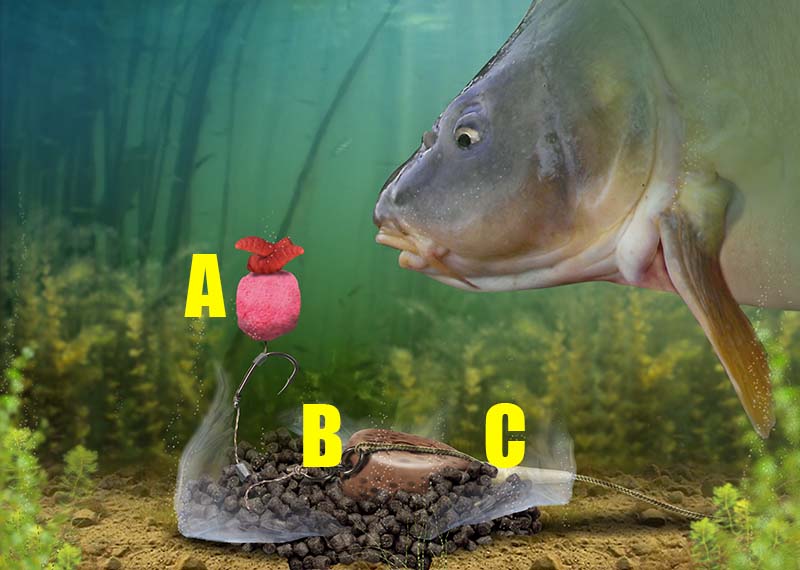
A) hookbait
Try a pop-up boilie enhanced with two live maggots on the hair.
B) The PVA bag
A PVA bag can be attached in several ways. Here it has been created around the leger weight.
C) solid or mesh?
Solid PVA bags are used when fishing for bigger carp. When fishing commercials for smaller carp and F1s, use a small mesh bag and nick it on to the hook.
Carp fishing rigs | Method feeder
There are a number of different types of rigs that you can use on commercials for carp fishing, and new versions and ideas are appearing all the time, but which one is really the best?
By far and away the most sensible choice is the Method feeder. It allows you to tuck a bait inside a ball of feed and have both mixed together once the feed breaks down in the water.
It’s also a self-hooking rig, meaning there’s no hitting tiny knocks on the quivertip. When a fish is on, you’ll know about it as the rod goes round!
Making the rig is easy, too. Most fisheries insist on your set-up being free-running, but modern tackle means that even elasticated feeders can be used safely.
Guru has its X-Safe system that allows the feeder to pull free of the line in the event of a breakage or the rig becoming snagged.
Elastic acts as a shock-absorber when playing a big carp under the rod-tip, which greatly reduces the number of last-minute hook pulls.

1) Lines and hooks
Big carp can give savage bites on the Method, so don’t skimp on lines. A tough mainline of around 8lb is the order of the day, matched to a 4ins hooklink of low diameter line in a similar breaking strain.
The short hooklink means that the bait will always be close to or in amid the feed. For hooks,
a barbless eyed carp pattern in sizes 16 or 14 will do. The eye is important, as it will allow you to hair-rig baits.
2) Top hookbaits
When a Method load breaks down, you want your hookbait to pop out and be easily visible to the fish, so give them something bright.
A hi-viz orange or yellow mini boilie or wafter, or a brightly-coloured 6mm pellet are good options but often, a plain hard pellet can bring equally good results. Don’t forget dead red maggots or a piece of corn either.
3) What to put around the feeder
Your feed is moulded around the frame of a Method feeder using a special mould, and there are only two choices of feed here – micro pellets or groundbait.
For out-and-out carp fishing, pellets work well. These need to be dampened slightly to help them stick around the feeder. Fishmeal groundbait comes into play when the carp are of a smaller stamp, and normally this is mixed 50/50 with micro pellets.
4) Feeder size
Method feeders range in size from tiny 15g models to massive versions taking over 50g. The size you pick is dependent on how far you need to cast, and any underwater countours.
For long casts, obviously a big feeder will do the job but for short chucks, a much smaller model will do.
Heavy feeders also come into play if you are fishing on an slope running away from an island, the extra weight helps the feeder to grip the lakebed as opposed to sliding down this slope.
5) Safe elastication
If you go down the elasticated feeder route, pick the Guru X-Safe system. This sees heavy pole elastic inside the feeder body stretch when a fish is being played, helping subdue the carp in double-quick time.
Should a fish get snagged and the mainline break, the feeder can pull free to prevent the carp being tethered.
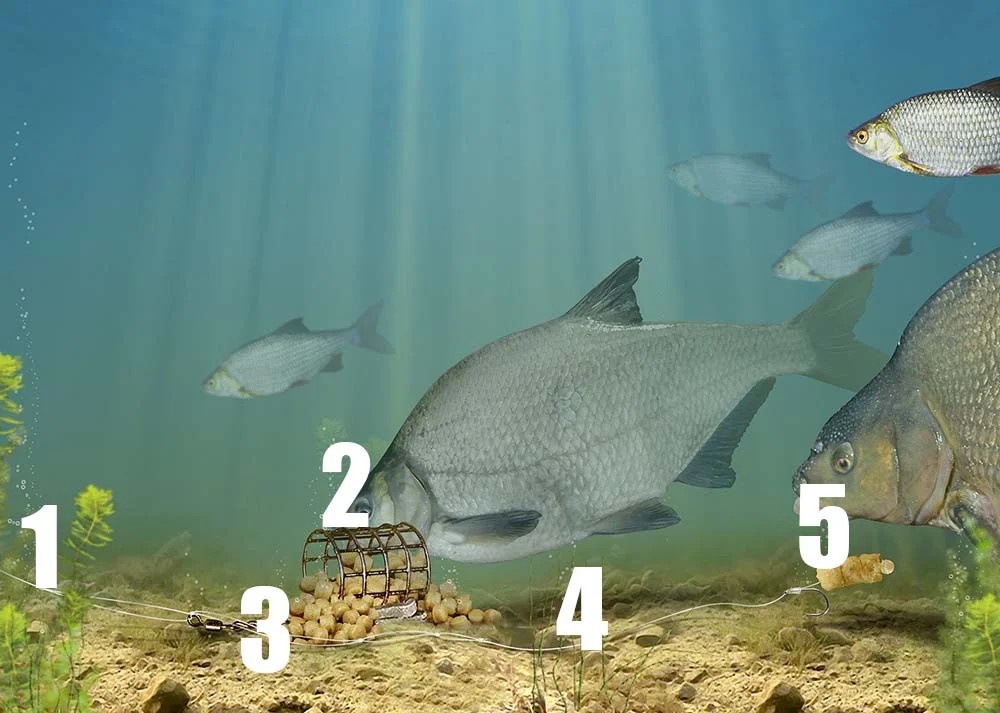
How to tie a method feeder rig for carp fishing
There are a number of different types of feeder to use on commercials for carp in early spring – but which one is really the best?
By far and away the top choice is the Method feeder, allowing you to tuck a bait inside a ball of feed and have both mixed together once the feed breaks down in the water. It’s also a self-hooking rig, meaning there’s no hitting tiny knocks on the quivertip. When a fish is on, you’ll know about it!
Making the rig is easy, too, as most fisheries insist on your set-up being free-running. The feeder is threaded on to the mainline and then stopped by a bead or stop above a short hooklength of around 4ins.
The bait is then buried inside the feed, with the mix moulded around the feeder.
As this feed breaks down quickly once in the water, the bait is exposed and the bite normally isn’t long in coming.
By keeping a tight line between feeder and rod, bites are extremely positive and often result in fish hooking themselves.
A) Feeder weight
A feeder of around 15g to 30g in weight is fine. The only change here would be when fishing on the slope of lakes where the water starts to shallow up leading to the margins, such as you’d find when casting to a far bank or an island. In this situation, a slightly heavier feeder will be needed to grip the slope and stop the feeder rolling down into the deep water.
B) Feeder type
There are a variety of Method feeders available but these can be narrowed down to in-line or elasticated versions, a flatbed being the best shape. This is a perfectly flat feeder that will sit flat on the bottom. Fishery rules often dictate whether elastic can be used. An inline model is safer, and works by having the line running through the body.
C) Hookbait
Any bait will work, but anglers do like to try and use on the hook what they’re putting around the feeder. A banded or soft 6mm pellet is often the number one choice, but in clear water, a brightly coloured 6mm or 8mm mini boilie can produce surprising results.
D) Feed
When it comes to feed you have a choice of groundbait or pellets with the Method. A fishmeal groundbait with a few small 2mm micro pellets dampened down before use is fine, but if you are fishing for just carp, do away with the groundbait and load the feeder up with just micro pellets.

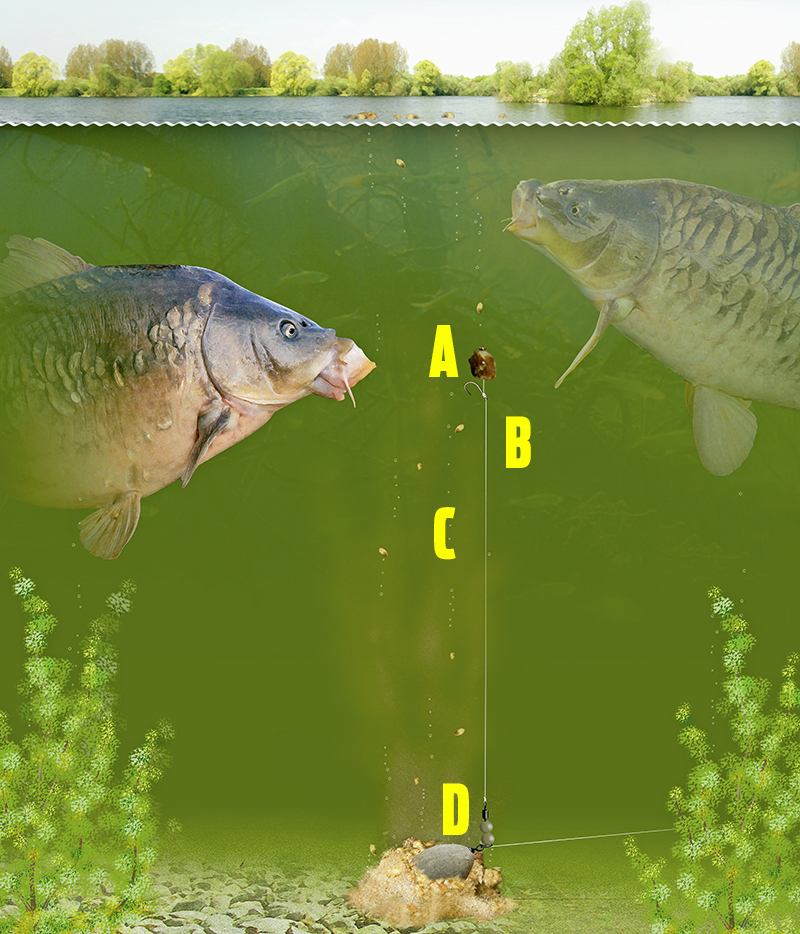
How to tie a PVA bag pop-up rig
PVA bag pop-up rig
With luck, carp are feeding off bottom at the moment, but not necessarily just under the surface, and a bait fished hard on the deck can fail to catch. What you need is something that can be placed at varying depths off bottom to pop a bait right in front of carp swimming around. A pop-up boilie is king in this instance.
But what do you feed? Sometimes, nothing is needed, relying on just the power of the pop-up to get a take, but when some bait is called for it should be kept tight and to a minimal amount. That’s where the PVA bag comes into play.
Tightly packing a PVA mesh bag with both sinking and floating pellets and making it the size of a £1 coin, the bag can be either nicked on the hook or wrapped around the lead with PVA tape and cast as far as you need it to go. When the rig settles, the bait will pop up and the bag will dissolve, releasing those goodies. By using a four seasons-style PVA, the bag will dissolve even in cold water.
A) Pop-up choices
For the hook, bright is best and lurid-coloured pop-ups are favoured. Fluoro pink, yellow or white are all good choices, using a 12mm or 14mm bait on a hair rig, although large pellets can also score, especially when used in conjunction with pellets in the bag.
B) How far off bottom?
This is open to choice and can change throughout the day, but a starting length of 2ft is advised, altering this if no indications are forthcoming. Sometimes, a change in depth by as little as 6ins can trigger a change to a bite every cast. This alteration is normally made by lengthening the trace to pop the bait up even more.
C) Hooklength materials
Fluorocarbons are popular among carp anglers for this purpose as they’re hard for fish to see underwater.Korda’s IQ2 remains a big seller. In terms of strength and breaking strains, 10lb to 12lb will work on most ‘runs’ waters, upping that to 14lb or heavier if the swim is snaggy or the fish very big.
D) Running rig
For simplicity and ease of use, fish a running rig with the lead stopped by a rubber bead before the swivel. This will produce a more positive bite on the rod-tip or bite alarm, and it also keeps within the rules of many fisheries.
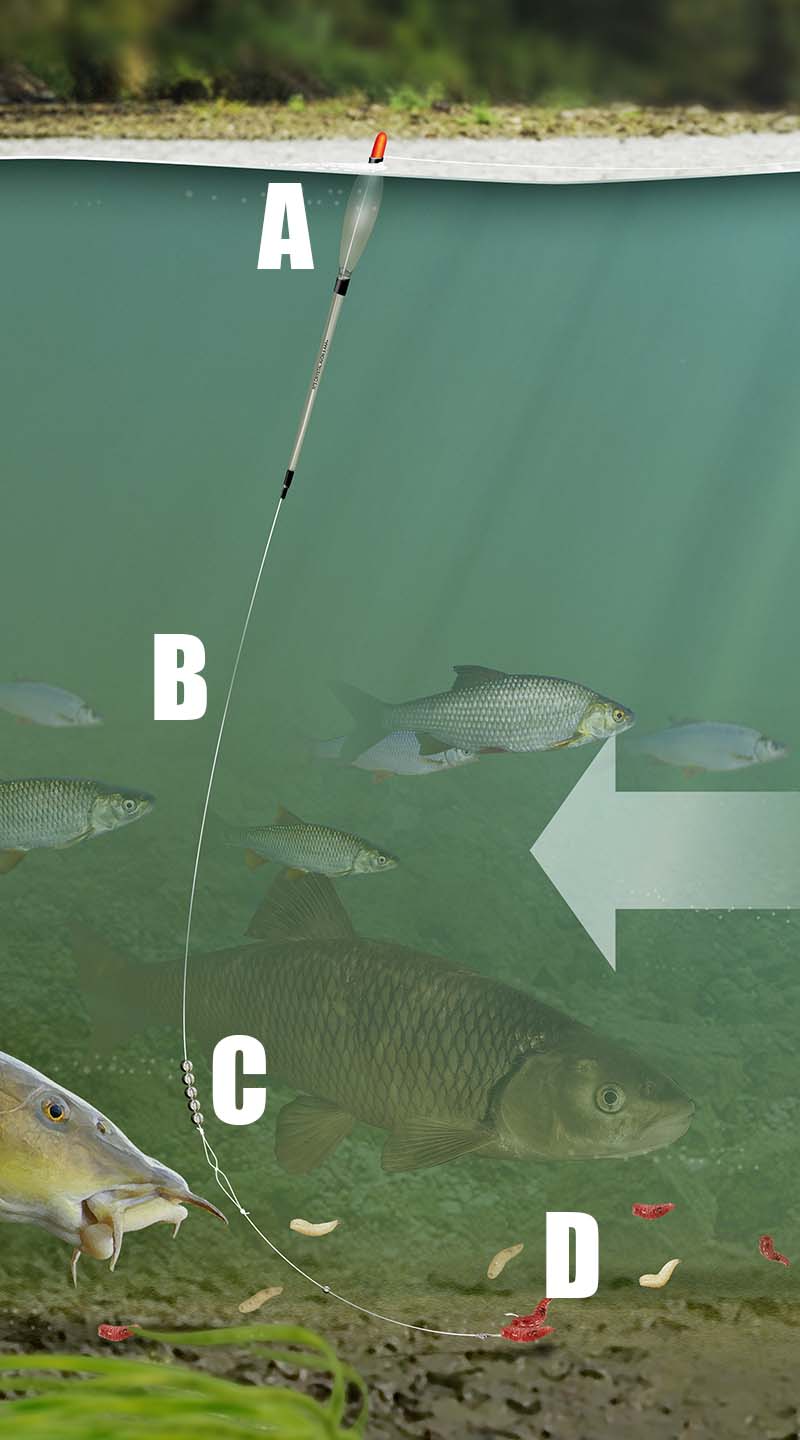
How to tie | The stealth pellet waggler rig

Setting up this pellet waggler rig couldn’t be easier if you think about how to get the best results from the rig that you are using follow our simple and easy steps to helping you tie one of these great pellet waggler rigs
1) Foam wagglers are relatively light so I fish them on 5lb Guru Pulse mainline to get maximum distance on the cast.
2) Purpose-built weighted adaptors for all three sizes of foam waggler mean you don’t have to put shot on light mainline, which could potentially damage it. These adaptors take the float down to the perfect level, and help it sit immediately.
3) A Guru pellet waggler snap link swivel allows me to change the size of waggler quickly and without fuss when the need arises.
4) To keep the waggler in place I use three small line stops. That way I can chop and change the depth without fear of damaging the line.
5) Below this I tie on a size 14 Cralusso Quick Snap Swivel which allows me to quickly change my hooklength while keeping everything neat and free from tangles.
6) For this type of fishing I tie my hooklengths 12ins long and for carp in the 4lb-10lb bracket I will use 0.17mm N-Gauge.
7) The hook will be either a size 16 or 18 super MWG pattern, depending on the size of pellet on the bait band. I’ll start with the rig set around 18ins deep with a view to coming higher in the water as the day progresses. I always prefer to start deeper, because that way I can get a better impression of what’s going on below the surface
How to tie | The rocket feeder carp rig
There are many different ways of catching carp up in the water, but one of the most effective is the Rocket Feeder.
As the name suggests, this is a floating feeder that is open at one end, enabling it to be filled with lightly dampened pellets or groundbait, which should be mixed so that it quickly exits the feeder once cast out.
Unlike other tactics, the Rocket Feeder is ideal for use with larger pellets, such as 8mm baits, enabling the angler to introduce sizable food items – ideal for larger carp. The feeder can also be cast long distances, thanks to its aerodynamic shape, so it’s useful when carp are beyond pellet waggler range.
The shape of the feeder means that it acts as a very effective bolt-rig when a carp takes the bait. In fact, it is essential to use strong line with this tactic to avoid being broken on the take. A minimum of 6lb is recommended.
Set the Rocket Feeder about 4ft above the hook then, as the carp become more accustomed to the stream of bait, move the float stops down so that the hookbait is just 2ft deep.
On heavily stocked carp fisheries the Rocket Feeder is an absolute winner at this time of the year. Get on it now!

Slide a float stop on to the mainline, followed by the Rocket Feeder, and then fix two further float stops to lock it in place

Adjust the float stops to lock the feeder in position. Having two stops below the feeder ensures that it will not move on the cast

The feeder should be locked about 3ft above the end of the mainline

Tie a figure-of-eight knot in the end of the mainline to form a small loop which you will attach the hooklength to

Use a four-turn grinner knot to attach the hook. Use a clear line a this is less visible when fishing up in the water

The hooklength should be 1ft long and attached to the mainline using a loop-to-loop knot. Attach the hookbait using a bait band

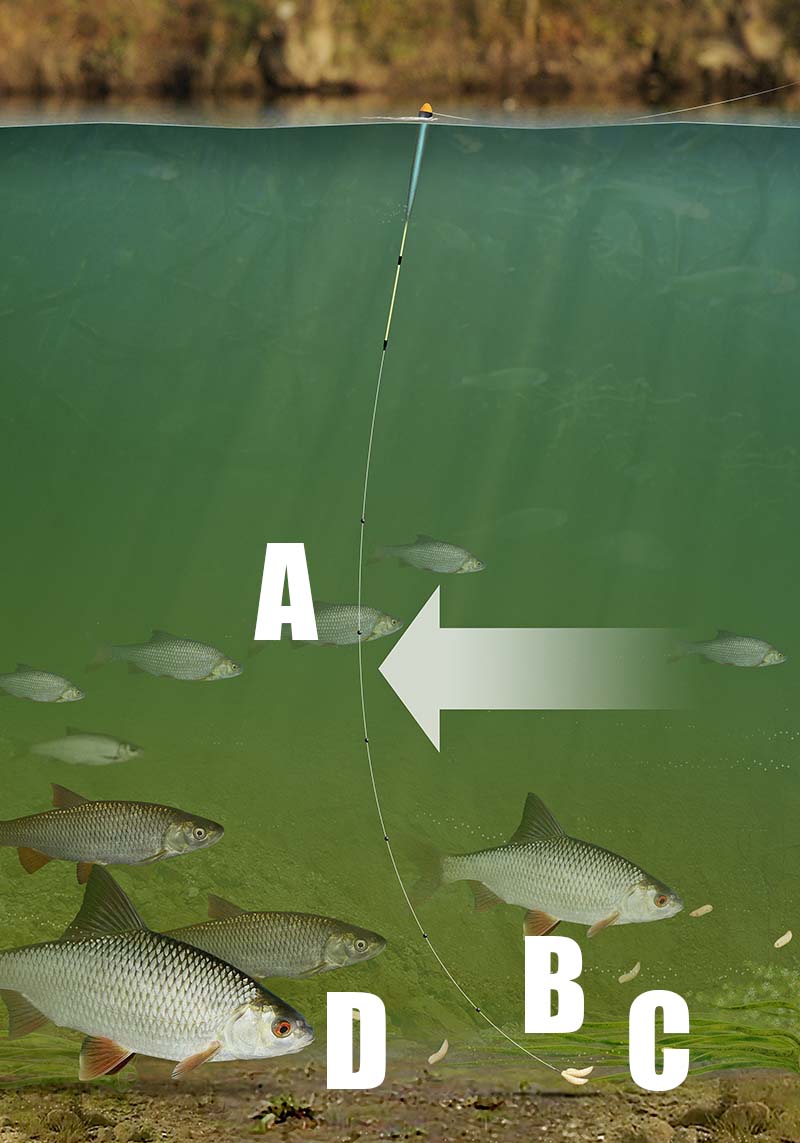


How to tie | Carp and tench float leger rig
An important rig for any budding carp, tench or bream angler is the float ledger rig as it helps target species which prefer an absolutely static bait. Use strong line and hooks with this rig, and big baits such as worms, bread, or mini boilies.
A large bodied waggler is required as the buoyant stem is less likely to be pulled under by the tow. Bites are normally indicated by the float shooting under.
A good tactic is to find the bottom of the marginal shelf – where the bottom levels out – and then set the float slightly overdepth. Now, when you tighten up the line, the float will slowly sink down to the correct position and the line will be tight from rod to the leger weight.
If you find yourself fishing a lake this year with the wind blowing straight towards you, or from side-to-side, and holding position is proving impossible, then try out this very effective, but surprisingly underused rig to give you the correct bait presentation to encourage bites. Check out our step by step guide below and tie it yourself.

Trap the float on the mainline with two float stops. The float should be a large bodied waggler as this is more stable in undertow

Use a swivel leger weight of between ¹/2 to 2/3 ounce. This should be free-running on the mainline for sensitive bite indication

Thread a mini buffer bead on to the mainline and then attach a mini swivel to the mainline using a four-turn grinner knot
Tie a size 12 hook to 10 inches of 5lb hooklength line. Use either a grinner or through-the-eye whipping knot

You need to keep the hooklength short – about 4in-6in will be perfect. Tie the end of this to the mini swivel
The lead weight will sit just above the buffer bead, creating a bolt-effect. Adjust the float so that just the tip is showing
How to tie the snowman rig
If you can’t decide whether to use a bottom bait or a pop-up rig, then why not try a snowman instead... it’s the best of both worlds!
In essence, it’s a standard boilie threaded on to a hair rig, with a smaller pop-up threaded on after it. Once on the bottom, the pop-up stands proud, acting like a beacon to any passing carp. Such a bait arrangement allows you to mix and match your baits. For example, you could use a dull, fishy-flavoured bottom boilie, with a bright, fruity pop-up.
Snowman rigs are highly versatile and can be used with any lead set-up, and with just about any length or type of hooklink.
How to tie

Strip back about 6ins of the outer layer from the coated braid. Form a small overhand loop in the end.

Secure a small metal rig ring loosely in place with an overhand knot, just below the hair loop.

Set the rig ring about 1.5ins from end of the loop, then secure firmly with a second granny knot.
Position the rig ring opposite the hook’s barb, then attach the hook using a knotless knot.
At this point you can add a hook aligner over the eye of the hook. This will help with hook-ups.

Finally, add a few small ‘mouse droppings’ of tungsten putty to the hooklink to nail it to the deck.
The adjustable zig rig
As the temperatures begin to rise this clever set-up will enable you to change the depth of your hookbait and search the water column for carp
Carp can spend much of their time up in the water column, especially in spring when the surface layers are warmed by the strengthening sun.
You could fish the margins or on top of gravel bars to present a bottom bait at the same depth as the carp, but in deeper venues a zig rig that presents a buoyant bait in mid-water can be much better. While this tactic is most often used on prolific venues, it has also accounted for some very large carp in recent years.
The adjustable zig not only works in any depth of water, but enables the height of the bait to be instantly adjusted, simply by retrieving or releasing line to reset the float height. The float also creates a bolt-effect, making bites easier to hit with fewer opportunities missed. You can also use the float to quickly gauge the depth of the swim. Try starting with the zig bait at half depth. If this produces no bites, then let the bait rise closer to the surface until you find the carp.
How to tie

Tie a size 10 Nash Fang Gaper hook to a one-metre length of 10lb Zig Line using a simple ten-turn knotless knot

Thread a Zig Aligner on to the hook so that the banded section sits opposite the point of the hook like this

Stretch the band on the Zig Aligner and insert zig foam. Place the black foam on the bottom so it’s easier for carp to see it from below

Tie a Ring Swivel to the other end of the hooklength using a twice-through-the-eye, four-turn grinner knot

Thread the metal ring and Zig Float on to the mainline. The metal ring ensures that the float will rise even when fished in weed

Tie the Ring Swivel to the end of the mainline using a four-turn grinner knot and pull into the hole on the top of the Zig Float
The safe bolt rig
Semi-fixed bolt rigs have become common in modern angling techniques, not just for those targeting carp, but for anglers chasing many other species too.
When a fish moves off with the hookbait, with the lead semi-fixed in place, it soon comes up against the full resistance of the weight and either hooks itself or bolts away giving unmissable bites.
Although originally developed for carp fishing, the rig is just as useful for tench and bream in stillwaters, and barbel and chub in rivers. Various baits can be used, from boilies and pellets to worms and maggots. The key, though, is to ensure that the hookpoint is exposed so that there is the greatest chance of it pricking the fish.
In the event of a line breakage, it is essential that the lead should be able to slide free from the rest of the rig to avoid tethering a fish that has been hooked. To do this, a lead safety clip should be used with the tail rubber lightly pushed on to the clip so that the lead can come free with the minimum of effort. Follow these simple steps below and you will create the perfect safe bolt rig set-up.

Thread a tail rubber and safety lead clip on to your mainline. Ensure it will slide off easily

Tie a rig swivel to the end of the mainline using a four-turn grinner knot or palomar knot

Pull the lead clip over the swivel and use the supplied pin to hold the clip on to the swivel

Attach the lead to the clip and lightly push on the tail rubber. Test that the lead ejects easily

Attach your hook using a knotless knot. The hooklink should be weaker than the mainline

Tie the end of the hooklength to the rig swivel using a four-turn grinner knot
The solid PVA bag rig
As presentations go, solid PVA bags offer a number of advantages that few other set-ups can rival.
Firstly, because the rig is safely packed inside the bag, they can be fished over pretty much any lakebed type and you can be confident your hookbait will be presented effectively. There’s no need to worry about the hook becoming masked by any weed or detritus as it falls through the water. This makes it perfect for casting towards showing fish when you’re unsure of what the lakebed is like.
A short hooklink in conjunction with an inline lead offers unrivalled hooking potential as fish come into contact with the weight of the lead much quicker. Cast out on it’s own, this set-up could easily bury into silt but, as it’s placed inside the bag, this isn’t a problem.
Tying up a few bags prior to your session means you can have all three rods fishing in no time at all and, once the bag melts, you’re left with an irresistible mouthful of bait around your hookbait.
How to make a solid PVA bag
Step 1)

Start by placing a small quantity of your mix in the bag followed by your hookbait. Then add more bait, followed by the lead and then top up with yet more bait mix.
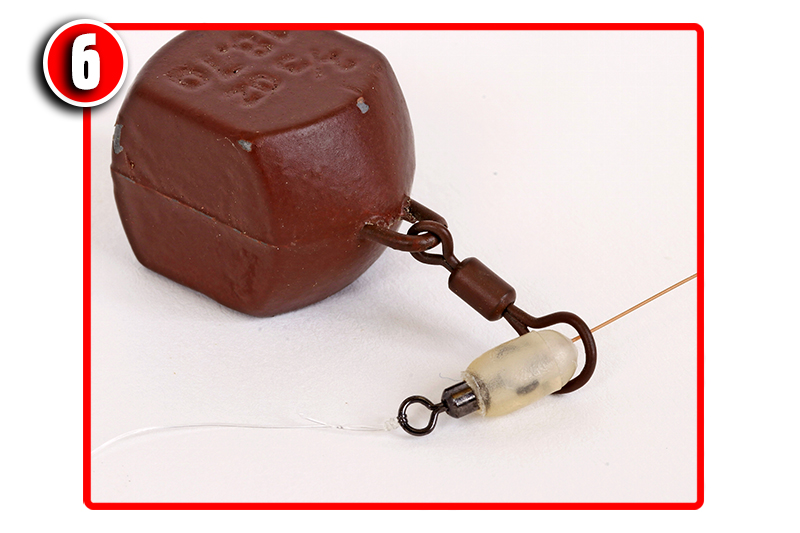
Step 2)

Ensure contents are tightly packed and twist the open end around the lead’s tail rubber
Step 3)

You can carefully lick the twisted section or use PVA tape to keep it all sealed in place
Step 4)

Once the top is sealed, push in the corners at the base of the bag
Step 5)

Moisten the folds and then press them down to create a neat aerodynamic bag for casting.
How to tie: A supple braid hookline for solid PVA bags
Step 1)

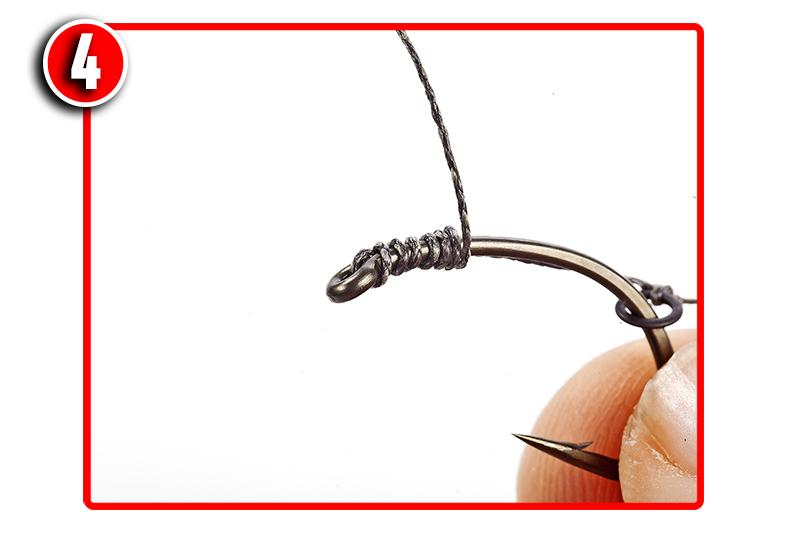
Take a short length of supple braid and attach to a curved shank hook using a knotless knot
Step 2)

Trim the tag end of the knotless knot and then slide a small rig swivel on to the hook
Step 3)

This needs to be followed by a small rubber hook bead to trap the swivel in place
Step 4)

Cut a 1cm length of shrink tubing and push it down over the eye of the hook, and steam.
Step 5)

Attach the hookbait by threading it on to a doubled length of fluorocarbon, then blobbing
Step 6)

This is what the finished rig should look like. Its hooking potential in unrivalled.
How to tie the ronnie rig!
Gardner tackle's Lewis Rhead walks us through the rig of the moment and how to tie it...
There are rigs and then there is the "Ronnie rig". Some rigs stand the test of time and work year after year. Others are more transient in nature, their tangible benefits are the figment of a twisted mind, and they don’t offer any real advantage in terms of catching carp or being easy to tie!
This one, however, is very special. It’s a rig that’s been used successfully on the quiet for a few years now, being deployed as a tool pivotal in catching some phenomenal big carp from a number of waters. But now the word is out and everyone want's to know how to tie this amazing rig

The Ronnie rig is easy to tie and offers the benefits of a super-consistent low pop-up presentation, fished the height of a hook and a swivel of off the lakebed, but without the issues of a naked hook eye that has the potential to snag in landing-net meshes (one of the main problems associated with the original 360-style rigs).
It offers all the advantages and awesome rig mechanics of the hinged stiff rig, but without the need to trying to fish it low to the lakebed, which isn’t the optimum arrangement. When it’s tied right, those of us that have used it extensively have pure unadulterated confidence in it because hook-pulls are almost non-existent. I can’t remember pulling out of a single fish with the Ronnie rig.
Luckily, it’s amazingly simple to construct thanks to the use of a size 12 Covert Kwik-Lok Flexi Ring Swivel mounted on the eye of the hook. That, combined with a Gardner Mugga hook, offers a highly aggressive, fast-reacting presentation that is ruthless in the extreme!
It’s also extremely versatile. I always have a number of pre-prepared hook sections ready to go, and I tailor the hooklink material to suit the lakebed or the lead arrangement.
That could mean a lead clip with a long, supple, skinned hooklink such as Ultra Skin in silt, or a helicopter-style arrangement and a Subterfuge fluorocarbon boom on clean sand and gravel.
Personally, I think balancing it like a hinged stiff rig works best – so the hookbait is slow to sink. Why? If you overbalance the hook by moulding putty around the shrink tube, the hook has a tendency to lie over further and this inhibits it from twisting and turning as quickly as it could (the same drawback you get with a hinged stiff rig).
Realistically, mounting the swivel through the eye means you need to use a ‘nice’ sized hook, and the size 4 Mugga or Continental Mugga are both perfect. You know, some rigs work with some hooks better than others, and this is the one. The Mugga’s curved swept shank and 20-degree inturned eye complement and enhance the mechanics, lining up the shrink tube naturally in a way that gives maximum ‘twistiness’.
Variants of some rigs come and go, but the Ronnie rig is one that I know will stand the test of time. Like all presentations, it isn’t the panacea of all things riggy, but what it is is the best low pop-up rig that I have used.
Now it's time to show you how to tie this amazing rig so you can go out and use it for yourself!
How to tie
Step 1)

Start by cutting a 1cm length of large Covert shrink tubing.
Step 2)
You then position the shrink tubing on the hook shank.
Step 3)

Attach the hook to a size 12 Kwik Lok Flexi Ring swivel.
Step 4)

The crook will distort slightly as it is opened up.
Step 5)

So once the hook eye is in place squeeze the crook closed with pliers.
Step 6)

Now bring the shrink tubing back down the hook to this position.
Step 7)

Carefully shrink the tubing down using the steam from a kettle.
Step 8)

Now you can slide a size 20 Target Swivel on to the hook.
Step 9)

Follow this with a hook stop to keep the swivel in place
Step 10)

Position the hook stop opposite the barb as shown here.
Step 11)

Attach your pop-up hookbait with some bait floss.
Step 12)

Mould some tungsten putty around the shrink tube to balance the bait.
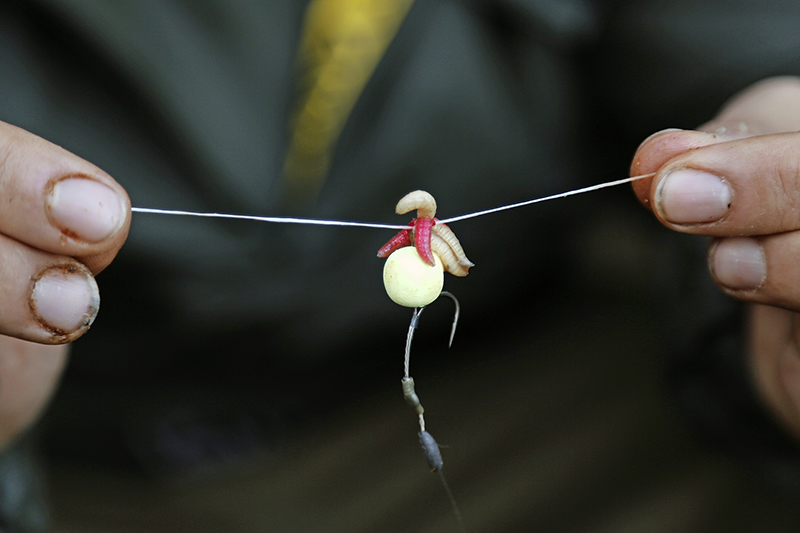
How to tie the pop-up boilie maggot rig!
Maggots are a superb bait in early spring and are my ‘go to’ tactic when times get hard. The key in is to use a maximum amount of attraction and minimal food. I see a lot of anglers using bucketfuls of maggots, but I really don’t think you need that many.
At this time of year, if you can find the fish you only need a small amount of bait to tempt a bite. Multiple catches can be made using small PVA bags of maggots.
I like to customise my maggots a little, in order to maximise their pulling power. Normally I apply a splash of liquid additive to them the night before, my favourite being L-Zero 30-T, which is naturally very salty and fishy. The maggots take on the flavour of the liquid and by the morning will be oozing with extra attraction.

When I’m buying maggots in the tackle shop, I always ask for them to be sieved. With no maize meal or sawdust, they will sweat up quickly, and so to prevent this I add some Krill Active Mix or powder. Krill works brilliantly with maggots and they will again take on the flavour of the powdered additive.
I use the ‘boosted’ maggots in a PVA bag and add some crumbed Krill boilies too. I hook the bag on to my rig to add all that taste, smell and the small amount of food around the hookbait.
On the rig, I like to use a 12mm Signature pop-up fished just off the bottom. Then, I tie five maggots to the hair loop of the hooklink using a length of bait floss (see sequence, below). I find that five is enough to catch the carp’s eye, but not too many to affect the buoyancy of the pop-up, which would change the way the rig is sitting.
This is fished with a simple combi-rig, with the supple section coming near the hook. This allows the pop-up to sit just off the lakebed, anchored down by a blob of putty. Adopting these tactics has helped me catch some special fish over the last few years. Last autumn, I had a number of carp to over 41lb using this approach - at a time when the lake hadn’t been fishing well and the carp had been hard to catch!
How to tie
Step 1.

Start off by pouring a generous helping of Sticky Baits’ L-Zero 30-T over the maggots
Step 2.

Next, add a small amount of Krill Active Mix to prevent the maggots from sweating too much
Step 3.

The maggots should now look like this. They will be packed full of fishy attraction
Step 4.

Choose a 12mm pop-up boilie in whichever colour you fancy. Yellow and white work well
Step 5.

Use a baiting needle to thread the pop-up on to the hair loop of your hooklink, as normal
Step 6.

Next, using a pair of sharp braid scissors, cut off a 30cm length of bait floss
Step 7

Take a sewing needle and thread on five maggots, nicking them only very lightly
Step 8.

Thread one end of the bait floss through the eye of the sewing needle
Step 9.

Carefully push the maggots on to the bait floss, making sure you don’t burst any of them
Step 10.
Pass the floss through the hair’s loop and secure with a couple of overhand knots
Tommy Pickering | How to make my simple groundbait feeder rig!
This is my favourite set-up for all my open end feeder fishing. It’s a very simple rig for wire cage and plastic frames, and the stiff boom which is tied in the end of the mainline means tangles are kept to a minimum.
As it’s free running it’s completely safe, too. Use it for bream, tench, roach, perch and even carp. All you need is your reel line, your feeder with a swivel eye or snap link attached, a packet of No8 Preston Stotz weights and your chosen hooklength.

Try this simple and tangle-free feeder set up.
Step 1.

Take the mainline or shockleader between thumb and first finger of both hands and twist in opposite directions to twizzle it together.
Step 2.

Ensure that the length of the twizzled line is longer than that of the feeder and link, to stop the two tangling when you cast the finished rig.
Step 3.

Bring the twisted line back over itself to form an overhand loop knot. Pass the end through itself twice and pull to tighten the knot properly.
Step 4.

You’re now left with a twisted section of line of around 6ins long, called a boom. Trim the tag end to reduce line spin when reeling in.
Step 5.

Now slide the swivel eye of the snap link attached to your feeder on to the twisted line and over the knot of the stiff boom.
Step 6.
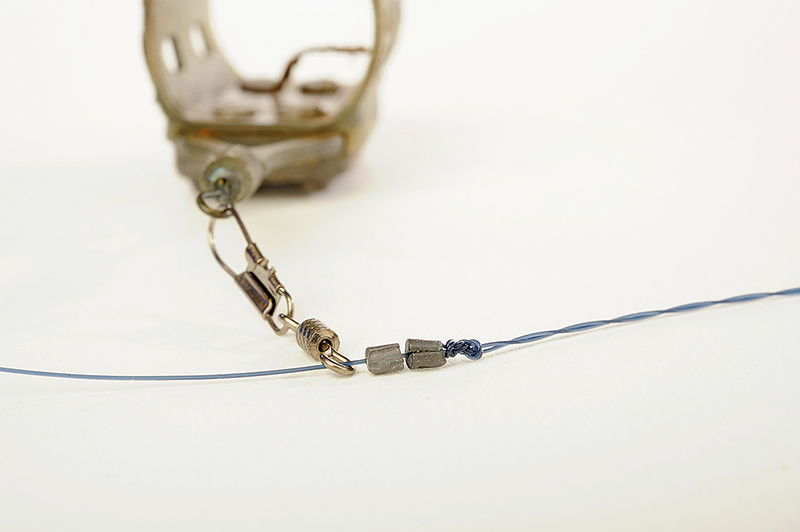
Attach two No8 Stotz to the mainline just above the twisted section, with the feeder above. These butt against the knot and stop the feeder too.
Step 7.

Time to add your hooklength, which you will probably have already tied. Push the hooklength loop over the end of the twisted boom.
Step 8.

Put the hook itself through the end loop in the twisted boom. Then pull the whole hooklength through with it as it goes through.
Step 9.

The loop-to-loop forms like this - you may need to flick the hooklength over its own loop knot to achieve this perfect connection. Pull tight.
How to tie a flatliner surface controller rig
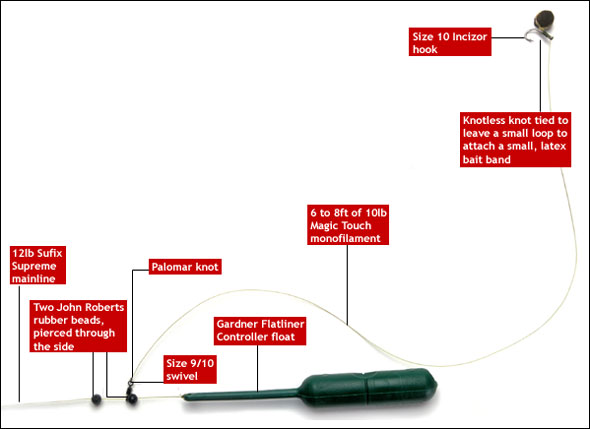
When it comes to surface fishing, the best way to do it is to keep everything simple. Always feed the swim first, get the carp taking your baits confidently and only then introduce your hook bait. Surface feeding carp are cautious at the best of times; feed them in to a frenzy and you can almost cast right on top of them!
Always cast your rig past the feeding fish, then slowly draw the hook bait back in to the feeding zone. Carp are not the best at taking baits from the surface so you need to keep a keen eye on the line and not always the hook bait. It’s best to keep the line fairly tight to the controller, not allowing for any bow in the line, therefore you’ll be able to hit takes a lot easier. It also pays to use either a floating mainline or grease your line to ensure that the mainline floats; this will also help you to hit takes swiftly.
Another tip is to use a slightly different hook bait than your loosefeed. A little edge is to use a floating pellet when feeding Chum Mixers, attached to the back of the hook using a bait band.
The rig I use is semifixed. The two John Roberts’ rubber beads used to fix the hooklength are pierced through the side using a baiting needle. The mainline is then looped over the needle and pulled through the bead. This locks the swivel in place, but if a breakage occurs the carp will easily be able to pull the hooklength from the mainline.
Give surface fishing a go as it’s the most exhilarating way of carp fishing - the anticipation is intense!
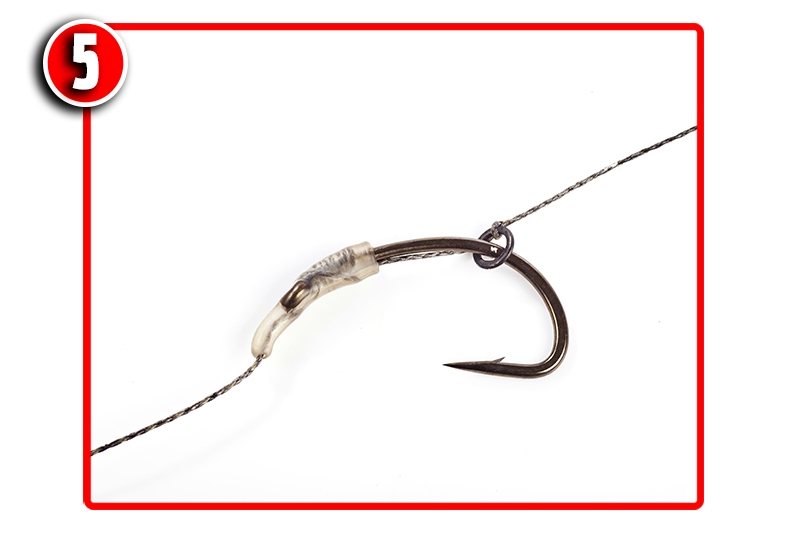
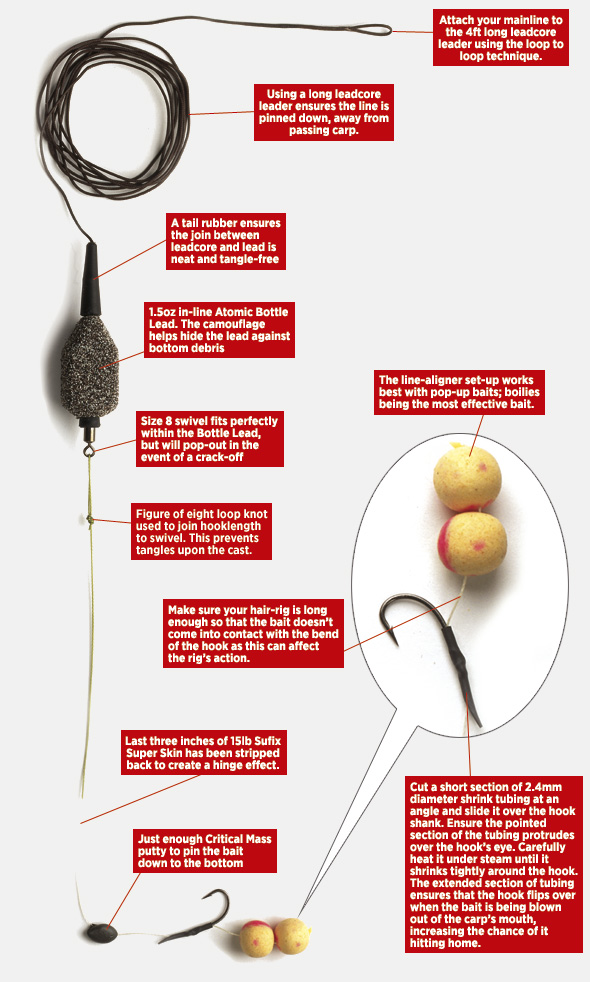
How to tie the perfect in-line big carp fishing rig
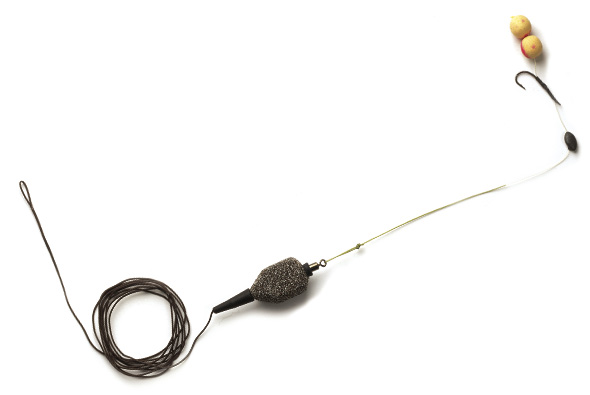
A simple tubular extension on a strong carp hook can make all the difference between a lost and landed fish. Richard Farnan explains how...
The line aligner was first published by Jim Gibbinson many years ago. The principle behind the set-up is to create an angle that in itself creates a very effective anti-eject rig.
By using a length of shrink tubing cut at an angle, you elongate the overall length of the hook’s shank. Leaving the ‘tail’ of the tubing makes the hook go into the carp’s mouth in a straight line as the fish sucks up the bait. Upon ejection the hook flexes and spins giving it more opportunities to take a hold.
This set-up is best used with popup boilies presented approximately two inches off the bottom, held in place with a small blob of putty upon the hooklength.
The loop knot at the swivel end ensures no tangling upon the cast. Personally I prefer to use an in-line lead with this set-up and by using a leadcore leader everything is pinned to the lake bed, thus not alerting the carp to any danger. This combination is very effective indeed!
How to tie a Chod rig for fishing silty venues
When fishing for carp over very silty lakes, it is essential to choose a set-up that ensures your rig will not get buried in the soft silt and ruin an otherwise good presentation. And the best rig for this is the Chod rig.
It was specifically designed for just this sort of fishing. The chod has proved to be very successful and has accounted for a lot of big fish recently. It should be used with very buoyant baits and will work superbly in silty areas.
It works upon the principle that the rig can be adjusted to position the bait anywhere along the leadcore leader, so no matter how far the lead sinks into the silt, the bait will be in a prime position to sit above the bottom debris.
This rig incorporates a spliced leadcore leader and fairly tight-fitting beads that allow the hooklink to be semi-fixed anywhere along the length of the leader. Shop-bought Chod rigs are available, for those who don't want to tie their own.
The rig has safety in mind, and the soft beads will easily pass over the spliced joining loop, allowing the hooklink to pull free of the leadcore should a breakage occur.
Here's how to tie your own Chod rig...
A Use a lightweight swivel lead - 1oz is perfect. Keep the lead as light as possible because when you are playing a fish the hooklink will slide down to the lead, so the lighter the lead, the less chance of the fish being bumped off. A short strip of silicone tubing helps neaten the lead swivel.
B This is a leadcore leader. It offers enough weight to sink to the bottom. A 3-4ft length is about right.
C If you want to fix your Chod rig you can place a bead here, between the lead and the hooklink swivel. They need to be semi-fixed - a rubber bead sitting on a short piece of silicone is perfect. It is a personal preference whether you use a stop between your ring swivel and the lead.
D Flexi ring swivel of either a size 11 or 12. It should offer just enough weight to anchor the pop-up. This type of swivel provides a full 360 degree movement, so if a carp sucks at the bait from any angle, the swivel will ensure that the bait can easily move and be sucked up.
E The top stop bead. When fishing in deep silt or weed this bead should be at least 2ft up the leader, but for cleaner bottoms it can be much closer to the lead.
F 2-4ins of very stiff mono hooklink line. ESP and Fox produce some of the best stiff links for the job. 15-20lb breaking strain is about right.
G The hook must have an out-turned eye with a D-Rig knotless knot whipping on the shank. This rig works well with a big hook, even if you are using a 14 or 16mm pop-up boilie. And the perfect bait for a Chod rig is a 14-16mm pop-up boilie that will not sink, regardless of how long the rig is submerged.
How to make a reverse hair-rig for carp fishing

Rig presentation is everything to big-carp specialist Richard Farnham. He's always looking for a better way to present his bait, especially when tackling waters such as the renown Horton Church lake - where takes are very few and far between.
Many years ago, during a full season tackling the venue where blanks are common, he set to work creating a new rig that might well transform those tentative pick-ups that carp can give into full-blown runs.
The idea was to create a rig where the carp found it absolutely impossible to suck up the bait and eject it without the hook point connecting with the fish - and so his reversed hair-rig was formed.
This rig transformed a terrible season on the venue. After a little tinkering with the set-up, and adding tungsten putty to pin the braided hooklength down, and flying backleads to sink the mainline to the bottom, Richard began to get runs.
His newly developed reversed hair-rig produced a new personal best carp for Richard - Shoulders at 42lb 8oz. This proves without a shadow of a doubt that this rig can effectively be used to effectively fish for very shy and wily carp.

Cut off a length of braided line and tie a small overhand loop in the end. Thread the braid through the back of the hook’s eye

Fold the braided hooklength over like this. Remember to make the distance between the loop and the hook’s eye long enough to fit your bait.

Whip the tag end of braid around the folded-over braid and the hook shank enough times to cover the doubled-over braid

Make another whip upwards, over the other whippings and pass the tag end through the back of the eye once more. The knot is now complete.

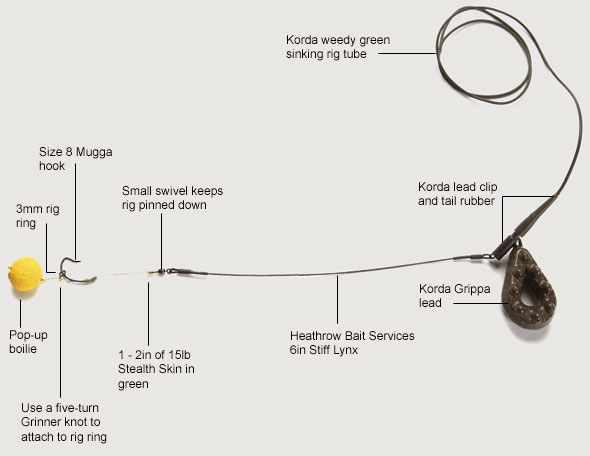
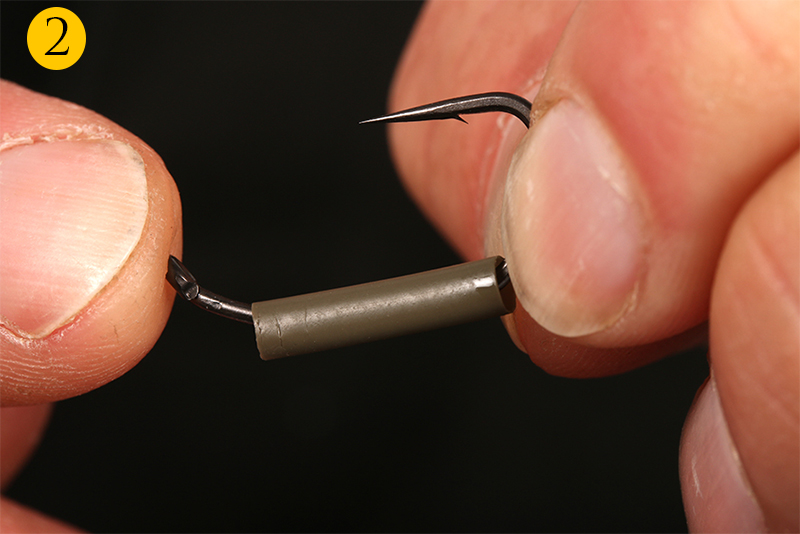
How to make an anti-eject rig for big carp

Knowing how to tie and create an anti-eject rig can and will put you streets ahead in terms of putting more carp on your unhooking mat simply because this type of rig is really difficult for the carp to blow out their mouths, therefore there's a mugh hgher chance of the hook point hitting home.
In general, stiffened lines are not usually used as a hooklength for bottom bait presentations, but by adding a short and supple braided section between the hook and stiff hooklength gives the rig remarkable anti-eject qualities.
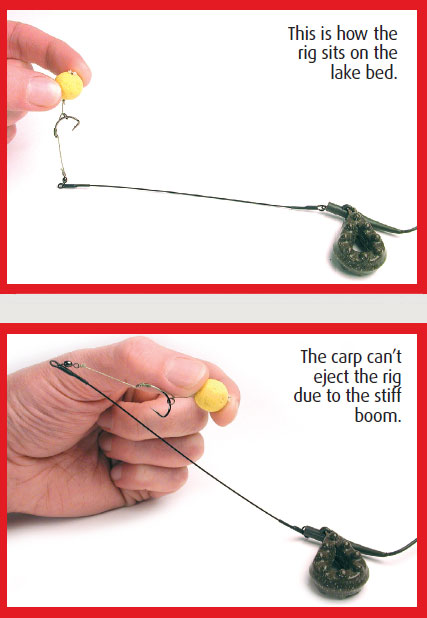
A great hook for this is a Mugga. This hook pattern has great turning properties in itself when a carp tries to blow the hook back out of its mouth, but add to this a sliding rig ring to create a ‘spit-back’ rig and the carp really do find this rig very difficult to eject. Another anti-eject aspect of this rig happens to be the ultra-stiff boom used to create most of the hooklength and the hinge created by the braid. The supple braid collapses in the carp’s mouth when the fish tries to eject the bait, the bait slides down the hook shank, the hook turns but the stiff boom prevents it coming all the way out. One nailed carp!
The stiff boom that is used is made and sold by Heathrow Bait Services. It’s 6 inches long and features swivels at either end. The business end - where the soft braided hinge is attached - features a very small swivel so as not to adversely affect the rig by weighting it down.
The lead is attached ‘on the side’ using a fi sh-safe Korda Lead Clip and Tail Rubber. If the lead were to become snagged the lead clip will come apart to release the lead and allow the angler to play the fish in safety.
This is a great rig to use in winter with small PVA bags of crushed boilies, and on the hair try using either two cut down (odd-shaped) boilies or a single bottom boilie. This is a cracking rig to try when bites are hard to come by.