
Top 10 Pole fishing tips
Here are 10 pole fishing tips to help you next time you are on the bank, to give you the best tips possible for pole fishing we have enlisted the help of top match angler Steve Ringer. These tips will cover everything you need to know when it comes to improving your pole fishing game.

1) plumb your peg!
It never ceases to amaze me how many anglers don’t plumb the entire peg. Instead they look at the swim from above, make a snap decision and miss out on any underwater features not visible from above!
Features such as hard patches, slightly deeper or shallower areas and the bottoms of slopes are natural holding spots, but by not plumbing your peg properly you are potentially missing out.
So don’t forget to plumb the whole of your swim properly – it might reveal a fish-holding spot you never knew existed.

2) use lighter rigs
I have long been maintained that light floats catch you more fish. In water 3ft-6ft deep I will think nothing of using a 4x10 float.
A light float gives a slower fall of the hookbait which I’m convinced leads to more bites. Carp spend a lot of their time off bottom but will follow a falling bait down before taking it.
A light float also allows the hookbait to behave in a natural manner, which helps to fool even the wariest of carp.

3) Adapt your shotting
There are loads of different shotting patterns for pole rigs but for the last 20 years I have pretty much stuck to one for commercial carp – a strung-out bulk.
What I like about this is its versatility. If I want a slow fall of the hookbait I simply fish a loosely strung bulk – in 5ft of water the bottom shot will be 6ins from the hook and the rest of the droppers spaced at 1.5 inch intervals above.
If I require a more positive shotting pattern I can tighten the shots up. In 5ft of water the bottom shot will still be 6ins from the hook but the rest of the droppers will be spaced at 0.5ins intervals instead.

4) tie short hooklengths
For pole fishing I use hooklengths of either 4ins or 6ins. The 4ins version is for shallow swims or fishing up in the water, the standard 6ins one for bottom work in water deeper than 3ft.
For shallow swims or fishing mid-depth a 6ins hooklength takes up too much of the rig itself and stops me putting shot close to the hook without putting it on the hooklength – something I’m reluctant to do.
Also, in deeper water a 6ins hooklength allows the hookbait a lot more movement, something which I always feel results in more bites.

5) Learn to use a puller kit
Over the last few years I have become a massive fan of puller kits.
These allow me to fish light elastics, which stop fish being bumped, while giving me the ability to land fish of all sizes.
If I’m fishing a venue where there are lots of decent skimmers and also carp from 7lb-10lb I can now fish a White Hydro set soft and land those big skimmers.
Should a carp come along, by using the puller I’ll have a great chance of landing it without having silly amounts of pole stuck up in the air, risking breakages.

6) work the aerators
Carp, F1s, and barbel all love to shoal up around features, so if you have any in your swim you need to make the most of them.
Perhaps the best right now are aerators. You’ll find that when they’re used regularly they will scour a deeper area in the bottom of the lake beneath them, and barbel in particular love to sit in these holes.
A little tip when targeting these features is always to start off fishing just off them as opposed to tight to them. This way you will get two bites at the cherry – you’ll catch a few fish straight away before it slows, then you can move closer to the aerator to catch a few more!

7) Create a cloud
When fishing in shallow water across to an island I’m a big believer in trying to put a cloud in the water. I’m convinced this will draw more fish into the swim and hold those that are already there.
There are lots of ways to make a cloud, but without doubt my favourite is to feed sloppy micros –in other words, over-wetted 2mm coarse pellets.
They’re easy to make. Just get some 2mm pellets and over-wet them until they turn into a slop. When fed, the slop creates a lovely fish-attracting cloud in the water. I then like to fish corn, meat or expanders on the hook.

8) Work your rig
To me there is nothing worse than just sitting there watching a motionless float and not doing anything about it.
I always like to believe there are fish present, and it’s my job to make sure they’ll have my bait.
One of the best ways of doing this is to lift and drop the float. This has the effect of causing the hookbait to rise and fall in the water, a movement that fish at times find irresistible.
When I say ‘lift and drop’ I don’t mean lifting the entire rig out and lowering it back in again.
Instead I lift the float between 4ins and 8ins, depending on the depth of water I’m fishing in, and then slowly lower it back in again. Bites tend to come as soon as the float settles.

9) Make something happen
Something I have always been a big believer in when pole fishing is trying to make it happen rather than just waiting for events to unfold.
So if I’m not getting any bites or indications, what I like to do is ping a few hard 4mm or 6mm pellets over the top of the float to try and pull a few fish into the swim.
I’m not talking loads of pellets here, just three or four at a time is enough.
Any fish in the area will then either hear the noise of the pellets hitting the water and home in on them or spot the pellets falling through the water column and follow them down.
The beauty of this approach is that I don’t have to feed a lot of bait, so if nothing happens or it doesn’t work I haven’t done any harm to the swim.

10) End on the keepnet line
Without doubt the most neglected line when fishing commercials is the ‘keepnet line’ – and fishing here is a deadly way to end your session.
This is an area of the swim I’ve mentioned in the past, yet I still rarely see anyone fishing it!
It’s somewhere that sees bait all the time, being constantly spilled as anglers either fill a pole pot or loosefeedby hand or catapult, and it’s a spot where fish have become accustomed to finding bait.
This isn’t a line I’d target from the start – it’s more like the margins, inasmuch as it’s a ‘last hour’ line.
The beauty of the keepnet line, though, is that you don’t have to prep it – you can just go on it and catch instantly.
I’ve had sessions where I’ve nearly doubled my weight in the last hour by fishing this spot – that’s how good it is!
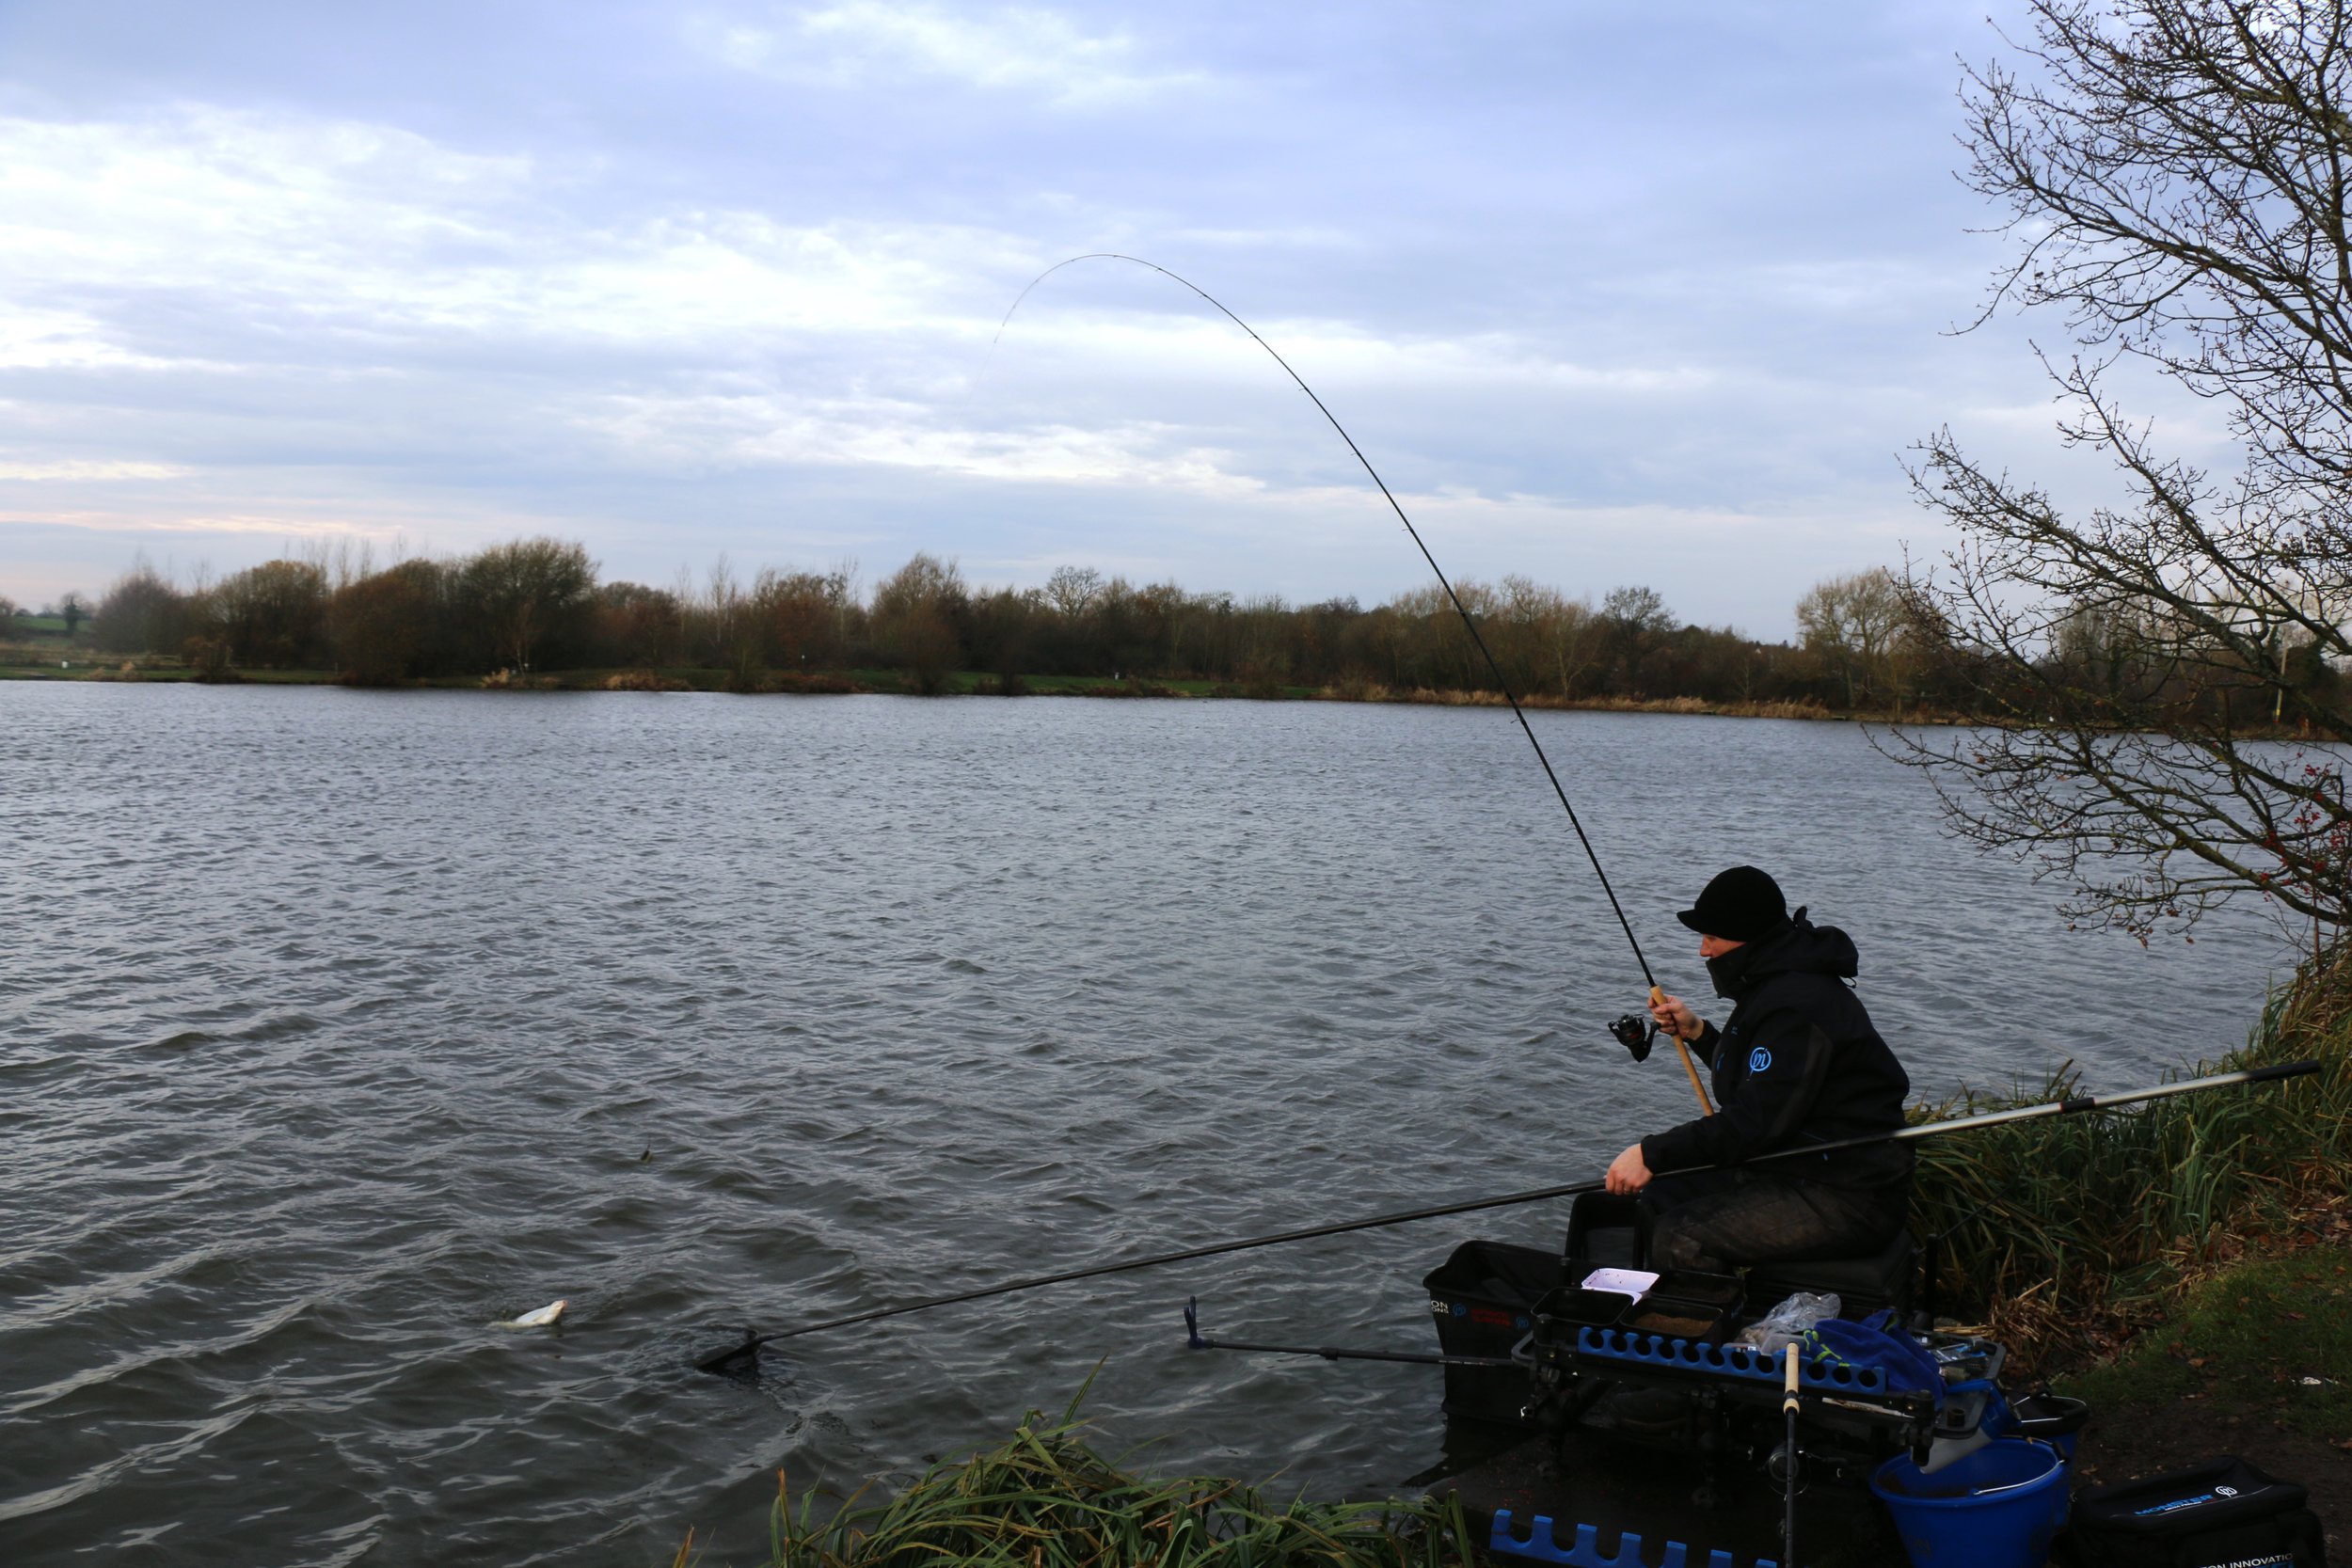
How to fish a margin line
Tommy Pickering talks you through how to fish a margin swim and why feeding two lines is essential when wanting to catch big carp from the margins.
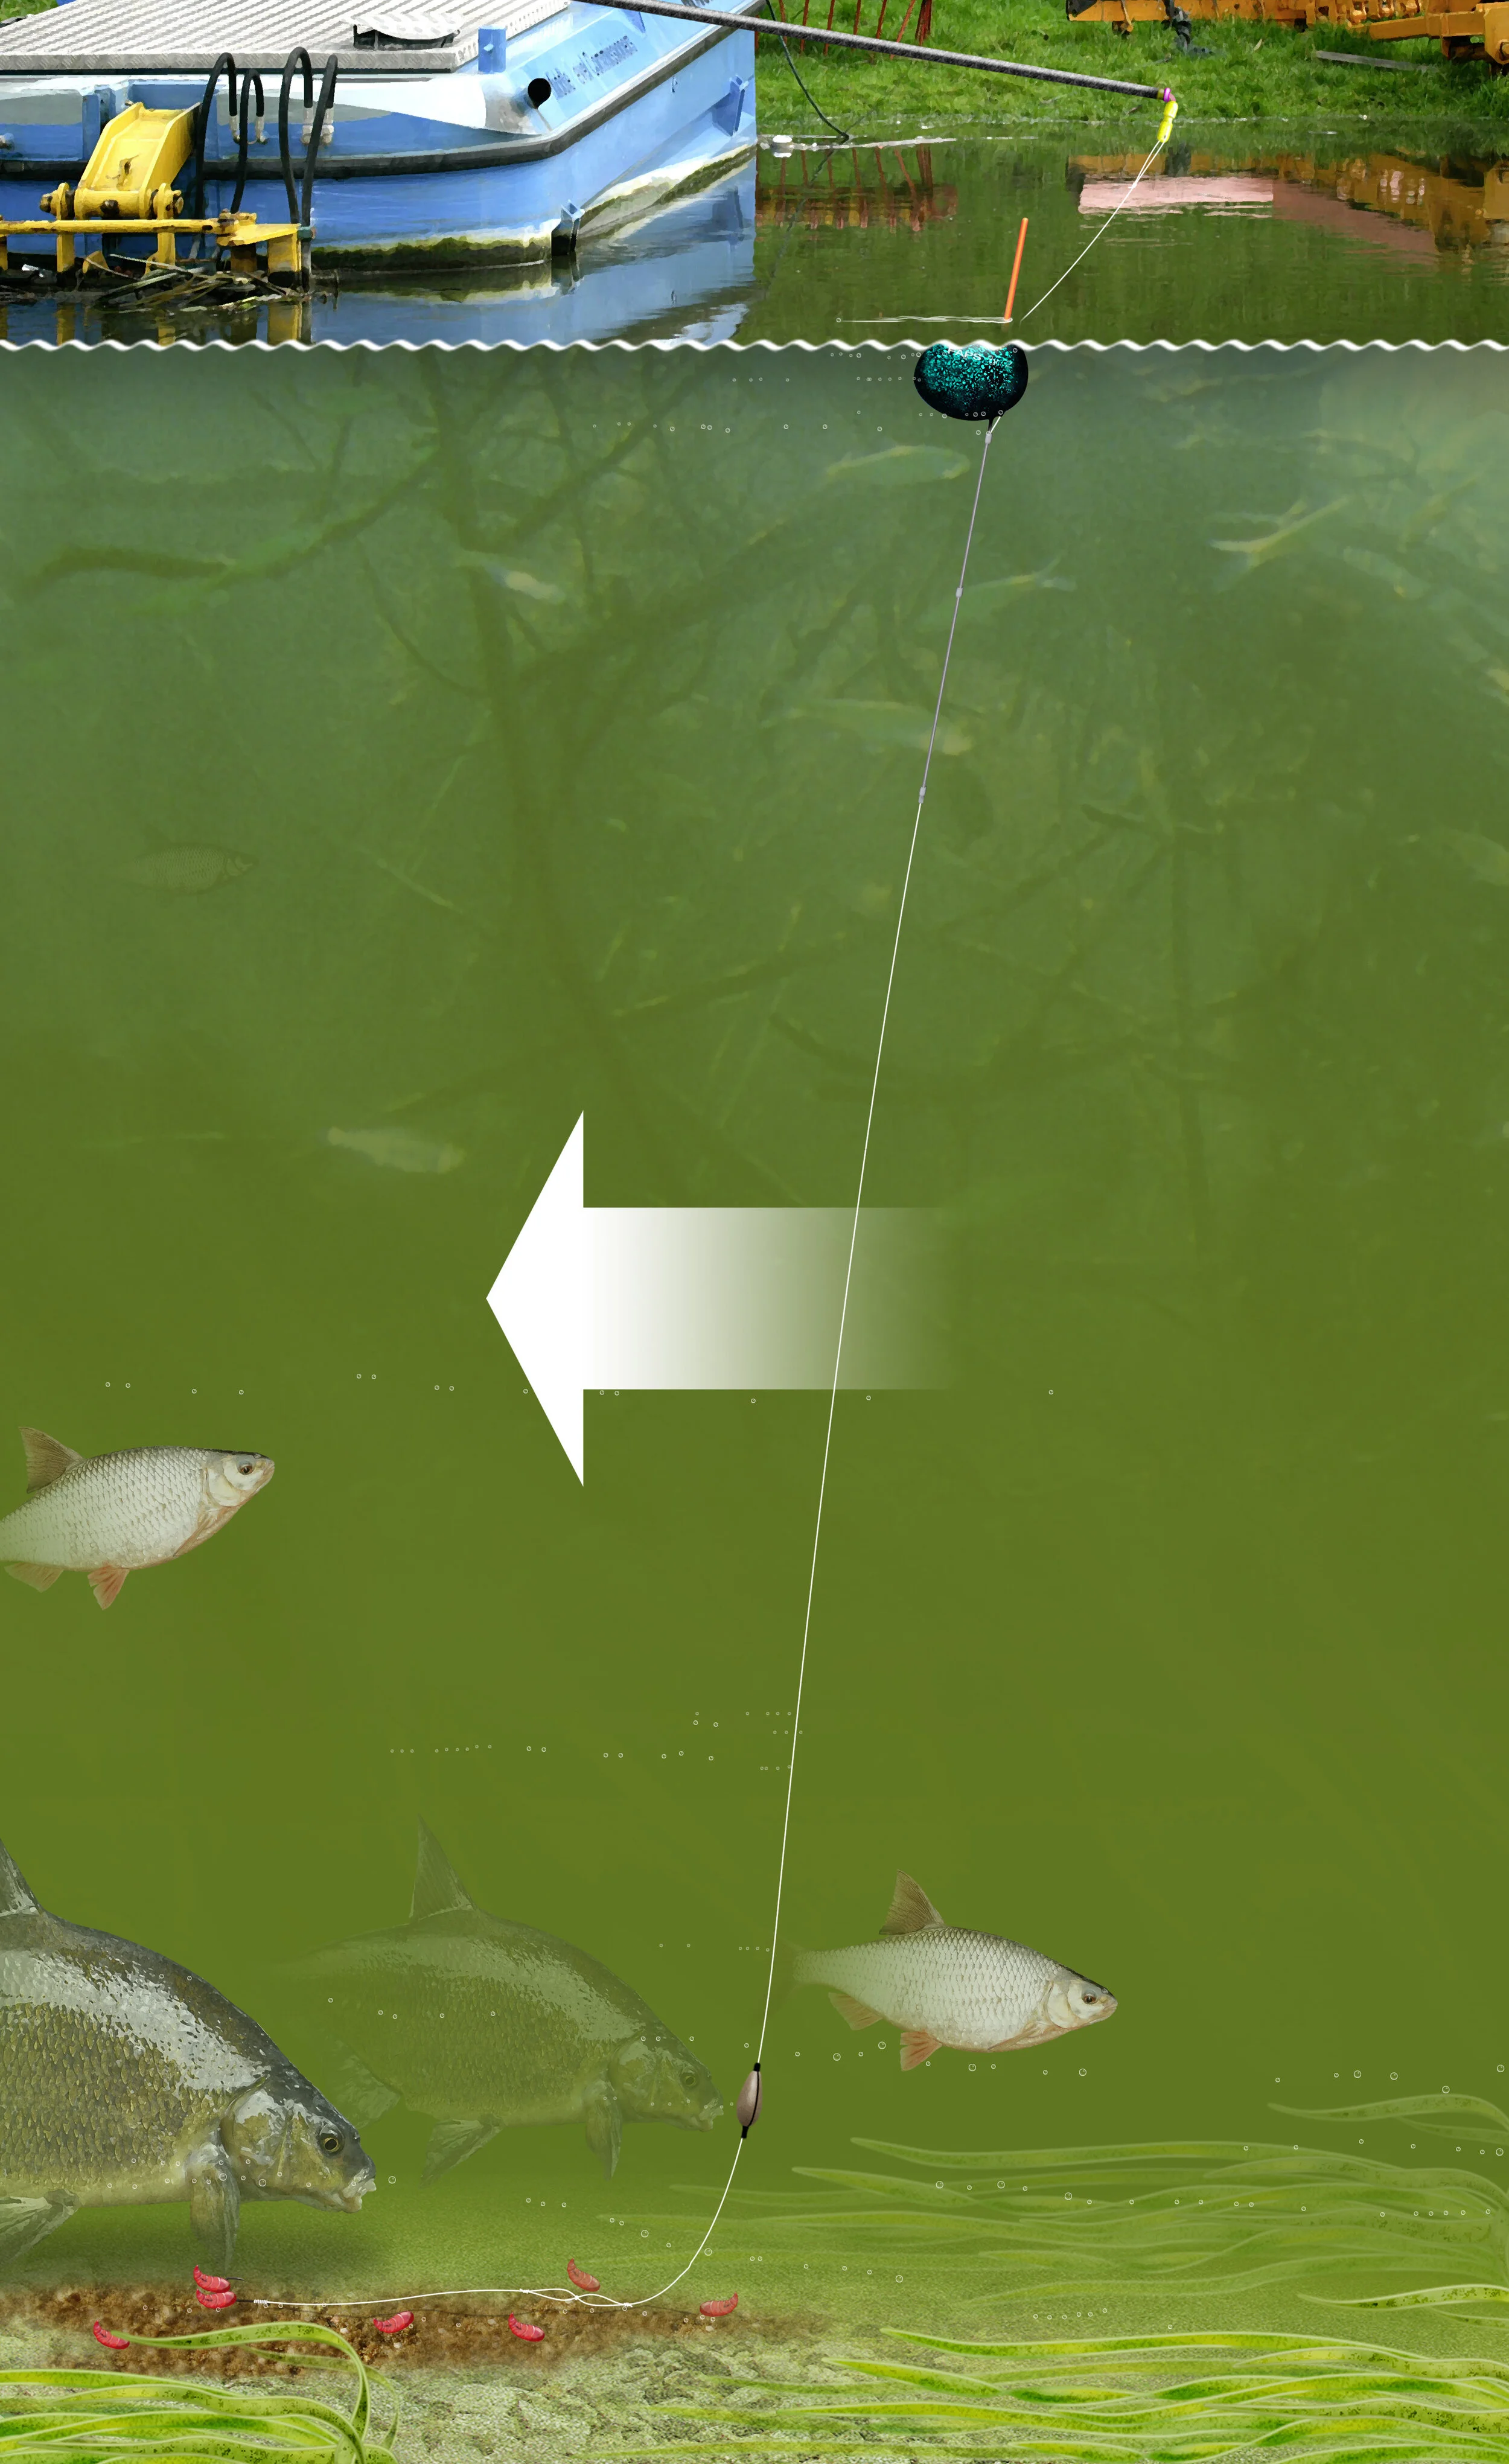
We all know that the margins are a fantastic place to catch big fish from at this time of year, but sometimes we don’t make the most of this part of our swim. More often than not we will fish just one area down the edge – but this can be a big mistake. when it is a better option to feed two different zones down the same margin to keep the bites coming.
Short line
This line is located around 5m away from my platform, and will be fed by hand. Fish in commercials respond to noise, which they associate with food. By regularly trickling bait in you will make plenty of commotion that won’t be ignored. Pellets, corn and meat all work well, thanks to the loud noise they make when they hit the surface.
Keep trickling bait in on a little-and-often basis when the rig is not in the water. Once you start fishing the zone, stop feeding like this as the noise often sends the fish into a bit of a frenzy and this can lead to line bites and foul-hooked fish.
Long line
Look further down the same margin and there is every chance there will be a vacant platform. If this is less than 14.5m away it is well worth feeding close to it.
I always feed this line directly in front of the platform as this is where keepnets are positioned. This means that the area is highly likely to be free of snags.
Feed pots of groundbait laced with free offerings, introducing it loose in less than 2ft of water and in balls when it is deeper. This area is a great place to try when bites stop on the short line. The fish won’t disappear – they’ll simply push further down the margin.
Waiting game
You might be tempted to fish the margins from the very first minute, but this is a big error. The margins get stronger as they day goes on, so it is much better to target other areas of your peg during the early and middle parts of the session.
The time to switch your attentions to the edge will be with just one or two hours remaining.
Related Items


How to elasticate a pole top kit
Elasticating your pole top kit can be quite a daunting task especially if it is the first time of doing it. Well you need not to worry any longer as we have a very simple step-by-step guide for you to follow that will allow you to elasticate your top kit in no time.

First, cut back the tip section of the pole a few inches at a time with a hacksaw until the PTFE bush fits snugly. Smooth the cut edge with sandpaper.

Now fit the PTFE bush. Some people like to use glue to achieve a permanent bond.

Slot the pole bung into the top kit and cut back the excess bung sticking out of the section, leaving enough space for the next section to fit.

Thread elastic through the top kit and tie off the bung end with figure-of-eight knot. Replace the bung and pull it tightly into place via the elastic.

The easiest rig connector is a plastic Stonfo, but some anglers like Dacron connectors or a figure-of-eight crow’s foot knot with trimmed-off ends.
What is the right sized reel?

In the market for a new reel but get confused by all of the reel sizes available then make sure that you read this whole article as angling legend Tommy Pickering will be explaining what each fishing reel size does and what is best for your style of angling.
When it comes to purchasing a new float or feeder rod there is every chance you will spend hours scouring the internet looking at the pros and cons of various aspects of each product.
It is sensible to put tackle under scrutiny to see whether it is right for the job in hand, but why people never give their reel choice the same treatment is beyond me.
I see lots of anglers using reels that are completely unsuited to the type of fishing they are doing. I’m going to look at the three key reel sizes and explain when they should come into play.
REEL SIZES
3000 size – This size reel is ideal when fishing small commercials where a short cast is all that is required. A small 3000 reel won’t help you cast long distances but is perfect for chucks of 30m or less. I will use this when fishing tactics such as the waggler, and will have a maximum of 5lb mainline on the spool.
4000 size – If you need to chuck up to 40m when using a tactic such as the Method or groundbait feeder then step up to a 4000 size reel. When you are reeling in feeders or floats from any distance you need a reel that has a little more power to retrieve them quickly, and this does just that. As a simple rule of thumb I will use 6lb or 8lb mainline on the spool.
5000 size – When a long chuck is required a big reel must be used to hit the distance, and a 5000 size usually comes into play when I am after bream at range on the feeder. For this type of fishing I will use 5lb mainline with an 8lb shockleader that is double the length of the rod to stop me cracking off on the cast. If I used heavier mainline on the spool I would not be able to cast the required distance, as thicker diameter line hinders big chucks.
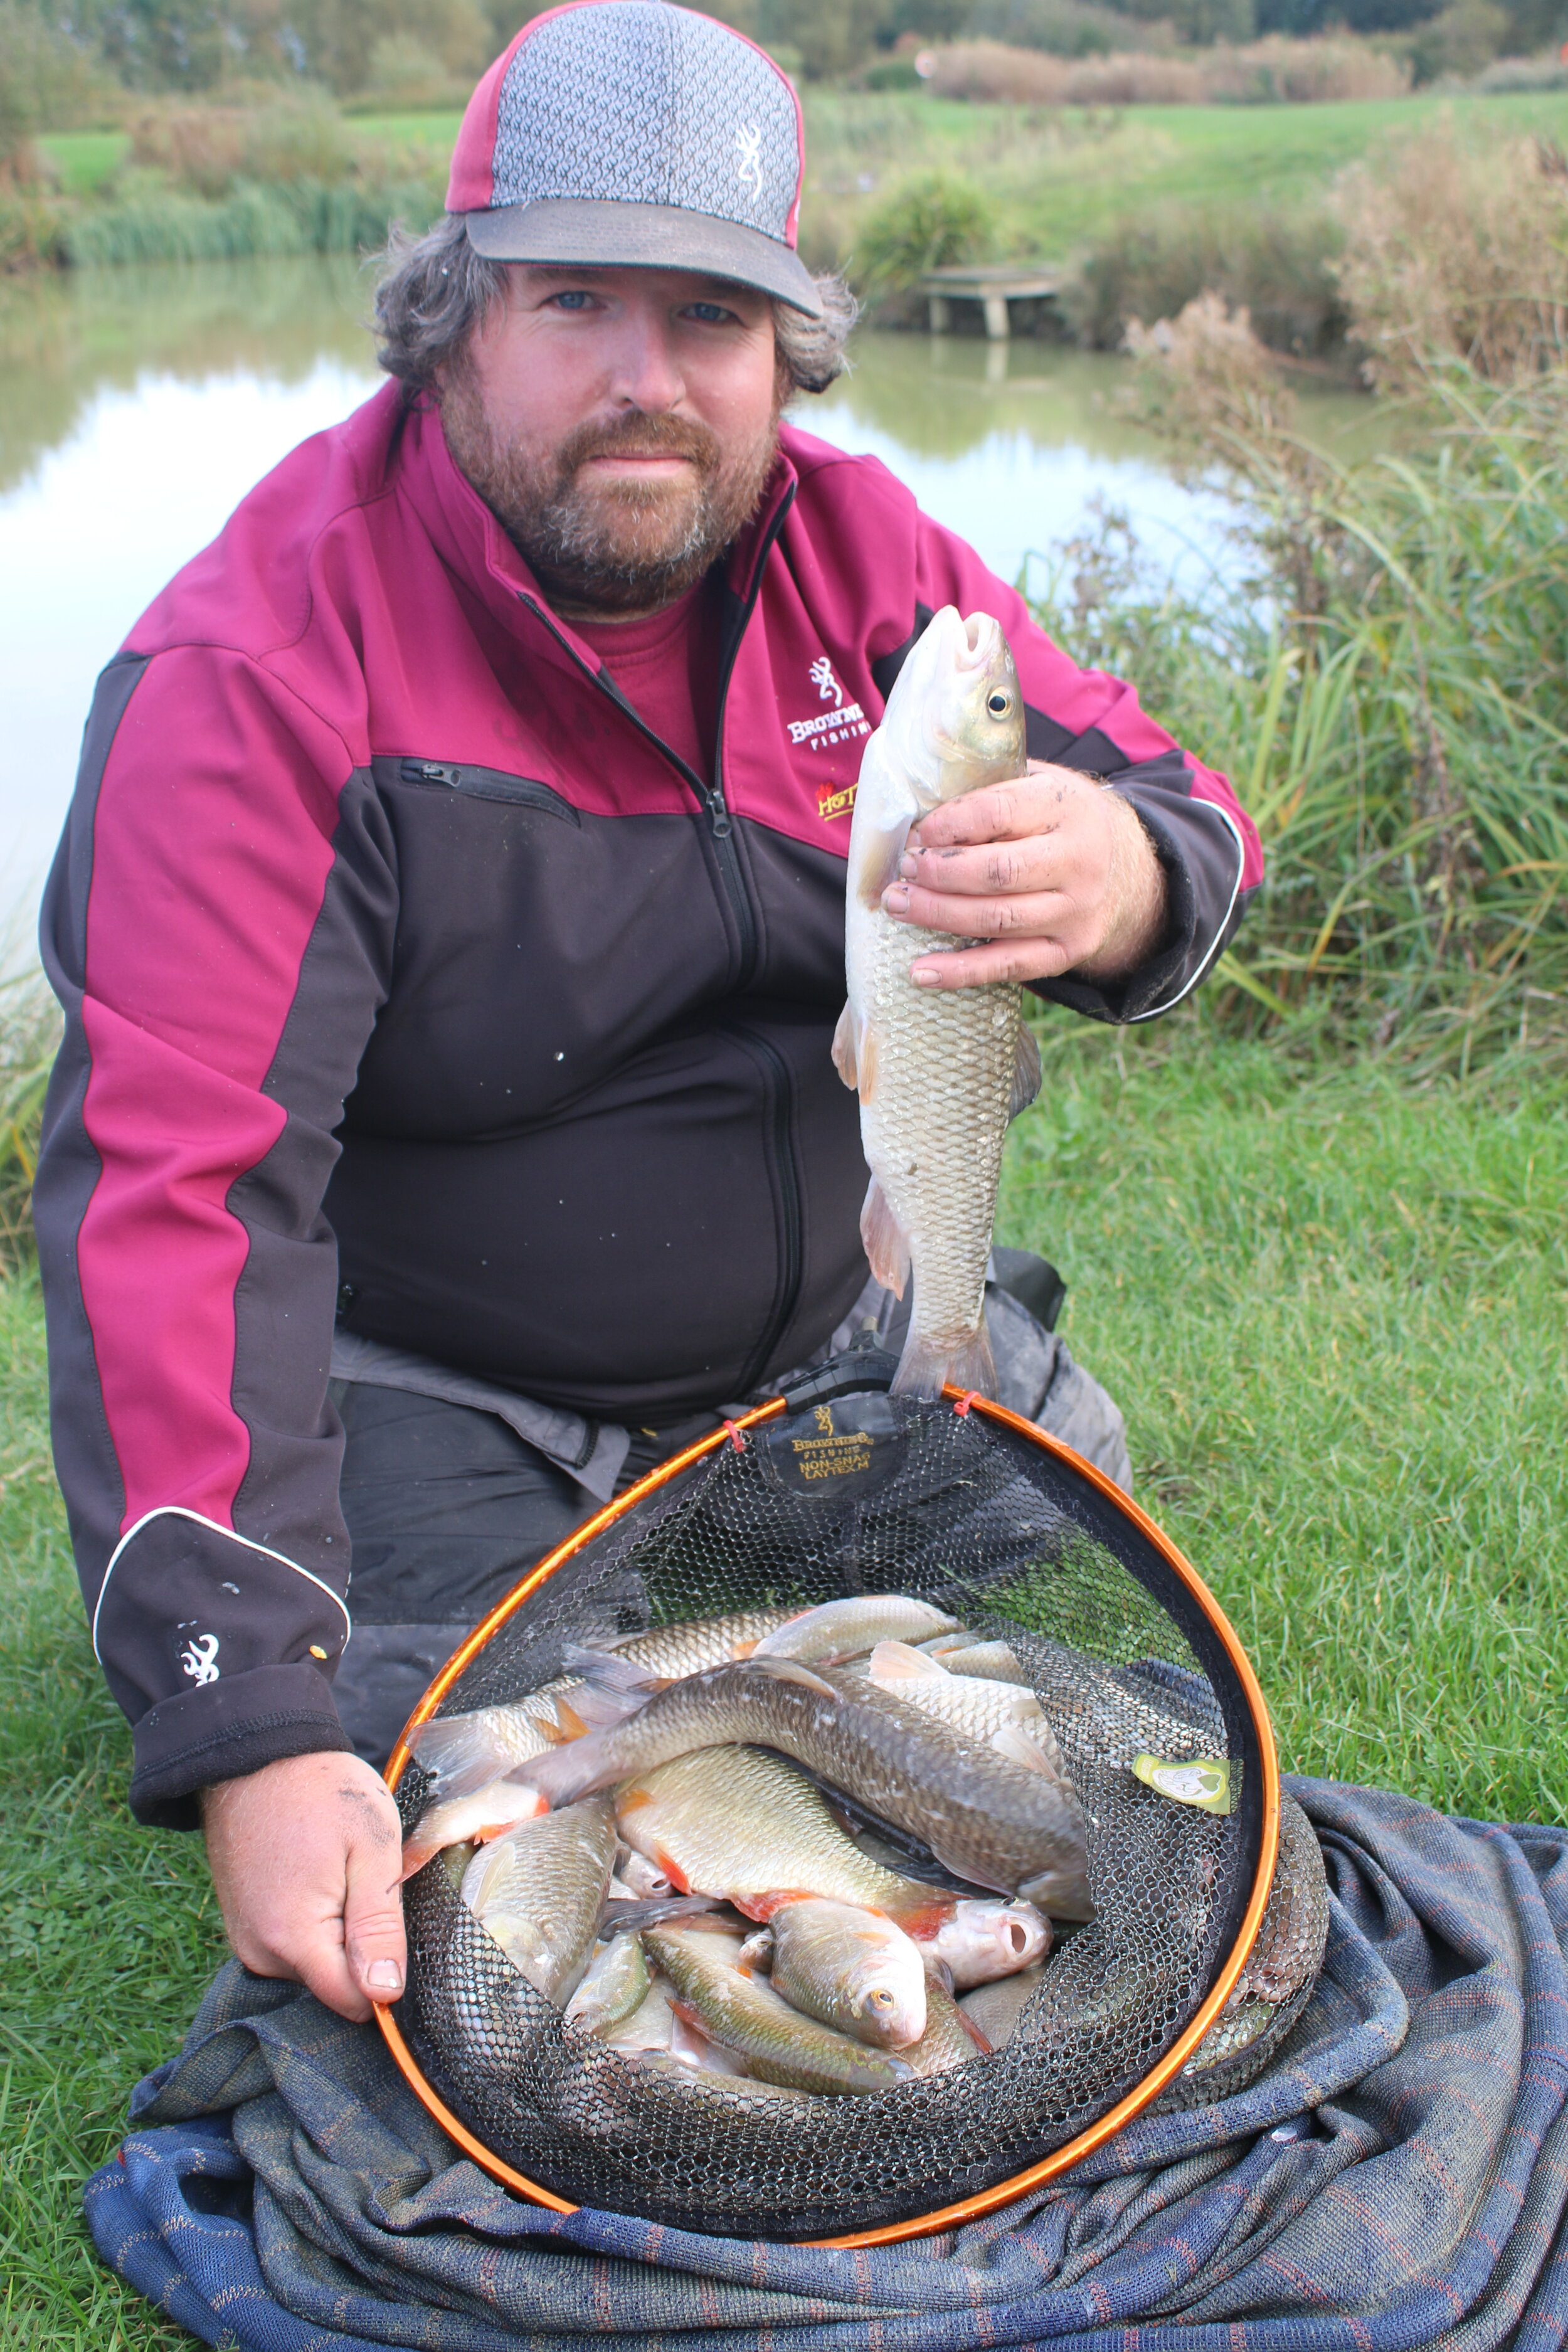


The fishing tackle and bait which won Jamie Hughes Fish O' Mania for a third time

Jamie Hughes won the Fish O' Mania final for a record-breaking third time on July 8 2017 on Arena Lake at Cudmore Fisheries with 26kg 900g of carp and silvers.
Now we've got the lowdown from the man himself on the exact tackle, bait and rig he used for the third title. This is how you can fish like a three times Fish O' champion, in his own words...

FLOAT
"I caught most of my fish up-in-the-water with these MAP SF2 foam floats, which have a diamond body and short fat bristle. I had a lighter 4 x 10 (0.1g) and a heavier 4 x 14 (0.4g) set up. Both had a 5-6ft length of line above them to keep the pole away from the fish near the surface. I either slapped my rig in or swung the rig out to cruising fish."
BUY NOW for £2.99 on Amazon

HOOKS
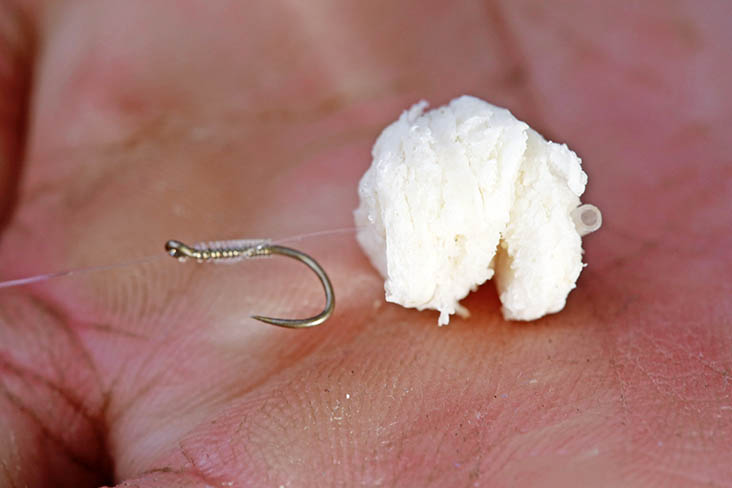
"Hooks were my favourite Kamasan B911 eyed in size 16. I tied a knotless knot hair-rig with a small microbait band to mount the hookbait, a 6mm pellet."
BUY NOW from £5.99 for multipacks on Amazon

LINE
"A great tip when pole fishing shallow is to use a much thicker mainline than your hooklength. I used 0.18mm MAP Power Optex because a thicker diameter is stiffer to avoid tangles. My hooklength however was a much lighter 0.12mm Optex to bring more bites."
BUY NOW for £4.99 from Chapmans Angling

POLE ELASTIC
"Wherever I can I always like to use light hollow pole elastic and Fish O' Mania was no exception. My choice was the pink grade 6-9 MAP Twin Core Hollow Elastic. I expected to catch everything from silverfish to carp up to 5lb. A light elastic means that fish cause less disturbance in the peg when you hook them, as they don't bolt off."
BUY NOW for £10.50 from Chapmans Angling

BAIT
"I catapulted casters as I initially expected to catch silverfish. But it brought a few carp into the peg instead! On the hair-rig I fished a bigger, selective bait the carp could pick out, a 6mm Bag 'Em Matchbaits Super Natural feed pellet. I put all my shot under my float so the rig could swing out easily and the bait could fall naturally."

POLE
"There's only one choice for me, the 16m MAP TKS 901 2G. It's won me a lot of money!"
BUY NOW for £2999 from Chapmans Angling

POLE ROLLER
"On venues with a raised bank behind you, such as the Arena Lake at Cudmore, you need a pole roller which you can extend to a decent height. I have a couple of MAP Dual Pole Rollers with telescopic legs which are perfect and the rollers themselves are very free moving and smooth, so I can fish at speed."
BUY NOW for £74.99 at Chapmans Angling

LANDING NET HANDLE
"Pay attention to your landing net handle choice and don't compromise on one which is too short. I prefer a 4m version, a Parabolix, because it enables me to net a fish as soon as it pops up, even if this is 4m away! It definitely saves you time in competitions."
BUY NOW for £119.99 from Chapmans Angling
Top 10 fishing tips for catching more on the rivers
With the river season now well underway we thought we would put together a list of the top 10 fishing tips to help you catch more fish on the rivers. With these tips you are guaranteed to get your river fishing season off to a flyer. Check out our list below and let us know what fishing tip you will use on your next session!
Cast down the middle for bream
The habits of bream on rivers don’t alter much in summer from back in the winter – they still prefer deep water, which is almost always found smack down the middle of the river. A tried-and-tested ploy is to cast two-thirds of the way across. If bites fade away, go even farther across to where the river begins to shelve up towards the far-bank shallows.
Walk the banks
Not sure where to fish? Visit at dusk and walk the banks in search of your quarry. Bream and tench will give themselves away by rolling just before it gets dark, and roach will also top regularly – they won’t move far from these spots so you can avoid a lot of disappointment by putting in the miles.
Always pick cover
Try to choose a river swim offering some sort of feature. This could be a reed bed or a tree on the far bank, some lily pads close in, or a moored boat. Whatever it is, fish will live close to it and it will give you another option to fish to during your session, normally with a feeder or waggler cast
Be a slacker
Check out the slacks for roach and chub, where the river’s main flow meets a calmer area. On the edge of this will be something called a ‘crease’, which allows the fish to head into the main current to pick off food that’s been washed down the river before heading back into the quieter water.
Find the fast water
Early-season rivers can suffer from lack of rain, which in turn reduces the rate of flow. On shallow venues, any such swims can be devoid of fish. To stack the odds in your favour, seek out the shallowest swims that will generate faster, oxygenated water. This is what the chub and barbel, in particular.
Seek out the Depths
Early-season rivers can suffer from lack of rain, which in turn reduces the rate of flow. On shallow venues, any such swims can be devoid of fish. To stack the odds in your favour, seek out the shallowest swims that will generate faster, oxygenated water. This is what the chub and barbel, in particular,

Watch the tide
Tidal rivers really come into their own throughout the summer. Although they can be fearsome places, with deep water and a fast flow that can change direction during a session, they will offer brilliant roach and bream sport. To get the best out of them, check a tide table online and combine your visit with a tide that’s ebbing (running out to sea) all day. This will produce the most fish.
Weed equals fish
A pain it may be, but where big fish are concerned, weed is prime real estate. Tench, big perch, eels and even barbel will stick close to the weed for a source of natural food and a bit of sanctuary, so it’s always worth feeding some chopped worm just over the weed to try for a big fish throughout the day.

Bait up for success
Pinning down a bream shoal on a river or big lake can be difficult in a short five-hour session, so do yourself a favour by spending a few evenings prior to fishing putting some bait in. Known as prebaiting, this action gives the fish a few large helpings of bait in advance and will get them into the area early doors. Keep it simple with corn, pellets, hemp and plain brown crumb groundbait.

Go early and late
Blinding sunshine and warm temperatures rarely do the fishing any good, especially if you are after bream and tench on a river or lake. You’re far better off going early or late before the sun gets up, the mercury rises and it’s more productive for you to soak up the rays.
Your guide to fishing a weir pool
If you're looking to catch an abundance of different species on a river this season then you really need to give a weir pool a try.
Weirs are a haven for a number of species thanks to the warm, oxygenated water that’s constantly being flushed through the swim. Food items naturally collect in the basins of weirs too, and there’s plenty of underwater features to create the perfect home for predatory species such as pike, perch and zander.
However, weir pools can be quite daunting for those who have never fished one before, so Angling Times is here to help. Here’s our exclusive overview of these fantastic river structures which will explain where you can expect to find each species and what tactics you can use to catch them, whatever you fish for.

Dace

dace are widespread in weir pools. They, too, thrive in shallow water much like the minnows, and can be found in numbers at the tail end of the weir. A trotted stick float or waggler with bronze maggots will find plenty of bites from these stunning fish – with the odd roach, perch and minnow too.
Roach

Roach can be caught from most areas. In the summer they can shoal up in shallow water over the gravel at the end of the weir, but will also drift into the deep hole created by the main flow. A maggot feeder is hard to beat for a weir pool roach, but watch out for those pike, which love to snap up a hooked roach as you wind it in.
Minnow

Those of you who have fished with maggots or pinkies on a river will have caught plenty of minnows in your time. These tiny fish thrive in shallow water with lots of gravel, and can be found relatively close to the bank at the tail end of a weir. Although regarded as an afterthought to many anglers, those looking to catch a big perch from a weir pool won’t find a better bait than a live minnow.
Chub

chub love gravel swims and can be found in all areas of the weir pool. You’ll find you will catch a lot of chub while fishing for the barbel, but if you want to target them deliberately few things can surpass a large piece of breadflake or a whole lobworm. They will also take small lip-hooked livebaits. Chub won’t venture far from the main flow, so aim your attack here to catch a few.
Bream

A weir pool is a great place for bream to pick up food items that have been washed downstream. They are often found in the deep holes at the bottom of the weir pool. Cast a heavy cage feeder stuffed with groundbait or liquidised bread around 5ft from the weir sill and fish flake, double corn or lobworm on the hook.
Barbel
Barbel fishing on a weir pool has to be up there with the best fishing around. These fish love fast, oxygenated water over gravel. When you’ve leaded around and found solid gravel use a bait dropper to introduce boilies, pellets and particles. Over this fish a bomb with a big pellet or chunk of meat to catch. The undercut directly under the sill of the weir also offers a good refuge for these fish.
Perch

Perch thrive in the snaggy features, as do the juvenile fish they eat! You can find perch under the weir sill, in shallow water and just where the gravel shelf drops off into deeper water. A chubber float with a lobworm is a superb tactic, but maggots will also catch. Big perch can be tempted on spinners, small jigs or lip-hooked livebaits.
Pike

Wherever there’s an abundance of silverfish such as roach or dace the pike won’t be far away. They’ll often skulk at the bottom of the weir pool or on the gravel shelf, from where they can easily ambush their prey. If there are limited snags at the bottom of the weir a legered roach or lamprey section is hard to beat for a pike. Alternatively a spinner or roach-imitation lure will get a reaction.


10 Steps to perfect method & hybrid feeder fishing
1) Method v Hybrid - Which is better?
I’ve lost count of the number of big catches I’ve taken on the feeder in the summer months. Until last season those catches were almost exclusively on the Method feeder, but now I use two styles – the Method and the Hybrid.
Regular readers will know that since the Hybrid feeder came out I have fished with little else, as I feel it offers the best hookbait presentation you can get. Owing to the raised sides your bait is protected on the cast, but once it breaks down there is nothing for the hookbait or loose offerings to get stuck on.
In my opinion the Hybrid is at its best fishing for one fish at a time, whereas a Method is all about building a swim to catch a lot of fish. This is simply down to the fact that it holds a lot more bait than a Hybrid can.

2) In-line or elasticated?
I use both but will usually err towards an elasticated feeder with either Black or White Hydro, elastic, depending on the size of the fish I’m likely to catch. When the fish is under the rod top the elastic does the work and helps to prevent, or at the very least minimise, hook-pulls.
With no elastic in the feeder, when a fish shakes its head the feeder shoots up the line. When it comes back down the ‘bounce’ can be enough to make the hook fall out. I could use a softer rod, but over the course of a season I just feel elastic causes me to lose less fish. An elasticated feeder permits quick changes so when I’m waiting for bites I can make more feeders up. Then when I catch a fish I can clip the feeder I’m using off and clip a loaded feeder on.
3) Think heavy
Choosing the right weight of feeder is far more important than a lot of anglers realise. It’s absolutely vital that once the feeder hits the bottom it doesn’t move. You have to realise that if the hookbait gets pulled away from the loose offerings, the whole benefit of this style of fishing is wiped out.
The size of your feeder is also important, because this determines the amount of bait you’re putting in. Some days you need to hold back, while on other days you need to get out as much feed as possible in a short period of time to hold the fish in your swim.
I use three sizes of feeder – Mini, Small, and Large – in various weights. When fishing in open water on small lakes, in winter, or when I only want to feed a small amount of bait, a Mini in the 24g size is perfect. The Small version is a more general-sized feeder for year-round use and comes in 24g and 36g weights. I pick the heavier version for longer casts.
A ‘Big Bertha’ Large version, in both 28g and 45g, allows you to get a lot more feed out and it’s the 45g size that I love to use on venues such as Boddington, where 90m-plus casts can be needed to reach the shoals.

4) Easy rigs
There’s nothing difficult about setting either rig up. If I’m clipping my feeders on and off I thread a Method feeder ‘tail rubber’ on to my mainline and tie a 3ins loop in the end of my mainline using a double overhand loop knot. Clip your feeder on and slide the tail rubber down on to the stem of the feeder – job done!
For inline feeders, thread the feeder on to your mainline, tie a 6ins twizzled loop in the end with a Speed Bead trapped inside, slide the feeder back down the line so it sits against the bead and then add your hooklength. Simple!

5) Short hooklengths rule
On both the Hybrid and Method, I find a 4ins hooklength ideal. This gives the hookbait extra movement so it behaves more naturally when a fish sucks it in. Hook size and line diameter depend on the species and size of fish. On venues where I’m looking to catch a mixed bag of skimmers, F1s and carp I will use a size 16 MWG to 0.17mm Guru N-Gauge.
On bigger waters, like Boddington Reservoir – where it’s all about carp and the average fish is 8lb-plus – I’ll set up with a size 12 QM1 hook to 0.19mm line. Both are tied with a knotless knot so I can hair-rig my hookbaits

6) Bright or blend-in hookbaits?
Hookbaits fall into two camps – blend in and stand-out. Blend in baits such as 6mm or 8mm hard coarse pellets are used to match the feed and work well when the fish are proving cagey. You can trick them into eating a hookbait which is masked among the loose offerings.
Stand-out hookbaits such as mini fluoro boilies, bright wafter boilies, and bread discs in winter, work in the opposite way. They give the fish a bait they can really home in on and are great when there are a lot of fish in the peg.

7) Pellets... The must have feed
A question I get asked a lot concerns what to put around the Method. What’s right on one day can be wrong the next, but if I’m in doubt I will opt for 2mm coarse pellets – all fish love them!
I will always have groundbait with me, as if it isn’t happening on pellets I can make the switch. You can also give pellets a dusting in groundbait – I normally use Dynamite’s Swim Stim Sweet Fishmeal. This is something I do if there are a few skimmers mixed in with carp and F1s. On the Hybrid it’s 2mm pellets every time for me!

8) To bury or not?
Going back a long time, I actually used to fish a Method feeder with the hookbait hanging out a couple of inches from the payload. However I noticed that I would sometimes get indications which didn’t result in bites.
This got me thinking. The idea of the Method feeder is to get fish eating the pellets or groundbait that’s on the feeder, so leaving your hookbait out actually made very little sense.I did a bit of experimenting and it seemed I got twice as many bites when burying the hookbait, so that’s what I do!

9) Try a pop-up on the method
The new Method feeder clip I’ve been using allows you to fish popped-up baits. Pop-up are very effective on the feeder but I’ve never felt they were being presented properly. The clip attaches the hookbait to the middle of the feeder in the perfect position amid the feed.
I still use a 4ins hooklength but by varying where I put the line in the clip I can fish with as long or short a hooklength as I want.The hookbait, an 8mm or 10mm orange boilie, pops up around 2ins from the feeder. Once the feeder breaks the hookbait is the first thing a fish will see as it approaches the feeders

10) How often to cast?
On a normal commercial I will cast every 3-5 minutes to start with to get some bait down and hold the carp once they arrive. You may find that you get short bursts of fish, then nothing for 20 minutes, then three more in quick succession.
In the last hour the swim may well be solid with fish as by this time there’s plenty of bait on the bottom and the fish are properly on the feed due to the time of day. This is a very positive way of fishing, and it has caught me a lot of big weights.
Six steps to catching tench this spring
If there’s one species that is associated with spring more than any other, it’s the tench.
Certainly among the UK’s most beautiful fish species, tench love all stillwaters and come in a variety of different hues, influenced by the colour of the water in which they live. They are known for their hard-fighting qualities so don’t be tempted to fish too fine, especially if you’re presenting a bait close to weed and lilies, where they like to live.
Pole fishing is productive, and you’ll catch well on the feeder too, but nothing beats watching a float sat close to a patch of lilies. At this time of year, early and late are the best times to go in search of tench.
Try to get to your water at first light or late in the afternoon, although sometimes you will catch in the heat of the day. As the tench season progresses the bigger fish, especially those that have been caught a few times, may become wary of big baits and you will then catch more with maggots and casters.

Tench love sweetcorn, but instead of using corn directly on the hook, it is often better to
hair-rig it, even when floatfishing. Two pieces of hair-rigged corn like this will be picked up without hesitation by a big tench when fished on the bottom.
Presenting your hookbait in this fashion will also help convert more bites into fish, as the hookpoint cannot be masked by the bait. Yellow corn is always favoured at the start of the tench season, but many big fish have also been taken on sweetcorn that’s been dyed red, especially when it’s fished over a red groundbait such as Van den Eynde Expo.
As far as hooks are concerned, use something like a size 14 or 12 strong, wide-gape pattern with a slightly inturned point that will stay in once the fish is hooked.

A mixture of chopped worm, micro pellets, casters and maggots provides a brilliant bed of bait for luring tench. But you can’t possibly catapult it in. This is when combining pole and waggler really works.
Use your pole cup to deposit this mix beyond the marginal shelf where tench patrol, then you can still use the traditional ‘lift method’ on your waggler rod over the top.

As the season progresses, you sometimes need to think outside the box where bait is concerned for tench. Tench start to get caught on some strange baits as they feed more readily. Marzipan and macaroni cheese are worth a go, probably because of their yellow colour.

Make yourself a weed rake to scrape the bottom clear of weed and debris, and to stir it up. Simply take two rake heads, stick them back to back using cable ties and attach a long, strong rope. Throw it into your swim, allow it to sink and drag it back slowly to sweep the bottom. Once you have finished, introduce some pellets, hemp, corn or casters to hold the fish.

When fishing the pole line, always cup your feed in. Tench love to feed over a bed of bait, and having it all in one neat pile will help increase the numberof bites you get. Marginal lily beds are a perfect place to start, as tench love nothing better than to patrol around the stems.
Start your session by introducing half-a-dozen balls of a rich, sweet groundbait containing lots of particles and leave it alone for a while until hopefully you see signs of fish in the swim. Tench will often show themselves by rolling at the surface. When you see this, lower a pole rig over your feed and you’ll soon catch.

After feeding a swim for tench, watch for tell-tale ‘pinprick’ bubbles appearing at the surface. These are created by the fish rooting around the bottom for food and expelling air through their gills.
Fish a decent-sized bait among the bubbles and you’re likely to get a bite within minutes. Just make sure you feed a variety of different food to ensure the fish do not become preoccupied with just one offering. This can happen, especially if you are feeding micro-pellets
How to catch more roach on a waggler
Silverfish are notorious for spooking easily, but there are ways of helping a shoal to settle.
One of them is to put the pole away and switch to the waggler. Waving a long length of carbon over the top of a big group of roach, rudd, perch and skimmers can put them off feeding at this time of the year. This week England star Darren Cox reveals his top tips for keeping the bites coming on the waggler...

Essential baits
“When it comes to fishing for roach and rudd on the waggler there are only two baits I will consider – maggots and casters. “Maggots work well when the going gets tough, with casters a better option when you are getting more bites and better stamp fish. “In order to get the shoals competing you need to be really busy with the catapult, firing out 10 freebies every minute or so.
“That said, you may have to cut it back to half that amount at times as the fish could go into a frenzy every time you feed, brushing against the line, moving the float around and giving false bites. “Reduce the feed and the fish will settle down, picking out the few freebies that are present and, in-turn, increasing your chances of them finding the hookbait.”
Light tackle

“Roach are incredible at sensing any resistance in a rig and once they feel something isn’t right, they’ll leave the peg and feed elsewhere.
“To combat this you need to use really light tackle, and 3lb mainline to an 0.10mm or 0.12mm hooklength and a size 18 Kamasan B911 F1 will help trip up a fish every chuck. Always dot the waggler to a pimple to reduce the chances of fish ejecting the bait before you have chance to react.
“Rod choice is also important and one with a soft tip will cushion the strike and reduce fish losses. I use a A Garbolino G System Match 13ft Light Waggler.”
Shotting patterns
“I use two shotting patterns on the waggler, and it is a matter of trial and error on the day to find out which one is best for the session.
“The first aims to get the bait to the bottom quickly. It has a small bulk set a couple of feet from the hook. This will be a starting point, but as soon as I start missing bites it means the fish have come shallow and it is time to change.
“The second set-up has No10 shot strung out down the line. This makes the bait fall slowly and helps me pick off fish on the drop. I will come off bottom a foot to start with, and come even shallower if I continue to miss indications.”
Venue knowledge
“Doing a little homework on the venue will definitely help your catch rate and one of the most important bits of information you can gather relates to the stamp of fish stocked.
“If you are fishing on a lake that has roach averaging 6oz but you are catching them at half that size, then you should make changes to try and increase the stamp. Little tweaks such as altering the depth, changing hookbait and adjusting the position of your shot on a strung-out pattern could achieve this.”
How to catch a net of bream

March and April are historically the months when bream and tench really begin to feed in earnest.
The pages of Angling Times are filled with massive single fish or big nets of smaller specimens, and already bream have begun to figure heavily in readers’ catches. Every day that passes means longer daylight hours, combined with the clocks going forward at the weekend, and that means more sunshine and warmer water temperatures.
Combine this with preparations for spawning and it’s no wonder that early-spring is seen as a bit of a bonanza for catching bream. The feeder remains king of them all for catching a net of bream on natural waters, so if you’re a bit rusty when it comes to fishing the tip, here are six essential bits of advice to help you get stuck into a shoal of slimy slabs!
Step 1) Choose the right feeder!
Gone are the days of using a standard open-end feeder for bream if you want to cast a long way. A small open-end or cage is fine for a 30-yard chuck, but if you need to cast further then look to invest in some of the modern rocket or distance feeders (below) on the market.
These are wire cage feeder swith the weight built into one end. They cast smoothly in the wind and will fly a long way. What size you pick depends on how far you need to go, and the conditions, but don’t force the cast – it should be a comfortable one to ensure accuracy.

Step 2) Go the distance
The water will still be a little clear and that means the chances of catching bream at shorter ranges are slim. You need a decent cast of upwards of 50yds to find the fish.
In open water this should put you in a decent depth but it’s worth counting how long it takes the feeder to hit bottom so you can work out how deep the swim is. As a guide, every second that it takes to get down equates to around a foot of water if using a standard 30g feeder. Around 6ft should be the minimum depth you’re looking for.

Step 3) Try using braid
The water will still be a little clear and that means the chances of catching bream at shorter ranges are slim. You need a decent cast of upwards of 50yds to find the fish.
In open water this should put you in a decent depth but it’s worth counting how long it takes the feeder to hit bottom so you can work out how deep the swim is. As a guide, every second that it takes to get down equates to around a foot of water if using a standard 30g feeder. Around 6ft should be the minimum depth you’re looking for.

Step 4) Pick the right groundbait
Whether you use a fishmeal mix or a sweet one will depend on the venue you are fishing, as some waters respond to fish while on others it can be a turn off.
If you are unsure, go down the classic route with a sweet mix combined with brown crumb. On waters where fishmeal works, a 50/50 blend of fishmeal and sweet will do the job. Mix this on the damp side so it stays in the feeder on the cast, but riddle it off to ensure no large lumps are left when it’s time to fish. It is also worth including some dark groundbait somewhere along the line in clearish water.

Step 5) Give them lots of goodies
Although we’re not yet at the time of year when loading a feeder with chopped worm and caster will work, you still have to make sure that some freebies are included in the groundbait mix in order to keep the bream feeding actively. Chopped worm and caster remains number one, but remember to chop the worm quite finely to release as much scent into the water as you can.
Micro pellets are another good addition on waters that see a lot of pellets used. If this isn’t the case, then dead maggots are a good substitute and a few grains of corn won’t do any harm. For the hook, two or three dead maggots will let you feel your way in, but worm will always pick out the bigger bream.

Step 6) Patience pays
You rarely catch bream immediately even in the height of summer, so this is definitely the case in March and April, when the fish aren’t fully in the feeding groove.
It’s reckoned that no bites in the opening hour of a session is a good thing, as this will allow you to build up a feed area without spooking any fish by catching them too early. However, if you get two hours into the day and haven’t caught it’s time to rethink the plan.
Casting further can work, as can the odd cast closer to you. A great trick is to chop some worms into a mush and pile these into the swim, relying on the scent cloud to attract a few bream into the area.

The diet secrets of fish with bait expert Dr. Paul Garner
With such a vast range of baits available, has it ever crossed your mind whether they resemble the natural food of coarse fish?
What do fish actually eat when they are not feasting on our bait? The answer can give you a better understanding of what baits work, and when.
The diet of coarse fish is affected by many things. Fish species is obviously important, but so is their size and the time of the year. Some fish are better able to make use of a sudden abundance of one type of food, while others have a more restricted diet.
Coarse fish gain most of their sustenance from eating small invertebrates – everything from tiny bloodworms to tadpoles and snails. Generally speaking, larger food items are preferred. Most will be eaten either off the bottom or picked from submerged plants, and although fish are very good at ‘sorting the wheat from the chaff’, some silt and plant material will also be swallowed. However, they gain very little nutrition from this.

Bloodworm for all
Bloodworm are found on the surface of silt and on the stems of plants. Smaller fish species such as roach pick them off for an easy meal. This is only half the story, though, as larger species may also become preoccupied with these tiny insects.
Tench and bream have a particular love of bloodworm and feed on them by hoovering up the lakebed, sorting the edible from the rest in their mouths and eating only the animals. This shows just how dextrous these fish can be. No wonder they can at times eject a hook with ease.
If you think that either species is in your swim, but you are not getting bites, tit’s possible that they are focused on bloodworm and a smaller bait could pay dividends. Red maggots or a small dendrobaena would be my choice.
Both species will move around lakes looking for fresh bloodworm beds where the amount of available food is high. This can explain the patrol routes that these fish adopt, and why some spots are more productive than others. Find a natural bloodworm bed and your chances of success will be good, especially if you plan to prebait.

Crunchy caddis
Often the mainstay of the diet of carp and tench, caddis larvae come in many different forms, from species that build intricate cases from grains of sand or bits of plant stem, to those that spin underwater webs, just like spiders.
Most are around a couple of centimetres long, making them a decent mouthful for even quite large fish. Those with crunchy cases are normally found over gravel, while a case constructed from plants is great camouflage over silt, or amid weedbeds.
The most common caddis that you are likely to see emerging in numbers at this time of the year is the black sedge. This is a cased caddis found widely in stillwaters, and is often the most numerous of all the caddis species. On some lakes where I have filmed underwater the bottom can be crawling with these critters, making a very easy meal for fish.
When fish are feeding on caddis larger baits can be used, and the fish are likely to be less picky. Larger worms are worth trying, as are more easily seen baits, such as sweetcorn and punched meat.

Snails
There are dozens of species of freshwater snail. Although we tend to think mainly of freshwater mussels, because they are so large, if you take a look into the margins of any river or lake you’ll see a whole range of different sizes and species. In fact the bottom is often covered with snails.
Snails are eaten not just by carp and barbel, but other species too. Roach are lovers of small snails, but bream and tench seem less fond of this delicacy.
If you retain a carp for a while, very often you will find the remains of snail shells in the sack that the fish has passed through its body. The shells are cracked open using the strong pharyngeal teeth at the back of the throat, allowing the juicy innards to be digested.
It has long been suggested that one of the reasons hemp is so effective is because it resembles small black snails. This could well be part of the reason, but the strong taste has to play a bigger part. Boilies and bigger baits, such as meat, come into play when the fish are feeding on snails, the bigger bait being more in line with the fish’s natural diet.

Five point plan for success when fishing a day-ticket water!
It can be quite difficult at this time of the year to succeed on a day-ticket water especially when the low temperatures have hit and the sun isn't quite giving off as much heat as you'd like. Gardner’s Jack Funnell however has a few tricks up his sleeve to ensure your alarms keep screaming so make sure you follow this five point plan for day-ticket waters.
1) Actively find the fish
You can’t catch what’s not there - it’s that simple! Carp won’t move very far in cold water, so you need to go to them, rather than vice versa, otherwise you’ll just end up camping, rather than fishing.
It is rare to always get the swim you hoped for but, equally, having a rigid plan can often work against you. “All lakes have a ‘go to’ area where the fish tend to congregate in winter,” Jack explained.
“They do go up into the shallows on very rare occasions, but if the fish aren’t actively showing, don’t bother.”
Another way Jack tries to find the shoals is to lead around in any empty swims. It sounds barmy, but he reckons that if the fish shoal up tightly, you can actually feel the lead bouncing through them - provided you get the cast right.
“I’ve done this and had some big hits of fish, while the lad in the next swim has blanked,” said Jack.

2) Swap mono for fluorocarbon
It sounds banal, but one tip that Jack was keen to share was the simple act of changing your mainline from mono to fluorocarbon - it can make a huge difference to your results. Mono sinks, but not as well as a good quality fluorocarbon. Jack’s favourite is Gardner Mirage.
“Using fluoro as the mainline ensures that the last few yards of line and end tackle are pinned to the deck. This guarantees that the fish will not spook off the mainline and it’s also almost invisible in water,” Jack told us.
“It is not always the latest rig or bait that makes the difference. But something much more simple! “I mean, it’s not magic, but it might just get you that couple of bonus fish on a tough day.”

3) Flavour-filled solid bags
In cold water, the carp won’t necessarily want to move to bait. Putting out 5kg of boilies at this time of year will most probably just see you prebaiting for next spring! As the fish’s metabolism is very much reduced, you need to fish for one bite at a time, not a hit of fish.
By using solid PVA bags you can slowly build a swim, as well as packing the bags with a variety of loosefeed items to create a compact trap on the lakebed. “One edge that has worked well for me is filling the bag with pellets, a few crushed Sticky Baits Manilla boilies, corn and maggots,” said Jack.
“I always have a few pre-tied, so can I cast at showing fish. Prior to casting, I inject the bag with some liquid flavour to flood the swim with attraction but little in the way of extra food content.”

4) Adjust your zigs
Although he always fishes one of his three rods on the deck, the other two will often be on zig rigs. “The biggest problem with zigs is trying to discover the exact depth at which the fish are sitting,” advised Jack.
“If they are obviously not on or near the surface I’d look to start around three-quarters depth with one rod, and slightly shallower with the second.”
He will then shorten the hooklink every couple of hours in increments of one foot at a time, so that he eventually covers all depths. “If I still haven’t had a run, then it is time to change the colour of the hookbait, cast to another area or even move swims,” he added.

5) Use maggots sparingly
Becoming more and more popular on many day-ticket waters, maggots can be devastating in the colder months. Jack, however, uses them very differently to other anglers.
“I have found that if I’m struggling for bites using boilies or corn for example, putting out a couple of Spombs of maggots can trigger the carp into feeding,” he explained.
Experience has shown the Croydon-based rod that once you get them eating, you can go back to your original hookbaits. The movement of the maggots just seems to trigger a feeding response in the fish that other baits don’t.
“I see anglers with truckloads of maggots in buckets, literally gallons and gallons,” he said.
“The problem with this is that they are both expensive and difficult to keep. I only bring three or four pints – most of which I might take home – just to use to try to provoke a couple of bites and get the swim going.”
Get a bite every cast with these waggler tactics
Learn how to get a bite every cast when reaching for a waggler with Steve Ringer.
In early spring when the water is cold and clear and not quite warm enough, the fish tend to back away from the bank.
Because of this, there is no better way of picking them off than by using a waggler! The beauty of the waggler is that you can fish further out than those using 13m-16m of pole. While they’re doing that, you can fish at 20-25m on the waggler. This obviously gives you a real edge, as you are fishing a line that you have all to yourself.
Additionally, you have the benefit of no pole waving about over the heads of the fish. Despite all these advantages, I see hardly anybody fishing with rod and line in the cold. however, here’s how I do it…
Bait
On commercials there is no better bait than pellets. All species eat them, from carp and skimmers right through to roach. Today I’m on Warren Pool at Meadowlands, near Coventry, where you are allowed to feed pellets only to a maximum size of 4mm. As it happens I wanted to feed 4mm pellets anyway, so this suits me. I wet my pellets before fishing. The reason behind this is that they become heavier, which allows me to loosefeed them further than would normally be possible.
The second benefit to wetting my feed pellets is that soaking them starts the breakdown process within the pellet, which means they release a lot more attraction into the water.
Alongside my 4mm feed pellets I’m also carrying some expanders. I have two different types today – 4.5mm Ringers Cool Water pellets and standard 4mm Bag Up pellets. This gives me a couple of different colour hookbait options, with the Cool Waters being slightly lighter in colour than the Bag Ups.
Plumbing the depth
Plumbing the depth with a waggler is a lot easier than a lot of anglers think. Whatever you do, don’t cast a big plummet out into the lake. You’ll scare every fish in the vicinity. Instead, squeeze an SSG shot on to the hook and then cast that out to get the depth. This creates a lot less disturbance and at the same time gives a very accurate reading.

Feeding
Little and often is the key. I don’t like to put a bed of bait on the bottom straight away, but prefer to build the swim up gradually.
As a guide I will kick off feeding 8-12 pellets every cast. In fact I normally get into a rhythm of ‘cast out, sink the line, feed and then wait for the bite’. It’s then simply a case of repeating the process throughout the session.
Of course, sessions rarely go perfectly – you need to vary your feed rate and frequency to take into account how many fish are in the swim. For instance, if the fishing is very hard I will keep up the regularity, as I believe the noise of pellets hitting the water attracts fish, but at the same time I will drop the amount down to 4-6 pellets at a time. You just have to think about what’s happening under the water and adjust your feeding accordingly.
On the subject of feeding, I’m not too worried about keeping my bait in a really tight area. One of the great things about the waggler is that it allows you to cover a lot of water, so I don’t mind feeding a decent area as opposed to a really tight spot.

Hookbait
This is a usually a single 4mm expander, which pretty much matches a soaked 4mm feed pellet in size so it blends in nicely with the loose offerings.
I could, of course, fish a banded hard pellet on the hook but when looking for a mixed bag I always feel a soft pellet has the edge. In the cold I do feel a soft expander pellet leads to more bites anyway.
One little tip regarding hooking an expander for waggler fishing is to make sure the hook has as much purchase inside the pellet at possible. In other words, don’t just nick it on, but instead thread it on. This just gives that little bit of extra security on the cast.
The second hookbait I like to have with me is sweetcorn. A single grain of corn often produces a bonus fish, so every now and again I will slip a grain on, even though I haven’t actually fed any.

Hookbait (left) and feed – wetted 4mms.
Casting
Expanders are a very soft hookbait so if you cast with a really fast action then chances are they are going to fly off the hook. The secret to fishing expanders on the waggler is to keep the cast nice and smooth. This ensures that your hookbait is still on once the float hits the water.
It’s also important to sink the line slowly once the float has landed on the surface. Winding the float under the water at 100mph is again going to tear the hookbait off. So instead I give the rod-tip a quick flick and then a slow but firm wind to sink the line.
This way I can be sure that the bait is still on the hook. Of course if it’s flat calm then there is no need to sink the line.
The Set-Up
Warren Pool at Meadowlands Fishery in the West Midlands lends itself perfectly to waggler fishing. It’s shallow, with just 2ft 6ins of water at around 25m. With this in mind, my float is a 5BB Drennan Glow Tip Antenna.

I love these for pellet fishing as they have a very fine tip which is very sensitive, and are easy to see in even the poorest of light.
To fix the float in place I use two AAAs and a BB, but rather than put them straight on to the 4lb mainline, which could potentially damage it and lead to a breakage, I thread some fine silicone on to the mainline first, then squeeze the shot on to that. This prevents the shot damaging the line. A 4lb Guru Pulse mainline makes a massive difference when waggler fishing. Not only does it make casting a lot easier, it also aids presentation as a light mainline isn’t picked up as readily as a heavier one by wind or tow.
I have recently started using size 14 Cralusso Fine Quick Snap Swivels to connect my waggler mainline to hooklength. These allow me to change my hooklength fast, should I need to, and are no heavier than a No9 shot. The swivel acts as my bottom dropper and above this, at 6ins intervals, I have two No9s.
For waggler fishing I like an 8ins hooklength of 0.14mm Pure fluorocarbon, with a size 16 Guru F1 Pellet hook, fast becoming my favourite in the cold! On Warren Lake I am fishing for skimmers, small stockie carp and the odd big carp, so 0.14mm is perfect. If the fish were all ‘proper’ carp, I would step up both hook and hooklength.
How to get early season feeder success!
With the rivers closed, it’s now time to start looking at commercial waters to get your fishing fix – and there’s no better way to keep the bites coming than by fishing the feeder.
Whichever model you use, the swimfeeder is simple to fish with relatively easy rigs, and deadly accurate in terms of placing your hookbait right next to a small pile of feed at up to 60 yards range.

It’s a little early in the year to bank on catching consistently on the pole or waggler, and you can even use the same rod and reel that’s served you so well on the rivers in the past few months. Here are six things to master if you’re planning a session on the swimfeeder over the coming weeks…
1) Choose the right feeder
This is the first consideration when deciding to fish the feeder. A feeder is ideal for when the fish want a bit of bait to get stuck into, but don’t go too mad by picking a big feeder that holds a lot of pellets right now.
Minimal feed will still be best, so that means picking a smallish feeder that’ll drop just a good pinch of bait into the peg on every cast. Method or pellet feeders are both good but the Hybrid feeder from Guru has won over lots of anglers in recent years.
If the water is cold and clear, try changing from feeder to bomb from time to time. The bomb will offer minimal disturbance in the peg while giving you the option to fish a large, highly visible hookbait around minimal feed.

2) Find where the fish are
Depending on the swim, you’ll be faced with several options as to where to fish. The swim could have an island, a far bank, overhanging trees or lily pads that are just beginning to establish themselves again after winter.
All will attract and hold fish, so if your swim has any feature, cast to it. However, don’t be tempted into casting tight up to this feature, as often the water there will be very shallow.
Instead, aim to land the feeder a metre or so away, where the water will be a little deeper. In open water, make the cast to a range that you can comfortably reach and, if that is your plan, where you can feed over the top with a catapult.
3) Use bright baits
Changing hookbaits can be the key to cracking a commercial in early March, as the water will still be a little on the clear side and the fish not yet in full-on feeding mode.
Tried and tested favourites such as hard pellets and dead maggots work brilliantly for smaller fish but colour plays a big part, giving the fish a hookbait that they can easily pick out from a small patch of pellets or groundbait.
Corn is brilliant, but if you want to go down the boilie route a bright yellow, green or pink mini pop-up, dumbell or wafter-type bait can really trigger a response.

4) Feed over the top
You don’t always have to rely on the feed that’s going into the swim via the feeder to keep the fish happy. Loosefeeding pellets over the top of where you’re casting to can pay dividends too.
This is a popular ploy when bomb fishing too, introducing half-a-dozen 6mm or 8mm hard pellets over the top via a catapult every few minutes. This way you can regulate how much feed is going into the peg and work out how the fish are responding to it.

5) Use light hooks and lines
Although spring is just about here, that doesn’t mean that you should switch back to heavy lines and big hooks on a mixed fishery. Erring on the light side will get more bites over five or six hours of fishing, but a balance needs to be struck – go too light and you may get broken by a big fish, whereas too heavy and the fishing will be patchy.
For a typical mixed commercial water when F1s, skimmers and the odd better carp are likely, a hooklink of around 0.12mm matched to 5lb mainline and a size 16 or 18 barbless carp-style hook makes for a balanced set-up. Only if the peg is snaggy or the fish particularly big should you think about stepping up to heavier tackle.
6) Time your casts
With any form of feeder fishing, a big puzzle to solve is how long to leave the feeder out before recasting. On natural waters for bream, or when in search of big carp, this can be up to half-an-hour, but if you are fishing a heavily-stocked commercial water that’s home to small carp, F1s, skimmers, tench and barbel, you can reasonably expect to get bites fairly regularly. You should be aiming to build a swim up over time to create a small area for the fish to feed over.
Casting every five minutes will quickly establish feed on the deck, and if you are using small baits such as maggots and 4mm pellets you should catch within this five-minute window. Only if you change to a bigger bait in search of something that pulls back harder should you leave the rig out that bit longer.

Tommy Pickering's greatest tips revealed!
When it comes to boosting your catches in early-spring, there’s no one more qualified to help than Tommy Pickering. The former world champion andcurrent Preston Innovations England feeder team boss is one of the world’s best all-round anglers, and this week he reveals a boxful of tips that will bring more fish your net.
Bait
LIght Groundbait
A light-coloured groundbait mix will always outscore a darker version when roach are the main target. The species tends to feed more confidently over a light blend, and a very fine product that has minimal feed content should be used to prevent overfeeding the shoal. Sonubaits Super Crumb Lake ticks all the boxes.
Pinkies for big fish
Worms, casters and maggots may seem like three deadly baits for skimmers, but pinkies go top of my list when fishing for the species on natural venues. Mix plenty of them into your groundbait, use two or three on the hook and you’ll find you are picking out much bigger stamp fish than other anglers around you.
Try a binding agent
If you are struggling to get your pellets to cling to the Method feeder then add a binding agent. Dampen your 2mm pellets as usual and then add one spoonful of Sonubaits Stiki Pellet to a pint of bait. This will make sure the pellets stick when casting and as the feeder falls, but also ensure they start to break down slowly once the feeder hits the deck.

Which goes first?
Add groundbait to the water when making paste but add water to the groundbait when making groundbait. This subtle change is may seem unimportant but it is essential, and will make sure your bait takes on the consistency that you require for the job
How to hook casters
There are two different ways to hook a caster, and how the day is going will dictate the best way to do it. The first is to bury as much of the hook inside the shell as possible. This produces more action when silvers are cagey. When they drop their guard, have the hookpoint fully exposed so you reduce the number of missed bites
Vary your pellets
Pellets are the staple diet of most commercial fish but the fish can wise up to them at times. In order to give yourself an edge, feed standard coarse pellets but use a flavoured or coloured pellet over the top to fool bites from wary specimens.
Cylinders V Cubes
Punched cylinders of meat are stacks better than cubes when fishing on the feeder. This is because the shape of cubed meat leads to twists occurring in the hooklength when you reel in.
Try pop-up boilies
The bomb and popped-up bread can be fantastic for carp and F1s on commercials right now but don’t neglect boilies. An 8mm or 10mm pop-up can be a better option if you are getting lots of little plucks that you can’t hit – small silverfish are often the culprits. Pop-ups are also better when you are waiting long periods, as you can be a lot more confident that the hookbait is still on the hair and hasn’t disintegrated.

Floats
Which float stem
The type of stem that your stick float has should be dictated by the conditions you are fishing in. Cane is best when trying to catch silvers on the drop, alloy versions are more stable in unpredictable, boiling swims and plastic-stemmed floats stand upright as soon as they hit the water. They are therefore real winners in turbulent and pacey swims.
Quick Change Swivel
Always use a snap link swivel with any kind of waggler. This will enable you to quickly change the size or pattern of the float at any stage of the day.

Overcast and windback
Sink the line when using the waggler so that the float stays in the same place for longer. In order to achieve this, cast five yards beyond your target zone, before winding the float back to your spot with the rod tip underwater. A small amount of line may still be floating and this can be sunk by sharply flicking the rod tip upwards.
Dot it right down
Never have any more than half the float bristle showing when pole fishing. When fishing for shy-biting species such as F1s, dot it down so only a few millimetres are showing. This can be done by adding tiny shot such as No12 Stotz to your rig in order to fine-tune it.

Accuracy every time and how to keep a short line
Pick a far-bank marker in order to fish in exactly the same spot all day. Line your swim up with an object that won’t move and make sure you are facing it when the rig goes in. Place your elbow on the same spot to get the same distance every time.
If you want to hit every carp and F1 bite on commercials you must keep a short line between pole-tip and float. Use a 6ins length in still conditions, 9ins if there is a ripple, and a foot if it is a bit windy.
Tackle
How long a rod?
Too many people don’t pay attention to the length of feeder rod they are using, but your choice will dictate how accurate your casting is. For fishing 30 yards out on a standard commercial, opt for a 10ft version, stepping up to a 12ft or 13ft rod when chucking beyond 50 yards on bigger waters.
Make yourself comfortable
Being comfortable when fishing from a box is incredibly important, or your mind will soon drift off the job. Make sure your side tray is as high as it can be so that you can reach bait with ease. Rig roosts and keepnets should also be easily accessible without having to over extend.

Positioning a pot
The positioning of your pole pot on the top kit will dictate how successful you are. Make sure it is only a few inches from the pole so that any loosefeed you drop in goes directly over the top of your hookbait.
Fail-safe shotting
Shotting patterns are rarely given the attention they deserve, and if you are after a mixed bag on commercials then one patterns always works well. Place a bulk of shot around 18ins to 2ft away from the hook and have three smaller dropper shot spread evenly between that and the hooklength loop. This will slow the fall of your hookbait and make it look natural as it nears the bottom.
Keep a short hair
The difference between an effective hair rig and one that doesn’t lead to many fish in the net is literally a few millimetres. The shorter the hair rig, the better and I find that hair rigs where there is only a tiny gap between the bait and the hook are most effective.

Control your area
On a busy commercial, think carefully about where you are going to fish. If all the anglers opposite are casting to the middle then the fish will probably avoid this commotion and go elsewhere. Look to fish in your own patch of water – even if that means coming shorter – and you’ll find more feeding fish.

Try a heavy plummet
We all know that plumbing the depth is important, but using the correct plummet is a must. If it is too light, you won’t be able to work out the contours of the bottom whereas a 20g-30g version will give you the precision that is required when using the pole.
Sensibly strong rigs
If a fishery states that the carp run up to 15lb, don’t set up a rig to catch only fish of that size. Using heavy lines and hooks you’ll miss out on bites from smaller fish, so compromise.
Feeder
longer hooklengths
On rivers I find an 18ins to 2ft hooklength best in coloured water. When bream fishing in normal conditions I will step up to 3ft, and 5ft for barbel, as they tend to sit well away from the feeder on big rivers like the Trent.

Don’t move a feeder
Once you have cast a feeder out don’t move it out of place. With a Method or pellet feeder you will only empty the frame and move your hookbait out of the pile of freebies. This will ultimately make the whole rig ineffective. When you cast out, make sure the feeder hits the water with the mainline still slack, so you can put a bend in the tip without moving the feeder.
Give it a chance
If your feeder is in the right place, leave it in the water for a long period of time. At this time of year you may only be fishing for 10 fish so don’t be afraid of leaving it be for up to 20 minutes.
Why plastic is best
I prefer a plastic open-end feeder to wire. This is because I am much more confident that all the bait stays in it until it gets to the bottom, and it also retrieves easier and doesn’t vibrate as much in the water.

Depth-Finder
To find the depth on bomb or feeder cast out a 1oz bomb. Once it hits the water start counting. A bomb of this size falls at a rate of a foot every half second, so you can work it out from there.
Fishing a light bomb
When fishing the bomb, the lightest lead you can get away with should be used at this time of year. Any excess commotion will spook any fish you have landed on and when fishing on commercials, a 3/8oz to ½oz bomb is about right.
Match feed to venue
Feeder groundbait when targeting bream depends on the water I am on. If it is a commercial that sees a lot of pellets than I will use a fishmeal-based product such as Sonubaits Bream Feeder, but if I am on a natural water I’ll turn to a cereal recipe such as Sonubaits Super Crumb Bream.
Half- Filled feeder
Half-filling a Banjo feeder is a fantastic way of getting extra bites in the cold. The reduced amount of food around the feeder forces the fish into taking the hookbait and it is often the bigger specimens that fall for this trick.

The top 10 steps to catching in the winter with Phil Ringer
It takes a real leap of faith to cast into a vast water such as Boddington Reservoir in the depths of winter and catch a number of carp – they could be anywhere!
However, there are some very simple things you can do to stack the odds in your favour. It’s true that throwing a bomb or feeder out and relying on the law of averages for a carp to find the bait will work – but that’s no good under match conditions.

Ideally, I want a bite every cast to stand any chance of winning a few quid. My 10-point plan for nobbling a few winter carp has worked time and time again. There’s nothing complicated to it, no herculean casts or fancy rigs needed. It’s all about getting the basics right and then making small changes throughout the day to get the tip to go round.
Step 1 - Set up comfortably
There are no prizes for being the first angler to catch, so take your time setting out your stall so that when you begin fishing everything will be to hand. You could be waiting up to half-an-hour for a bite so when it comes, you don’t want to be groping around for the landing net. Equally, make sure your seatbox is set comfortably.
Having pellet banders, Method moulds, pellet cones and spare hooklinks to hand is also vital, as is an array of bait and additives. That way I don’t have to get off my box and faff about looking for some pop-ups – and miss the inevitable bite!

Step 2 - Feeder or Bomb
Winter carp fishing revolves around fishing the tip, and the first decision to make is whether to use a bomb or a feeder. I’ll look at how the lake is fishing before I even arrive on the bank so I have an idea in my head as to whether the fish will want a bit of feed or not.
If they will, it’s a Hybrid feeder (above) in conjunction with my favourite hookbait, an 8mm Chocolate Orange Wafter, but if the water is cold and weights are not brilliant I’ll think about beginning on the bomb with a pellet cone and two yellow 8mm wafters – a great bait when the going gets tough.

Step 3 - The right distance
It’s unlikely that the carp will be at short range, but you don’t need to hit the horizon. Around 50m is a good starting point, so you will need a rod that can do the job – something around 12ft or 13ft. I deliberately begin by casting shorter because I know that the fish will push further out into the lake as the day goes on.
This means that my final cast of the day will often be the longest. Begin fishing at the range of your casting and you’ll only be left with the option of coming back towards you.That’s no good.

Step 4 - Clipping up
Accuracy is important when every bite is at a premium, so that means using your line clip and a pair of distance measuring sticks so you can say with certainty where you will be casting to. Often, if I catch a fish, I will throw back to the same spot to see if its mate is about but without a line clip, the cast will never be 100 per cent accurate.

Step 5 - Fish positively
You may only catch six carp in a typical winter session and end up waiting up to 40 minutes for each bite. The very worst thing that can happen in this instance is to lose the fish that you hook by gearing up too lightly with a size 18 hook and a light hooklink.
I want to be confident that when I hook a carp, I will get it in, so that means a size 10 Guru QM1 hook and a 0.17mm hooklink. Remember, it’s not about getting a bite as soon as you can, so delicate rigs aren’t as important as in summer.

Step 6 - Go left and then right
Not only do I vary how far I cast into the lake – I also change how far down or far up the swim I go. By this, I mean that I will cast 10 or 20 yards to the left or right of my starting point directly in front of me.
A carp may well be sitting just 10 yards away, but in winter lethargic fish won’t move on to the spot where your feeder or bomb is sat. By winding in and casting down the peg, however, your chances of catching are instantly increased.

Step 7 - Timing your casts
A stopwatch is a vital part of my winter match fishing carp kit as it lets me know how long the rig has been out in the swim. I pay a lot of attention to how long it takes me to get a bite, and I’ve found that between 20 and 35 minutes is the optimum time for a bite to come. Naturally I need to know at a glance when I’m approaching the ‘witching hour’.
Normally, I will wind in again after half-an-hour but if the lake is fishing very hard then I may leave the bait out another 15 minutes.

Step 8 - Method ball sizes
These are the two Method balls I use – ‘skinny’ or ‘fat’, based on how many micro pellets are moulded on to them. The skinny ball is used at the start as it puts a minimal amount of bait into the swim, working on the assumption that the carp won’t initially want a lot of bait.
If it turns out that the fish are feeding reasonably well, I’ll change to the fat ball with double the amount of pellets to give them what they want. This change tends to happen in the second half of the match when things have warmed up a little.

Step 9 - Changing hookbaits
Changing what’s on the hook can trigger a big change in what you catch at any time, but especially in winter. You may get no response on a wafter, whereas a stack of three bits of corn can see the tip fly round. We all have favourite baits and mine is an 8mm Chocolate Orange Wafter for starters.
But if I am getting no response, my next cast might see me change to a corn stack, a yellow wafter or a small, highly visible pop-up. Often, just a change in colour can make all the difference.

Step 10 - Using additives
I know a lot of anglers who think additives are nonsense but I think this all boils down to confidence – I don’t think they can do any harm, especially in winter. I always carry a bottle of Almond Power Smoke Korda Goo, which I drape on to the hookbait inside the Method ball. This releases a lasting green cloud as it breaks down.
Bread can be changed too by dyeing it from its natural white colour, and almost any hookbait on your tray can be dipped in an additive just before casting out.

Jamie Hughes guide to using popped-up bread to catch more carp in winter
There aren’t many tactics that will tempt bites from sluggish commercial carp at the moment, but popped-up bread is one that can bring a response says Jamie Hughes..
Carp like this just love bread in winter.
With their appetites hit by the freezing conditions, mirrors and commons are proving hard to fool – but Jamie Hughes has kept the rod-tip hooping round by combining rod and line tactics and this supermarket favourite.
There’s more to it than just chucking out a bit of bread and hoping for the best, and this week the MAP-backed star reveals his winning approach with winter carp.
Big baits
“It’s understandable why people would instantly go for a small hookbait but something big is much better,” said Jamie.
Discs of bread presented on hair
“It will stand out a mile in the clear water and a big carp or F1 can slurp up a big mouthful of bread with minimal effort.
“I punch out discs of bread and then thread them on to a hair rig. I will have no hesitation in using up to six discs at once to make a really obvious bait.
“The buoyancy of the bread will pop it up off the bottom. The lead will sink to the lakebed, taking the bread with it, and the bait will then pop up.
“If you use a foot-long hooklength, that is how far off bottom your bait will be presented.
“Sometimes I will place half a 6mm Bag ‘Em Matchbaits pop-up boilie on the hair rig as well to make it even more buoyant.”
Vary the depth
“The coldest water in the lake will sometimes sink to the bottom and with this in mind, fish could be sat up in the water in the warmer layers. It’s a matter of trial and error to find out where they are.
“I will start popping the bait up six inches and will keep increasing the length of my hooklength until I start getting indications.
“Don’t be surprised if you end up catching with the bread popped up three foot off the deck.”
Click on the image for more on how Jamie fishes with bread for carp
No-nonsense tackle
“You might only get a handful of bites so you need to have faith that your tackle is up to landing every single fish.

A sliding olivette creates less disturbance than a tradtional bomb or feeder.
“Mainline is 5lb MAP Optimum to 0.15mm Power Optex for F1s and small carp or 0.19mm for proper carp, finished off with a size 16 eyed PR36 hook.
“I also use an inline olivette instead of a traditional leger, stopped at the hooklength by a quick-change bead. . It creates less disturbance when hitting the water but is just as aerodynamic as a bomb for casting.
“I carry a range of sizes, from 4g up to 12g, but on a typical commercial fishery where you’ll only be casting 30 yards or so, an 8g olivette will do nicely.”
Steve Ringer's guide to fishing for skimmer bream
Feeding loose micros into deep water can be the kiss of death when you’re fishing for F1s and carp, as it leads to lots of line bites and foul-hooked fish.
But for skimmers it’s a very different story. This is a method that I first came across a few years ago after making a trip up to Hayfield Lakes for a silverfish match.
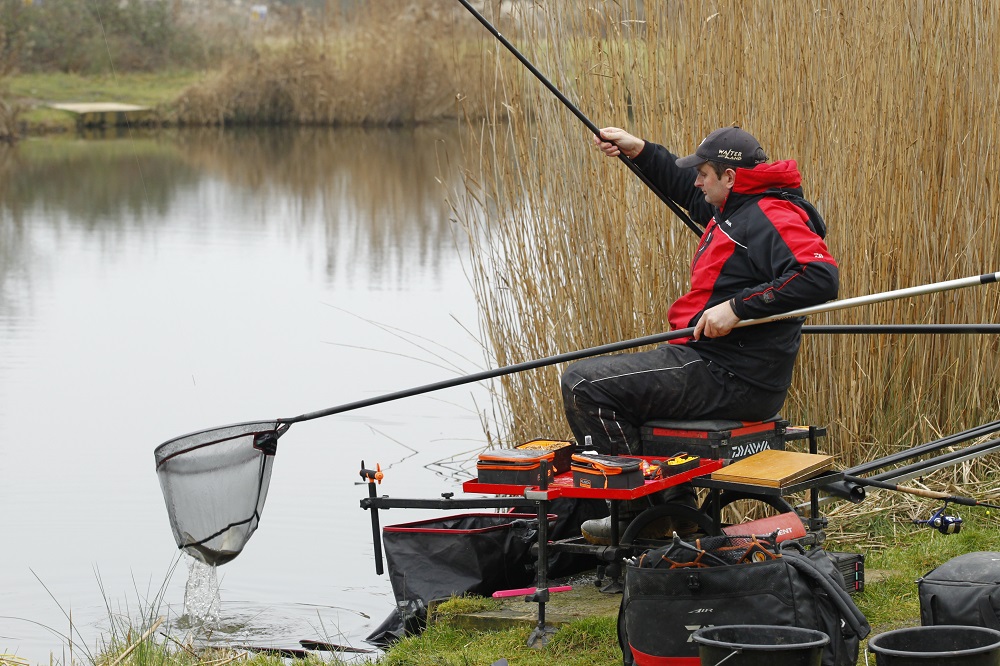
My plan was to target skimmers over groundbait and dead maggots and pinkies. In theory it was a good plan, but despite trying lots of different ways of feeding the swim, after two-and-a-half hours I’d managed just one small skimmer.
With time running out I knew I had to try something different to pull fish into the swim. I’d been told that Kinder potting 2mm micro pellets worked well for the skimmers on there, but I had dismissed it – frankly, feeding loose micros into 10ft of water seemed like madness to me.
But with nothing to lose I decided to give it a go so I quickly attached a Kinder pot and filled it with micros. Two feeds later I had a bite, then another and another, and within 20 minutes I was getting a bite every put-in from small skimmers. The difference was quite simply amazing. I can only think that the micros falling through the water were pulling fish into the swim.
Since that day it’s an approach I’ve used a lot and it’s rarely let me down. Right now, on waters with a silverfish bias, it’s definitely worth trying. I have to admit, it still doesn’t seem right, but it certainly works!

Wetted-down 2mm coarse pellets and expanders for the hookbait
How many pellets?
When it comes to bait it really doesn’t get any simpler - all you need is a pint or so of wetted-down 2mm coarse pellets and a few expanders for the hook.
I always like to prepare my micros the night before, slightly overwetting them so they soak up as much water as possible and expand to their maximum size. In fact, if you have the right micro pellet it’s even possible to use them on the hook!
Coarse pellets are best for this type of fishing as they are light in colour and skimmers can spot them easily as they fall through the water. As I’ve said many times before, I’m convinced that when the water is clear fish feed by sight rather than by smell, so these falling pellets offer a high degree of attraction.
Feeding

Steve starts by sprinkling half a pot of pellets
To kick the swim off I like to feed a quarter of a small 100ml Drennan pot of loose micros.
After the initial feed I like to let the swim settle for at least 30 minutes – I’m not a fan of going straight in when fishing for skimmers as I feel they need time to feel confident enough to feed. When I do decide to have a look, though, I will first load up a small Guru pole pot full of wetted-down micro pellets.
I’ll sprinkle half out straight away and wait for a bite. If I don’t get one within two minutes I’ll sprinkle in the other half of the pellets. I’m totally convinced the reason this method works is bait falling through the water, hence even if I’m not getting bites I like to keep a bit of bait going in.
From this point on I’ll feed to bites, and once I start getting a few fish I will feed again. This is a busier than usual way of feeding for skimmers, but it works, believe me!
Start on an expander

Starting hookbait: A 4mm expander
When it comes to what to fish on the hook I will always start with a 4.5mm Ringers Coolwater Expander. Skimmers love a soft pellet, and an expander stands out well over a bed of micro pellets, giving the skimmers something they can easily home in on.
I also carry a variety of sizes and colours of expander, just so I can mix it up throughout a session. You’ll often find, for example, that you’ll catch well on a standard 4mm expander to begin with and then bites will go a little bit funny, even though there are still fish in your swim.
I think what happens is that the fish get used to feeding on the micros and start to ignore the bigger baits. When this happens I switch to a 3.5mm F1 Light expander pellet to match the feed and keep catching.
My Rig (click to open in full)

Follow my advice for a catch like this..
Feed the right way to catch more silverfish
FEEDING a swim correctly at the start of a winter roach fishing session can make or break your catch, according to match ace Mark Pollard.
You need to think how you are going to deliver it to the swim. The Dynamite and Matrix-backed star uses five different methods of feeding, and here he reveals where and when each one comes into play.

Using a catapult will allow you to feed steadily and fish at range.
CATAPULT
“If you are fishing at a range that can’t be fed easily by hand, but a steady trickle of bait is required, then a catapult will play a big part in your strategy.
“If you have a fairly deep swim and you are targeting roach, it is far better to try to get them feeding shallow, as it will then take a lot less time for the float to go under once the rig has settled.
“Keeping a regular trickle of bait going through the water column will eventually bring the silvers shallow – even on really cold days – and introducing 10 maggots or casters every minute is ample.”
BY HAND
“Bigger species such as carp and F1s will be sat well away from the bank now, but you can guarantee silverfish will be at close quarters.
“A regular trickle of maggots and casters is needed to get roach shoals competing, and the easiest way to do that is by hand. As a rule of thumb I will feed 10 maggots or casters every minute or so.
“Feeding by hand also works on a ‘throwaway line’ close to the bank for bonus fish later on. Trickle in a few grains of corn or pellets throughout the session and it could produce a few key bites in the dying stages.”

Using a big cup allows you to feed accurately
BIG POLE CUP
“Feeding with a big cup provides pinpoint accuracy and more often than not that is key to getting a few bites.
“Make sure you don’t overdo it at the beginning – too much bait can kill a swim in an instant. Introduce something like 50-60 pellets or maggots over each line at the start and don’t add this amount again unless bites completely tail off.
“A big cup is also ideal for feeding balls of groundbait when you want the pile of feed to be concentrated tightly.”
BAIT DROPPER
“There’s no better way of guaranteeing that your bait gets to the bottom in flowing water than using a bait dropper.
“It is particularly useful when fishing worm and caster for big perch or chub, when you feed a decent quantity from time to time, as opposed to styles where a little and often approach is required.
“Use a bait dropper in very deep swims on stillwaters to get every morsel to the bottom where the bigger fish are.”
SMALL POLE CUP

A small cup allows you to re-feed after every fish
“Almost every top kit I have set up will have a small pole cup on the end, and I will usually add bait to the swim with it after every fish.
“The amount needed to top up at this time of year when fishing for carp and F1s is minimal – five to 10 pellets, maggots or grains of corn is more than ample to help get that next bite.
“Make sure your cup is as close to the pole tip as it can be so that you are feeding directly over the top of where your rig is sitting.”
BOOK A COAHCING SESSION WITH POLLY
To book a day of professional tuition with Mark visit: www.markpollardfishingdays.com

Get your feeding right and you can enjoy catches like this.