
Snag-free link legering rig for big barbel and chub
Barbel love to hide under or tight to streamer weed, sunken branches, tree roots and other submerged obstacles. That makes catching them really difficult.
Static leger rigs may seem to be the answer, but often they aren’t. A mistimed or an inaccurate cast might see the heavy rig land bang in the middle of the obstruction – not only snagging up, but also disturbing the fish in the swim.
If you’re overly tentative with your cast, your rig might land too far away and the barbel won’t want to move out from the sanctuary of the feature to take the bait, especially in daylight hours.
These are the times when a neat link leger rig really comes into its own.
A correctly balanced link leger not only allows the angler to reach the desired distance upon the cast, but it also allows you to let the bait trip gently downstream.
No longer will you have to accurately cast your rig onto an area the size of a dinner plate. With a link leger you can cast upstream of the fish-holding spot and gradually work it downstream right next to or even underneath the feature.
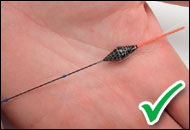
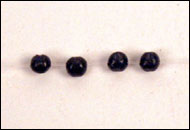
The key to a successful link leger rig is to use the right amount of weight upon the link. Basically you’ll need to squeeze enough split shot onto the link to ensure that the rig sinks quickly and just holds the bottom when the rod is placed upon the rests.
If you leave the rod alone, the rig will remain in place until a fish takes the bait or a large twig or strand of weed hits the mainline as it is swept downstream.
But if you gently lift the rod tip to dislodge the rig it will rise up off he bottom and be swept downstream a little closer to the snag. Now place the rods in the rest ready to detect your next bite.
You can slowly and steadily repeat this until the rig lies exactly where you want it to be.
But this link leger rig offers something a little unique. The split shot can quite easily fall off the link if they become snagged, therefore this rig is very fish-friendly and safe. It’s the perfect rig to use when you’re fishing very tight to snags.
HOW TO TIE A LINK LEGER RIG
You don’t need a huge array of tackle to create this rig. You will need some large split shot, your hook, your chosen hooklength material (braid or mono), strong mainline (around 6-8lb is ideal), a strong swivel and a swivel bead.

A – Your hook needs to match the species and the size of bait you are using. When fishing for barbel, use a very strong hook
B – Your hooklength needs to be strong enough to cope with the fight of a barbel. If you decide to use mono, opt for lines in the region of 6-10lb breaking strain. If you decide to use braid to camouflage it against the venue bottom, use 12lb breaking strain.
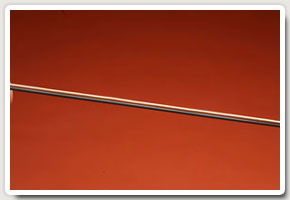
C – The best method of connecting your mainline to hooklength is to use a swivel.
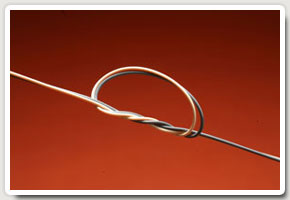
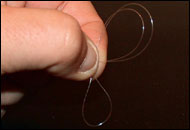
D – A swivel bead is the perfect accessory for attaching the leger link. Thread your mainline through the bead end and thread 6ins of strong line through the swivel. Fold this line over and lock the two lengths of line together using enough split shot to hold the rig onto the bottom. The beauty of this style of creating a link leger is that the split shot can quite easily fall off the link if it becomes snagged, leaving you free to play the fish back to the net.
E – Your mainline needs to be reliable and strong. 6-10lb breaking strain is ideal for most barbel fishing situations.
Popped up leger rig for pike and zander
The No1 rig when legering for pike or zander! It's easy to create, it's easy to cast, it's virtaully tange-free and it provides absolutely excellent bite registration.
It features a very long paternoster link that has a large bomb and one end and a large diameter swivel at the other.
All you need to create this rig is a 2-3oz bomb, some spare 10-12lb mainline, a large swivel, a large bead, your pike trace, some spare pike wire, a couple of Bait Poppers, wire cutters and a pair of forceps.
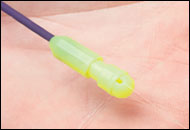
Firstly, you will have to attach a couple of Bait Poppers to your wire trace to ensure that the deadbait is lifted off the bottom and away from any weed.
Now cut off a 2ft length of 10-12lb mainline and tie it securely to your heavy leger bomb. Next you will need to tie a large swivel to the other end. This link needs to be at least 6in longer than your wire trace, so measure it first before tying on your swivel.
The best knot to use to tie your swivel and bomb to the line is a grinner knot.
Thread your mainline through the eye of the link's swivel, and then through a bead. Finally attach your pike rig onto the end of your mainline using another grinner knot.
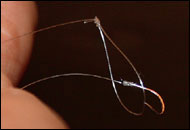
This rig casts really well, plus you can see whether it has become tangled throughout the cast. It's best to swing the lead around the wire trace before casting so that it rotates immediately before casting. This will keep the trace hooks and the leger link separate and therefore tangle-free.

A - use a heavy 2-3oz lead
B - a 10-12lb mono link is perfect
C - popping your deadbaits off the bottom works best
D - a large swivel followed by a bead minimises resistance to a taking fish
E - use 12lb mono or 30lb braid as your mainline.
Presenting expander pellets on the bottom with the pellet deck rig
This rig is ideal for presenting expander pellets on the bottom for carp, tench and bream. It can be used in depths of 3ft or more and when fished correctly it can tempt bites when all other pellet rigs fail.
A Use a long, body-down pole float for this style of fishing. One having a long plastic bristle is perfect as bite registration will be near instant.
B Cock the float with an olivette to form a bulk. This needs to be positioned around 12in from the hook.
C Place two dropper shot equally spaced between the olivette and the hook. Ideally they should be No10 shot that are light enough to create a gentle and natural fall of the bait through the final few inches of water.
D The hookbait should be set so that it just touches the bottom, so accurate plumbing is vital with this rig.
E The best way to tempt extra bites with this rig is to loosefeed little and often with sinking pellets, then lift and lower your rig regualrly. This gives the expander pellet plenty of movement, and the simple waft of the bait dropping down to the bottom can bring a bite when a static bait is often ignored.
How to tie a tucked water knot

Follow the steps below to learn how to tie a tucked water knot...
Place a shorter length of leader, say about 12 inches, next to the main leader as shown.

Now make a loop with both lengths making sure they remain together as one. You’re now ready to for the knot.
Pass the the loose ends (furthest from the fly line) through the loop at least two times. Many anglers prefer three or four times.

Moisten the knot and pull ends tight so the knot beds down neatly. Choose the loose end pointing towards the point fly as the dropper.

To make your droppers stick out away from the main leader, take the loose end (pointing away from the fly line) and tuck.

Moisten and gently draw tight. NOTE: This tucked knot suits standard mono and not fluorocarbon.
Drifter rig for catching pike at range
This is an absolutely deadly rig to use when pike fishing in a breeze. It can be used with dead or livebaits and can catch pike well out of casting range, and also catch pike from areas of lakes that are otherwise inaccessible to bank anglers. The best float to use is a Fox Drifter Float - they are perfect for the job.

A Use a floating braided mainline when drifter float fishing. The braid should be 30lb breaking strain as a minimum. Using braid ensures that you gain direct contact with the rig upon the strike, even when fishing 100 yards from the bank. The float needs locking to the required depth by using a powergum stopknot followed by a bead.
B Place a bead under the drifter float to protect it from the weight further down the mainline.
C Use either a series of large SSG split shot or a Fox Egg Sinker to cock the float. You will find Egg Sinkers in sizes to suit the size of the float body you wish to use.
D Whether you decide to use a live or a deadbait, they both should be mounted upon a wire trace using two sets of treble hooks. When using a deadbait, make sure you mount it in the same way as you would a livebait, so that the fish hangs horizontally and not vertically (which looks unnatural). One final point - set your rig so that your bait is positioned well off the bottom and away from any bottom weed.
Make a rig for your pole fishing
Here Jamie Masson shows how to make a pole rig at home, from individual components, so you have a complete set-up ready to fish with. Plus you'll be able to make the perfect pole rig for tackling your favourite venue. What you’ll need is:
1) Genesis Extreme II mono.
2) Pole winders and anchors.
3) Maver Black Ice pole floats.
4) Maver Match This hooks or hooks to nylon.
5) Silicone pole sleeve and a variety of shot.


1. Start by cutting three pieces of silicone pole float sleeves, two small and one three-times as long
2. Thread the rig line through the float eye then thread on three pieces of silicone in this order
3. Push the pieces of sleeve on to the float’s stem. The top piece is placed 1in below float’s body


4. Don’t push it right up to the float’s body as this causes too much pressure on the float’s eye
5. In the end of the mono above the float, double over the line and form a loop
6. Pass the tag end through the loop twice to form a double overhand knot


7. Lubricate with spit and pull the knot tight to form a loop in the top of the rig
8. This loop is used to attach the rig to the stonfo connector when you want to fish the rig.
9. To attach hooklink, make a loop in end of the mainline and pass through the hooklink loop

10. Now pass the hook through the loop in the end of the mainline
11. Pull the mainline and hooklink tight to form the loop to loop knot. (Hooklinks not used on carp rigs)
12. With the hooklink on, shot the float using Jamie’s guide (right) to the amount of shot you’ll need


13. To place the finished rig on a winder, first place the hook on to the winder’s peg
14. Carefully wind the rig on to the winder,then place a rubber winder anchor into the end loop
15. Pull the rubber pole winder anchor and slot it over the peg in the end of the winder

16. Always make sure the float sits in the deeper side of the winder so it doesn’t get damaged in your box
How to balance your tackle
Elastic size
Line size
Hook size
No5 solid
0.06mm - 0.12mm (1lb - 3.3lb)
22 - 18
No8 solid
0.12mm - 0.16mm (3.3lb - 5.7lb)
18 - 14
No12 - 20 Dual Core
0.14mm - 0.20mm (4.2lb - 8.8lb)
16 - 12
No 16-20+ Dual Core
0.16mm - 0.26mm (5.7lb - 13.2lb)
14 - 8/6
Jamie's guide to shotting
Styl wt.
Shot wt.
Pattern 1
Pattern 2
4x10
0.1g
4xNo10 bulked
4xNo10 strung out
4x12
0.2g
5xNo10 bulked
3 bulked & 2 droppers
4x14
0.35g
4xNo8 bulked
3xNo8, 2xNo10 drop
4x16
0.5g
5xNo8 bulked
3xNo8, 3xNo10 drop
Shopping list
The bait and tackle to get you started
l Genesis Extreme II mono – £5.99
l Pole winders and anchors – £2
l Maver Black Ice pole floats – £1.50 each
l Maver Match This hooks – 99p for pack of 10 hooks
l Silicone pole sleeve and a variety of shot – £4
