
Roach Fishing Rig | River waggler rig
Few tactics are more fun than running a waggler down a steady stretch of your local river and putting together a mixed bag of chub, roach and other silver fish.
When the conditions are right this is a very successful style of angling, with fish often being caught on the drop as well as when the hookbait is tripping along the riverbed.
Many anglers struggle with this tactic, for two simple reasons. First, they attempt to fish like this when the wind is blowing downstream. This will make presentation very difficult, as the wind will constantly pull the float off line. The type of waggler and its shotting pattern have to be correct, too, to avoid tangles and to present a slow-sinking bait.
Use a waggler with a thick, buoyant tip that resists being dragged off line or under when the hookbait catches the bottom.
Spread the shot evenly to ensure a constant sinking rate and to avoid tangles.
If you follow these simple steps your set-up will work effectively, giving you some fantastic sport.
1) Float adaptor
A float adapter enables the float to be changed quickly and offers little resistance on the strike.
2) Even speed of fall
No6 shot set at 2ft intervals down the line help the hookbait to fall through the water at a natural speed.
3) Maggot hookbait
Big chub and smaller silver fish will both readily take a double red maggot hookbait on a size 18 hook
How to tie a river waggler rig

1) A float adaptor like this enables you to change the size of the float and helps the float fold flat, creating less resistance on the strike.

2) Set the float at the rough depth of the swim and lock it with AAA shot. If the float is rated to 4AAA+ use four AAAs around it.

3) Tie a size 18 hook to an 18ins length of 2.5lb line. This is strong enough to tame any larger chub, yet fine enough to bring plenty of bites.

4) Attach the hooklength to the mainline using a loop-to-loop knot. This ensures the hooklength can be easily changed.

5) Place a No8 shot about 6ins above the hook. This will accentuate bites, and should be set so that it is just touching the river bed.

6) Fix No6 shot at 2ft intervals above the tell-tale shot. These straighten the line on the cast so the hookbait sinks at a natural speed.
Roach fishing rig | The waggler
The waggler is the approach that most anglers began their fishing career using.
On a mixed commercial fishery where bites are the name of the game, it’s ideal for a relaxing day catching quality roach with the odd bonus surprise thrown in.
Roach are a species that will feed at all depths, and because of the waggler’s versatility compared to that of the feeder, you can target fish feeding from a foot deep to hard on the bottom, making changes throughout the day to keep in touch with the fish.
Rod and line tactics mean that if you hook a carp or two, you’ve or every chance of getting them out – something that can’t be said for a pole armed with a light rig!
1) Insert or straight?
Insert and straight wagglers perform very different jobs. For all-round fishing the insert can be fished with the bait falling through the water (known as on the drop) or hard on the bottom.
It can also be used for fishing shallow, and can be identified by the thin insert tip. The straight waggler is better for fishing on the bottom, often with a few inches of line laid on the lakebed to present a still bait. The straight waggler has a thick, blunted tip.
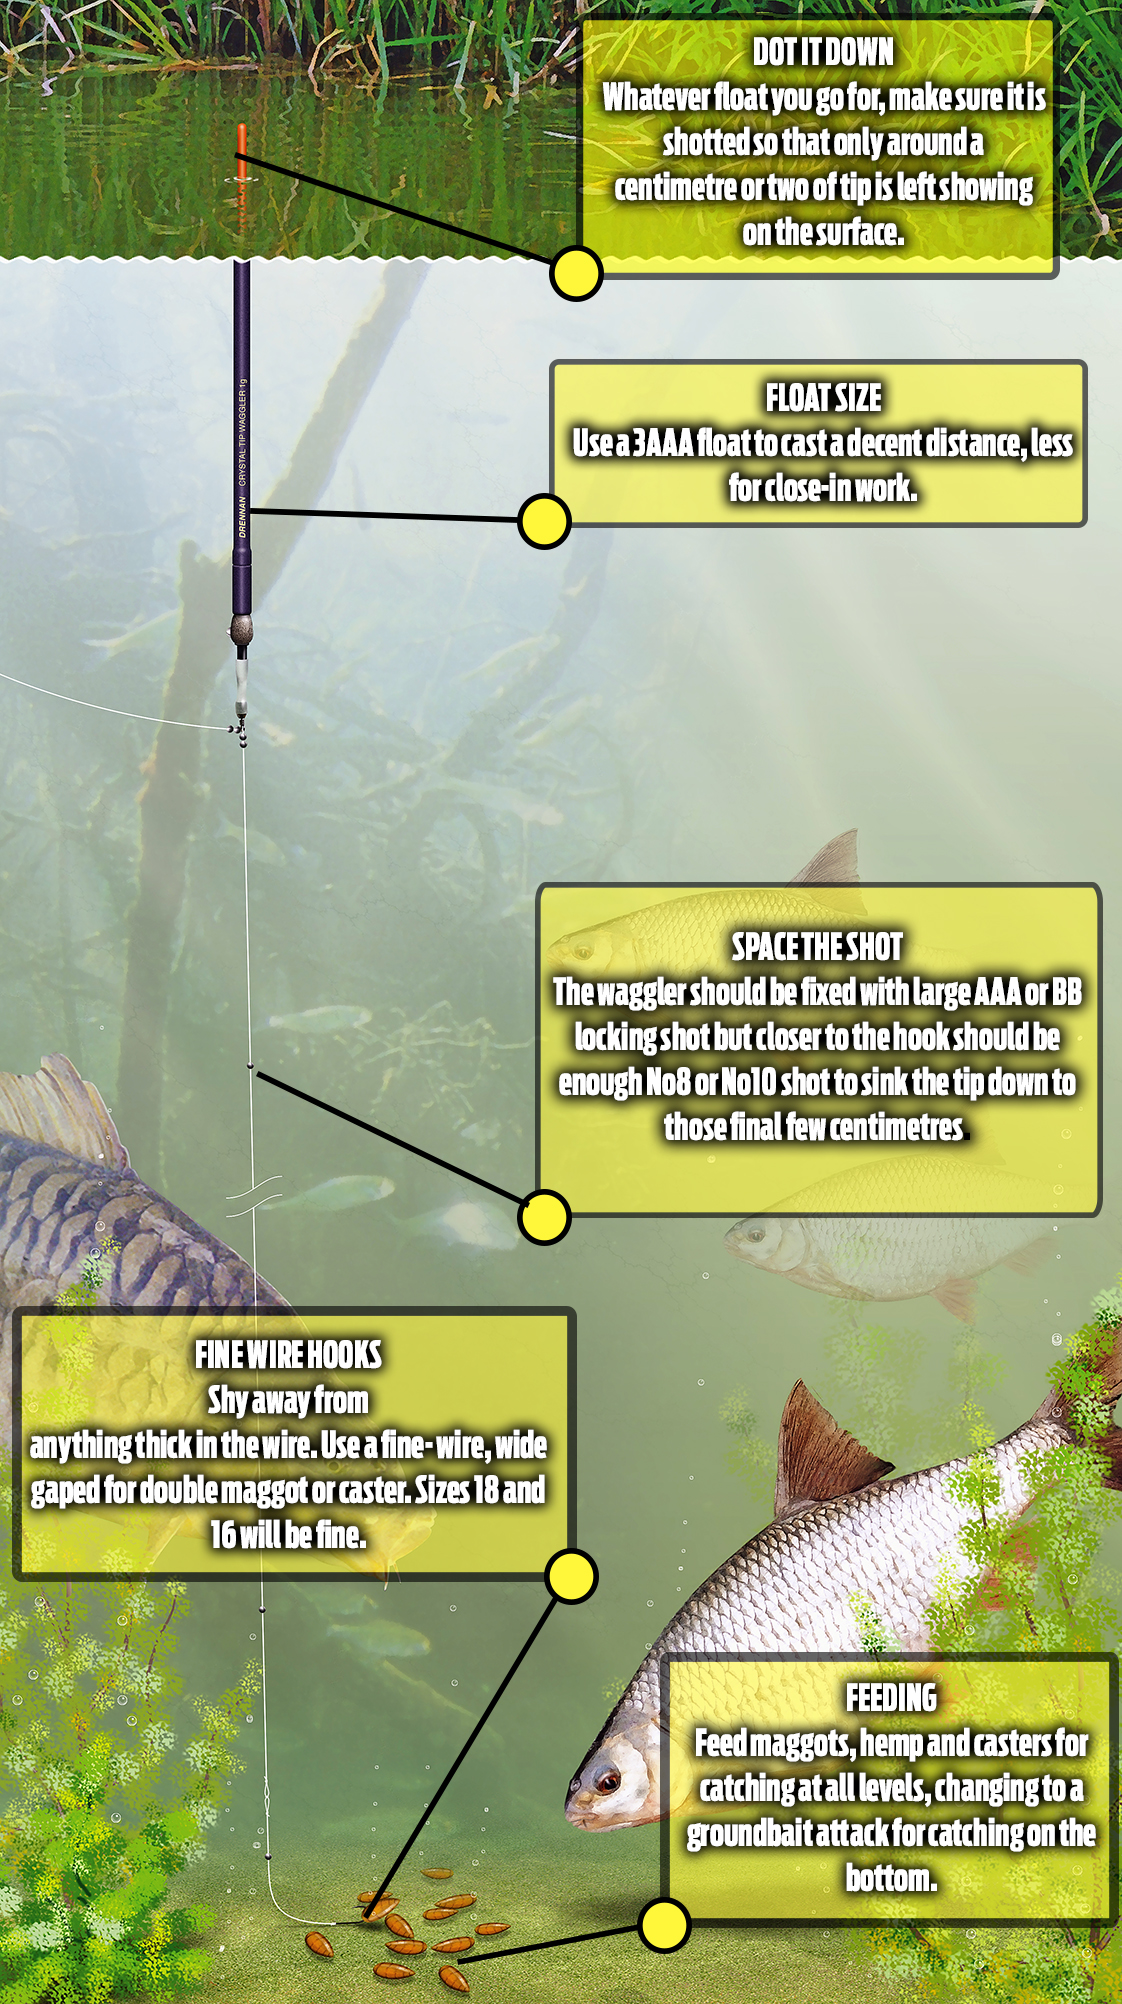
2) Float size
If you need a decent cast to find the fish a 3AAA float is about right. If you plan on catching fish close in on the drop a big float isn’t needed. Prepared anglers will carry a range of float sizes, to cover all eventualities, but a 2AAA straight or insert waggler will deal with most jobs.
3) Feeding
What you feed should be based on where you want to catch the fish in the swim. That means using maggots, hemp and casters for fishing off bottom or on the drop, changing to a groundbait attack for catching on the bottom.
A steady trickle of loosefed maggots or casters (a dozen fed every few minutes) will work for catching off bottom.
If you go down the groundbait route, two or three balls with casters and hemp added will get the swim going. You can then loosefeed over the top or rely on a top-up of the odd ball of groundbait when bites fade away.
4) Space the shot
The waggler should be fixed with large AAA or BB locking shot but closer to the hook should be No8 or No10 shot, enough to sink the tip right down. You should end up with five or six shot down the line.
Push these together as a large bulk just above the hooklength for fishing on the bottom or space them between hook and float to give the bait a slow natural fall through the swim.
5) Hookbaits
Classic roach baits are red maggots, casters or small pieces of worm fished as singles or doubles, but a bold big bait can sometimes score.
That means a grain of sweetcorn or even a piece of breadflake are both worth slipping on to the hook now and again.
How to tie | The slow sinking feeder
During summer fish will often be stationed well up in the water, especially on deeper lakes where they will find a depth where the light-levels and temperature suit them.
At short range this situation is ideal for fishing a waggler rig with the shot well spread so that the hookbait falls at a slow rate, matching that of the free offerings.
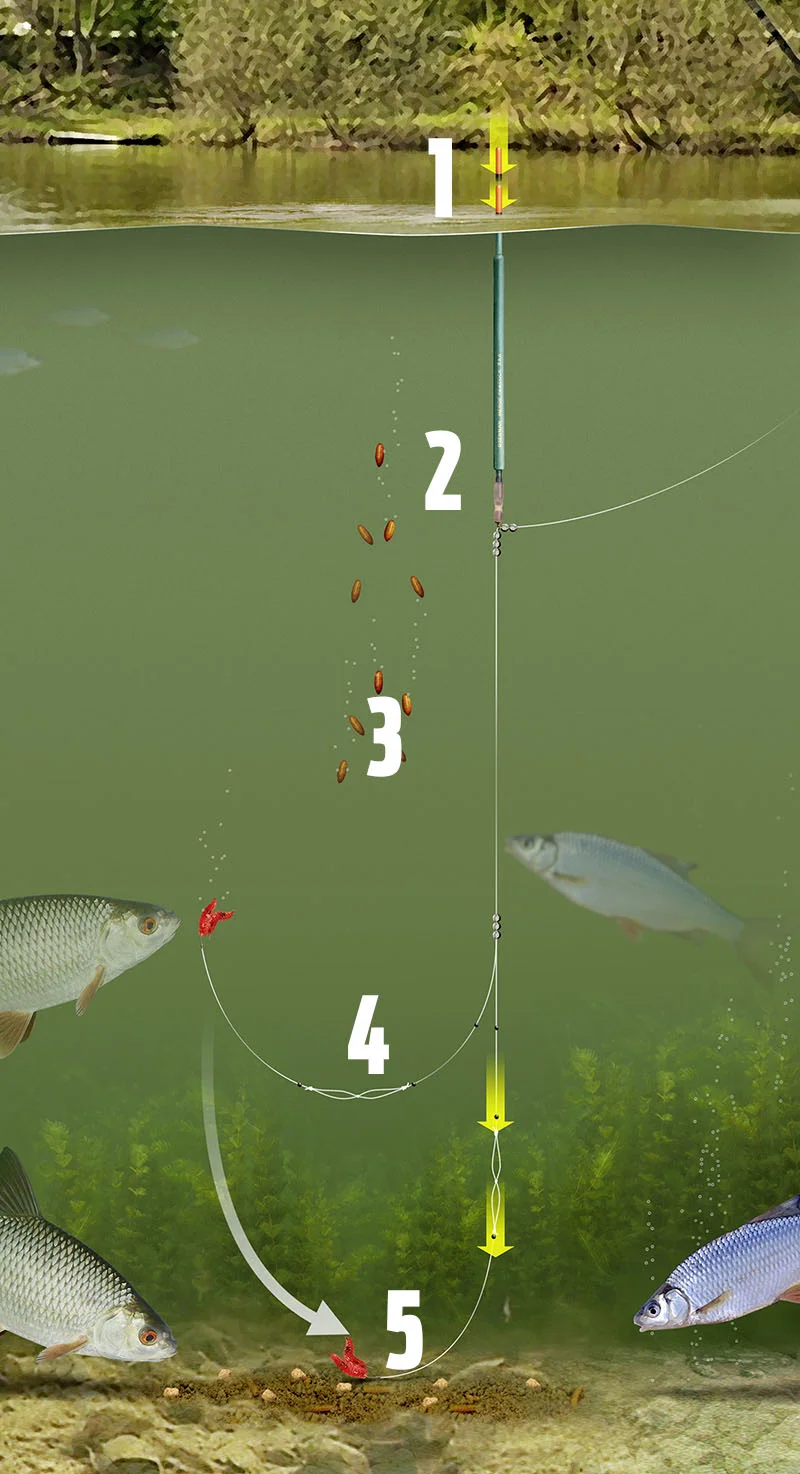
But what if you are fishing beyond float range? On big rivers, reservoirs and large gravel pits, roach, rudd and bream will often not come within 30 metres of the bank. This is where the on-the-drop feeder comes into its own.
By using a long hooklength and a lightweight feeder the time it takes the rig to settle is extended, giving fish plenty of time to intercept the hookbait on the drop.
Bites can be expected at any time. It is not uncommon for the quivertip to never signal the feeder touching down, as a fish intercepts the bait in mid-water. Also, bites can be expected within seconds if the feeder does hit the bottom. There is no point in leaving the feeder once the rig has settled on the bottom.
Within a minute or so of casting, wind in, rebait and recast to keep a constant cloud of attractive bait falling through the water column.

Thread a Medium Grip Mesh feeder on to your mainline. Choose a feeder weight of around 14g-28g

Follow the feeder with two small rubber beads. These act as a shock-absorber cushioning the feeder on the cast

Fold over the last 30cm ofmainline and tie a large loop. Next, tie four further loops inside the large loop at regular intervals

Ensure that the beads and feeders come to rest on the uppermost knot. If they slide over, tie a second knot over the first

Cut off a 120cm length of hooklength. Use hooklengths of 90cm-180cm to vary the sinking speed of the hookbait

Tie on the hook using a spade-end knot where the hooklength line has been first passed through the eye of the hook

Once you’ve attached the hook, tie a figure-of-eight loop knot in the other end of the hooklength

To complete the rig, simply attach the hooklength to the mainline using a loop-to-loop knot


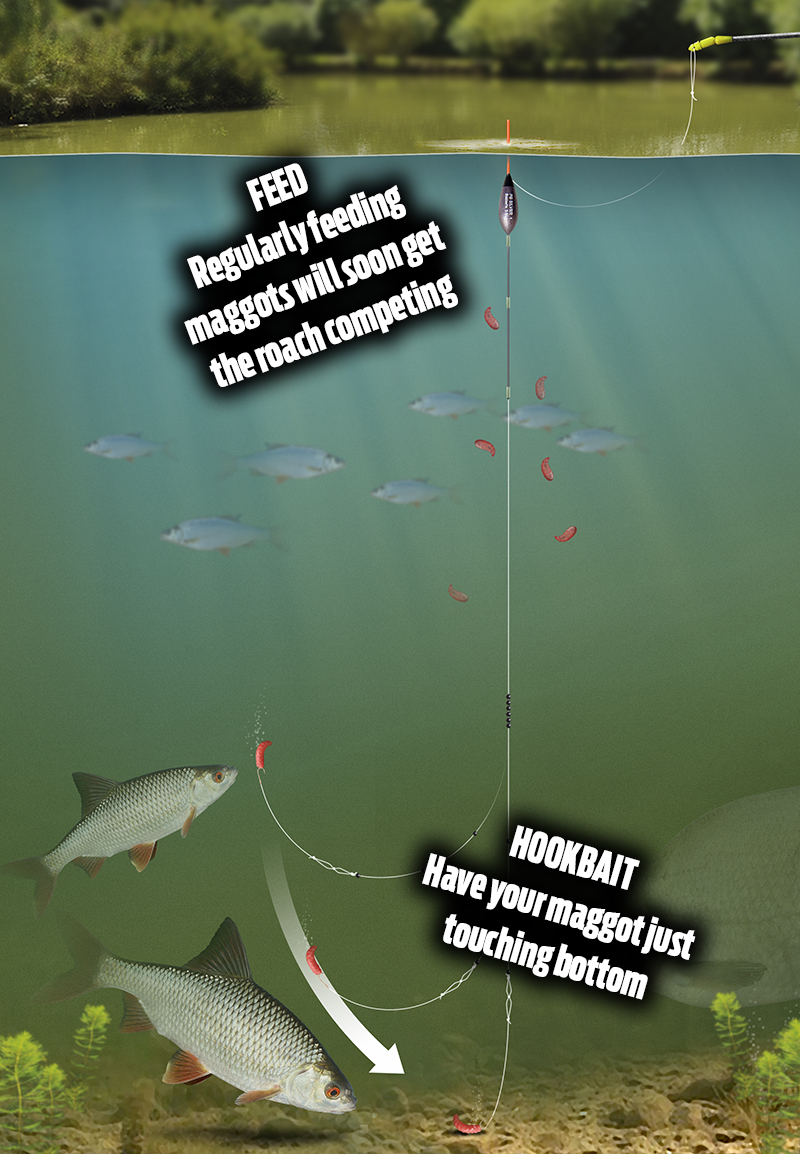
Essential river roach rigs
Roach are very obliging and will often give you a few bites when not much else is happening.
Legering is worth a go but the truly classic way to catch roach from a river is to floatfish with a waggler or stick, running the hookbait down the swim with the pace of the flow and loosefeeding regularly. Over time you can build the swim up so it draws more and more fish in. As a result, the fishing gets better and better.
Should you find yourself on a slow, deep river it’s time to turn to the pole. This is a very positive way to fish with a big float in conjunction with groundbait to get the bait down fast. It gets far quicker results than rod and line.
Water conditions play a big part in choosing your tactics. As a rule of thumb, colour in the water lends itself to feeding groundbait and fishing the pole, while gin-clear rivers are best approached with the float and loosefeed.
River pole rig
Offering precision feeding and bait placement, along with delicacy of presentation, it’s no wonder the pole is the number one choice of match anglers.
But the pole is also a very attacking method, should you be faced with lots of roach. You can get the bait down quickly using a big float, feed plenty and hit bites with more accuracy than with a waggler or stick float.
Better still, if you can get the fish at short range, a long pole or whip to hand can be quicker still!
Top hookbaits
Begin with maggots, ideally a single bronze maggot. This will get you quick bites, but have an eye on changing to something like a caster or even a grain of hemp later in the session to search out quality fish. Feeding hemp and caster will give you the best chance of catching on both, as the fish will become used to them over time.

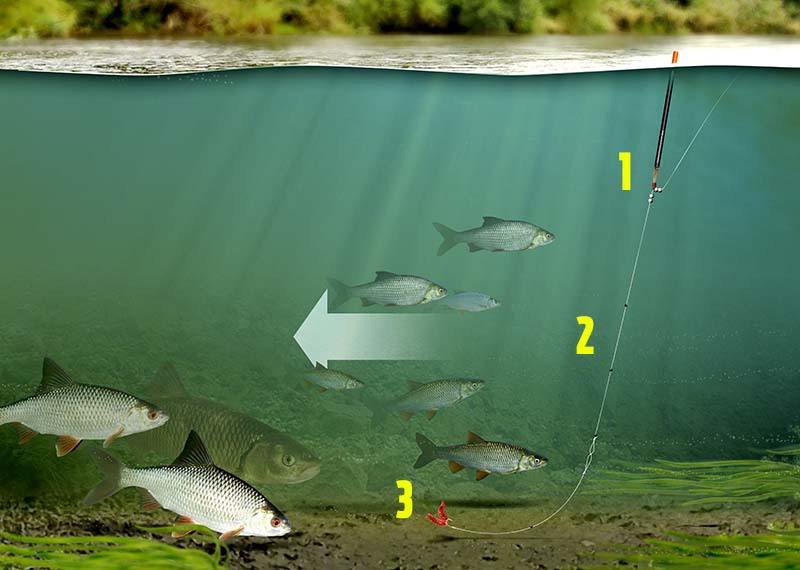
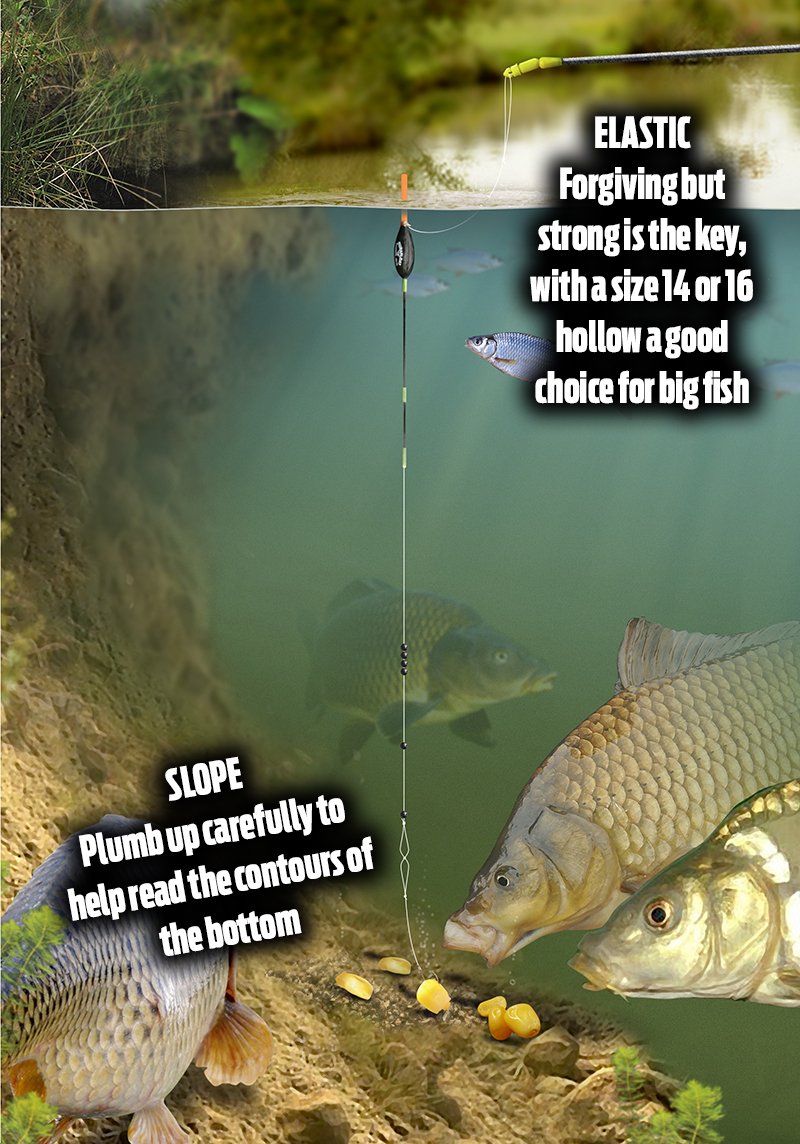
River waggler rig
Few methods lend themselves to fishing a river better than the waggler. This float allows you to cover a lot of water, fish at different depths and present the bait well overdepth or just tripping bottom – it’s that versatile!
To truly search a peg out for roach, gear up with a straight thick peacock waggler that’ll let you drag line on the bottom to slow the bait down without it being dragged under.
This method, when fished with loosefed maggots, is brilliant and gives you the chance of catching a bonus chub or two as well.

River maggot feeder rig
Perfect for introducing small consignments of bait into tight spots such as overhanging snags where the fish lurk, the maggot feeder is also perfect for catching roach in clear river conditions when groundbait may prove to be a bit of a turn-off.
Regular casting, say every five minutes, will build up a stream of bait in the peg, which in turn will draw roach from downstream over time. When it works, the maggot feeder should produce bites within seconds of it hitting bottom.

Top 5 pole rigs that you need to try!
No matter where you choose to fish this month, you can guarantee that your target species will come close to the bank in search of food now that the temperatures have risen sharply.
When this happens, the pole is an unbeatable item of tackle but the sort of rig you use with it will dictate whether you get just a few bites or have a session that you won’t forget in a hurry.
Paying careful attention to your terminal tackle and bait choices is vital if you want to make the most of your time on the bank, as is getting the subtle details such asshotting and float patterns spot on.
We reveal the five most deadly spring pole rigs that are almost certain to help you and your friends put more fish in the net.
The Worm Rig

GOOD FOR: Putting together big mixed bags of quality bream and tench on stillwaters.
TACKLE: Use a rugby ball-shaped float with 5lb mainline, a 4lb hooklength and size 14 or 16 hook.
HOOKBAIT: Half or a full worm will appeal to both species at this time of year.
The Maggot Rig
GOOD FOR: Quality roach that will only feed if the hookbait looks natural.
TACKLE: Keep it light with 3lb mainline, a 2lb hooklength and a size 18 or 20 hook.
HOOKBAIT: Red maggots will keep the bites coming. Alternate between single and double.
The Pellet Rig

GOOD FOR: Catching F1s and carp in open water swims on commercials.
TACKLE: A narrow float will help you spot every bite. Use 5lb mainline to a 4lb hooklength and a size 16 hook.
HOOKBAIT: Start with a 4mm expander, switching to a banded pellet if small fish show.
The Margin Rig
GOOD FOR: Catching the biggest carp and F1s in the lake, especially late in the session.
TACKLE: Don’t risk getting bust by a big carp and use 6lb mainline to a 5lb hooklength. A strong float with a thick tip is a must.
HOOKBAIT: Corn is unbeatable in the margins.
The Meat Rig

GOOD FOR: Fishing in open water for carp, F1s, big bream and tench on commercials.
TACKLE: A balanced rig helps catch all species. Use 5lb mainline, 4lb hooklength to a size 16 hook.
HOOKBAIT: A 6mm cube of meat will catch all species that are stocked in the fishery.
Three pellet waggler rigs to fish this weekend!
A waggler is the most versatile float of all, capable of catching fish from rivers, canals, commercials and massive natural lakes.
But within the waggler family there are groups of floats that have very definite roles to perform. These include the pellet waggler for distance fishingup in the water, and see- through plastic floats for use on gin clear waters.
At this time of year, when the weather can change drastically from one day to the next, being adaptable is the key to catching.
To make sense of the types of waggler, how the rig should be set up and the best baits and feeds to use, try these rigs that will cover just about every base over the next few weeks…
Insert waggler rig for silver fish
Fish can be caught on commercials at a range of depths in spring, so if there was one versatile float to pick it’d have to be the insert waggler. This rig is a simple to make waggler set-up for tackling a typical lake swim up to 8ft deep.
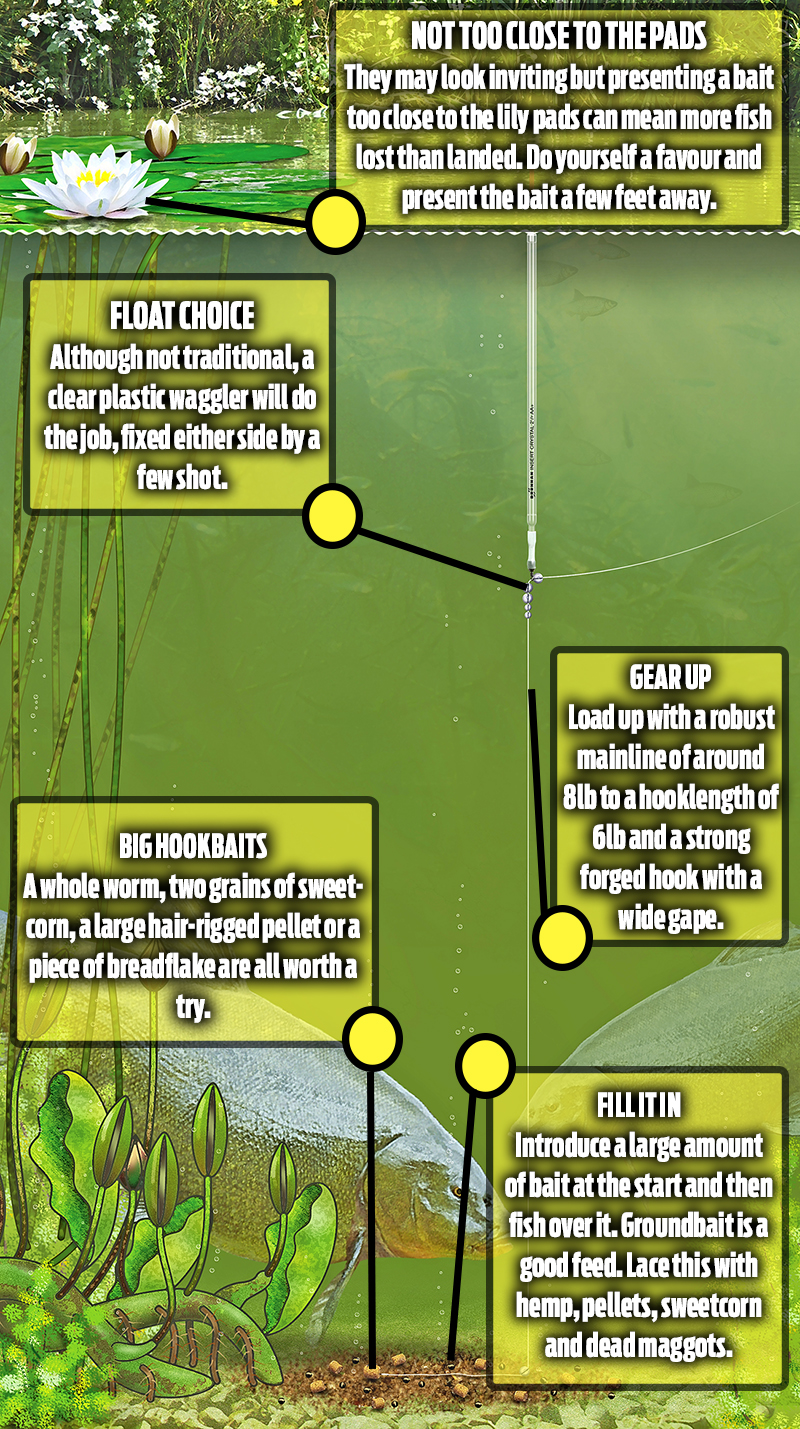
Waggler rig for tench
There are few more evocative sights in fishing than a float poised next to a patch of lilies, ringed by the tell-tale pinhead bubbles of feeding tench. This rig allows you to fish what’s known as the ‘lift’ method, using a large shot on the lakebed.
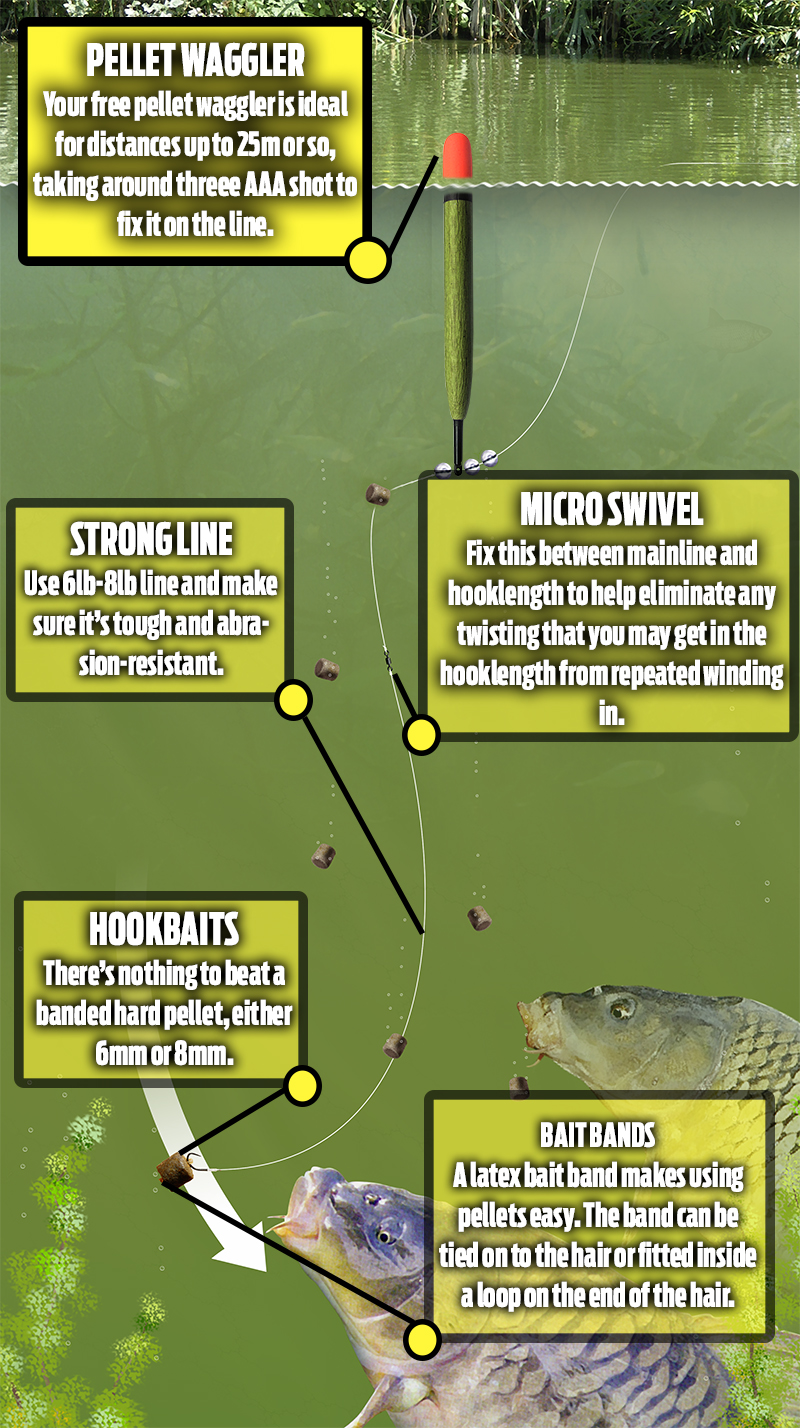
Pellet waggler rig
The pellet waggler rig is all the rage right now but how do you fish it? Well setting the pellet waggler up is easy to do and a brilliant option in May and June when the weather starts to warm up.
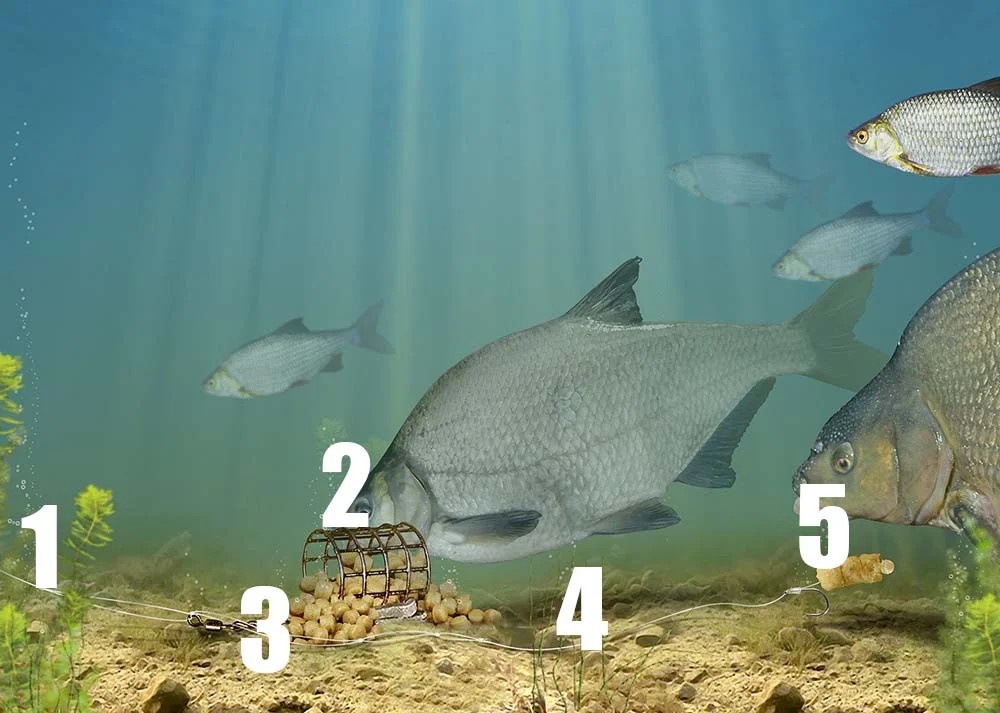
The helicopter feeder rig
The helicopter feeder has become a mainstay for a great many anglers fishing for species as diverse as specimen roach, tench and carp.
This rig has two main advantages. It is very tangle-proof, especially when higher diameter line is used for the hooklength and also an effective bolt rig, meaning that most bites will be very positive.
Coupled with a maggot feeder, this is an excellent set-up for big roach. With a larger oval maggot feeder, it lends itself well to fishing for tench. The hooklength should be as short as possible, generally around 3in-6in, which can be quite tricky to tie, but persevere, because the resulting rig is well worth the effort.
The hooklength should be stopped just above the feeder, although not so close that the hook can accidently foul the feeder on the cast. As a general rule, the closer the hooklength is to the feeder the more bites you will get.
This is the ideal rig to tie if you plan to fish a ‘sleeper’ rod while float fishing, because generally the bites are unmissable. For this reason, it pays to use a reel with a freespool facility that can give line when a fish bolts away.
How to tie
Cut off 20cm of Power line. This hooklength should not be too fine to avoid tangles

Tie on the eyed hook using a through-the-eye whipping knot with 12 turns, for a great angle

Thread a Rig Sleeve on to the other end of the hooklength, tapered end towards the hook

Tie on a Micro Rig Swivel using a twice-through-the-eye four-turn grinner knot

Thread a soft Line Stop on to the mainline, which should be at least 6lb to avoid breakages

Thread on the hooklength swivel, followed by a second Line Stop leaving a 5mm gap
Thread another Rig Sleeve on to the mainline. Tie on swimfeeder using a four-turn grinner

Slide the stops and hooklength into position so that the hook rests just above the feeder
Rig for floatfishing close to islands and features
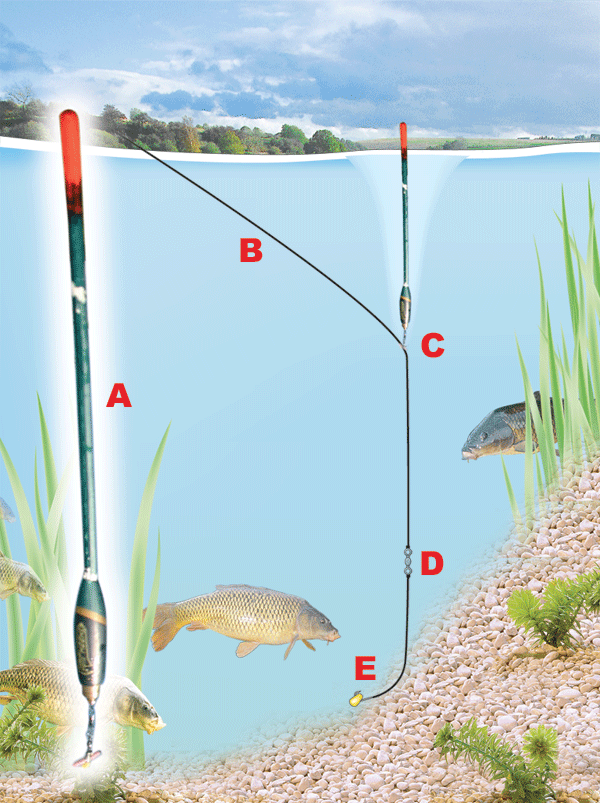
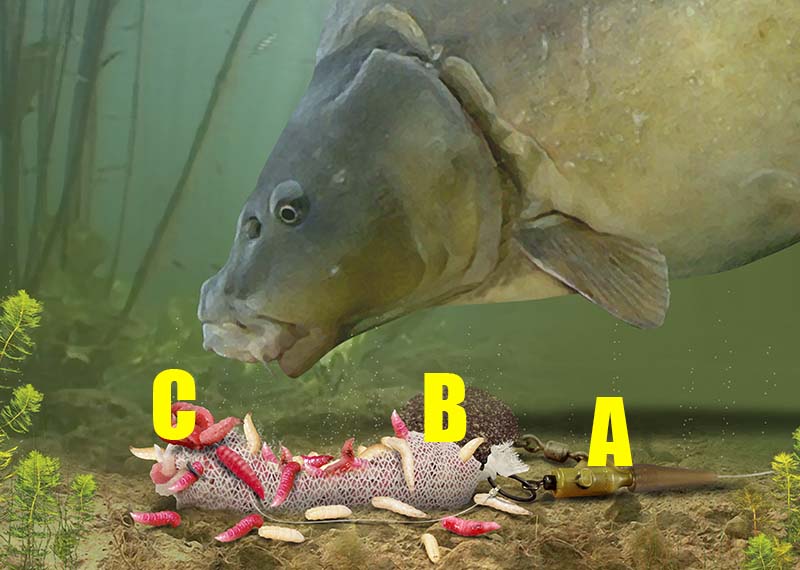
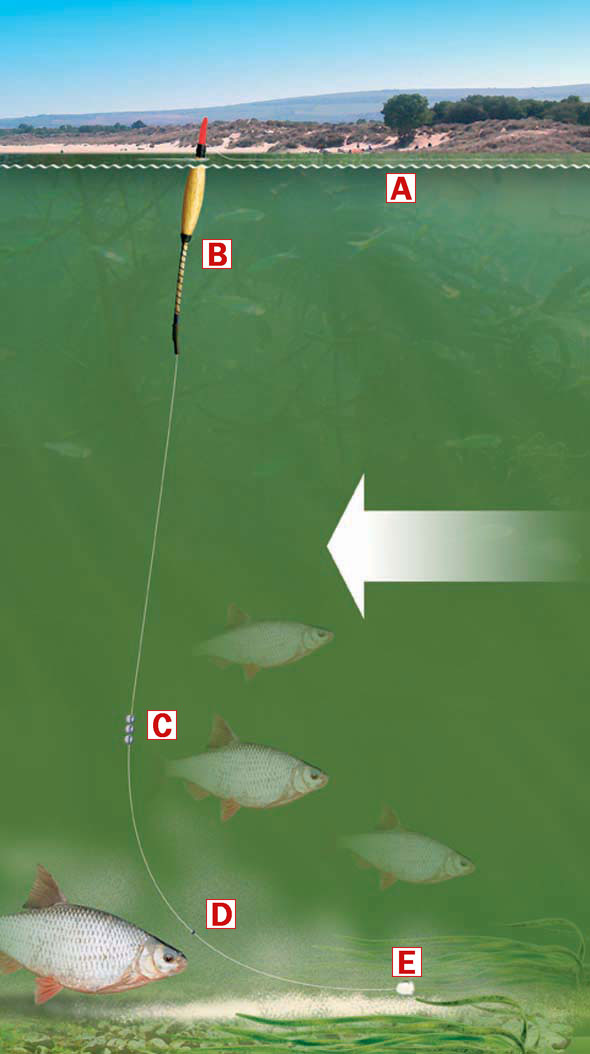
This float rig is ideal when casting tight to an island to catch the carp that patrol around its margins. As you will be casting to a feature you can actually use this rig with the line clipped up because a hooked fish will not be able to swim away from you - it can only swim to the side or towards you.
A Use a loaded, bodied float that is attached to the line with a fixed float adaptor. Alternatively a couple of tiny split shot will suffice. The best float to use is a straight bodied waggler because they pop up to the surface very quickly, ready to detect a bite straight away.
B Mainline needs to be strong enough to cope with carp and the problem of hooked fish reaching any snags. We suggest using no lighter than 4lb.
C Make sure that the depth is plumbed accurately so that the rig is set cotrrectly and that the bait touches the bottom.
D By using a swivel to link the mainline to the hooklength esnures that a replacement hooklength can be attached quickly, and as this rig will be cast a lot of times, the hooklength will not spin up as the bait revolves when it is being drawn back to the bank.
E Ideal hooklengths for this rig need to be 0.14mm and above. The best baits for this style of fishing are either sweetcorn, maggots, casters or a piece of worm.
How to use a chubber float for fishing shallow and fast rivers or streams
The short, fat and dumpy chubber float is perfect for fishing shallow and fast river glides or trotting on streams. It’s capable of carrying a lot of shot, due to the size and buoyancy of the float. This is perfect because fast, shallow swims need a lot of lead down the line to ensure that the bait is pushed down to the bottom right where the fish are.
A typical chubber rig is simple to tie, and here’s how…
A Your mainline ought to be a floating one. Drennan Floatfish is perfect. Choose a breaking strain that matches the fish that you are likely to catch. A 3lb line will be adequate for most situations, but you may need to step up to 5 or even 6lb if there are lots of big barbel present.
B The chubber float needs to be attached to the mainline using three rubbers – one just under the sight tip, one in the middle and one at the base of the float.
C There are two ways to shot a chubber float – either use a string of large shot (BBs, AAs or even SSGs) placed around 1ft from the hook, or alternatively use an olivette. This creates a much smaller and neater bulk of weight.
D Because chubbers should be fished in fast water, the fish don’t have that much time to check out the hooklength, so this sort of rig can be fished straight through to your hook. You still need to match the hook size to the size of the bait you are using.

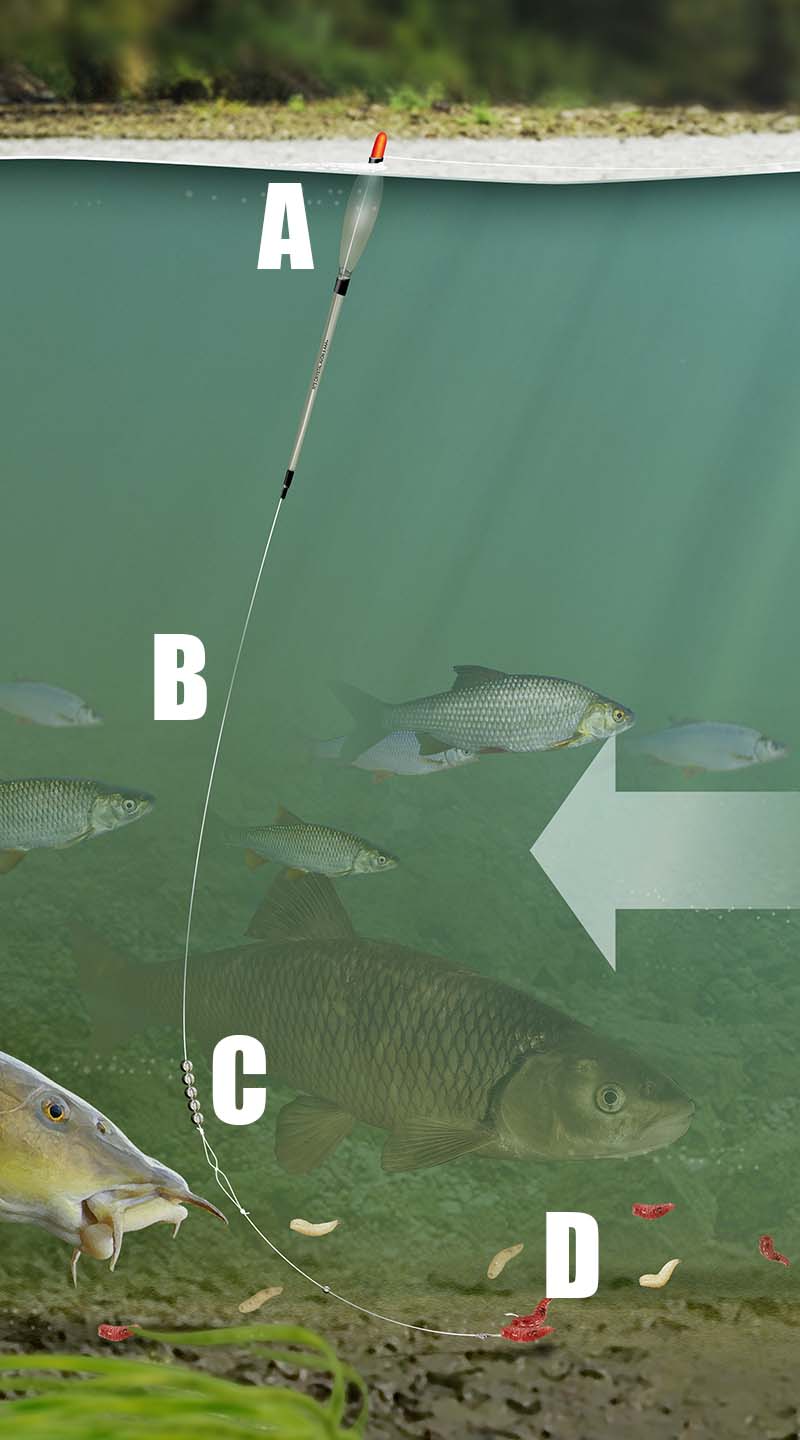
How to plumb the depth when floatfishing a waggler
Close in
Hold the plummet in one hand and your rod in the other – flex the tip of the rod slightly by pulling the line taught. Open the bail arm of the reel. Swing the rod upwards, let go of the plummet and take your finger off the spool to cast the plummet into the swim. Timing and a smooth motion is crucial, so do it very slowly to begin with to gain practice. Casting the plummet in this fashion minimises the disturbance it causes when it hits the water – but you can cast it overhead just like you would a float if you can’t master this way.
At distance
Pinch an SSG weight onto your hook (inset). Cast it into the swim in an overhead fashion. As long as the SSG is enough to sink your float it will take it out of sight if you are too shallow. When you can only see the fluorescent part of the float, it is set at a dead depth.
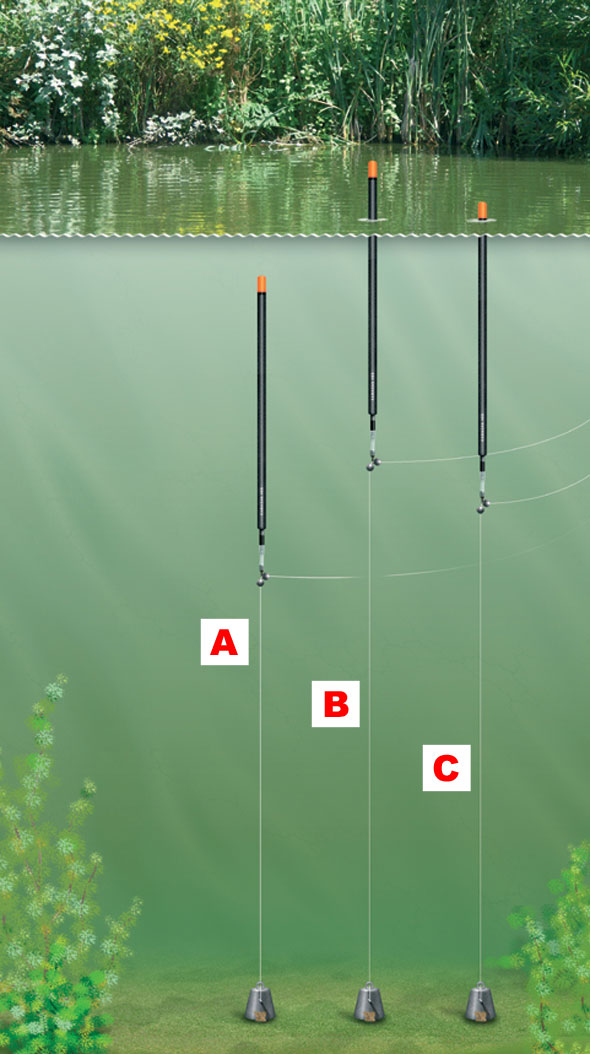
A. This shows you are too shallow.
B. This shows you are slightly too deep.
C. This shows you are just on the bottom.
How to find the depth when pole fishing
Plumbing and finding the depth of the lake, canal or river when pole fishing is a lot easier than finding the depth when you're float fishing because you can simply lower the plummet into your swim and gently drop it onto various areas of the swim to gain a true picture of the venue's depth.
It's a vital part to a successful session as it will give you a true picture of what's under the water and therefore give you a great insight into where you should be feeding and placing your bait.
You can also use your plummet to locate any underwater obstacles too by gently 'swinging' the plummet through the swim to see if it becomes lodged against anything that's submerged.
Here's how to go about finding the depth on your pole line...
STEP 1
Pass your hook through the eye in the plummet
STEP 2
Secure your hook into the cork in the base of the plummet.
STEP 3
Lower the plummet into the swim below the end of your pole.
STEP 4
Add a section of pole at a time and plumb around the swim, lowering the plummet straight down, not at an angle, to ensure an accurate reading of the swim.
STEP 5
Once you have got the exact depth of the swim, hook your hook into the base of your pole top kit. This will pull the elastic out slightly and secure your rig. With Tipp-Ex, mark the point where the top and the bottom of your float sit against the pole. This means you always have a point to refer back to should you change the depth you are fishing during the day.
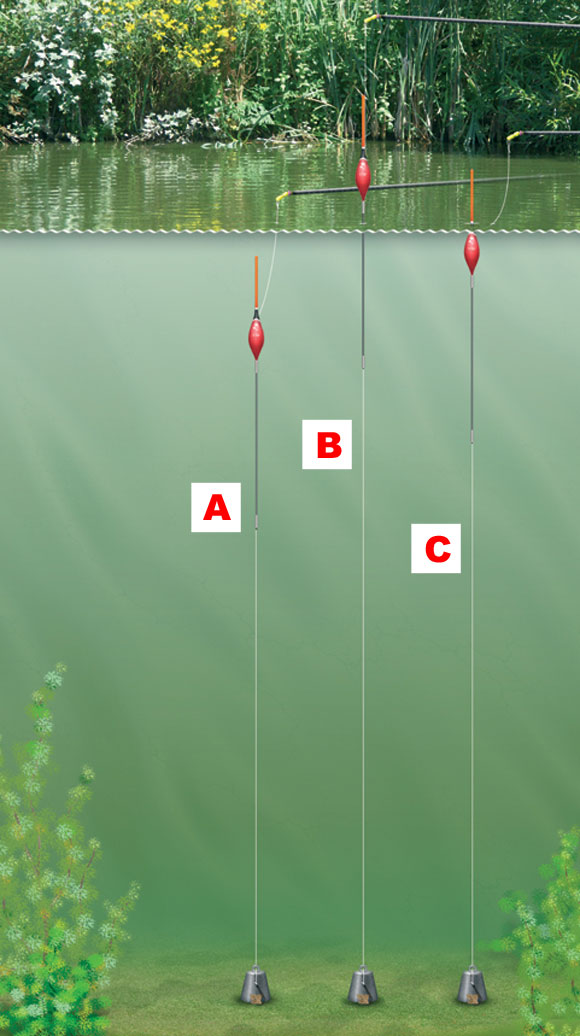
A. This shows the float is set too shallow
B. This shows the float is set too deep
C. This shows the float is set perfect
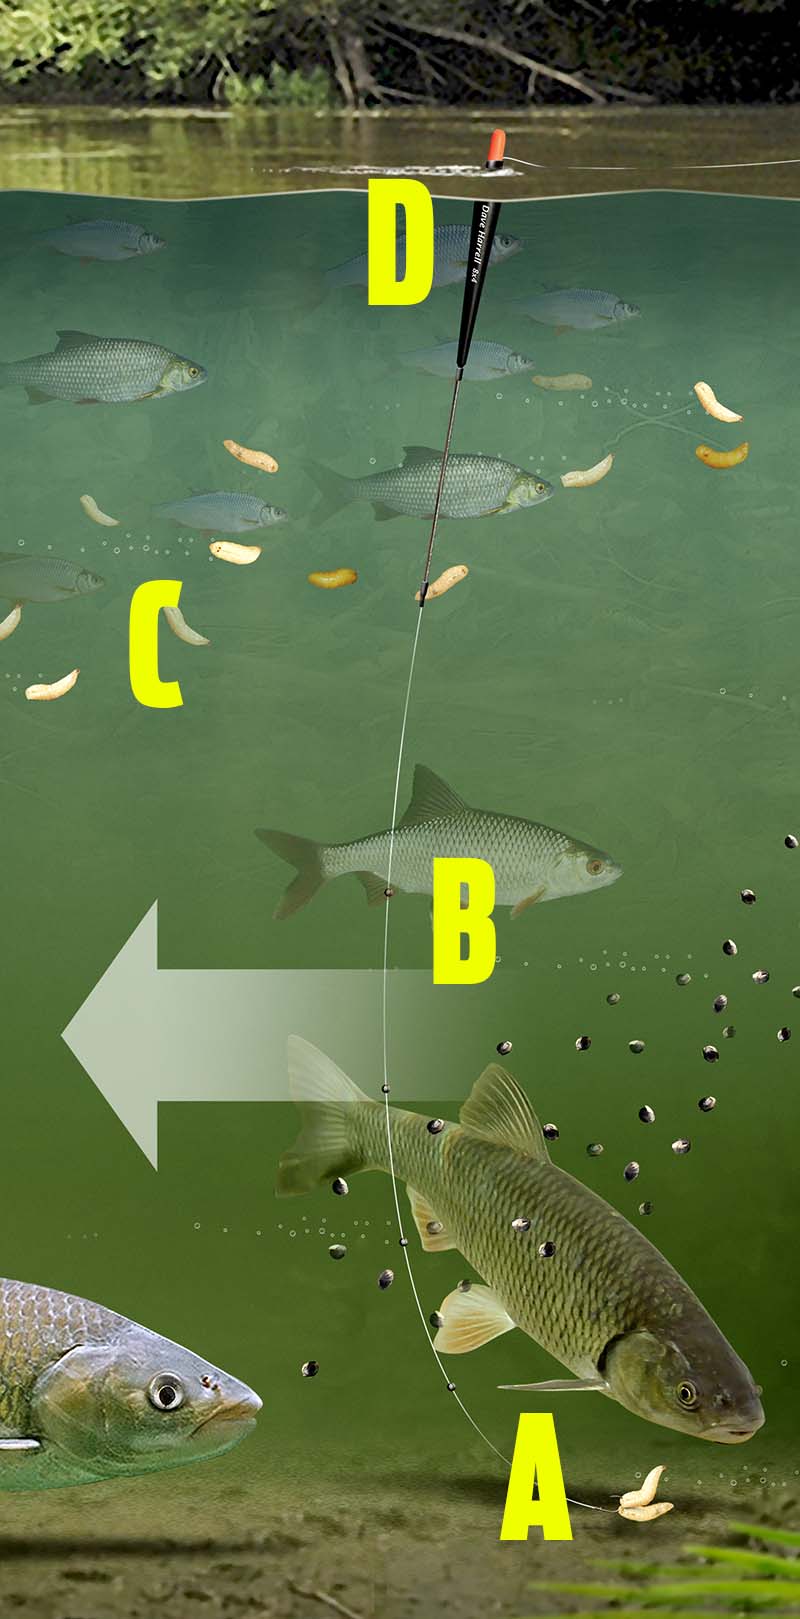
How and when to use a Driftbeater float rig
Want to be able to keep your float rig still when fishing a large windswept lake? Well here’s the rig for you – the simple driftbeater rig. When fished correctly this rig can be used to anchor your bait to the bottom in the strongest of undertows.
It works by placing a fairly large shot overdepth, so that it rests on the bottom. This helps hold the rig in place far better than a standard waggler rig fished overdepth ever would.
Driftbeater floats are a little specialised items of fishing tackle so not all tackle shops sell them, unfortunately. They are a bodied waggler having a very long and slender stem that leads to a bulbous balsa sight tip. No other float looks like a driftbeater.
You will need to plumb the depth accurately when using a driftbeater rig, as you have to place a shot far enough down the line so it rests on the bottom.
Here’s how to make the rig:
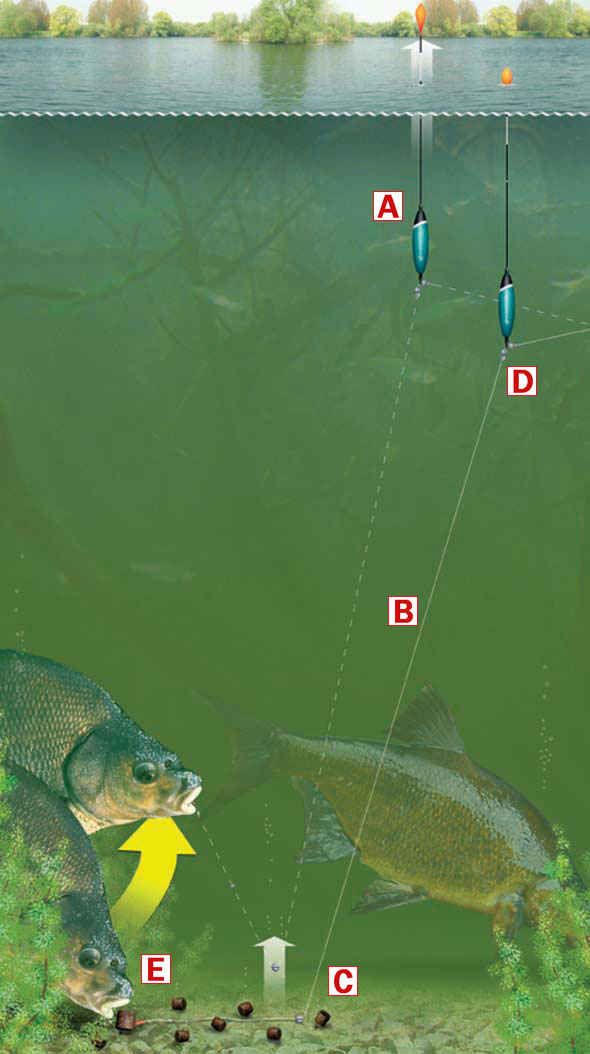
A Shot the float so that only the body is submerged. Don’t worry that there is 8ins of the stem sticking out the water – you’ll rectify this when you are fishing with the rig properly.
B Your mainline will need to match the species you are catching. A good starting point will be around the 3-4lb mark. Also, sinking mainlines are better as the line will cut through the surface tension and sink, preventing it from being pulled across the water surface in the wind.
C Find the depth of the swim using a plummet, then add another 12ins to the length of the rig. Now place a substantial split shot 8ins from the hook. A No1, or in extreme conditions a BB shot, would be ideal.
D After casting, allow the bottom-most shot to settle on the bottom, then sink your rod tip and wind it a few turns to sink the line between rod and float. Place your rod in rests with the rod tip submerged and slowly turn the reel’s handle until the float sinks to its sight tip. It is now ready to register a bite. Although there are times when the float will be instantly pulled under, most bites will lift the float right out the water.
E Remember to use a hook to match the size of the bait you are fishing with.
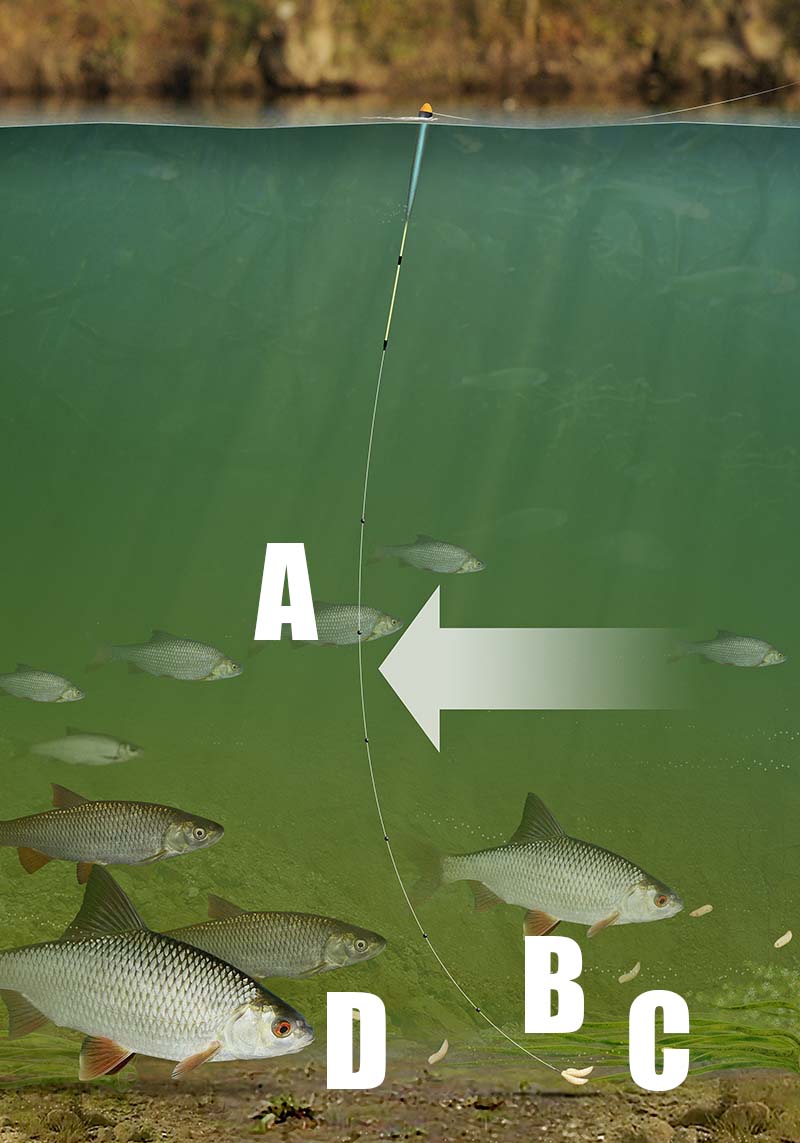
How to tie a stickfloat rig ideal for trotting on slow flowing rivers and streams
Trotting a small river for roach, chub, bleak, dace and skimmer bream is a fantastic way to spend a day fishing. It’s an active method that involves flicking your rig out, paying out line from the reel, mending the line to make sure the float travels along the right line, and occasionally holding back the float to make the bait flutter off the bottom. Then wham. The float ducks under and a fish is on. Brilliant!
This type of fishing requires a different approach to stillwater fishing where the float is cast overhead. A stickfloat rig needs to be cast underarm, from one side. This means that tangles can prove a problem, but not if you have set your rig up correctly. And this one, below, is not only ideal for catching fish at all depths as the bait falls, but it’s also virtually tangle free! Here’s what you need to do…
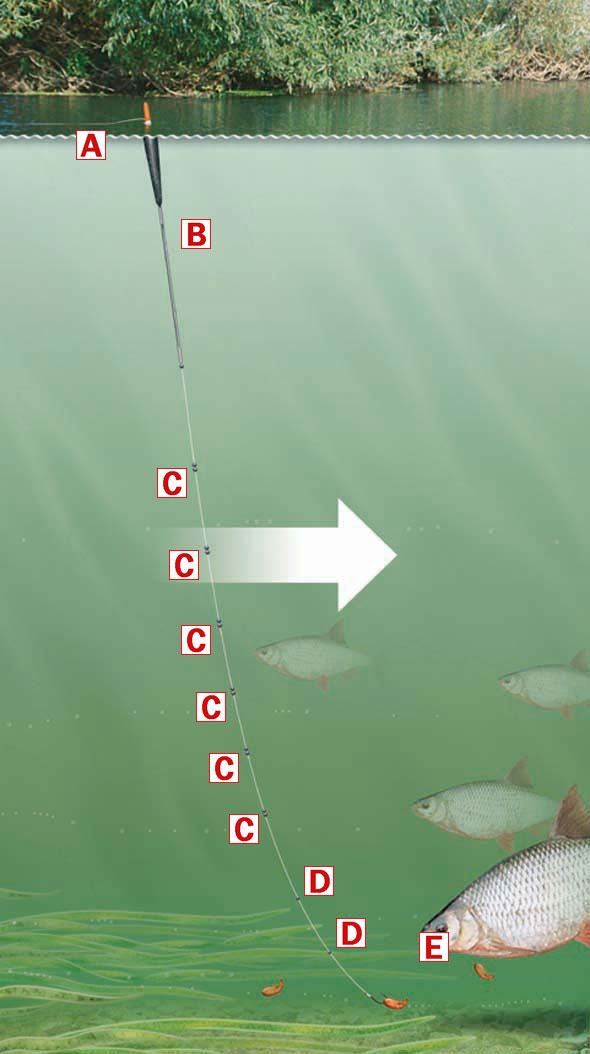
A Choose a light floating mainline, something like 2-3lb Drennan Floatfish would be ideal for this rig. The floating line lifts off the water easily, therefore you can mend your line to keep control of the float really easily, plus you’ll be able to strike fast bites easier too.
B The best type of float to use when fishing slow-paced rivers and streams is a plastic, cane or carbon stemmed stickfloat as these are nice and light. It needs to be attached to the line using three rubbers. Thread them onto the line first and then pass the float inside the rubbers. One rubber needs to be positioned under the sight tip, the other in the middle and the final one over the stem. Once you have found the correct depth, mark it using a single No8 shot directly underneath the float.
C The shot needs to be equally spaced down the line, but the majority of the weight needs to be positioned in the top two-thirds of the rig. Here pairs of shot have been used, equally spaced down the line. Pairs of No8 or No6 shot are ideal.
D The last two shot should be set singularly to produce a slow and natural fall of the hookbait through the last foot or so of water. No8 shot are ideal for this.
E As with all rigs, your hook needs to suit the bait that you are fishing with.
How to float fish a river with a Crowquill Avon trotting rig
The crowquill Avon is a very underused float nowadays, but it’s one of the very best for tackling pacey, powerful or deeper rivers where plenty of shot is needed to get the bait down to the feeding fish.
The float itself is quite long and features a large and long balsa body that requires a lot of shot to cock it correctly, and that’s perfect for pushing the bait down through powerful flows.
Because the crowquill Avon is produced from natural quills, it’s often bent, but that needn’t worry you as the float will still perform perfectly well.
Here’s how to set one up…
A Your mainline needs to be quite strong as you are likely to encounter quality fish using this rig. A 4-6lb floating line would be ideal because the floating lines give you better float control and a faster line pick-up on the strike.
B Attach the crowquill Avon float using a couple of float rubbers. Thread the rubbers onto your mainline first and pass the sight tip through the top rubber and the float stem through the bottom rubber.
C Shot the float with a bulk of large split shot around 18ins from the hook. A string on BBs, AAs or even SSGs are perfect, depending upon the size of the float being used.
D Use a single tell-tale shot around 8ins from the hook. This is a positive rig so a fairly large No1 shot will be adequate.
E Use a hook of a size to match your bait.