How to tie | The bomb and worm rig
Worms – no perch angler would fish without them, and while the species will take a bait that’s drifting past them, when fishing to cover a static bait gets much better results.
Perch will tuck themselves under trees or close to snags, waiting for prey fish to go past, so popping a big lobworm right in front of them is an invitation too good to refuse.
A whole lobworm is a good, active bait, but two tail sections can be even better, as the broken worms give off attractive natural juices that spread through the water. Fish them on a size 8 hook with a simple running set-up using an Arlesey bomb – one of Dick Walker’s own inventions for tackling the lake of the same name – and a long tail of modern fluorocarbon line.
Feeding in this sitation is hard, but if you want to add some pices of chopped worm, make a few casts with a blockend feeder instead of the bomb.
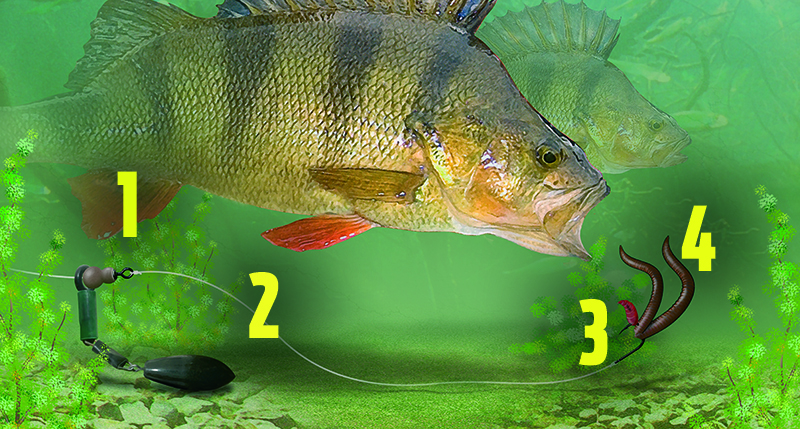
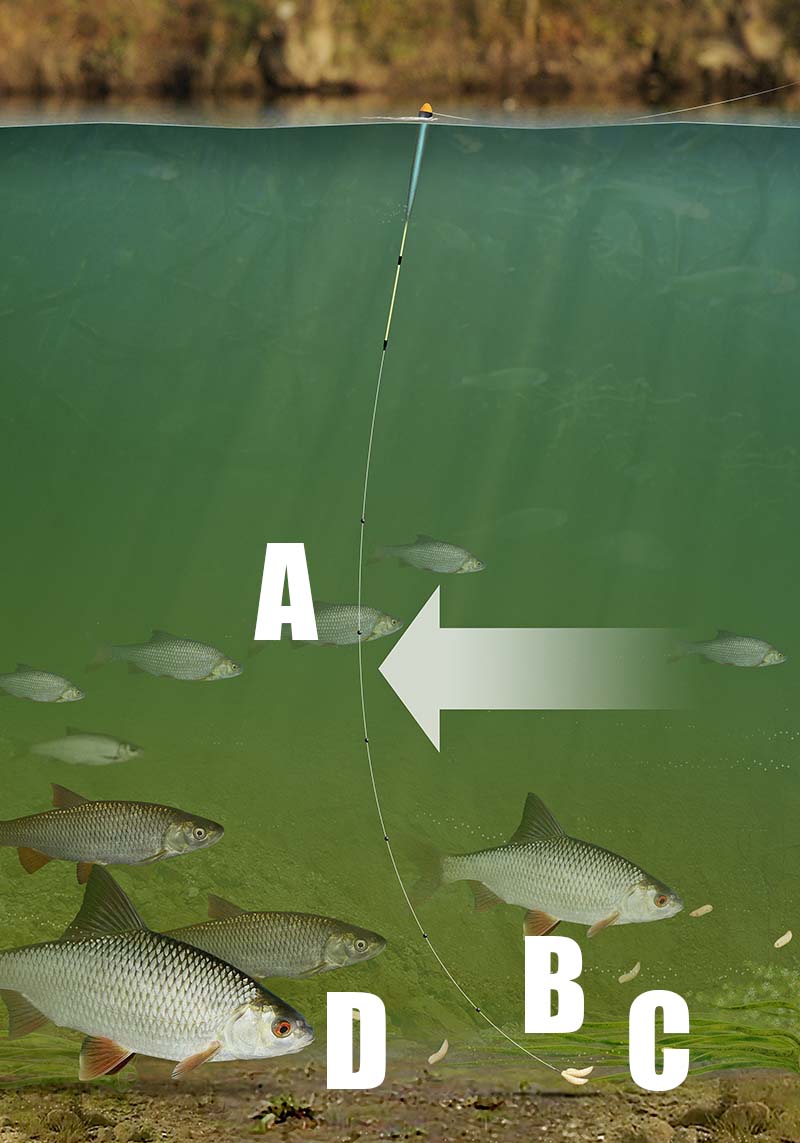
1) free-running set-up
This streamlined lead is fished on a running rig comprising the bomb on a link swivel to a run ring. It’s topped by a tulip bead pushed into the swivel carrying the hooklink.
2) Arlesey bomb
This streamlined lead was developed specifically for perch fishing by Dick Walker for distance casting on deep lakes, but is now the go-to lead for many other scenarios.
3) Red maggot teaser
Two lobworm tails on a size 8 wide gape hook are the perfect medicine for specimen perch, but why not tip the bait off with a single red maggot for that extra bit of movement?
4) big bait for big perch
Perch do not chomp down on prey like pike, but ‘inhale’ it – and there’s not much their capacious mouths can’t take in. Two big lobworm tails will deter the smaller stripeys.
How to tie | The stealth pellet waggler rig
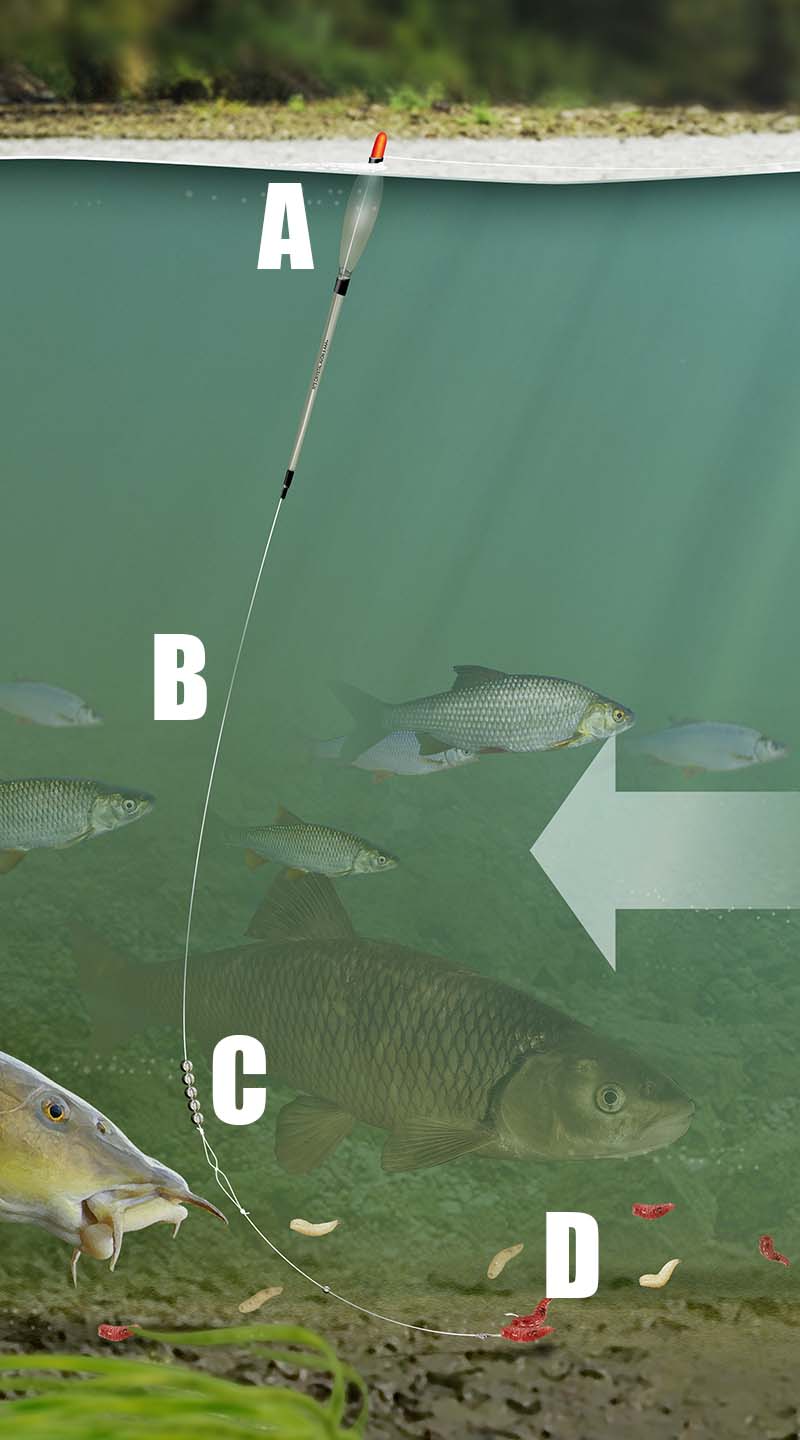
Setting up this pellet waggler rig couldn’t be easier if you think about how to get the best results from the rig that you are using follow our simple and easy steps to helping you tie one of these great pellet waggler rigs
1) Foam wagglers are relatively light so I fish them on 5lb Guru Pulse mainline to get maximum distance on the cast.
2) Purpose-built weighted adaptors for all three sizes of foam waggler mean you don’t have to put shot on light mainline, which could potentially damage it. These adaptors take the float down to the perfect level, and help it sit immediately.
3) A Guru pellet waggler snap link swivel allows me to change the size of waggler quickly and without fuss when the need arises.
4) To keep the waggler in place I use three small line stops. That way I can chop and change the depth without fear of damaging the line.
5) Below this I tie on a size 14 Cralusso Quick Snap Swivel which allows me to quickly change my hooklength while keeping everything neat and free from tangles.
6) For this type of fishing I tie my hooklengths 12ins long and for carp in the 4lb-10lb bracket I will use 0.17mm N-Gauge.
7) The hook will be either a size 16 or 18 super MWG pattern, depending on the size of pellet on the bait band. I’ll start with the rig set around 18ins deep with a view to coming higher in the water as the day progresses. I always prefer to start deeper, because that way I can get a better impression of what’s going on below the surface
How to tie | The slow sinking feeder
During summer fish will often be stationed well up in the water, especially on deeper lakes where they will find a depth where the light-levels and temperature suit them.
At short range this situation is ideal for fishing a waggler rig with the shot well spread so that the hookbait falls at a slow rate, matching that of the free offerings.
But what if you are fishing beyond float range? On big rivers, reservoirs and large gravel pits, roach, rudd and bream will often not come within 30 metres of the bank. This is where the on-the-drop feeder comes into its own.
By using a long hooklength and a lightweight feeder the time it takes the rig to settle is extended, giving fish plenty of time to intercept the hookbait on the drop.
Bites can be expected at any time. It is not uncommon for the quivertip to never signal the feeder touching down, as a fish intercepts the bait in mid-water. Also, bites can be expected within seconds if the feeder does hit the bottom. There is no point in leaving the feeder once the rig has settled on the bottom.
Within a minute or so of casting, wind in, rebait and recast to keep a constant cloud of attractive bait falling through the water column.
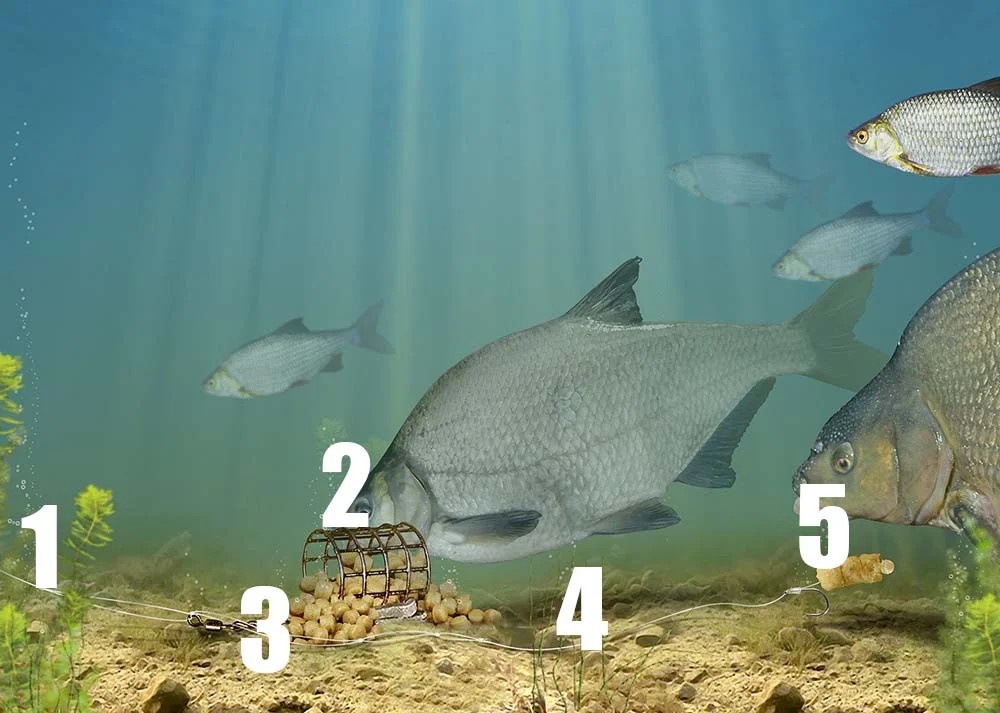
Thread a Medium Grip Mesh feeder on to your mainline. Choose a feeder weight of around 14g-28g
Follow the feeder with two small rubber beads. These act as a shock-absorber cushioning the feeder on the cast
Fold over the last 30cm ofmainline and tie a large loop. Next, tie four further loops inside the large loop at regular intervals
Ensure that the beads and feeders come to rest on the uppermost knot. If they slide over, tie a second knot over the first
Cut off a 120cm length of hooklength. Use hooklengths of 90cm-180cm to vary the sinking speed of the hookbait
Tie on the hook using a spade-end knot where the hooklength line has been first passed through the eye of the hook
Once you’ve attached the hook, tie a figure-of-eight loop knot in the other end of the hooklength
To complete the rig, simply attach the hooklength to the mainline using a loop-to-loop knot
How to tie | The rocket feeder carp rig
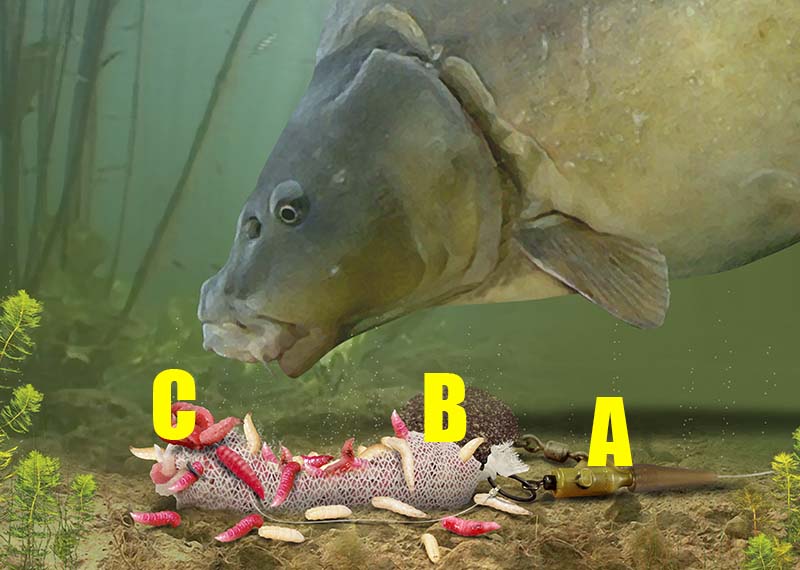
There are many different ways of catching carp up in the water, but one of the most effective is the Rocket Feeder.
As the name suggests, this is a floating feeder that is open at one end, enabling it to be filled with lightly dampened pellets or groundbait, which should be mixed so that it quickly exits the feeder once cast out.
Unlike other tactics, the Rocket Feeder is ideal for use with larger pellets, such as 8mm baits, enabling the angler to introduce sizable food items – ideal for larger carp. The feeder can also be cast long distances, thanks to its aerodynamic shape, so it’s useful when carp are beyond pellet waggler range.
The shape of the feeder means that it acts as a very effective bolt-rig when a carp takes the bait. In fact, it is essential to use strong line with this tactic to avoid being broken on the take. A minimum of 6lb is recommended.
Set the Rocket Feeder about 4ft above the hook then, as the carp become more accustomed to the stream of bait, move the float stops down so that the hookbait is just 2ft deep.
On heavily stocked carp fisheries the Rocket Feeder is an absolute winner at this time of the year. Get on it now!
Slide a float stop on to the mainline, followed by the Rocket Feeder, and then fix two further float stops to lock it in place
Adjust the float stops to lock the feeder in position. Having two stops below the feeder ensures that it will not move on the cast
The feeder should be locked about 3ft above the end of the mainline
Tie a figure-of-eight knot in the end of the mainline to form a small loop which you will attach the hooklength to
Use a four-turn grinner knot to attach the hook. Use a clear line a this is less visible when fishing up in the water
The hooklength should be 1ft long and attached to the mainline using a loop-to-loop knot. Attach the hookbait using a bait band
How to tie | Carp and tench float leger rig
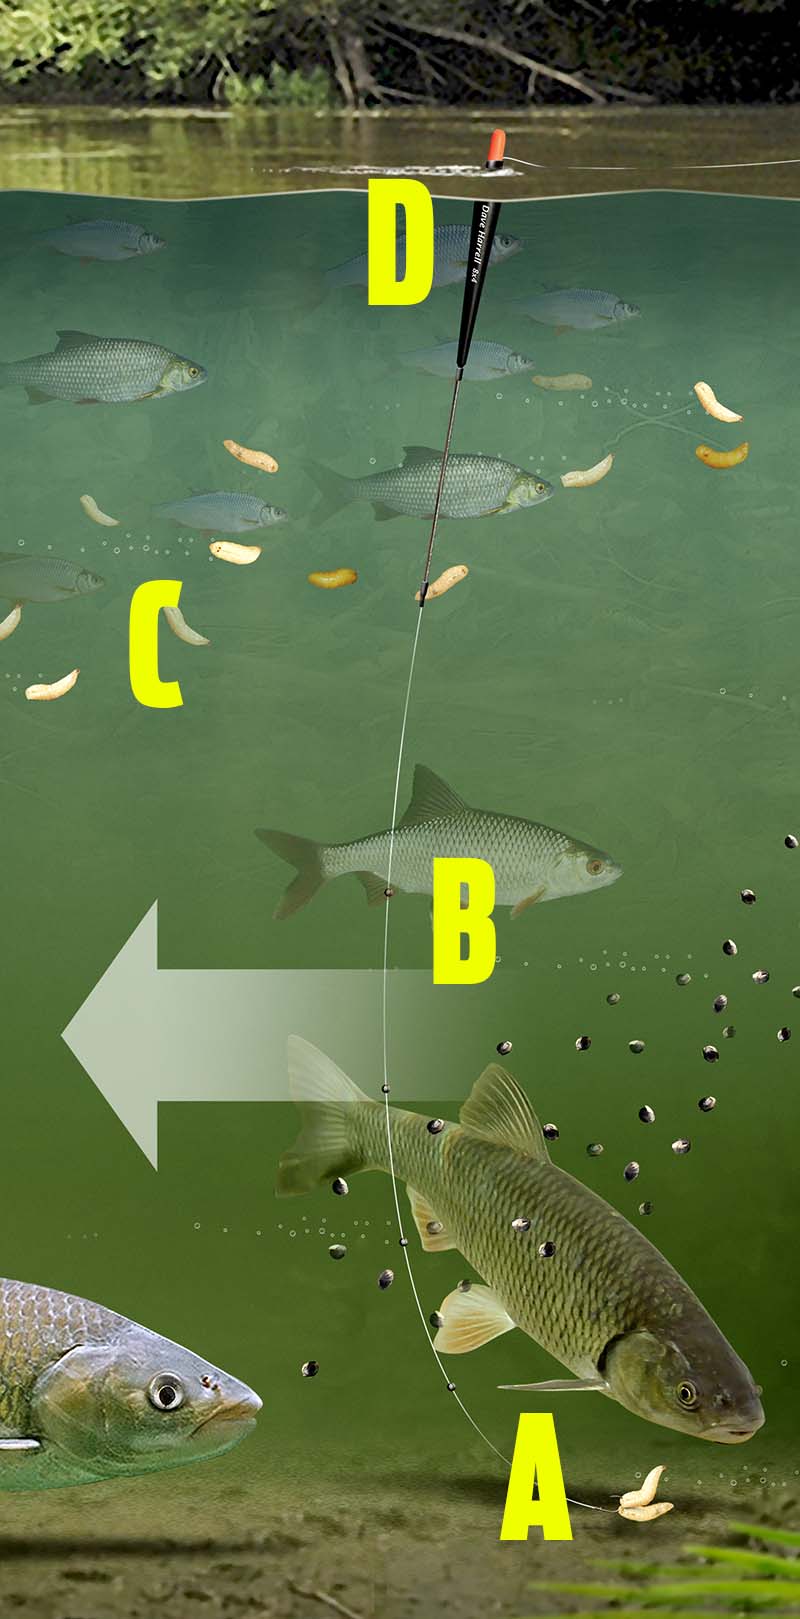
An important rig for any budding carp, tench or bream angler is the float ledger rig as it helps target species which prefer an absolutely static bait. Use strong line and hooks with this rig, and big baits such as worms, bread, or mini boilies.
A large bodied waggler is required as the buoyant stem is less likely to be pulled under by the tow. Bites are normally indicated by the float shooting under.
A good tactic is to find the bottom of the marginal shelf – where the bottom levels out – and then set the float slightly overdepth. Now, when you tighten up the line, the float will slowly sink down to the correct position and the line will be tight from rod to the leger weight.
If you find yourself fishing a lake this year with the wind blowing straight towards you, or from side-to-side, and holding position is proving impossible, then try out this very effective, but surprisingly underused rig to give you the correct bait presentation to encourage bites. Check out our step by step guide below and tie it yourself.
Trap the float on the mainline with two float stops. The float should be a large bodied waggler as this is more stable in undertow
Use a swivel leger weight of between ¹/2 to 2/3 ounce. This should be free-running on the mainline for sensitive bite indication
Thread a mini buffer bead on to the mainline and then attach a mini swivel to the mainline using a four-turn grinner knot
Tie a size 12 hook to 10 inches of 5lb hooklength line. Use either a grinner or through-the-eye whipping knot
You need to keep the hooklength short – about 4in-6in will be perfect. Tie the end of this to the mini swivel
The lead weight will sit just above the buffer bead, creating a bolt-effect. Adjust the float so that just the tip is showing
Top 5 pole rigs that you need to try!
No matter where you choose to fish this month, you can guarantee that your target species will come close to the bank in search of food now that the temperatures have risen sharply.
When this happens, the pole is an unbeatable item of tackle but the sort of rig you use with it will dictate whether you get just a few bites or have a session that you won’t forget in a hurry.
Paying careful attention to your terminal tackle and bait choices is vital if you want to make the most of your time on the bank, as is getting the subtle details such asshotting and float patterns spot on.
We reveal the five most deadly spring pole rigs that are almost certain to help you and your friends put more fish in the net.
The Worm Rig
GOOD FOR: Putting together big mixed bags of quality bream and tench on stillwaters.
TACKLE: Use a rugby ball-shaped float with 5lb mainline, a 4lb hooklength and size 14 or 16 hook.
HOOKBAIT: Half or a full worm will appeal to both species at this time of year.
The Maggot Rig
GOOD FOR: Quality roach that will only feed if the hookbait looks natural.
TACKLE: Keep it light with 3lb mainline, a 2lb hooklength and a size 18 or 20 hook.
HOOKBAIT: Red maggots will keep the bites coming. Alternate between single and double.
The Pellet Rig
GOOD FOR: Catching F1s and carp in open water swims on commercials.
TACKLE: A narrow float will help you spot every bite. Use 5lb mainline to a 4lb hooklength and a size 16 hook.
HOOKBAIT: Start with a 4mm expander, switching to a banded pellet if small fish show.
The Margin Rig
GOOD FOR: Catching the biggest carp and F1s in the lake, especially late in the session.
TACKLE: Don’t risk getting bust by a big carp and use 6lb mainline to a 5lb hooklength. A strong float with a thick tip is a must.
HOOKBAIT: Corn is unbeatable in the margins.
The Meat Rig
GOOD FOR: Fishing in open water for carp, F1s, big bream and tench on commercials.
TACKLE: A balanced rig helps catch all species. Use 5lb mainline, 4lb hooklength to a size 16 hook.
HOOKBAIT: A 6mm cube of meat will catch all species that are stocked in the fishery.
How to tie the snowman rig
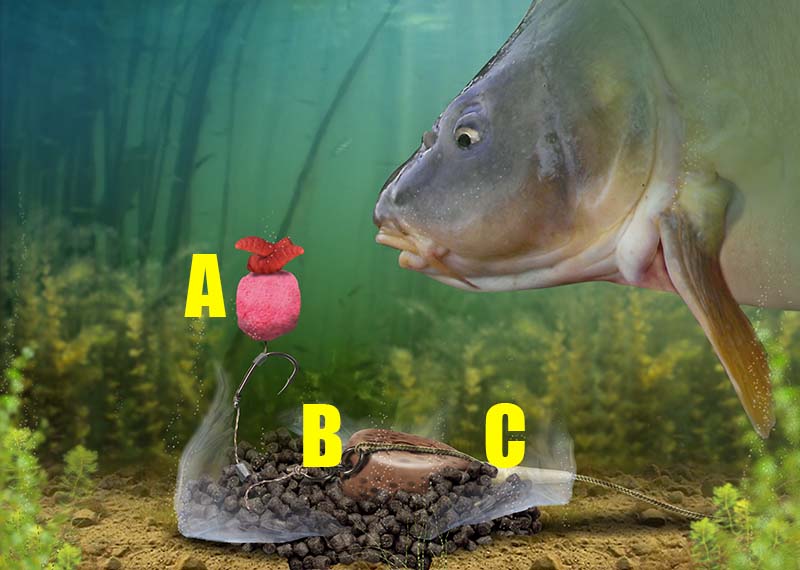
If you can’t decide whether to use a bottom bait or a pop-up rig, then why not try a snowman instead... it’s the best of both worlds!
In essence, it’s a standard boilie threaded on to a hair rig, with a smaller pop-up threaded on after it. Once on the bottom, the pop-up stands proud, acting like a beacon to any passing carp. Such a bait arrangement allows you to mix and match your baits. For example, you could use a dull, fishy-flavoured bottom boilie, with a bright, fruity pop-up.
Snowman rigs are highly versatile and can be used with any lead set-up, and with just about any length or type of hooklink.
How to tie
Strip back about 6ins of the outer layer from the coated braid. Form a small overhand loop in the end.
Secure a small metal rig ring loosely in place with an overhand knot, just below the hair loop.
Set the rig ring about 1.5ins from end of the loop, then secure firmly with a second granny knot.
Position the rig ring opposite the hook’s barb, then attach the hook using a knotless knot.
At this point you can add a hook aligner over the eye of the hook. This will help with hook-ups.
Finally, add a few small ‘mouse droppings’ of tungsten putty to the hooklink to nail it to the deck.
Top five lures for perch fishing with Sam Edmonds
After the pike, perch and zander have spawned they will be ready to go on a feeding spree. so here are my top five lures that i use when going after perch and zander in spring.
Shad (Berkley Ripple Shad 5cm and 7cm)
The Ripple Shad has a thick paddle tail, and ribs running along the body, which produce lots of vibration when the lure is retrieved – ideal for fishing in coloured canals.
Plastic worm (Berkley Floating Mice Tail)
A plastic worm that works well on a drop shot rig, nose-hooked on a size 6-8 hook. Brown is a great all-round colour, but brighter pink and white lures are great in coloured water.
Crankbait (Berkley Frenzy Flicker Shad Suspending 5cm)
This crankbait dives to around 5ft, great for fishing shallow canals. It covers lots of water quickly, searching out fish, and an internal rattle adds to the enticing action.
Shad (Berkley Powerbait Shrug Minnow 1.5ins)
Rigged on a 1.5g or 2.5g jighead, I use this tiny shad for smaller perch and zander, but it works for big fish too. Orange Glow is a great colour but Cherry Red is a close second.
Twitchtail (Berkley Twitchtail Minnow)
Available in many colours, this is my favourite soft bait for rigging on a drop shot rig to target big perch, but is also great for zander. I like to nose-hook these on a size 2 Owner Mosquito drop shot hook.

