
How to tie | The rocket feeder carp rig
There are many different ways of catching carp up in the water, but one of the most effective is the Rocket Feeder.
As the name suggests, this is a floating feeder that is open at one end, enabling it to be filled with lightly dampened pellets or groundbait, which should be mixed so that it quickly exits the feeder once cast out.
Unlike other tactics, the Rocket Feeder is ideal for use with larger pellets, such as 8mm baits, enabling the angler to introduce sizable food items – ideal for larger carp. The feeder can also be cast long distances, thanks to its aerodynamic shape, so it’s useful when carp are beyond pellet waggler range.
The shape of the feeder means that it acts as a very effective bolt-rig when a carp takes the bait. In fact, it is essential to use strong line with this tactic to avoid being broken on the take. A minimum of 6lb is recommended.
Set the Rocket Feeder about 4ft above the hook then, as the carp become more accustomed to the stream of bait, move the float stops down so that the hookbait is just 2ft deep.
On heavily stocked carp fisheries the Rocket Feeder is an absolute winner at this time of the year. Get on it now!

Slide a float stop on to the mainline, followed by the Rocket Feeder, and then fix two further float stops to lock it in place

Adjust the float stops to lock the feeder in position. Having two stops below the feeder ensures that it will not move on the cast

The feeder should be locked about 3ft above the end of the mainline

Tie a figure-of-eight knot in the end of the mainline to form a small loop which you will attach the hooklength to

Use a four-turn grinner knot to attach the hook. Use a clear line a this is less visible when fishing up in the water

The hooklength should be 1ft long and attached to the mainline using a loop-to-loop knot. Attach the hookbait using a bait band


How to tie the method feeder rig
Method feeders are a staple among match anglers and, with a few tweaks, can also be used to target big carp, tench and bream.
The only changes you need to make to turn it into a rig capable of landing any carp that swims are to strengthen the component parts and increase the size of the hookbait and loosefeed.
The Method is perfect for ‘runs waters’ or for targeting carp in pressured venues that have seen it all when it comes to rigs.
How to tie the hooklink

Tie on a curved shank hook. We’ve used a palomar knot here, but a grinner is also fine to use.

Thread a micro rig swivelover the point and down the shank, followed by a small hook bead.
Position the hook bead and then attach the bait to the swivel using bait floss or a small bait band.

Tie a swivel to the other end. Make sure it is a snug fit in the base of the frame of the Method feeder.
How to load the method feeder

Put your chosen ingredients into a bait tub. Dampen the comtents and make sure they bind together well.

Place your hookbait in the fat end of the supplied mould and bury it with your Method mix.

Firmly press the feeder into the mould, with the hooklink positioned as shown above.

Remove the frame from the mould. Some frames have push-button releases. You’re ready to cast out!
Tench feeder rig
When going after tench there are many tactics that can be used, for instance when you are on a larger gravel pit it is a feeder approach that often scores. This is thanks to its characteristic of placing bait close to the hookbait even when fishing towards distant gravel bars and other features.
While the feeder is brilliant for tench, it often has to be rigged-up with a short hooklength stopped close to the feeder to prove successful for tench. This is because tench tend to sift through food and detritus while hardly moving. Use a long hooklength and the hookbait is likely to be expelled before a bite is registered!
Maggots, casters and worms are all brilliant tench baits because they mimic the fish’s natural diet, and this rig can be used with all three of these baits. To make the hookbait stand out, it pays to pop-up the bait. This can be easily achieved using a slither of rig foam attached to the hair, with the bait fished on the hook. Follow the steps below to learn how to tie this brilliant rig...

Tie a size 10 forged hook to a short length of 8lb fluorocarbon using a knotless knot and attach a slither of red rig foam to the hair

At the other end of the hooklength attach a mini swivel using a four-turn grinner knot. The hooklength should be around 4in long
Slide a medium-sized Clinger on to the mainline, followed by the hooklength swivel and then another Clinger

Slide a mini rig sleeve on to the mainline and then tie on a medium-sized Oval feeder
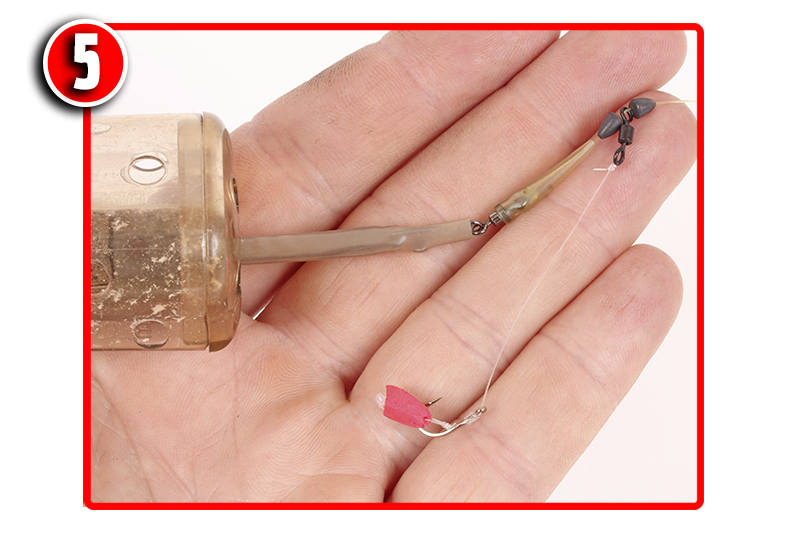
Adjust the Clingers so the hooklength is fixed just above the feeder
Tommy Pickering | How to make my simple groundbait feeder rig!
This is my favourite set-up for all my open end feeder fishing. It’s a very simple rig for wire cage and plastic frames, and the stiff boom which is tied in the end of the mainline means tangles are kept to a minimum.
As it’s free running it’s completely safe, too. Use it for bream, tench, roach, perch and even carp. All you need is your reel line, your feeder with a swivel eye or snap link attached, a packet of No8 Preston Stotz weights and your chosen hooklength.

Try this simple and tangle-free feeder set up.
Step 1.

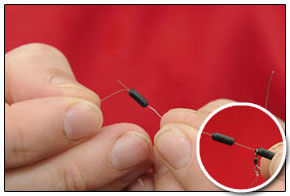
Take the mainline or shockleader between thumb and first finger of both hands and twist in opposite directions to twizzle it together.
Step 2.

Ensure that the length of the twizzled line is longer than that of the feeder and link, to stop the two tangling when you cast the finished rig.
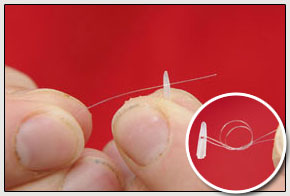
Step 3.

Bring the twisted line back over itself to form an overhand loop knot. Pass the end through itself twice and pull to tighten the knot properly.
Step 4.

You’re now left with a twisted section of line of around 6ins long, called a boom. Trim the tag end to reduce line spin when reeling in.
Step 5.

Now slide the swivel eye of the snap link attached to your feeder on to the twisted line and over the knot of the stiff boom.
Step 6.
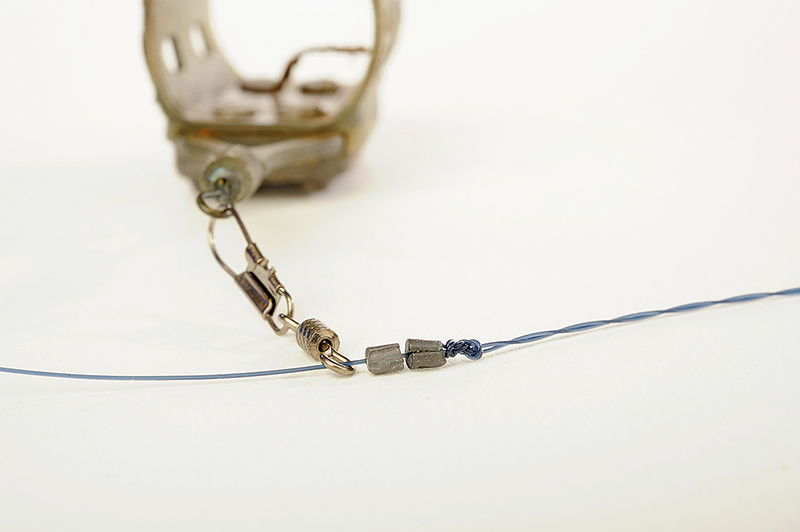
Attach two No8 Stotz to the mainline just above the twisted section, with the feeder above. These butt against the knot and stop the feeder too.
Step 7.

Time to add your hooklength, which you will probably have already tied. Push the hooklength loop over the end of the twisted boom.
Step 8.

Put the hook itself through the end loop in the twisted boom. Then pull the whole hooklength through with it as it goes through.
Step 9.

The loop-to-loop forms like this - you may need to flick the hooklength over its own loop knot to achieve this perfect connection. Pull tight.
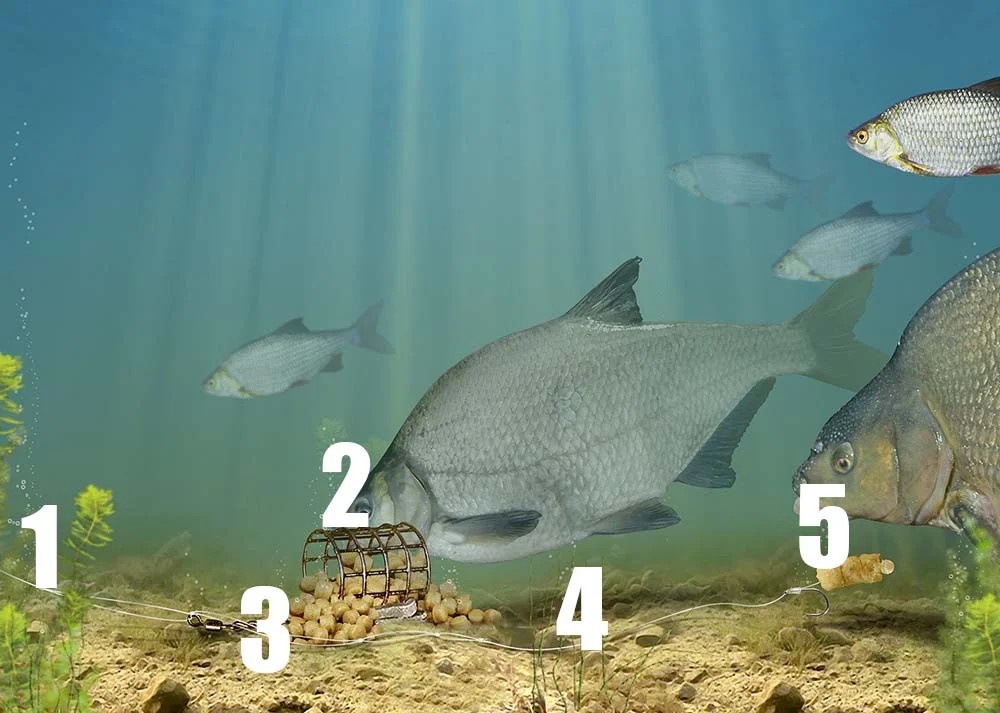
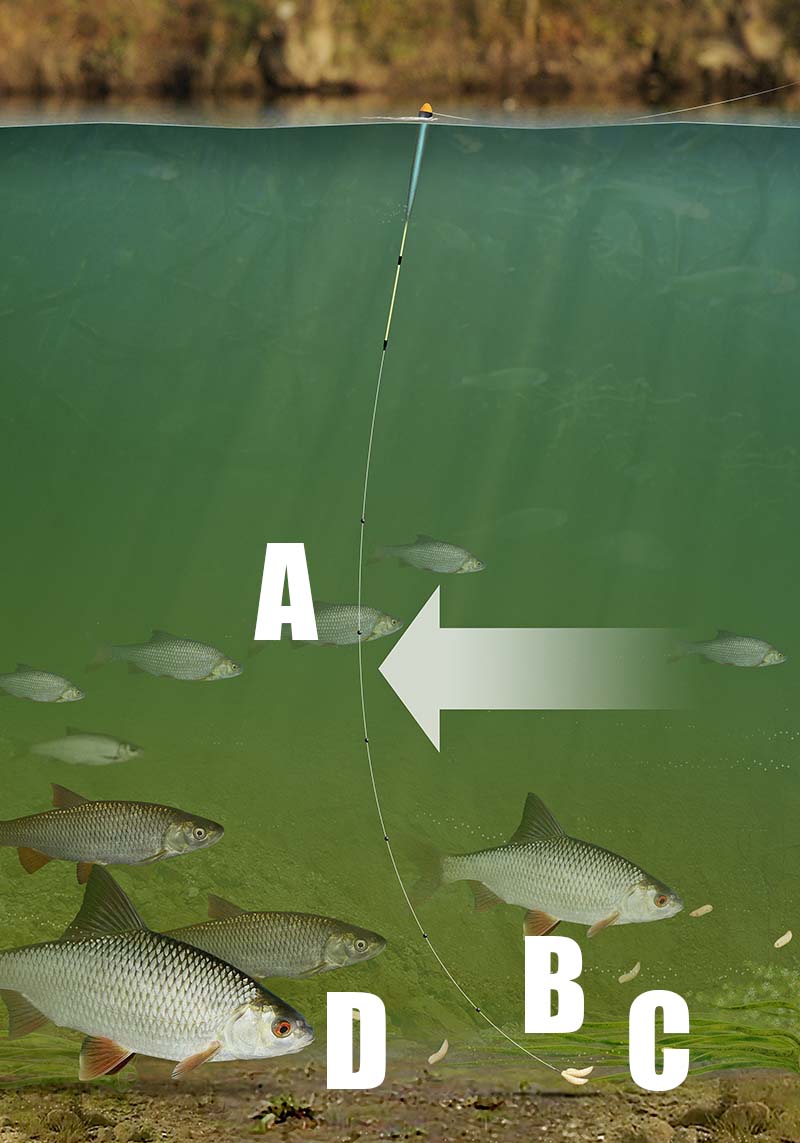
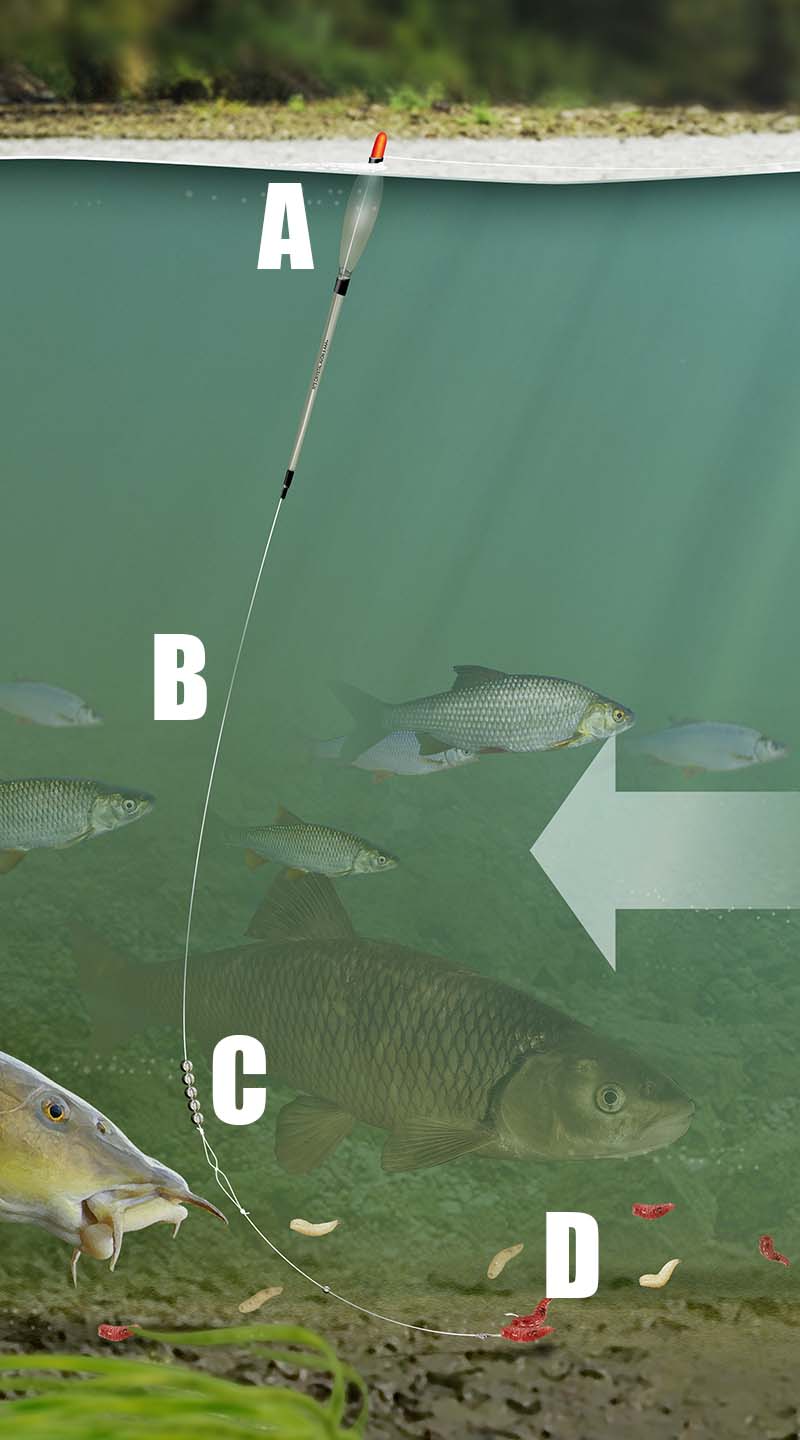
Get more bites when feeder fishing for bream, carp and tench

If you want to get more bites when fishing a groundbait or open end feeder, try this neat trick and twitch your rig back. It’s easy to do and can trigger even more bites than you’ve ever had before. It works brilliantly for bream, carp and tench – even roach too when you’re fishing a maggot feeder.
It is very simple and relies on the fact that you’re drawing your hookbait right over your loosefeed – simple really!
After casting your feeder rig, leave it for five minutes as you may well get a bite straight away. But if you don’t it’s time to twitch your rig to tempt those fish into taking your bait.
The only thing you need to think about before you start twitching your rig is to remember the length of your hooklength. For this example, let’s say that it’s 3ft – an average length for a typical feeder rig.
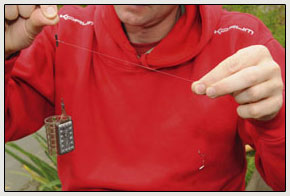
Pick up your rod and gently move it to one side to take up the slack so you have a tight line to the feeder (A).
Now gently begin to pull your rod tip further to dislodge the feeder (B). You’ll feel the feeder bounce. Once it dislodges, continue moving your rod tip very slowly by 3ft. No more than that or you will have defeated the object.
Now your feeder will have emptied the remainder of the bait trapped inside it, your hooklength will have straightened and your hookbait will have been pulled across the bottom, right on top of your feed (C).
Leave the rig in the water for another five minutes to see if you get that extra bite. If not, wind it in, re-bait and recast, and repeat the process all over again.

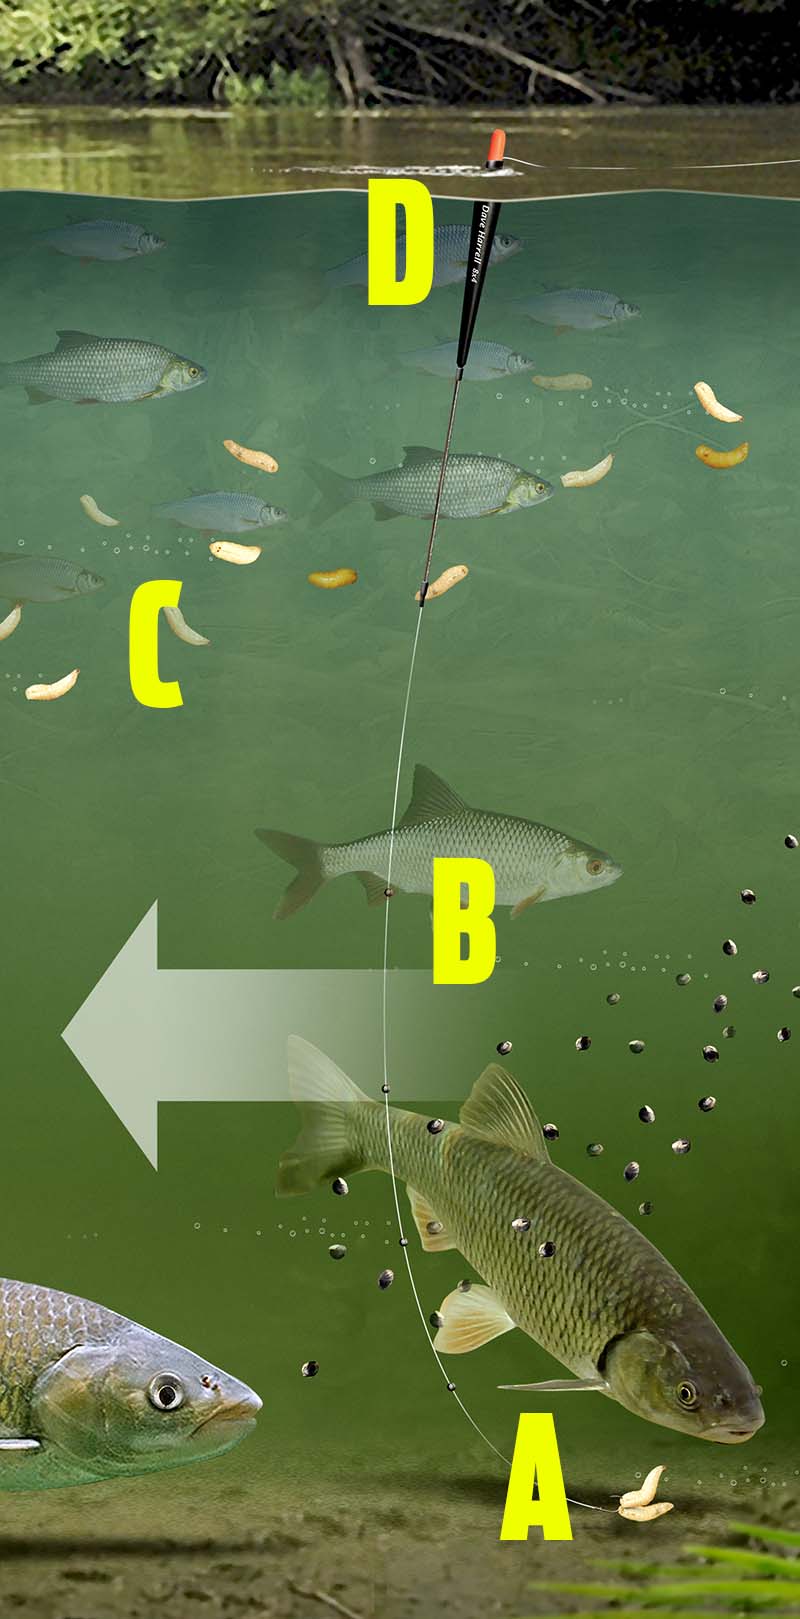
Groundbait feeder rig for river barbel, chub and bream
This simple yet very effective feeder fishing rig is perfect for catching river barbel, chub and bream. It’s easy to make and can be used in deep sluggish rivers through to fairly shallow and swift flowing rivers.
The beauty of this rig is that it can be used to catch all of our larger river species, providing you use an appropriate bait and loosefeed to tempt them.
All you’ll need to tie this rig is a variety of different weight of feeders, some eyed hooks, some hooklength braid, strong mainline, a snap link swivel and a buffer bead.
Buffer beads are small rubberised sleeves that fit over half of a swivel. They can be found at all good specialist fishing tackle stores and are ideal for stopping your swivel from hitting knots and potentially weakening them.
The most important part – and often the most technical – is choosing the right weight of feeder. The feeder must be an open end type. Cage feeders simply release their load of groundbait too quickly, whereas open end feeders hold on to the groundbait until the feeder hits the river bed.
Getting the right weight of feeder requires a few experimental casts. Pick a feeder that you think might offer enough weight to hold still in the flow, cast it out and see if the feeder remains static on the bottom. Ideally you should choose a feeder that only just holds still in the flow – one that will easily dislodge and begin rolling if a fish were to pick up the bait and nudge the feeder out of position.
Two of the best baits for this rig are either large drilled halibut pellets or fishmeal boilies – bream, barbel and chub love them. But you could use maggots, worms, casters, sweetcorn, anything you wish.
The feed you put inside the feeder ought to match the hookbait you’re using. If you decide to use a halibut pellet or a fishmeal boilie on a hair rig, you will do best to use a fishmeal groundbait and pellets in your feeder.
HOW TO TIE THIS RIG
A – Larger baits like pellets and boilies should be hair-rigged. You’ll need a strong eyed hook for this and the best way to tie a hair rig is to use the knotless knot.
If you intend to use more conventional baits, just choose a strong hook of a size to suit your chosen bait.
B – It’s your choice whether you decide to use a mono or a braid hooklength. If you decide to use a mono hooklength pick one that will cope with a barbel, so 6-8lb breaking strain will be ideal. If you opt for braid, chose a 12lb breaking strain.
C – Your loosefeed should match your hookbait. Fishmeal groundbait and pellets is an ideal match for boilies and drilled halibut pellets. This combination scores well for river specimens.
D – Your open end feeder should have enough weight in the lead to just hold still in the river’s flow.
E – Use a quick-release snap link swivel to attach the feeder, and a buffer bead to attach your hooklength.
F – Your mainline needs to be strong enough to cope with a big barbel, so choose 8lb or 10lb breaking strain.
How to make the perfect feeder rig for fishing close to islands
Anyone who fishes commercial carp waters will know that islands are a prime area to target for good carp weights. Float fishing is almost impossible due to the amount of line hanging underneath the float - this can catch in overhanging vegetation, so the only effective way to fish tight to an island is to use a feeder rig set up.
Here we show you one of the very best feeder rigs to use when fishing tight to an island feature, in a handful of easy-to-follow steps to make sure you can easily create this rig.
It's worth bearing in mind the style of feeder used here - it's a cage feeder. These feeders are the best choice to use in shallow water around an island as the large holes in the sides allow water to enter rapidly, therefore the attractive groundbait inside escapes quickly to leave a cloud of scent in the water.

1. You will need a 1oz Korum cage feeder, size 16 Korum S3 hooks, size 24 mini swivel, 0.13mm (4lb 12oz) Reflo Powerline for hooklength, Korum Rig Stops, plus Korum Quickstops and Quickstop Needle
2. First, push your hooklength through a Quickstop and tie it on with a simple overhand knot

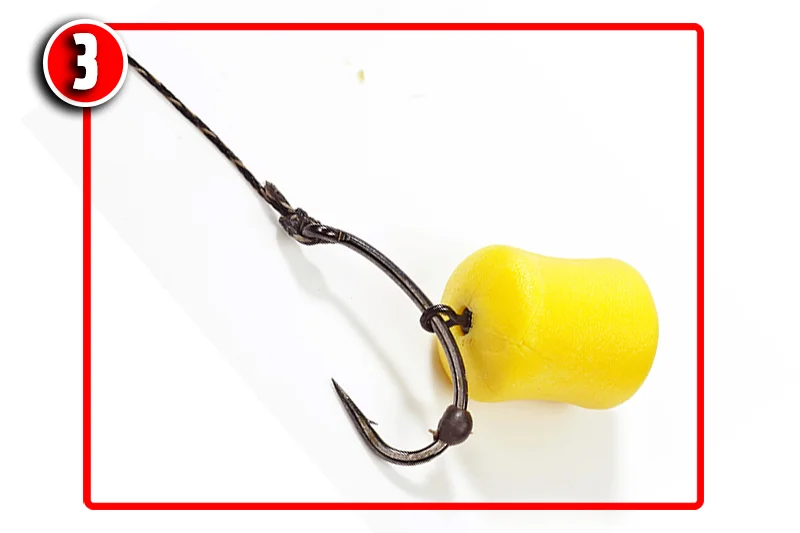
3. Push hooklength through the hook eye – from the back – and measure out the hair length

4. Tie a knotless knot. Korum S3 hooks don’t have a gap in the eye, so they are safe with this knot

5. On the other end of the hooklength, typically 24 inches long, tie on a size 24 mini swivel with a safe knot like a six-turn grinner. This hooklength attaches on to the reel line above the feeder, helicopter style
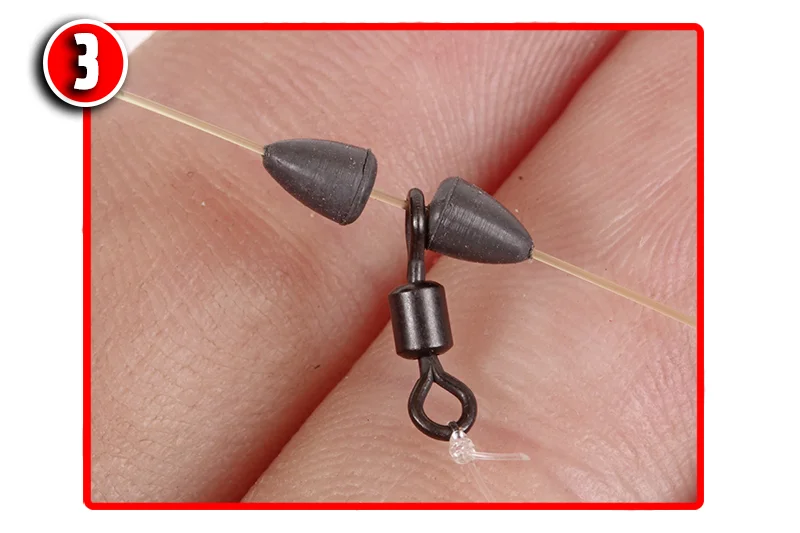
6. Slide a Rig Stop on to reel line, add hooklength swivel then anotherStop

7. The swivel can spin freely between the Rig Stops, which slide up and down the reel line. This set-upreduces tangles, yet will pull apart if your reel line breaks so you do not tether a hooked fish

8. Now attach your cage feeder to the reel line, again using a proven knot like a grinner or half-blood. Leave a small tag end on the knot as to account for any slippage

9. Now push the swivel and Rig Stops down the reel line until they are 15cm (6in) above the feeder. Your hook will now drop 45cm (18in) below the feeder when you cast
10. The finished rig is effective and safe so it can be used at any fishery that enforces a ‘no fixed rig’ policy for fish welfare
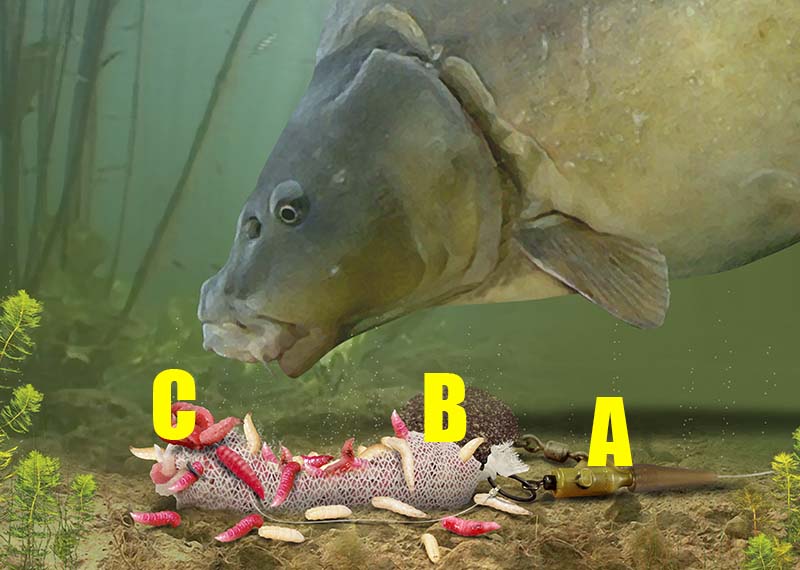
How to set up an in-line bolt maggot feeder rig
In-line maggot feeders are relatively new to the market but they have already helped catch many big carp, bream and tench to those anglers who know how to rig and set them up correctly.
Here Bob Roberts shows us how he sets his up when fishing specialist-style for big tench...
This technique not only ensures that the fish hooks itself against the weight of the heavy maggot feeder, but it also ensures that the fish are brought straight to the hookbait due to the accurate placement of the wriggling maggots escaping from the large in-line maggot feeder.
It's a really simple rig to tie and one that you could use the next time you're seeking a big carp, tench or bream.
This method will work on rivers for barbel and chub, providing you use a feeder that has enough weight to hold the bottom in the strong current, but ideally it's more of a stillwater technique used alongside bite alarms and indicators...

How to do it...

1. Get a Drennan Bolt Blockend feeder, size 16 Drennan Carp Method hooks, size 9 E-S-P Uni-Link swivel, 10lb Drennan brai

2. Thread the feeder’s tail rubber down the reel line, followed by the feeder. The metal plate ensures it lands base down

3. The reel line runs straight through the centre of the feeder helping the rig become aerodynamic for castin

4. Cut a length of braid and tie to the hook with a grinner knot. Cut the link so it’s a little shorter than the swimfeeder

5. Tie the swivel on the hooklink with a Palmor knot and lock it in the feeder. The hooklink is shorter than the feeder

6. Lift the cap off the feeder – the stem is flexible to make this easier. Load a handful of maggots inside the feeder

7. Fill the feeder but don’t pack it too tight. Leave a gap so the maggots can wriggle better and exit the feeder quicker

8. When a fish picks up the hookbait on such a short link, the line is pulled tight to the heavy feeder and the hook sinks home
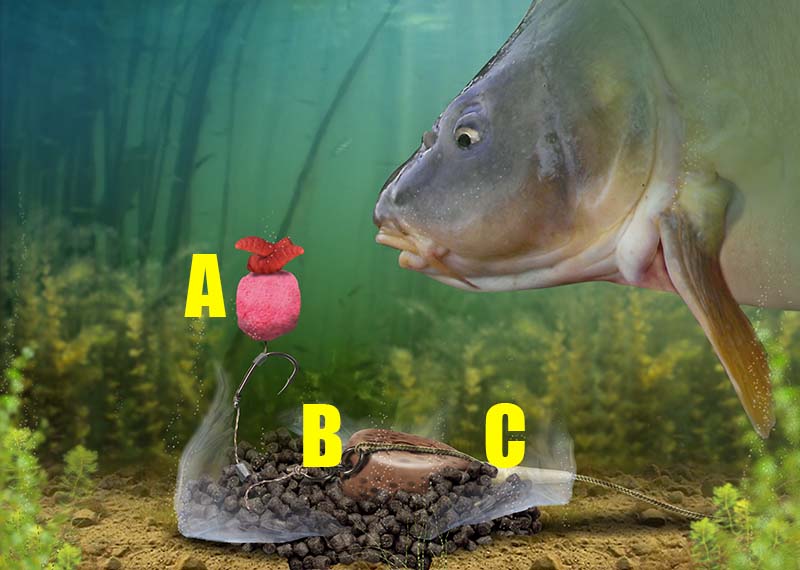
In-line Method feeder rig for carp, bream and tench
The Method feeder is a devastating item of tackle for the commercial carp angler as it not only attracts fish to the swim, but it’s easy to use and easy to catch fish with!
To create this rig you’ll need to thread an in-line Method feeder upon your strong mainline – between 8lb and 12lb is ideal. Next thread a small bead onto your mainline and tie on a strong swivel.
The hooklength you will need should be very short and very robust, again between 8lb and 12lb breaking strain line is ideal. And an ideal length would be between 3in and 6in, because the bait needs to be presented as close as possible to the feeder.
Ideal baits for fishing the Method ought to be the best baits being used on the venue at the time, so ask the venue owner or regulars before you arrive to give you an idea of what to use for the best results.
Groundbait to mould around the feeder is quite important as not all groundbaits work. Ideally choose a specific Method Mix as these groundbaits bind together well and will therefore stick to the frame of the feeder.
You’ll need to mix the groundbait with a little water then take a small handful and press it into the frame of the feeder. Then, using both hands, squeeze a little more groundbait around the frame so that it is completely hidden by the mix. Don’t overfill the feeder as you’ll struggle to cast it out.
The best rods for this style of fishing are either power feeder rods or 2.5lb test curve carp rods.
The key to a good Method Feeder session – as with all forms of feeder fishing – is to consistently hit the same spot to build up a bed of bait that the carp will be drawn to.
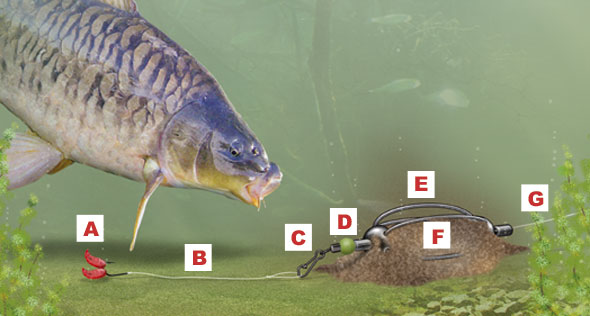
A Use the best baits on the venue at the time you’re fishing. Ring first and you’ll get the right info!
B Use a very short and strong hooklength as bites can be savage when fishing the Method. A 3-6in length of 8-12lb line or braid will be perfect.
C A snap link swivel will allow you to tie two or three hooklength and bait them up when you are waiting for a take. Then, after landing a fish you’ll be able to release the old hooklength and clip on a new one quickly and easily.
D Remember to use a bead to absorb the shock of the feeder on the swivel knot during casting.
E In-Line Method Feeders are best because if your line snaps the fish can pull the rig free from the heavy weight.
F Remember to use a specific Method Mix for your groundbait as it will bind to the feeder correctly and stick to it during the cast.
G Your mainline will need to be tough enough to stand up to the pressure of fishing this technique – 8lb to 12lb mainline is best.
How to tie a resistance-free running feeder or leger rig
The resistance-free running rig has to be one of the simplest leger and feeder rigs a fisherman ought to know how to tie, and it’s deadly too. It will work on rivers, lakes and canals, for almost all British freshwater fish, and below you'll find out how to tie it...
This rig can be used with a groundbait feeder, a blockend feeder or a straight lead, and it can be used with a very short hooklength or a really long one – the choice is yours.
This rig is ideal as it allows the angler to swap and change the weight, style of type of leger/feeder being used in seconds. You simply unclip the Feedabead or snap link swivel and swap the feeder/leger over. This is handy if you need extra weight to cast through a wind. Maybe you’ve fed enough and want to switch to a smaller feeder. Or perhaps you want to search the water for signs of fish and wish to switch to a straight lead – you can do it all with this rig.
Here’s how to tie it…
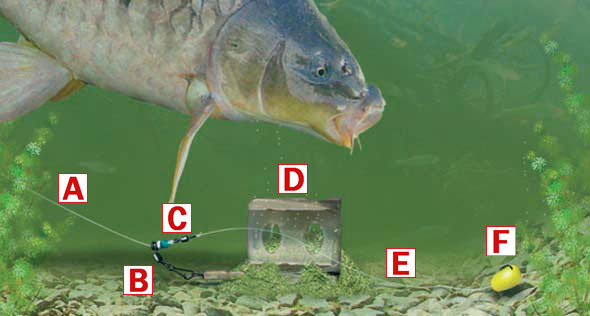
A Your mainline needs to be strong enough to cope with the fish you are likely to catch. An average day on an average stillwater will require 4-6lb line.
B Thread a Korum Feedabead or snap link swivel onto your mainline and follow this with a small bead.
C Now securely tie on a micro swivel. Micro swivels are tiny and therefore they weigh very little, so a fish that takes the bait won’t be able to feel the weight of this tiny swivel.
D Clip your chosen weight onto the Feedabead or snap link swivel. It could be a groundbait feeder, a blockend feeder or a straight lead.
E Your hooklength choice will again depend upon the size of fish present in the venue. The best hooklengths are high-tech lines as these offer great strength for a reduced diameter, meaning you’ll get more bites and stand a better chance of landing the fish you hook. A good starting point for general fishing will be 0.10mm, but step up to something like 0.16mm if you are hitting into lots of big carp.
F Your hook needs to match the size of your chosen bait.