
How to make a surface controller rig for floater fishing
Fishing for carp off the top with a surface controller rig is perhaps one of the most exciting ways to catch carp. You can see them patrolling the upper layers looking for food, and that can send the adrenaline levels off the scale as the huge barrel-like shapes approach your hookbait.
But, although it’s an exciting technique, it’s incredibly frustrating too as hitting bites can be extremely difficult – the carp can nudge the bait or at best take it and spit it out well before you’ve managed to strike the hook home.
One way to prevent this happening is to use a semi-fixed bubble float bolt rig on the surface – it’s deadly, camouflaged against the water’s surface and self-hooking.
Take a look at the diagram below to find out what you need to create this brilliant surface rig.

A Use a substantial mainline such as 8-12lb breaking strain. You’ll need mainline strong enough to land the fish you’re targeting.
B The Fox In-Line Controller Floats are clear, they can be filled with water, they are almost invisible to fish and they can be semi-fixed upon the line. Open up the two plugs and submerge until they are half-full with water. Now thread it upon your line.
C Tie on a size 12 swivel to the end of your mainline and push it into the base of the controller float to fix it in place.
D Your hooklength line needs to be strong, clear and of a low diameter. Clear high-tech pole lines are perfect for this, and 8lb to 10lb breaking strain is about right.
E Attach your buoyant hookbait by either gluing it to the back of the hook shank, using a bait band or by hair-rigging it.
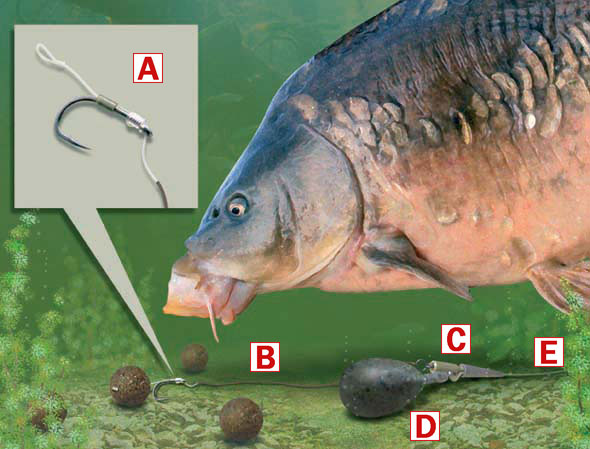
How to make a pole rig for paste fishing for commercial carp
Of all the various pole rigs that anglers use, the paste rig is perhaps the most misunderstood but it’s one of the easiest to tie, easiest to fish and it catches absolutely tons of carp each year.
The most important thing that you need to get right when paste fishing on the pole is to plumb the depth accurately. So, you’ll need to lower your plummet all over your swim to locate a flat area where you can be 100 percent sure that your bait will always be touching the bottom.
The float is important too. The perfect paste float will be seriously long, have a large balsa body and a very long and thick sight tip. All these features are vital to ensure that your float performs in the way it should.
Shotting paste rigs is easy – you just need a bulk of shot set just above your hooklength. It ought to be positioned around 8ins from the hook. One thing you must bear in mind is that you need to add enough shot to take the float down to the top of the balsa body – all the sight tip should be visible above the water.
The next important thing to do it tie on the largest hook you have, bearing in mind the rules of the venue. You can use huge hooks when paste fishing because the paste is moulded around the hook, therefore the fish can’t see it.
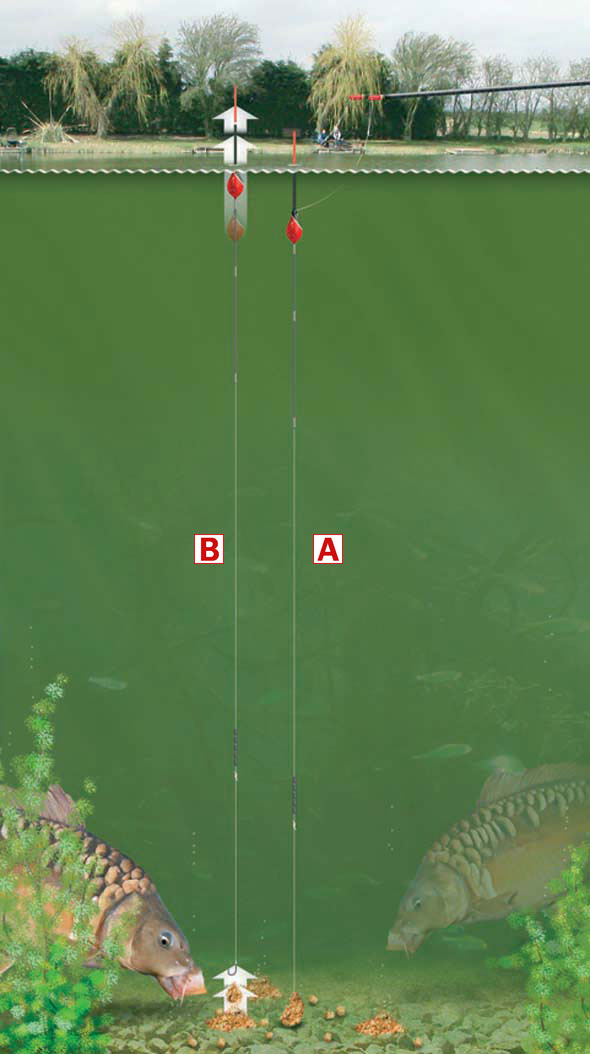
When you have found the area that you are going to fish, it’s time to set the correct depth of your rig. Clip a plummet onto the hook, lower it into your swim and if the whole of the float’s sight tip is showing you have the rig set too deep. You will need to slide the float down the line a little until only 1cm of the float is showing when you lower the plummet and rig into your swim. This is crucial.
Take a look at the paste rig on the right (A). Here the plummet has been removed, a large chunk of paste has been moulded around the hook and the float sits perfectly in the water – this is because the weighty paste is anchoring the rig to the bottom – it’s pulling the float down.
Now take a look at the rig on the left (B). Here the paste has dissolved and broken down, therefore it has lost its grip on the hook. The buoyant pole rig will pull free from the paste and you’ll immediately see the float pop up to the surface. That’s the time to ship the rig back and bait the hook with some more paste.
No other rig tells you that your bait has fallen off quite like this paste rig – it’s perfect and helps you save time waiting for a bite when your bait has dissolved ages ago!
Bites are unmissable – the float will either shoot under, rise to the surface then go under, or just bob around and go under.
Simple waggler rig to catch fish overdepth
This is a simple, straightforward waggler rig that will catch fish from stillwaters, canals and rivers. It’s the basic float rig that every angler ought to know how to tie.
The float is locked onto the line using a silicone float adaptor (these allow a quick change of float whenever required) and is locked in place using the vast majority of shot either side of the adaptor.
You’ll find the number and sizes of shot needed to cock the float printed on the side of the float. This will give you a guideline as to the amount of shot needed.
Next place a few much smaller dropper shot just below mid-depth (a few No6 or No8 shot will ideal).
After this place another two or three No8 shot equally spaced between the last shot and the hook. These will provide a slow and gentle fall of the bait through the last few inches of water.
You will need to plumb the depth really carefully so you know how deep to set the rig, and aim to set the rig 4-6in overdepth so that the bait settles on the bottom.
Most fish feed on the bottom, so this is a good place to start presenting your bait.
A Add enough shot to the rig so that your float’s sight tip just breaks the surface.
B Use a silicone float adaptor to attach the float onto your line, and lock the float in place using the vast majority of shot.
C Your strength of line needs to match the species of fish you are likely to catch. For small fish use between 2.5-4lb, and for carp use between 4-8lb.
D This group of No6 or No8 shot need placing just below mid-depth.
E Spread two or three No8 shot equally between the last group of shot and the hook.
F Your hooklength needs to be slightly weaker than the mainline so if a breakage occurs, it will occur here and not on your main rig.
G Aim to present your baited hook on the bottom at the start of the session as it’s here that most fish will feed. Present the bait between 4-6in overdepth at the start.
Tying a snowman rig for catching big carp
All big-carp anglers are searching for that extra-special trick that can lead to another huge carp landed. One great way to do this is to combine a pop-up boilie with a bottom boilie and present a snowman rig.
Why is it called a snowman rig? You only need to look at the diagram and you can see – the bait just looks like a snowman. The bait is actually two boilies presented on top of each other.
To do this you will need a sinking boilie and a pop-up boilie. They don’t need to be the same flavour or the same colour. In fact they are better if they aren’t the same.
Having a lighter pop-up boilies sitting on top of a darker bottom boilie will help it stand out. And why not have two different flavours of boilies? You’ll provide the fish with a smell combination that they will probably have never encountered.
A favourite among the big-carp anglers in the office is to use a fishmeal bottom bait combined with a pineapple pop-up bait – a deadly pairing.
Here’s what you need to do…
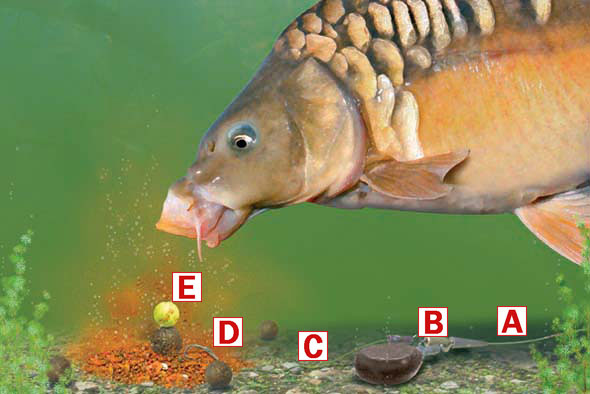
A Your mainline should be strong enough to land the carp that you are fishing for. Most big-carp venues can be fished with 12lb line, but if there are loads of snags present you will be better using 15 or even 18lb line.
B Use a simple semi-fixed helicopter rig set-up for this rig. They can be made from a lead clip pack available from all good tackle shops. The tail rubber is threaded onto the line first, followed by the plastic lead clip. The lead’s swivel needs to be attached to the clip and the components pushed together securely.
C For best results use a braided hooklength, of around 6ins, in a colour that matches the bottom of the venue you are fishing. It will need attaching to the mainline using a swivel that will fit inside the lead clip.
D Use a knotless knot to create a hair-rig upon your hook. Remember to match the size of the hook to the size of the bottom boilies you are using.
E When attaching the bait to the hair, thread on the sinking boilies first and follow this with your pop-up boilie. Lock the baits onto the hair using a bait stop or a small strip of grass.
How to fish for commercial carp using a splasher waggler rig
The splasher waggler has taken the match world by storm this last couple of seasons, accounting for some absolutely massive hauls.
It’s a great way to fish too as it’s a very active method when fished correctly as you will be feeding, casting, retrieving and playing fish all the way through the day.
It works on the principle that sound means free food. Carp soon associated the plop plop plop sound of large pellets hitting the water with the arrival of even more fresh grub, so this technique mimics the sound, tricking the fish into turning to have a look, then they see the slowly falling bait and rush to take it.
The key to this method is to use the right float – a true splasher waggler. They are short, fat balsa floats capable of carrying a lot of shot. And it’s this reason why they make such a splash when they land on the surface.
But, even though they need a lot of shot, the sight tips are large and therefore very buoyant – this helps prevent the float from diving too far under the water when it lands.
You will find that there are both loaded and unloaded splasher wagglers available. The loaded ones cast best because they are aerodynamic and perfectly weighted. But there’s nothing wrong with the unloaded versions except for the fact that shot must be pinched onto the line, therefore there is a chance that the line could become damaged.
Here’s how to tie a typical splasher waggler rig…
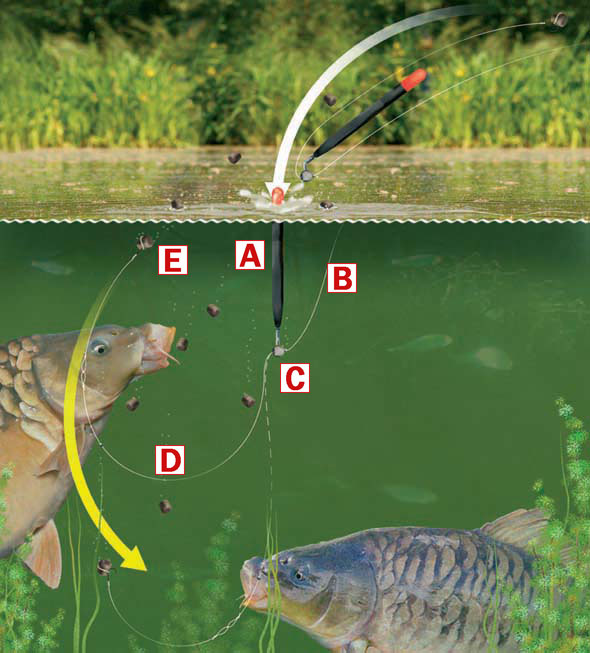
A Use a designated splasher waggler for this method. They are short, fat and straight floats. Here a loaded float has been used, which is the best option, but unloaded floats will still catch plenty of fish.
B Use a strong mainline. 4lb is okay, but 6lb is better as you will be casting frequently and, hopefully, catching a lot of carp too.
C Here the loaded splasher waggler has been locked onto the line using a quick change float adaptor. This is perfect as it won’t damage the line. If you are using an unloaded float, lock it onto the line using large split shot either side of the float.
D Tie on a substantial hooklength strong enough to take the strain of carp. Something like 0.14mm high-tech line will do the job perfectly. Now adjust the length of the rig to suit the conditions. Sometimes a 3ft long rig will be best, but on really hot days when the carp are coming right to the surface a 1ft hooklength is best.
E The best bait to use for this method is definitely a pellet – not a soft expander pellet, but a hard 6mm pellet attached to the hook using a bait band.
How and when to use a Driftbeater float rig
Want to be able to keep your float rig still when fishing a large windswept lake? Well here’s the rig for you – the simple driftbeater rig. When fished correctly this rig can be used to anchor your bait to the bottom in the strongest of undertows.
It works by placing a fairly large shot overdepth, so that it rests on the bottom. This helps hold the rig in place far better than a standard waggler rig fished overdepth ever would.
Driftbeater floats are a little specialised items of fishing tackle so not all tackle shops sell them, unfortunately. They are a bodied waggler having a very long and slender stem that leads to a bulbous balsa sight tip. No other float looks like a driftbeater.
You will need to plumb the depth accurately when using a driftbeater rig, as you have to place a shot far enough down the line so it rests on the bottom.
Here’s how to make the rig:
A Shot the float so that only the body is submerged. Don’t worry that there is 8ins of the stem sticking out the water – you’ll rectify this when you are fishing with the rig properly.
B Your mainline will need to match the species you are catching. A good starting point will be around the 3-4lb mark. Also, sinking mainlines are better as the line will cut through the surface tension and sink, preventing it from being pulled across the water surface in the wind.
C Find the depth of the swim using a plummet, then add another 12ins to the length of the rig. Now place a substantial split shot 8ins from the hook. A No1, or in extreme conditions a BB shot, would be ideal.
D After casting, allow the bottom-most shot to settle on the bottom, then sink your rod tip and wind it a few turns to sink the line between rod and float. Place your rod in rests with the rod tip submerged and slowly turn the reel’s handle until the float sinks to its sight tip. It is now ready to register a bite. Although there are times when the float will be instantly pulled under, most bites will lift the float right out the water.
E Remember to use a hook to match the size of the bait you are fishing with.
How to tie a resistance-free running feeder or leger rig
The resistance-free running rig has to be one of the simplest leger and feeder rigs a fisherman ought to know how to tie, and it’s deadly too. It will work on rivers, lakes and canals, for almost all British freshwater fish, and below you'll find out how to tie it...
This rig can be used with a groundbait feeder, a blockend feeder or a straight lead, and it can be used with a very short hooklength or a really long one – the choice is yours.
This rig is ideal as it allows the angler to swap and change the weight, style of type of leger/feeder being used in seconds. You simply unclip the Feedabead or snap link swivel and swap the feeder/leger over. This is handy if you need extra weight to cast through a wind. Maybe you’ve fed enough and want to switch to a smaller feeder. Or perhaps you want to search the water for signs of fish and wish to switch to a straight lead – you can do it all with this rig.
Here’s how to tie it…
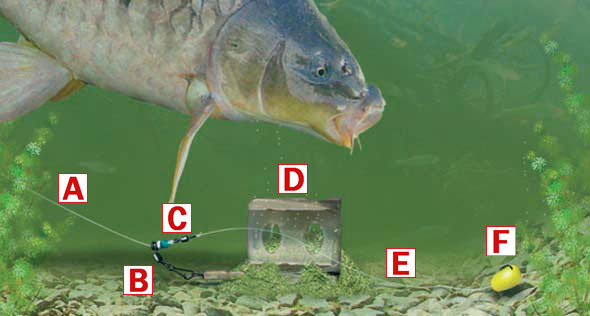
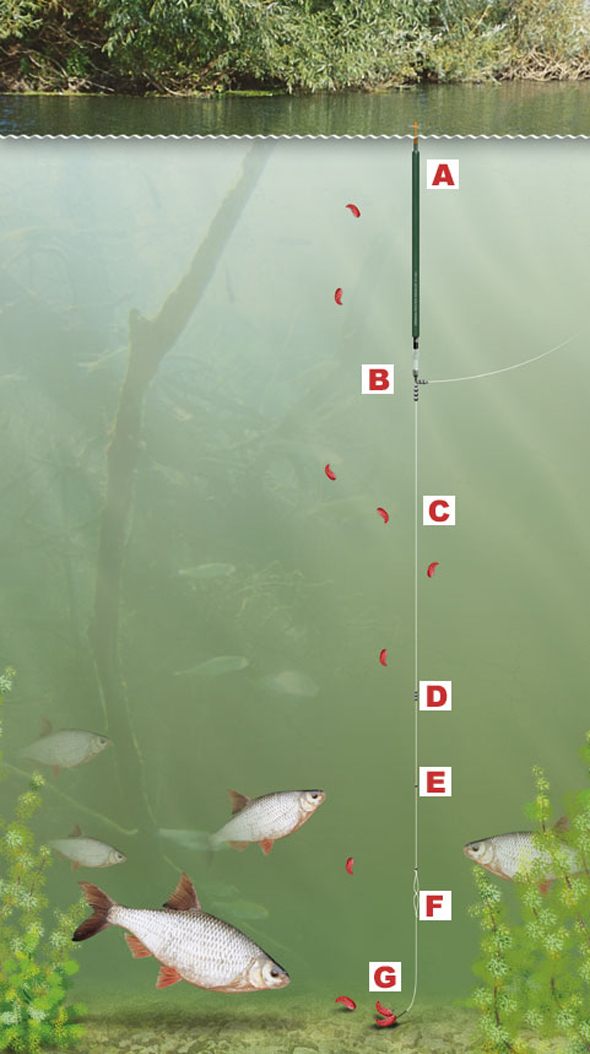
A Your mainline needs to be strong enough to cope with the fish you are likely to catch. An average day on an average stillwater will require 4-6lb line.
B Thread a Korum Feedabead or snap link swivel onto your mainline and follow this with a small bead.
C Now securely tie on a micro swivel. Micro swivels are tiny and therefore they weigh very little, so a fish that takes the bait won’t be able to feel the weight of this tiny swivel.
D Clip your chosen weight onto the Feedabead or snap link swivel. It could be a groundbait feeder, a blockend feeder or a straight lead.
E Your hooklength choice will again depend upon the size of fish present in the venue. The best hooklengths are high-tech lines as these offer great strength for a reduced diameter, meaning you’ll get more bites and stand a better chance of landing the fish you hook. A good starting point for general fishing will be 0.10mm, but step up to something like 0.16mm if you are hitting into lots of big carp.
F Your hook needs to match the size of your chosen bait.
How to tie a simple helicopter rig for specimen fishing
The helicopter rig forms the basis of the vast majority of big carp fishing set-ups used by specimen anglers. It’s incredibly simple to create and its fish-safe too. This means that if the rig is created properly, a fish is hooked and the mainline breaks or the lead becomes snagged, the lead and line will eject from the rig.
You don’t require much in the way of terminal tackle to tie this rig – five things in fact. They are: a lead, a swivel, a lead clip with tail rubber, a carp hook of a size to match your bait and some hair stops. An offcut of your strong mainline could be used for your hooklength if you wish, but some anglers prefer to use camouflaged braid. And in this example a tiny piece of silicone tubing has been threaded onto the hair and hook to produce a line-aligner rig.
This set-up works upon the principle that the short hooklength combined with a heavy lead ensures that when a fish picks up the bait it will very quickly feel the weight of the heavy lead and then bolt off, hooking itself in the process. That’s when your bobbin rises and your alarm screams.
It can be used in the margins or as far as you can cast. It can be used on lakes, rivers and canals, and it can be used throughout the year. This is one rig that you really ought to know how to tie, it really is that important.
Here’s how to tie it…
A Tie a hair-rig and attach your bait so that it almost touches the bend of the hook. Here a tiny piece of silicone tubing has been threaded onto the hair and hook in order to align the hair upon the hook shank.
B Although you could use a length of strong mono (10-12lb is ideal) most anglers prefer to use a braided line that matches the colour of the venue’s bottom. Use a hooklength of between 6ins and 12ins to ensure you create a bolt rig effect. Tie a swivel onto the end of your hooklength.
C This is a lead clip. It is available in packs from many different specialist tackle manufacturers and comprises a plastic lead clip and tail rubber. The tail rubber should be threaded onto the line first, then the plastic clip and the hooklength swivel should be tied onto the end of the mainline.
D Your lead needs to have a swivel and quite heavy. 2oz is around the minimum weight, but you may need to go as heavy as 5oz to keep the rig stationary when fishing for big barbel in powerful, flooded rivers. Attach the lead’s swivel to the line clip and push the clip and tail rubber together to secure the rig.
E An ideal mainline for fishing in this way is 12lb, but if you are fishing extremely snaggy and weedy waters you may need to go as heavy as 15lb or even 18lb.
How to make a bagging waggler rig for catching big carp match weights
This bagging waggler rig is one of the easiest and safest rigs you can use to catch loads of carp in matches. It takes seconds to set up and can provide you with frantic sport and huge weights in the warmer weather.
You will need a bagging waggler float (the type with a large balsa body and a weighted frame feeder on the base), a lead clip and tail rubber (the type used by carp anglers to create helicopter rigs), robust mainline of around 8-10lb, robust hooklength of around 8lb, a powerful hook and a robust bait such as a small brightly coloured sinking boilies.

A Your bagging waggler needs to be large and robust. Check any weak points between the float and the feeder frame for damage before you set up as the float will go through a lot of abuse in a session.
B Check your mainline thoroughly. It also needs to be strong and damage-free as this will also go through a lot of abuse with frequent casting and retrieving. 8-10lb mainline is ideal.
C Your groundbait should be soft and fluffy. Method Mix is too sticky for this technique – normal carp style mixes are better, mixed slightly damper than you would mix groundbait for feeder fishing.
D Use a lead clip and tail rubber for attaching your float to your mainline. Thread the mainline through the tail rubber, then the lead clip and tie a size 12 swivel onto the end of your mainline. The float should be attached to the lead clip and the tail rubber pushed over the plastic hook to hold it in place.
E Your hooklength needs to be up to the job. 8lb high-tech line is a good starting point, but you may need to step up to 10lb if there are really big fish present. The length will depend upon the depth at which the fish are feeding. Experimentation is the key here and a good starting point will be about 2-3ft, but expect to shallow this length as the session progresses.
F Hair-rigged baits are best, and boilies are tough enough to withstand this style of fishing. You can catch numerous carp on the same boilies. A wide gape size 12 or 10 hook coupled with a white or brightly coloured midi boilies is perfect.
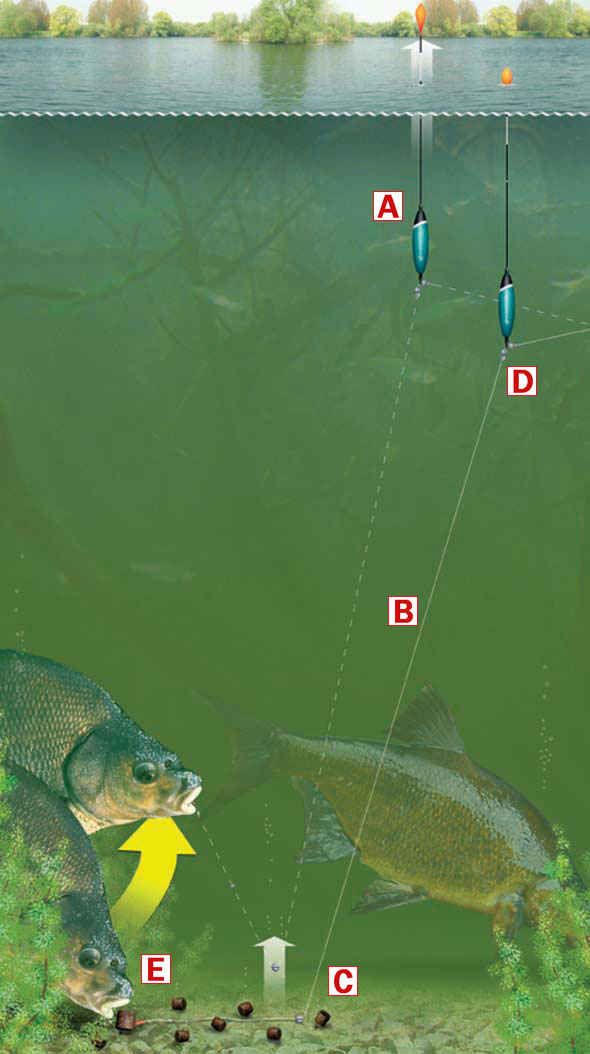
How to catch more fish after prebaiting a lake or river swim
If you have spent lots of time, effort and money prebaiting a lake or a river for masses of bream, barbel, carp or tench, you ought to know how to fish that peg correctly so you get the most out of it.
Here we show you where to cast to make sure that you keep the shoal right where you want them, prevent spooking the fish and help you keep those bites coming thick and fast.
If you have prebaited correctly you will have introduced your bait over a fairly wide area – this is best because you are hoping to attract a mass of fish into your swim, and they will need plenty of room to browse over your feed. It’s no good if the fish have to fight each other for the food.
Also, you should have earmarked your baited area quite accurately by using either a floating marker, a far bank marker or some other means. This is crucial too as you will need to know where to cast or else all your effort will have been for nothing.
So, when you approach your baited swim armed with all your fishing gear, don’t just cast right over the top of your prebaited swim as this could spook the fish that are feeding upon the food you’ve introduced.
Instead aim to pick off the fish from the near outskirts of the baited area. Just because you’re fishing off the baited area doesn’t mean that the fish won’t come to your bait because they will.
Once you hook a fish you can gently steer it away from the prebaited zone so you don’t spook any other fish that are enjoying all the free food.
It’s best to alternate the fishing spots too. Try casting to the left of the baited area, then just short of it, then to the right. Eventually you will find the best place to cast and you’ll soon have a keepnet full!
Presenting expander pellets on the bottom with the pellet deck rig
This rig is ideal for presenting expander pellets on the bottom for carp, tench and bream. It can be used in depths of 3ft or more and when fished correctly it can tempt bites when all other pellet rigs fail.
A Use a long, body-down pole float for this style of fishing. One having a long plastic bristle is perfect as bite registration will be near instant.
B Cock the float with an olivette to form a bulk. This needs to be positioned around 12in from the hook.
C Place two dropper shot equally spaced between the olivette and the hook. Ideally they should be No10 shot that are light enough to create a gentle and natural fall of the bait through the final few inches of water.
D The hookbait should be set so that it just touches the bottom, so accurate plumbing is vital with this rig.
E The best way to tempt extra bites with this rig is to loosefeed little and often with sinking pellets, then lift and lower your rig regualrly. This gives the expander pellet plenty of movement, and the simple waft of the bait dropping down to the bottom can bring a bite when a static bait is often ignored.