
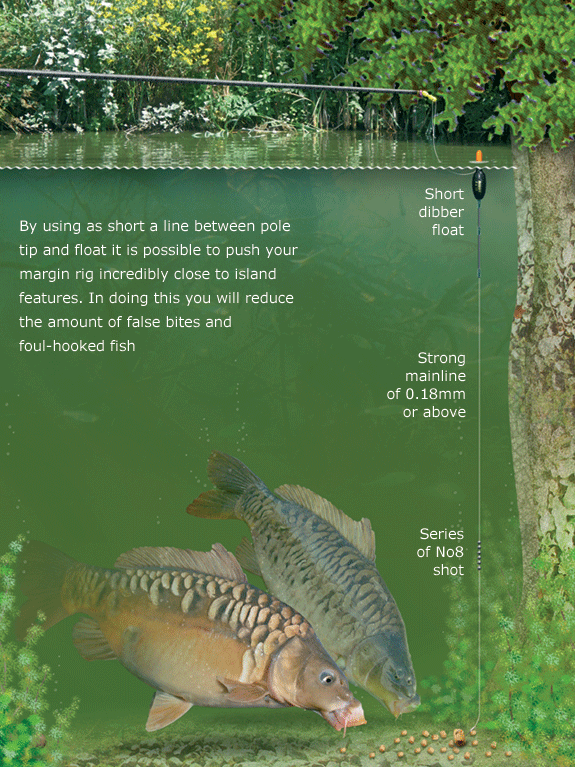
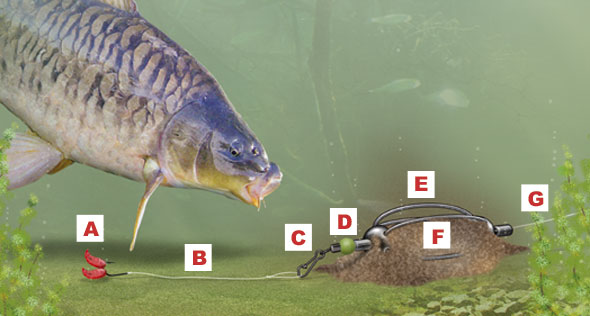
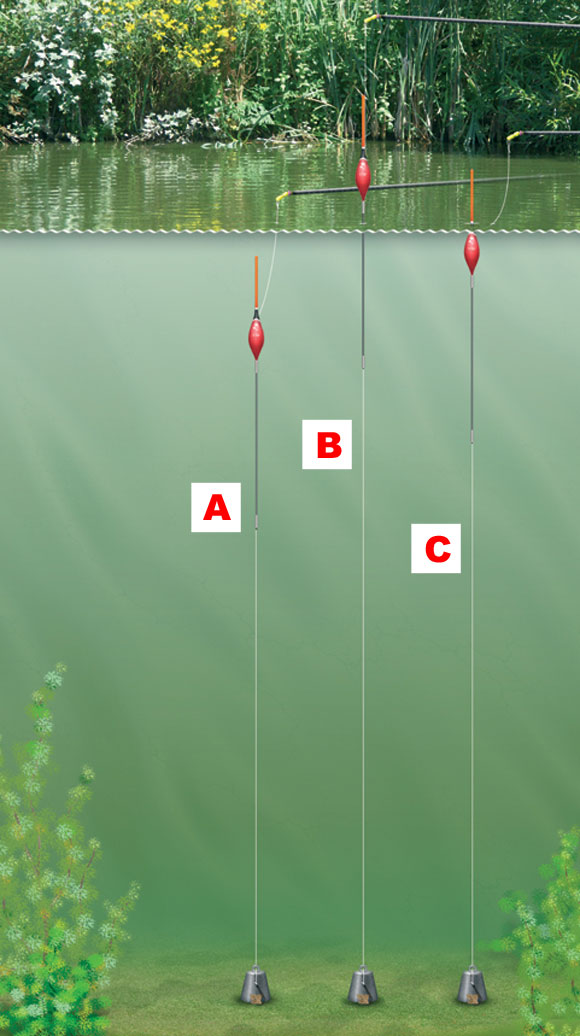
Prevent foul hooking carp when margin fishing
We've all done it at some time - foul hooked a carp in the fin or flank when pole fishing tight to the margins or an island. It's almost inevitable that the feeding carp will, at some time, swim into our lines and become foul-hooked.
Not only is this unsporting, but playing a foul-hooked carp is twice as hard as normal, putting your pole, elastic, hook and line under incredible pressure that often ends in disaster.
Although we cannot guarantee that this technique will prevent carp becoming foul-hooked, it will certainly decrease the chance of that happening. And in turn it will increase your confidence too.
Here's how it's done and how to tie it...
The key tackle requirements are a strong hook (eyed or spade end, it doesn't matter), strong mainline and a short dibber pole float. Then you'll need a handful of No8 shot to dot the float down to the bulbous sight tip.
When we say strong mainline, choose a high-tech line of around 0.18mm to 0.22mm diameter (between 6-10lb). That will be strong enough to cope with the rigors of this style of fishing.
All your shot should be placed together, in a line, below mid-depth.
You'll also need strong pole elastic. A grade 18 will be spot on, but you may get away with a 16 if the fish aren't enormous.
Finally, to fish this technique effectively you will need to use as short a line between pole tip and float. The reason for this is simple. You're going to have to push your rig as close to the margins or island as is possible. Having a short length of line above the float will help you do this effectively.
Plumb the depth carefully as your bait should just rest on the bottom an inch or two. Now you're ready to take the swim on, feed it and start catching.
The trick to the effectiveness of this rig is really very simple. If your rig is presented as close as possible to the margins it'll be positioned just out of the way of the feeding carp. Also, when a carp does pick up your bait and you strike, there's a very high likelihood that the carp will swim directly away from the margins and into open water, where you'll be able to gain control of it quickly. Obviously there's no way the carp can swim forwards, because of the island or the bank.
Take a look at the diagrams below and you'll see why it's important to fish as close as possible to the feature.
THE RIGHT WAY
THE WRONG WAY


How to rig and fish with a pellet waggler

The pellet waggler is one of the best ways to put together a huge haul of commercial carp during the warmer months. It's basically a floatfishing tactic that relies on heavy feeding to bring carp into your swim and feeding just under the surface where they compete for the loosefeed.
The best bait for this style of fishing is and will always be sinking pellets of between 4mm and 10mm, depending upon the distance that they need feeding.
And although the rig - detailed below - is very very simple to create, it's the feeding that will make or break a session fishing the pellet waggler.
The key is to feed little and often, any by this we mean feed around 6-10 pellets every minute. This will create lots of tapping noises on the surface which will help attract the carp, but it will also create a constant stream of bait falling through the water.
Once the carp find this falling bait they will start to intercept it and eventually rswim up higher in the water to get at the pellets before all the other carp. Evenutally they will rise so high in the water that you will see swirls on the surface as soon as a new batch of pellets hits the surface.
And that's the time to cast out you float and let your pellet hookbait fall right on the nose of the carp underneath!

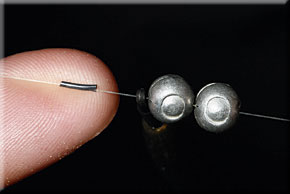
1. 3-5SSG Silverbacks from KC Angling are ideal. Others are by Drennan, Middy, Maver Preston, Ultra and Premier
2. You have to use large SSG shot but thread lengths of GURU 0.3mm micro silicone tubing on the line and pinch shot on to this


3. The silicone acts as a buffer and stops the shot pinching directly on the mainline. This cushions the line and prevents damage
4. Leave half-inch gap between shot. This makes the float lay on the surface when it lands, making a larger splash. It flattens on the strike to improve hook-up rate


5. In open water situations where there are few snags Alex uses 4lb GURU Drag-Line on his reel and 0.20mm Shimano Silk Shock Antares as his hooklink
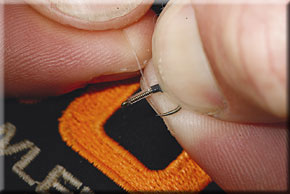
6. Now for the hooklink. Cut off around 15 inches of Antares 0.20mm diameter line and thread it through a GURU rubber bait band


7. Tie a four-turn grinner knot to attach the band to the end of the hooklink. Snip off the tag end of line.
8. This knot allows the band to hang straight down from the hooklink line, producing a good angle with the hook when it is attached


9. Thread micro silicone tubing on to the hooklink. This will help position bait against the hook at the correct angle for hooking fish
10. Thread the top end of hooklink through the back of the hook eye. Slide line through it to pull the bait band up to the bend of the hook


11. Thread the silicone over the hook point and slide it round the bend on to the shank
12. The silicone sleeve holds the line tight to the shank of the hook, keeping the bait band close to the hook point

13. Thread hooklink through the back of the hook eye and whip it down the shank. Whip away from where the hook eye is closed against the shank
14. Whip the line down the shank, making 10-11 turns of line, then thread the hooklink through the back of the hook eye again


15. Moisten coils and pull line tight. This is the knotless knot. Tie Figure of 8 loop in the hooklink and attach to mainline using a loop-to-loop connection
16. Get a hard 8mm Bait-Tech feed pellet and pinch it against the bottom of the bait band


17. Still pinching the band against the bait stretch it beyond the pellet and pull it over it. The bait is now circled by the band.
18. The band grips the bait firmly and stops it flying off the rig on the cast. You should be able to make several casts with the same bait

19. The final rig is best used in water at least five feet deep with the float set to fish the top couple of feet. Shorten or increase depth on the day.
How to make a reverse hair-rig for carp fishing

Rig presentation is everything to big-carp specialist Richard Farnham. He's always looking for a better way to present his bait, especially when tackling waters such as the renown Horton Church lake - where takes are very few and far between.
Many years ago, during a full season tackling the venue where blanks are common, he set to work creating a new rig that might well transform those tentative pick-ups that carp can give into full-blown runs.
The idea was to create a rig where the carp found it absolutely impossible to suck up the bait and eject it without the hook point connecting with the fish - and so his reversed hair-rig was formed.
This rig transformed a terrible season on the venue. After a little tinkering with the set-up, and adding tungsten putty to pin the braided hooklength down, and flying backleads to sink the mainline to the bottom, Richard began to get runs.
His newly developed reversed hair-rig produced a new personal best carp for Richard - Shoulders at 42lb 8oz. This proves without a shadow of a doubt that this rig can effectively be used to effectively fish for very shy and wily carp.

Cut off a length of braided line and tie a small overhand loop in the end. Thread the braid through the back of the hook’s eye

Fold the braided hooklength over like this. Remember to make the distance between the loop and the hook’s eye long enough to fit your bait.

Whip the tag end of braid around the folded-over braid and the hook shank enough times to cover the doubled-over braid

Make another whip upwards, over the other whippings and pass the tag end through the back of the eye once more. The knot is now complete.

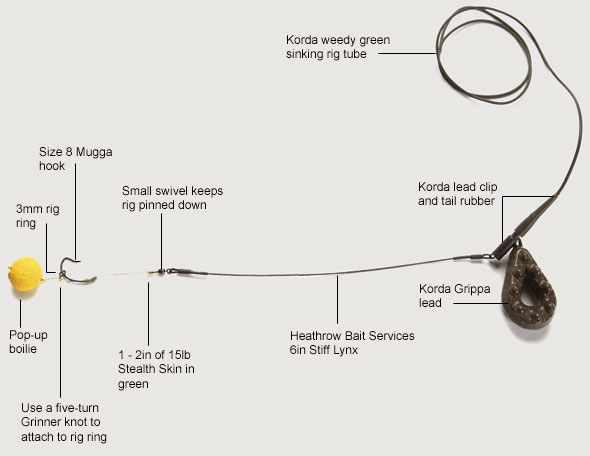
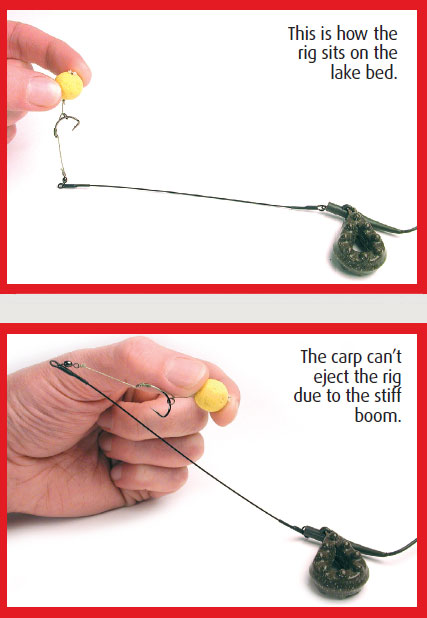
How to make an anti-eject rig for big carp

Knowing how to tie and create an anti-eject rig can and will put you streets ahead in terms of putting more carp on your unhooking mat simply because this type of rig is really difficult for the carp to blow out their mouths, therefore there's a mugh hgher chance of the hook point hitting home.
In general, stiffened lines are not usually used as a hooklength for bottom bait presentations, but by adding a short and supple braided section between the hook and stiff hooklength gives the rig remarkable anti-eject qualities.
A great hook for this is a Mugga. This hook pattern has great turning properties in itself when a carp tries to blow the hook back out of its mouth, but add to this a sliding rig ring to create a ‘spit-back’ rig and the carp really do find this rig very difficult to eject. Another anti-eject aspect of this rig happens to be the ultra-stiff boom used to create most of the hooklength and the hinge created by the braid. The supple braid collapses in the carp’s mouth when the fish tries to eject the bait, the bait slides down the hook shank, the hook turns but the stiff boom prevents it coming all the way out. One nailed carp!
The stiff boom that is used is made and sold by Heathrow Bait Services. It’s 6 inches long and features swivels at either end. The business end - where the soft braided hinge is attached - features a very small swivel so as not to adversely affect the rig by weighting it down.
The lead is attached ‘on the side’ using a fi sh-safe Korda Lead Clip and Tail Rubber. If the lead were to become snagged the lead clip will come apart to release the lead and allow the angler to play the fish in safety.
This is a great rig to use in winter with small PVA bags of crushed boilies, and on the hair try using either two cut down (odd-shaped) boilies or a single bottom boilie. This is a cracking rig to try when bites are hard to come by.
Pinned down helicopter rig for snag fishing

Snag fishing knowledge and understanding how to fish really close to weed, reeds and underwater features is a great skill to have as it can help you put many more big, heavy, specimen carp on the unhooking mat.
We all know that snags are like a magnet to big carp - they use them as cover, plus the carp feed on waterlife that lives or drifts into the snag or feature.
Here you'll find how to create the perfect rig for snag fishing, and how best to use it...
Remember these rules when creating a rig for snag fishing: Use a flying back lead and rig tubing with putty or wire to keep the line above the rig pinned down to the lake bed. A pear lead can be used on a flat bottom, but try a Grippa for slopes. Finally, to allow easy release of the lead, push the tail rubber only one-third of the way on to the safety clip.
How to tie a spade end hook
We show you how to use the popular Matchman hook tyer one of the easiest ways of tying a spade-end hook…
Scroll down to see how to tie a spade end hook using the Matchman hook tyer in twelve simple steps.

STEP ONE Clamp the hook into the tyer by tightening the dial. Ensure the hook point isn’t showing as this can catch the line.

STEP TWO Push in the metal prongs, note how the front one has a gap for the line to go under

STEP THREE Hold the line tight by putting a weight on the spool, or by pulling against the rod if you tie direct to the mainline.

STEP FOUR Run the tight line behind the two metal prongs.

STEP FIVE Pin the tag of line to the hook tyer with your thumb.

STEP SIX With your other hand bring the tag of line behind the hook and the tight line.

STEP SEVEN Pull the tag and the main piece of line tight to the hook near the base of the shank.

STEP EIGHT Slowly rotate the hook tyer seven or eight times, moving up the shank of the hook towards its spade.

STEP NINE Hook the tag of line behind the front prong and push both prongs in.

STEP TEN Pull both lines tight before unscrewing the clasp and wetting the lines with saliva.

STEP ELEVEN As you unscrew the clasp apply steady pressure on the line and slowly tease the knot down.

STEP TWELVE Slide the knot up to the spade by pulling the line above it. Pull the knot tight and trim the tag off. Ensure the line comes off the front of the spade.
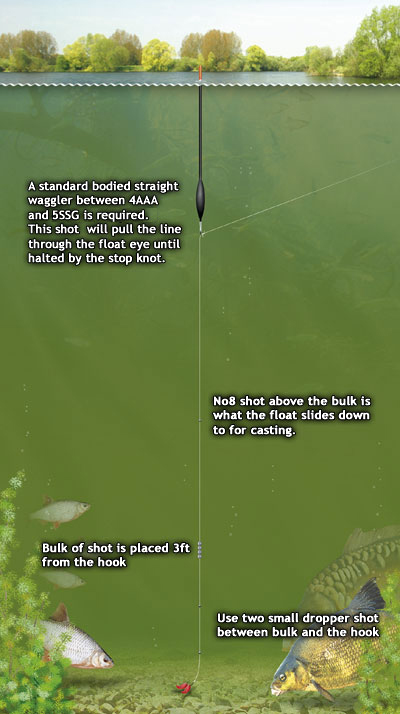
How to fish and create a slider float rig
You may well have read or heard about match anglers fishing a slider float rig. If you’ve ever wondered what they are talking about, read on as here’s a compact guide to tying a slider float rig and how to fish the slider…
A slider rig is one of the best ways to float fish a bait on the bottom in deep venues – those 10ft deep or more – because the float isn’t locked in position on the line like normal waggler rigs.
This means that any depth of water can be tackled, and casting is easy. Even when your rod is only 12ft, but the water’s way deeper than that.
Slider float rigs work on this principle: The large waggler float is attached to the line using a swivel float adaptor that allows the float to slide along the mainline. Below the float is all the shot required to cock the float. And above the float is a stop knot that prevents the float from going too far up the line.
There’s a certain way to set up the shotting below the float – just take a look at the diagram below to see how’s it’s done.
The position of the stop knot above the float will depend upon the depth. Basically, it’s a case of attaching a plummet to the hook, sliding the stop knot along the line to guess the depth and casting the rig to see if you’ve found the correct depth. Obviously the float will sink if the rig is set too shallow. Basically, that single stop knot positioned above the float takes the place of the split shot that you’d normally use around the float’s base.
The float must be of a certain style. Normal straight, crystal and insert wagglers aren’t ideal for this technique. The perfect float needs to have a large shot carrying capacity – something in the region of 4AAA and above is needed. And here’s why…
When this rig hits the water you must leave the bale arm open. The large waggler will rest on the surface for a second or two while the huge amount of shot drops, dragging line through the eye of the float adaptor. That’s why the bale arm needs to be open – so line can zip through easily.
Before you’ve time to blink the stop knot will hit the float adaptor’s swivel and suddenly the float will stand up and sink to the correct level, ready to detect a bite. That’s the time to snap over the reel’s bale arm and maybe take up any slack in the line, ready to hit a bite.
It’s a very ingenious method of float fishing and, as with most good things, it’s really very simple when it’s clearly described.
And what’s more, despite needing a gigantic float, this technique is very sensitive, so you’ll be able to detect the most gentle of bites – often spotting more bites than you would if you were feeder fishing the same swim.
SLIDER FISHING TRICKS
You must use a swivel float adaptor when fishing the slider to ensure your line passes through the float easily and quickly.
It’s best to use either a small piece of your mainline or slightly thicker fishing line for the stop knot.
If your stop knot slips, simply tie a second one onto the line and push them together. Obviously they both must be tied onto the line above the float.
Leave around 1in of line protruding from each side of the stop knot as this will help prevent the float slipping over the knot.
Don’t use a waggler rod with really tiny line guides, especially of you have to cast long distances, as this will cause too much resistance and you may not cast the distance required.
If all your swivel float adaptors have large swivels, simply crush the swivel loop into an oval using pliers. That works for Alan Scotthorne, so it’ll work for you too!
How to tie a helicopter-style Method feeder rig
The method feeder is a deadly technique for catching carp and bream. The groundbait that is moulded around the frame attracts the fish, they nudge the crumbs to try to get to any larger food particles inside and then they find your hook bait - that's when the fish hook themselves against the weight of the feeder and its lead.
There are two different ways to create a method feeder rig. One is to fish it in-line style so that the mainline runs through the feeder and the hooklengths attaches to that. This technique is a good one, but it's not the best. This sort of rig can tangle, so another alternative is the helicopter-style method feeder rig detailed below.
This method feeder rig is widely used by specialist carp and bream anglers, it can be cast very long distances, it's easy to create, it's near fool-proof and it's almost 100 percent tangle-free.
Here's how it's tied...

To set the feeder up helicopter-style, Joe uses a Korda Safe Zone leader

Thread the mainline through the feeder, through the eye of the leader and back through the feeder. Pull the mono to thread the feeder onto the leader.

Slide the feeder down the leader and push the base on to the swivel at the end of the Safe Zone leader

Similar to the in-line rig shown above, this semi-fixes the feeder onto the leader.

Using a baiting needle, thread on a 6mm bead, followed by a size 8 Korda ring swivel with hooklink attached and then a second 6mm bead

Hook the eye of the leader on to the baiting needle and gently slide the beads and ring swivel on to the Safe Zone leader.
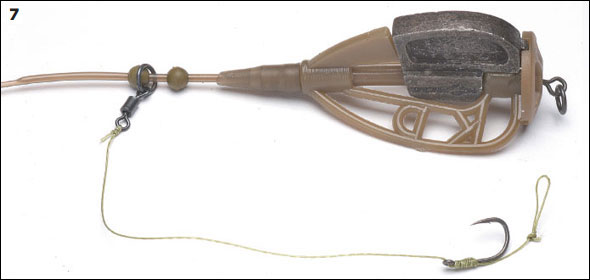
Push the beads and swivel down the leader and position them just above the feeder to form the helicopter link.
Tie the end of the mainline onto the loop at the top of the leader and you are ready to fish.
Once again, the 6mm bead and swivel will easily pull off the leader if the mainline snaps.
How to set up an in-line bolt maggot feeder rig
In-line maggot feeders are relatively new to the market but they have already helped catch many big carp, bream and tench to those anglers who know how to rig and set them up correctly.
Here Bob Roberts shows us how he sets his up when fishing specialist-style for big tench...
This technique not only ensures that the fish hooks itself against the weight of the heavy maggot feeder, but it also ensures that the fish are brought straight to the hookbait due to the accurate placement of the wriggling maggots escaping from the large in-line maggot feeder.
It's a really simple rig to tie and one that you could use the next time you're seeking a big carp, tench or bream.
This method will work on rivers for barbel and chub, providing you use a feeder that has enough weight to hold the bottom in the strong current, but ideally it's more of a stillwater technique used alongside bite alarms and indicators...

How to do it...

1. Get a Drennan Bolt Blockend feeder, size 16 Drennan Carp Method hooks, size 9 E-S-P Uni-Link swivel, 10lb Drennan brai

2. Thread the feeder’s tail rubber down the reel line, followed by the feeder. The metal plate ensures it lands base down

3. The reel line runs straight through the centre of the feeder helping the rig become aerodynamic for castin

4. Cut a length of braid and tie to the hook with a grinner knot. Cut the link so it’s a little shorter than the swimfeeder

5. Tie the swivel on the hooklink with a Palmor knot and lock it in the feeder. The hooklink is shorter than the feeder

6. Lift the cap off the feeder – the stem is flexible to make this easier. Load a handful of maggots inside the feeder

7. Fill the feeder but don’t pack it too tight. Leave a gap so the maggots can wriggle better and exit the feeder quicker

8. When a fish picks up the hookbait on such a short link, the line is pulled tight to the heavy feeder and the hook sinks home
How to tie a Zig rig to catch carp mid-water
The zig-rig is a devastating rig for catching carp when they are feeding high in the water, in mid-water and feeding right on the surface.
It works around the same principle as a standard semi-fixed bolt rig – the only difference is the length of the hooklength.
The lead set-up is very simple. Here it comprises a large swivel lead attached to the line using a safety clip. A swivel joins the mainline to the hooklength, but here it’s covered in a short length of tubing to prevent tangles.
The hooklength must be a clear line (fluorocarbon is best) so as not to spook the fish, and the length of it must be shallower than the depth of water.
To find the water depth you may need to use a marker float set up, then from this you will be able to find the depth and then create a hooklength long enough to present the bait at the required depth – sometimes just 6in under the surface works best – sometimes mid-depth will get you more bites.
Bite registration ought to be the same set-up as you normally use – an alarm and an indicator.
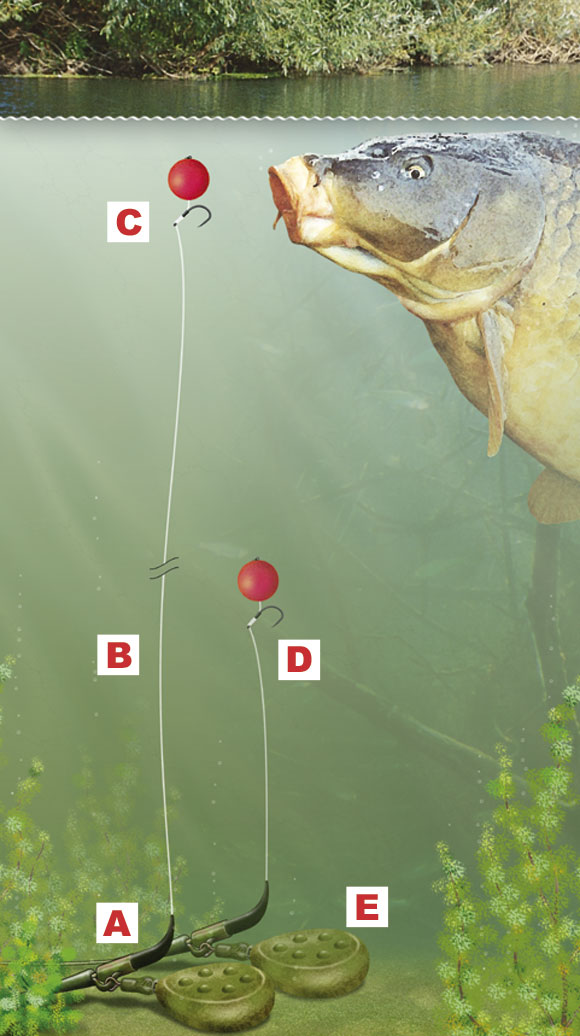
A Remember to use a length of tubing over the swivel as this will prevent tangles.
B Fluorocarbon line is best for this rig, but clear mono will also catch you fish.
C Use a large pop-up boilies as this will provide the buoyancy to suspend the bait well off the bottom.
D In mild water conditions, a bait presented at mid-water will gain you more takes.
E Use a gripper-style lead to hold the bottom securely as you will never know if you have cast your rig onto a steeply-shelving bottom.
How to use a chubber float for fishing shallow and fast rivers or streams
The short, fat and dumpy chubber float is perfect for fishing shallow and fast river glides or trotting on streams. It’s capable of carrying a lot of shot, due to the size and buoyancy of the float. This is perfect because fast, shallow swims need a lot of lead down the line to ensure that the bait is pushed down to the bottom right where the fish are.
A typical chubber rig is simple to tie, and here’s how…
A Your mainline ought to be a floating one. Drennan Floatfish is perfect. Choose a breaking strain that matches the fish that you are likely to catch. A 3lb line will be adequate for most situations, but you may need to step up to 5 or even 6lb if there are lots of big barbel present.
B The chubber float needs to be attached to the mainline using three rubbers – one just under the sight tip, one in the middle and one at the base of the float.
C There are two ways to shot a chubber float – either use a string of large shot (BBs, AAs or even SSGs) placed around 1ft from the hook, or alternatively use an olivette. This creates a much smaller and neater bulk of weight.
D Because chubbers should be fished in fast water, the fish don’t have that much time to check out the hooklength, so this sort of rig can be fished straight through to your hook. You still need to match the hook size to the size of the bait you are using.

How to find underwater features using a marker float rig
This simple yet amazingly effective marker float rig diagram will enable you to ‘see’ all those hidden underwater features and therefore ensure you can place your bait right where you need it.
This rig can be cast to various spots around the lake to not only find the depth in that particular spot, but also to find out what lies on the bottom – weed, gravel, mud or silt.
With a little experience you can very quickly figure out the exact make-up of the bottom of the lake you are fishing and determine which areas are likely to hold the fish and therefore where you think you will be best casting your bait.
All you need to create this set up is a spare carp rod (preferably around 2.75lb test curve), a reel loaded with strong braid, a marker float, a heavy swivel lead (of around 2oz or more), a length of strong monofilament, a strong baiting needle, a cork ball and a run ring with bead.
The reason for using a strong rod and strong braid is so the angler can ‘feel’ the bottom of the lake. Basically the combination of strong stiff rod and braid helps transmit every knock and bump of the lead along the bottom to the angler’s hands. It’s hard to describe in words, but with a little practices you’ll be able to tell exactly what lies on the bottom by the feeling you get through the rod and braid when the leads moves.
Building the link for the rig
Creating this rig is really very simple… Cut off 14in of your strong monofilament and tie one end to your swivel lead. Now pierce the cork ball with your baiting needle and draw the strong monofilament through it so the ball is trapped upon the line. Now tie the run ring to the end of the strong line.
To complete this link, push the cork ball onto the base of the run ring. You could glue this in place if you wish.
Setting up the rig
Thread your braid through the guides of your spare 2.75lb test curve carp rod and pass it through the run ring of the link you made earlier. Now thread the braid through the run ring’s bead and then tie it onto the base swivel of the marker float. Job done!

Using the rig
You must cast this rig with a fluid motion – not a jerky cast – so you don’t tangle it. And once the rig lands gently wind the reel’s handle to send the large marker float down to the bottom where it will contact the link and lock up.
You’ll feel this through the rod, when the float hits the link and the line tightens fully.
Now open the reel’s bale arm and pay out line 1ft at a time, remembering to count as you go and remember to add the 12in (1ft) that forms the link. Keep paying out line and counting until you see the float break the surface. Whatever figure you arrive at – that’s the depth.
Remember that figure, or better still write it down, and then gently wind the float back down again until it locks up against the link.
Now gently pull the rod around to your side, while keeping the reel locked up, and drag the lead along the bottom.
You’ll feel various things through the rod depending upon the substance that the lead travels over.
If the lead hits into weed, the rod might well lock up solid and then jerk round again as you pull on the lead.
If the lead passes over flat mud or through silt you’ll feel a constant but smooth pressure.
If the rod passes over gravel or rock you’ll feel a definite tap-tap-tap feeling through the rod.
Once you’ve pulled the rod right round to your side, swing it around again to point directly at the lead, wind down again slowly and pay out line until the float pops to the surface, counting the depth as you go.
Do this many times in a wide variety of places around the lake and you’ll begin to build up an excellent picture of the bottom of the lake with all its little dips, troughs, gravel bars, weed beds and ledges.
Get the right distance


If you find a real corker of a feature there's only one way to ensure that you hit that spot. Cast to it with your marker float and once you've found it again, clip the line around your line clip.
Wind the rig in and place both your marker float rod and your fishing rod onto rod rests and open the bale arm. Now walk the marker float and the fishing rig out until the line hits the clip. Once you've done that, place the rigs onto the ground, walk back to the rods and clip up the line of your fishign rod.
Now you'll always cast the right distance and hit that spot every single time you cast!

If you are new to this rig and aren’t exactly sure what you ought to be feeling through the rod when you pull your lead across mud, gravel, silt or into weed then try this trick… Simply visit a lake that has all those features in the margins, drop your lead onto those features, walk the rod away from them and simply drag the lead across or into the features and note what it feels like through the rod.
Resistance-free running rig for big perch
This is THE rig to use if you are targeting specimen perch. Although it’s quite simple to tie, the components you will need are quite specialised but can be bought from all good tackle shops.
A Run Ring is a must because this provides a large diameter bore through which the line passes, therefore resistance is kept to a minimum. Big perch will drop a legered bait if they feel the slightest resistance.
The Run Ring will need covering with some silicone tubing to prevent tangles, and then a snap link swivel can be clipped to the Run Ring so that any weight of lead can be used quickly and easily.
The best hooklength lines should be soft, supple and camouflaged – either a braid or clear mono is ideal. Length needs to be between 2ft and 4ft.
One of the best baits for big perch is a couple of lobworms, so this means that the hook will need to be quite large. A size 4 wide gape will be ideal, preferably barbed so that the worms remain on the hook.

A Use a Run Ring followed by a bead and a swivel. The Run Ring reduces the amount of resistance to the taking fish.
B The size and weight of lead ought to suit the distance that you intend casting. You could switch the lead for a feeder crammed with red maggots or chopped worms if you wish.
C It’s best to incorporate a snap link swivel into this rig so you can change the lead quickly at any stage during the session.
D Use a large swivel and a very strong knot to lock on your hooklength as there’s every chance you may encounter a large tench, carp or bream fishing with this rig.
E Hooklengths need to be strong and short – 2ft to 4ft is ideal and between 4lb and 8lb is best.
F When fishing with two lobworms hook them in the saddle with a wide gape size 4 hook.
G Chop and change your baits between using whole lobworms and broken lobworms to find out which bait the fish respond to best.
In-line Method feeder rig for carp, bream and tench
The Method feeder is a devastating item of tackle for the commercial carp angler as it not only attracts fish to the swim, but it’s easy to use and easy to catch fish with!
To create this rig you’ll need to thread an in-line Method feeder upon your strong mainline – between 8lb and 12lb is ideal. Next thread a small bead onto your mainline and tie on a strong swivel.
The hooklength you will need should be very short and very robust, again between 8lb and 12lb breaking strain line is ideal. And an ideal length would be between 3in and 6in, because the bait needs to be presented as close as possible to the feeder.
Ideal baits for fishing the Method ought to be the best baits being used on the venue at the time, so ask the venue owner or regulars before you arrive to give you an idea of what to use for the best results.
Groundbait to mould around the feeder is quite important as not all groundbaits work. Ideally choose a specific Method Mix as these groundbaits bind together well and will therefore stick to the frame of the feeder.
You’ll need to mix the groundbait with a little water then take a small handful and press it into the frame of the feeder. Then, using both hands, squeeze a little more groundbait around the frame so that it is completely hidden by the mix. Don’t overfill the feeder as you’ll struggle to cast it out.
The best rods for this style of fishing are either power feeder rods or 2.5lb test curve carp rods.
The key to a good Method Feeder session – as with all forms of feeder fishing – is to consistently hit the same spot to build up a bed of bait that the carp will be drawn to.
A Use the best baits on the venue at the time you’re fishing. Ring first and you’ll get the right info!
B Use a very short and strong hooklength as bites can be savage when fishing the Method. A 3-6in length of 8-12lb line or braid will be perfect.
C A snap link swivel will allow you to tie two or three hooklength and bait them up when you are waiting for a take. Then, after landing a fish you’ll be able to release the old hooklength and clip on a new one quickly and easily.
D Remember to use a bead to absorb the shock of the feeder on the swivel knot during casting.
E In-Line Method Feeders are best because if your line snaps the fish can pull the rig free from the heavy weight.
F Remember to use a specific Method Mix for your groundbait as it will bind to the feeder correctly and stick to it during the cast.
G Your mainline will need to be tough enough to stand up to the pressure of fishing this technique – 8lb to 12lb mainline is best.
How to tie the rocket feeder rig for carp near the surface
The Rocket Feeder only entered the fishing world a couple of seasons ago and it certainly made an impact. It works around the same principle as a spod whereby loosefeed is cast out within a rocket-shaped device to feed a swim accurately at range, but here there’s a baited hook attached.
The Rocket Feeder itself is a small conical plastic device that is a cross between a feeder and a large float. It has fins for stability during casting, holes to let the feed escape and a bright orange sight tip containing foam for added buoyancy.
Under the feeder there is a link and a swivel to join it to the mainline.
The principle behind this is to be able to fill the Rocket Feeder quickly and cast it out to create a cloud of slow-sinking loosefeed that the carp will intercept to take on the drop. Then your bait is presented on a fairly short, unweighted hooklength to catch the fish high in the water.
In order to ensure that the bait remains inside the Rocket Feeder on the cast, a small layer of soft groundbait can be used as a plug – this also helps cloud the water upon impact too, helping to draw even more carp into your swim.
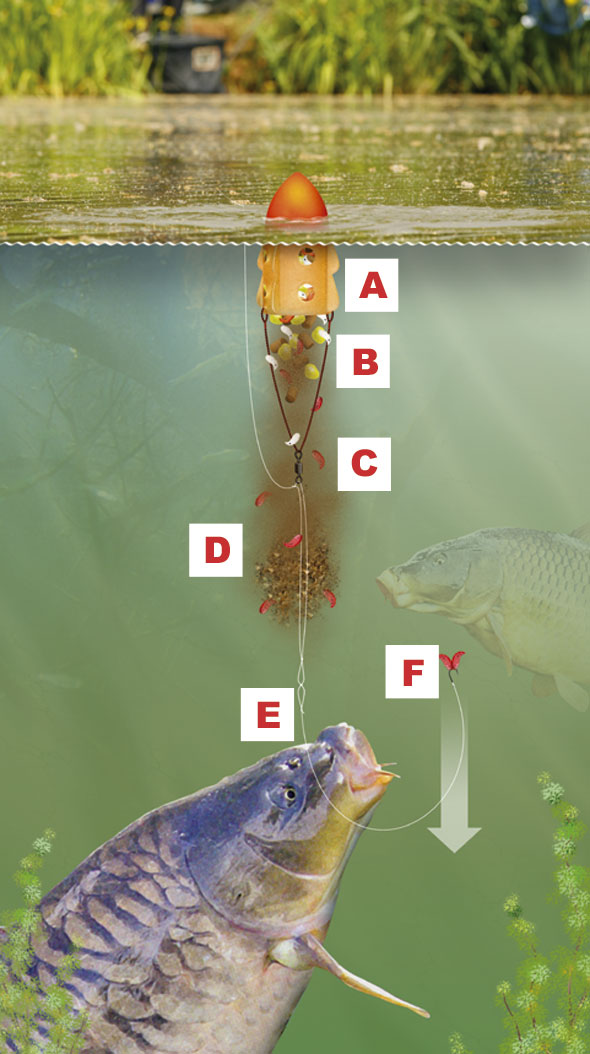
A The Rocket Feeder is a highly buoyant cross between a float and a feeder.
B Fill the feeder with small slow-sinking baits like casters, maggots and pellets.
C It’s best to attact your Rocket Feeder onto the line using a long loop.
D The groundbait plug will create a highly-scented cloud in the water that attracts even more fish to your swim.
E Make sure your link between mainline and hooklength is a strong one as bites can be really savage.
F Use small baits on the hook to ensure that they sink slowly, therefore giving the carp plenty of time to see and take them as they fall.
How to tie the knotless knot hair rig
The knotless knot hair rig is perhaps the most valuable of all knots for those anglers who wish to catch a big fish.
The reason why it's so valuable is because it allows the angler to easily and quickly tie a rig that enables the bait to be presented off the hook.
It might sound strange to a newcomer that the bait should be presented away from the hook, but tying the rig in this way ensures that the fish does not feel the hook the instant it takes the bait, and also that the point of the hook remains proud at all times, creating a superb hookhold each and every time.
Using the knotless knot hair rig also allows baits that can't otherwise be presented directly on to the hook - like rock hard pellets and pop-up boilies.
Those baits can be drilled right through to allow the hair to be threaded through them, then locked in place using a boilie or hair stop.
Here's how to tie it...
STEP 1

Tie a tiny loop in the end of your hooklength line, trim off the tag end and thread the line through the back of your eyed hook.
STEP 2

Pull the hooklength through the eye of the hook until the hair hangs the desired length from the bend of the hook. Now hold the hair securely and begin whipping the hooklength around the hook shank and the hair.
STEP 3
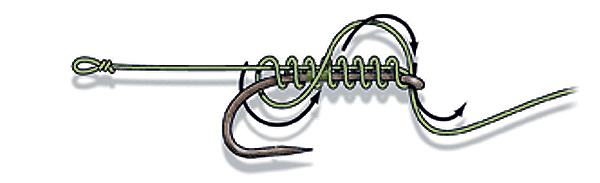
Keep the whipping as tight as possible, continuing whipping down the hook shank until they sit adjacent to the point of the hook. Now make one final whip up and on top of the previous whippings. Finally thread the end of the hooklength through the back of the hook's eye once more. Pull and tie to your mainline or rig.

How to plumb the depth when floatfishing a waggler
Close in
Hold the plummet in one hand and your rod in the other – flex the tip of the rod slightly by pulling the line taught. Open the bail arm of the reel. Swing the rod upwards, let go of the plummet and take your finger off the spool to cast the plummet into the swim. Timing and a smooth motion is crucial, so do it very slowly to begin with to gain practice. Casting the plummet in this fashion minimises the disturbance it causes when it hits the water – but you can cast it overhead just like you would a float if you can’t master this way.
At distance
Pinch an SSG weight onto your hook (inset). Cast it into the swim in an overhead fashion. As long as the SSG is enough to sink your float it will take it out of sight if you are too shallow. When you can only see the fluorescent part of the float, it is set at a dead depth.
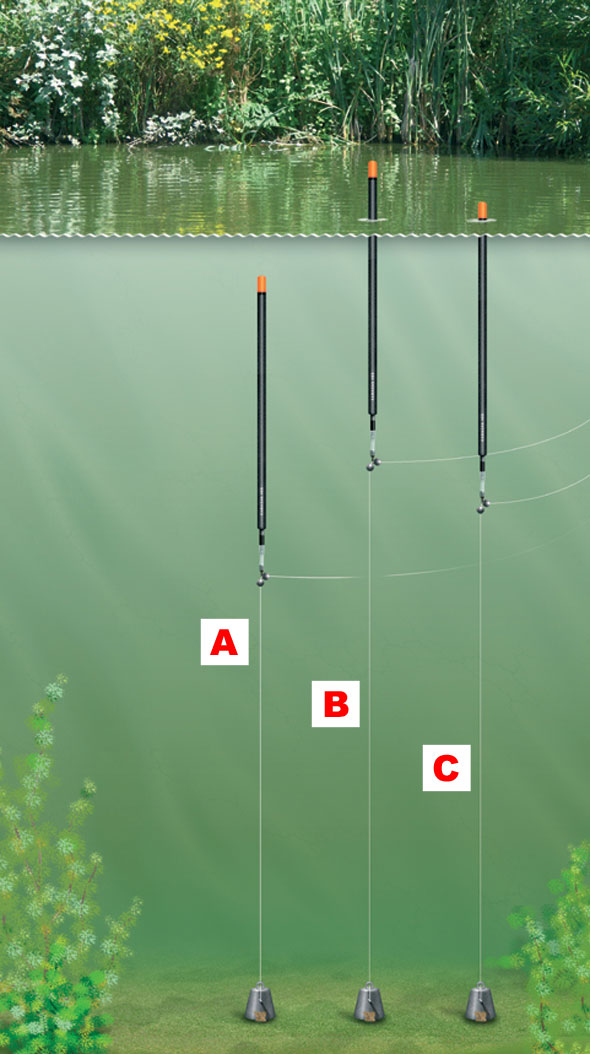
A. This shows you are too shallow.
B. This shows you are slightly too deep.
C. This shows you are just on the bottom.
How to find the depth when pole fishing
Plumbing and finding the depth of the lake, canal or river when pole fishing is a lot easier than finding the depth when you're float fishing because you can simply lower the plummet into your swim and gently drop it onto various areas of the swim to gain a true picture of the venue's depth.
It's a vital part to a successful session as it will give you a true picture of what's under the water and therefore give you a great insight into where you should be feeding and placing your bait.
You can also use your plummet to locate any underwater obstacles too by gently 'swinging' the plummet through the swim to see if it becomes lodged against anything that's submerged.
Here's how to go about finding the depth on your pole line...
STEP 1
Pass your hook through the eye in the plummet
STEP 2
Secure your hook into the cork in the base of the plummet.
STEP 3
Lower the plummet into the swim below the end of your pole.
STEP 4
Add a section of pole at a time and plumb around the swim, lowering the plummet straight down, not at an angle, to ensure an accurate reading of the swim.
STEP 5
Once you have got the exact depth of the swim, hook your hook into the base of your pole top kit. This will pull the elastic out slightly and secure your rig. With Tipp-Ex, mark the point where the top and the bottom of your float sit against the pole. This means you always have a point to refer back to should you change the depth you are fishing during the day.
A. This shows the float is set too shallow
B. This shows the float is set too deep
C. This shows the float is set perfect
How to tie the figure-of-8 knot
If you are looking for a knot for tying your hooklength to the end of your fishing mainline, the figure of eight knot is the one for you...
It's a really easy knot to tie and when tied correctly and used correctly, will provide a small loop that can be used to lock on another loop in another length of line - for example, your hooklength or ready-tied hooklengths.
The best thing about using this knot and method to attach two lengths of line together is that if you push the knots together after the loops have been joined together, you can actually thread the hooklength out from the mainline loop making it really quick and easy to switch to either a thinner or a thicker hooklength in seconds.
Here's how to tie the figure of eight knot.

STEP 1: Fold your mainline into a loop.
STEP 2: Fold it back across itself.

STEP 3: Wrap the loop around the back of the folded lines and thread it back through the main loop.

STEP 4: Adjust the knot size, wet the line and tease it together, pulling on the loop, the mainline and the tag end at the same time.
How to tie the overhand loop knot

If you are seeking a knot for tying your hooklength to the end of your fishing mainline, the overhand loop knot is absolutely perfect...
It's a really easy knot to tie and when tied correctly and used correctly, will provide a small loop that can be used to lock on another loop in another length of line - for example, your hooklength or ready-tied hooklengths.
The best thing about using this knot and method to attach two lengths of line together is that if you push the knots together after the loops have been joined together, you can actually thread the hooklength out from the mainline loop making it really quick and easy to switch to either a thinner or a thicker hooklength in seconds.
Here's how to tie the overhand loop knot...
STEP 1: Double your mainline to create a large loop

STEP 2: Fold the loop over to form another loop.

STEP 3: Pass the first loop at least twice through the second loop.

STEP 4: Moisten the knot with saliva and pull it tight. Trim the knot and you are away.
STEP 5
Follow the same process with your hooklength and pass it through.
USING THE OVERHAND LOOP KNOT TO ATTACH A LOOP TO ANOTHER LOOP
